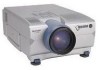
XGP10XU Operation Manual
Page 2
Model No.: XG-P10XU Serial No.: There are designed to provide reasonable protection against the list of "Supplied Accessories" on the bottom of the projector and retain this equip- WARNING: To reduce the risk of fire or electric shock, do not stare directly into... SCREW. NO USER-SERVICEABLE PARTS EXCEPT LAMP UNIT. ment. Before recycling the packaging, please be sure that the device complies with arrowhead symbol, within a triangle is operated in reporting the loss or theft of your new SHARP LCD Projector, using the LCD projector, please read this product to correct ...
Model No.: XG-P10XU Serial No.: There are designed to provide reasonable protection against the list of "Supplied Accessories" on the bottom of the projector and retain this equip- WARNING: To reduce the risk of fire or electric shock, do not stare directly into... SCREW. NO USER-SERVICEABLE PARTS EXCEPT LAMP UNIT. ment. Before recycling the packaging, please be sure that the device complies with arrowhead symbol, within a triangle is operated in reporting the loss or theft of your new SHARP LCD Projector, using the LCD projector, please read this product to correct ...
XGP10XU Operation Manual
Page 5
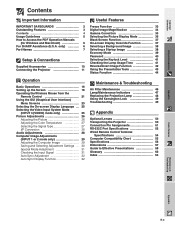
...Air Filter Maintenance 46 Lamp/Maintenance Indicators 47 Replacing the Projection Lamp 48 Using the Kensington Lock 49 Troubleshooting 49 Appendix Optional Lenses 50 Transporting the Projector 50 Connection Pin ...Assignments 51 RS-232C Port Specifications 52 Wired Remote Control Terminal Specifications 54 Computer Compatibility Chart 55 Specifications 56 Dimensions 57 Guide to Access the PDF Operation Manuals (for Windows and Macintosh 6 For SHARP...
...Air Filter Maintenance 46 Lamp/Maintenance Indicators 47 Replacing the Projection Lamp 48 Using the Kensington Lock 49 Troubleshooting 49 Appendix Optional Lenses 50 Transporting the Projector 50 Connection Pin ...Assignments 51 RS-232C Port Specifications 52 Wired Remote Control Terminal Specifications 54 Computer Compatibility Chart 55 Specifications 56 Dimensions 57 Guide to Access the PDF Operation Manuals (for Windows and Macintosh 6 For SHARP...

XGP10XU Operation Manual
Page 6
...directed onto the skin. This will return the projector to rise, the lamp will shut off the projector lamp. As long as the projector is a Class II laser which may be extremely hot during projector operation due to maintain high image quality, SHARP recommends that all internal cleaning must be performed by...the laser pointer window or shine the laser beam on the power by an Authorized Sharp Industrial LCD Products Dealer or Service Center. The three marks shown on the projector will flash, and after the lamp has been used for details. See pages 48 and 49 for the laser beam....
...directed onto the skin. This will return the projector to rise, the lamp will shut off the projector lamp. As long as the projector is a Class II laser which may be extremely hot during projector operation due to maintain high image quality, SHARP recommends that all internal cleaning must be performed by...the laser pointer window or shine the laser beam on the power by an Authorized Sharp Industrial LCD Products Dealer or Service Center. The three marks shown on the projector will flash, and after the lamp has been used for details. See pages 48 and 49 for the laser beam....
XGP10XU Operation Manual
Page 8
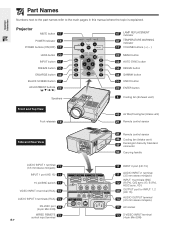
Important Information Part Names Numbers next to the part names refer to the main pages in this manual where the topic is explained. Projector MUTE button 17 POWER indicator 16 POWER buttons (ON/OFF) 17 LENS button 20 INPUT button 17 FREEZE button 33 ENLARGE button 34 BLACK ...SCREEN button 37 ADJUSTMENT buttons 23 Speakers 47 LAMP REPLACEMENT indicator 47 TEMPERATURE WARNING indicator 17 VOLUME buttons 23 MENU button 32 AUTO SYNC button 36 RESIZE button 35 GAMMA button 20 UNDO button...
Important Information Part Names Numbers next to the part names refer to the main pages in this manual where the topic is explained. Projector MUTE button 17 POWER indicator 16 POWER buttons (ON/OFF) 17 LENS button 20 INPUT button 17 FREEZE button 33 ENLARGE button 34 BLACK ...SCREEN button 37 ADJUSTMENT buttons 23 Speakers 47 LAMP REPLACEMENT indicator 47 TEMPERATURE WARNING indicator 17 VOLUME buttons 23 MENU button 32 AUTO SYNC button 36 RESIZE button 35 GAMMA button 20 UNDO button...

XGP10XU Operation Manual
Page 18
...power can only be used on the remote control. (See page 41.) • After the projector is unpacked and turned on for about 90 seconds. When the power is ready. Red: Change the lamp. 3 Press INPUT to change the mode. Press INPUT again to select the desired input mode.... set to temporarily turn the sound back on . • If the keylock level is warming up . The projector will then enter standby mode. • Wait until the cooling fan stops before 3 the lamp turns on . 6 E-17 Press POWER OFF. Press VOLUME to adjust the volume. 5 Press MUTE to "Level A" or...
...power can only be used on the remote control. (See page 41.) • After the projector is unpacked and turned on for about 90 seconds. When the power is ready. Red: Change the lamp. 3 Press INPUT to change the mode. Press INPUT again to select the desired input mode.... set to temporarily turn the sound back on . • If the keylock level is warming up . The projector will then enter standby mode. • Wait until the cooling fan stops before 3 the lamp turns on . 6 E-17 Press POWER OFF. Press VOLUME to adjust the volume. 5 Press MUTE to "Level A" or...

XGP10XU Operation Manual
Page 25
...8235;ן882 Resolution Hor Freq Vert Freq 640ן480 37.5 kHz 72 Hz Sharp Custom Blue None Sharp Custom None Normal Level A Level B Options Language Lamp Timer BLK SCRN Disp [ON/OFF] OSD Display [ON/OFF] Video System Background Startup Image Economy ...Mode Front • The resolution, vertical frequency and horizontal frequency figures displayed above are for example purposes only. • "Color", "Tint", and "Sharp" appear only when Component input is selected in INPUT 1 or 2 mode. • Only the items highlighted in the tree charts above can be adjusted...
...8235;ן882 Resolution Hor Freq Vert Freq 640ן480 37.5 kHz 72 Hz Sharp Custom Blue None Sharp Custom None Normal Level A Level B Options Language Lamp Timer BLK SCRN Disp [ON/OFF] OSD Display [ON/OFF] Video System Background Startup Image Economy ...Mode Front • The resolution, vertical frequency and horizontal frequency figures displayed above are for example purposes only. • "Color", "Tint", and "Sharp" appear only when Component input is selected in INPUT 1 or 2 mode. • Only the items highlighted in the tree charts above can be adjusted...
XGP10XU Operation Manual
Page 42
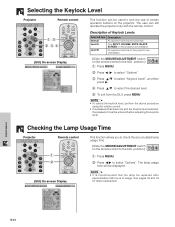
...Level", and then press ©. 4 Press ∂/ƒ to select "Options". The lamp usage time will be displayed. (GUI) On-screen Display • It is recommended that the lamp be replaced after approximately 900 hours of certain operation buttons on the remote control to check... control to lock the use of usage. Checking the Lamp Usage Time Projector Remote control 1 2 This function allows you to the ADJ. See pages 48 and 49 for lamp replacement. on the projector. on the projector are available. Selecting the Keylock Level Projector Remote control 1, 5 2, 3, 4 (GUI) On...
...Level", and then press ©. 4 Press ∂/ƒ to select "Options". The lamp usage time will be displayed. (GUI) On-screen Display • It is recommended that the lamp be replaced after approximately 900 hours of certain operation buttons on the remote control to check... control to lock the use of usage. Checking the Lamp Usage Time Projector Remote control 1 2 This function allows you to the ADJ. See pages 48 and 49 for lamp replacement. on the projector. on the projector are available. Selecting the Keylock Level Projector Remote control 1, 5 2, 3, 4 (GUI) On...
XGP10XU Operation Manual
Page 48
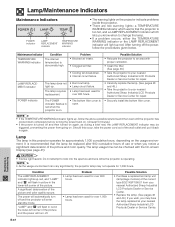
... (See page 46.) • Take the projector to your nearest Authorized Sharp Industrial LCD Products Dealer or Service Center for approximately 1,000 cumulative hours, depending on . It is recommended that the projector is too hot, and a LAMP REPLACEMENT indicator which lets you may be triggered,... preventing the power from your nearest Authorized Sharp Industrial LCD Products Dealer or Service Center. The power will automatically turn...
... (See page 46.) • Take the projector to your nearest Authorized Sharp Industrial LCD Products Dealer or Service Center for approximately 1,000 cumulative hours, depending on . It is recommended that the projector is too hot, and a LAMP REPLACEMENT indicator which lets you may be triggered,... preventing the power from your nearest Authorized Sharp Industrial LCD Products Dealer or Service Center. The power will automatically turn...
XGP10XU Operation Manual
Page 49
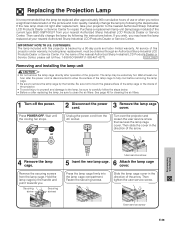
... after approximately 900 cumulative hours of use or when you notice a significant deterioration of the projector. IMPORTANT NOTE TO U.S. CUSTOMERS: The lamp included with this projector under warranty, including lamp replacement, must be sure to the nearest Authorized Sharp Industrial LCD Products Dealer or Service Center for cleaning the air filters. 1 Turn off the power. Wait...
... after approximately 900 cumulative hours of use or when you notice a significant deterioration of the projector. IMPORTANT NOTE TO U.S. CUSTOMERS: The lamp included with this projector under warranty, including lamp replacement, must be sure to the nearest Authorized Sharp Industrial LCD Products Dealer or Service Center for cleaning the air filters. 1 Turn off the power. Wait...
XGP10XU Operation Manual
Page 50
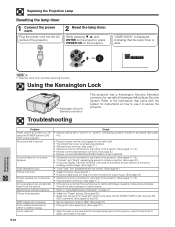
... for proper focus. (See page 18.) • Cables incorrectly connected to rear panel of the projector. 2 Reset the lamp timer. Color is reset. Ł • Reset the lamp timer only after replacing the lamp. Maintenance indicator lights up. Color is not plugged into the AC socket of the... connected to rear panel of some or all buttons (See page 41.) • Projector power cord is distorted (except for use with the corresponding mark on the projector, push the lens firmly in place, and rotate to "Lamp/Maintenance Indicators" on , creating a black image. (See page 37.) •...
... for proper focus. (See page 18.) • Cables incorrectly connected to rear panel of the projector. 2 Reset the lamp timer. Color is reset. Ł • Reset the lamp timer only after replacing the lamp. Maintenance indicator lights up. Color is not plugged into the AC socket of the... connected to rear panel of some or all buttons (See page 41.) • Projector power cord is distorted (except for use with the corresponding mark on the projector, push the lens firmly in place, and rotate to "Lamp/Maintenance Indicators" on , creating a black image. (See page 37.) •...
XGP10XU Operation Manual
Page 57
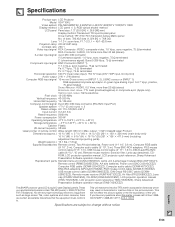
...Remote mouse receiver, Extra air filter, Lens cap (attached), CDROM, LCD projector operation manual, LCD projector quick reference, Sharp Advanced Presentation Software operation manual Replacement parts Standard lens unit (CLNS-0169CE02), Lamp unit (Lamp/cage module) (BQC-XGP10XU/1), Remote control (RRMCG1585CESA), AA size batteries...: 650 nm / Max. Specifications Product type LCD Projector Model XG-P10XU Video system PAL/SECAM/NTSC 3.58/NTSC 4.43/DTV 480P/DTV 720P/DTV 1080I Display method LCD panel ן3, RGB optical shutter method LCD panel Panel size: 1.3Љ (20.0 ...
...Remote mouse receiver, Extra air filter, Lens cap (attached), CDROM, LCD projector operation manual, LCD projector quick reference, Sharp Advanced Presentation Software operation manual Replacement parts Standard lens unit (CLNS-0169CE02), Lamp unit (Lamp/cage module) (BQC-XGP10XU/1), Remote control (RRMCG1585CESA), AA size batteries...: 650 nm / Max. Specifications Product type LCD Projector Model XG-P10XU Video system PAL/SECAM/NTSC 3.58/NTSC 4.43/DTV 480P/DTV 720P/DTV 1080I Display method LCD panel ן3, RGB optical shutter method LCD panel Panel size: 1.3Љ (20.0 ...
XGP10XU Operation Manual
Page 64
... Interface 23 I INPUT 1 port 11 INPUT 1 terminals 12 INPUT 2 port 11 INPUT button 17 Intelligent compression and expansion 3 I/P conversion 28 K Kensington Security Standard connector 49 L LAMP REPLACEMENT indicator 47 LASER POINTER button 22 Laser pointer window 5 LEFT-CLICK button 22 LENS button 20 Lens cap 50 E-63 M MENU button 23 MOUSE... mouse control cable 15 V VIDEO INPUT 3 terminal 13 VOLUME buttons 17 W Wired remote control input 22 WIRED REMOTE control input terminal 22 Wireless mouse 21 X XGA resolution 3 Appendix
... Interface 23 I INPUT 1 port 11 INPUT 1 terminals 12 INPUT 2 port 11 INPUT button 17 Intelligent compression and expansion 3 I/P conversion 28 K Kensington Security Standard connector 49 L LAMP REPLACEMENT indicator 47 LASER POINTER button 22 Laser pointer window 5 LEFT-CLICK button 22 LENS button 20 Lens cap 50 E-63 M MENU button 23 MOUSE... mouse control cable 15 V VIDEO INPUT 3 terminal 13 VOLUME buttons 17 W Wired remote control input 22 WIRED REMOTE control input terminal 22 Wireless mouse 21 X XGA resolution 3 Appendix

