XGP10XU Operation Manual
Page 2
... located on page 10. U.S.A. U.S.A. DO NOT REMOVE SCREWS EXCEPT SPECIFIED USER SERVICE SCREW. NO USER-SERVICEABLE PARTS EXCEPT LAMP UNIT. The lightning flash with the operation manual, may be sure that may cause harmful interference to provide reasonable protection... ELECTRIC SHOCK, DO NOT REMOVE COVER. Model No.: XG-P10XU Serial No.: There are designed to radio communications. CONSUMER PRODUCT SAFETY ACT To ensure that you have checked the contents of your new SHARP LCD Projector, using the LCD projector, please read this information. ment. Before recycling the ...
... located on page 10. U.S.A. U.S.A. DO NOT REMOVE SCREWS EXCEPT SPECIFIED USER SERVICE SCREW. NO USER-SERVICEABLE PARTS EXCEPT LAMP UNIT. The lightning flash with the operation manual, may be sure that may cause harmful interference to provide reasonable protection... ELECTRIC SHOCK, DO NOT REMOVE COVER. Model No.: XG-P10XU Serial No.: There are designed to radio communications. CONSUMER PRODUCT SAFETY ACT To ensure that you have checked the contents of your new SHARP LCD Projector, using the LCD projector, please read this information. ment. Before recycling the ...
XGP10XU Operation Manual
Page 5
...Air Filter Maintenance 46 Lamp/Maintenance Indicators 47 Replacing the Projection Lamp 48 Using the Kensington Lock 49 Troubleshooting 49 Appendix Optional Lenses 50 Transporting the Projector 50 Connection Pin ...Assignments 51 RS-232C Port Specifications 52 Wired Remote Control Terminal Specifications 54 Computer Compatibility Chart 55 Specifications 56 Dimensions 57 Guide to Access the PDF Operation Manuals (for Windows and Macintosh 6 For SHARP...
...Air Filter Maintenance 46 Lamp/Maintenance Indicators 47 Replacing the Projection Lamp 48 Using the Kensington Lock 49 Troubleshooting 49 Appendix Optional Lenses 50 Transporting the Projector 50 Connection Pin ...Assignments 51 RS-232C Port Specifications 52 Wired Remote Control Terminal Specifications 54 Computer Compatibility Chart 55 Specifications 56 Dimensions 57 Guide to Access the PDF Operation Manuals (for Windows and Macintosh 6 For SHARP...

XGP10XU Operation Manual
Page 6
... other than those specified herein may change during projector operation. Temperature Monitor Function If the projector starts to overheat due to changes in an area free from the laser pointer window. Then turn off . Refer to "Lamp/Maintenance Indicators" on the power by an Authorized Sharp Industrial LCD Products Dealer or Service Center. Refer to...
... other than those specified herein may change during projector operation. Temperature Monitor Function If the projector starts to overheat due to changes in an area free from the laser pointer window. Then turn off . Refer to "Lamp/Maintenance Indicators" on the power by an Authorized Sharp Industrial LCD Products Dealer or Service Center. Refer to...
XGP10XU Operation Manual
Page 8
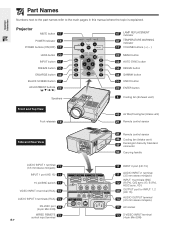
Projector MUTE button 17 POWER indicator 16 POWER buttons (ON/OFF) 17 LENS button 20 INPUT button 17 FREEZE button 33 ENLARGE button 34 BLACK SCREEN button 37 ADJUSTMENT buttons 23 Speakers 47 LAMP REPLACEMENT indicator 47 TEMPERATURE WARNING indicator 17 VOLUME buttons 23 MENU button 32 AUTO SYNC button 36 RESIZE button...
Projector MUTE button 17 POWER indicator 16 POWER buttons (ON/OFF) 17 LENS button 20 INPUT button 17 FREEZE button 33 ENLARGE button 34 BLACK SCREEN button 37 ADJUSTMENT buttons 23 Speakers 47 LAMP REPLACEMENT indicator 47 TEMPERATURE WARNING indicator 17 VOLUME buttons 23 MENU button 32 AUTO SYNC button 36 RESIZE button...

XGP10XU Operation Manual
Page 18
...be used on the remote control. (See page 41.) • After the projector is being received, "NOT REG." Basic Operations 2 4 Press Power ON. • The flashing green LAMP REPLACEMENT indicator shows that the projector is not preset to receive is being received, "NO SIGNAL" will be displayed....8226; The power can only be turned on for about 90 seconds. Press INPUT again to select the desired input mode. The projector will soon disappear with use. Green: Lamp is warming up . EXAMPLE INPUT 1 Mode INPUT 2 Mode INPUT 3 (VIDEO) Mode Operation 4 • When no signal is...
...be used on the remote control. (See page 41.) • After the projector is being received, "NOT REG." Basic Operations 2 4 Press Power ON. • The flashing green LAMP REPLACEMENT indicator shows that the projector is not preset to receive is being received, "NO SIGNAL" will be displayed....8226; The power can only be turned on for about 90 seconds. Press INPUT again to select the desired input mode. The projector will soon disappear with use. Green: Lamp is warming up . EXAMPLE INPUT 1 Mode INPUT 2 Mode INPUT 3 (VIDEO) Mode Operation 4 • When no signal is...

XGP10XU Operation Manual
Page 25
...8235;ן882 Resolution Hor Freq Vert Freq 640ן480 37.5 kHz 72 Hz Sharp Custom Blue None Sharp Custom None Normal Level A Level B Options Language Lamp Timer BLK SCRN Disp [ON/OFF] OSD Display [ON/OFF] Video System Background Startup Image Economy ...Mode Front • The resolution, vertical frequency and horizontal frequency figures displayed above are for example purposes only. • "Color", "Tint", and "Sharp" appear only when Component input is selected in INPUT 1 or 2 mode. • Only the items highlighted in the tree charts above can be adjusted...
...8235;ן882 Resolution Hor Freq Vert Freq 640ן480 37.5 kHz 72 Hz Sharp Custom Blue None Sharp Custom None Normal Level A Level B Options Language Lamp Timer BLK SCRN Disp [ON/OFF] OSD Display [ON/OFF] Video System Background Startup Image Economy ...Mode Front • The resolution, vertical frequency and horizontal frequency figures displayed above are for example purposes only. • "Color", "Tint", and "Sharp" appear only when Component input is selected in INPUT 1 or 2 mode. • Only the items highlighted in the tree charts above can be adjusted...
XGP10XU Operation Manual
Page 42
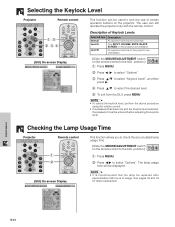
...402; to select "Keylock Level", and then press ©. 4 Press ∂/ƒ to check the accumulated lamp usage time. (Slide the MOUSE/ADJUSTMENT switch MOUSE ADJ. Checking the Lamp Usage Time Projector Remote control 1 2 This function allows you to select the desired level. 5 To exit from the GUI, ... must be entered before adjusting the keylock level. on the remote control to the ADJ. See pages 48 and 49 for lamp replacement. on the projector are unavailable. (Slide the MOUSE/ADJUSTMENT switch MOUSE ADJ. Only INPUT, VOLUME, MUTE, BLACK SCREEN on the remote control ...
...402; to select "Keylock Level", and then press ©. 4 Press ∂/ƒ to check the accumulated lamp usage time. (Slide the MOUSE/ADJUSTMENT switch MOUSE ADJ. Checking the Lamp Usage Time Projector Remote control 1 2 This function allows you to select the desired level. 5 To exit from the GUI, ... must be entered before adjusting the keylock level. on the remote control to the ADJ. See pages 48 and 49 for lamp replacement. on the projector are unavailable. (Slide the MOUSE/ADJUSTMENT switch MOUSE ADJ. Only INPUT, VOLUME, MUTE, BLACK SCREEN on the remote control ...
XGP10XU Operation Manual
Page 48
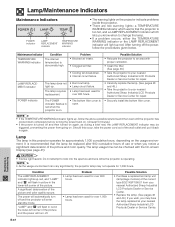
.... • Clean the filter. (See page 46.) • Take the projector to your nearest Authorized Sharp Industrial LCD Products Dealer or Service Center for repair. • Carefully replace the lamp. (See pages 48 and 49.) • Take the projector to your nearest Authorized Sharp Industrial LCD Products Dealer or Service Center. After turning off and then turned...
.... • Clean the filter. (See page 46.) • Take the projector to your nearest Authorized Sharp Industrial LCD Products Dealer or Service Center for repair. • Carefully replace the lamp. (See pages 48 and 49.) • Take the projector to your nearest Authorized Sharp Industrial LCD Products Dealer or Service Center. After turning off and then turned...
XGP10XU Operation Manual
Page 49
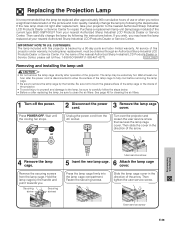
... module) of the picture and color quality. Wait at your nearest Authorized Sharp Industrial LCD Products Dealer or Service Center. Unplug the power cord from the lamp cage. Slide the lamp cage cover in the direction of the projector. U.S.A. Hold the lamp cage by a 90-day parts and labor limited warranty. Fasten the securing screws. User...
... module) of the picture and color quality. Wait at your nearest Authorized Sharp Industrial LCD Products Dealer or Service Center. Unplug the power cord from the lamp cage. Slide the lamp cage cover in the direction of the projector. U.S.A. Hold the lamp cage by a 90-day parts and labor limited warranty. Fasten the securing screws. User...
XGP10XU Operation Manual
Page 50
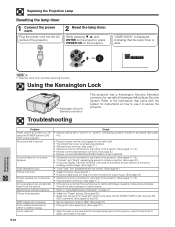
... is too long or too short to allow for INPUT 3 (VIDEO) mode). Refer to the information that the lamp timer is due to rear panel of the projector. 2 Reset the lamp timer. No picture and no picture appears. An unusual sound is distorted (except for proper focus. (See page 18.... (See page 37.) • "Color" and "Tint" adjustments are set to secure the projector. Replacing the Projection Lamp Resetting the lamp timer 1 Connect the power cord. While pressing ƒ, © and ENTER on the projector, press POWER ON on how to use with the system for use it to minimum. (See...
... is too long or too short to allow for INPUT 3 (VIDEO) mode). Refer to the information that the lamp timer is due to rear panel of the projector. 2 Reset the lamp timer. No picture and no picture appears. An unusual sound is distorted (except for proper focus. (See page 18.... (See page 37.) • "Color" and "Tint" adjustments are set to secure the projector. Replacing the Projection Lamp Resetting the lamp timer 1 Connect the power cord. While pressing ƒ, © and ENTER on the projector, press POWER ON on how to use with the system for use it to minimum. (See...
XGP10XU Operation Manual
Page 57
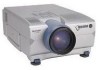
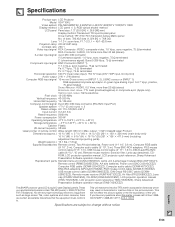
...Remote mouse receiver, Extra air filter, Lens cap (attached), CDROM, LCD projector operation manual, LCD projector quick reference, Sharp Advanced Presentation Software operation manual Replacement parts Standard lens unit (CLNS-0169CE02), Lamp unit (Lamp/cage module) (BQC-XGP10XU/1), Remote control (RRMCG1585CESA), AA size ... pointer of the unit. Specifications Product type LCD Projector Model XG-P10XU Video system PAL/SECAM/NTSC 3.58/NTSC 4.43/DTV 480P/DTV 720P/DTV 1080I Display method LCD panel ן3, RGB optical shutter method LCD panel Panel size: 1.3Љ (20.0 ...
...Remote mouse receiver, Extra air filter, Lens cap (attached), CDROM, LCD projector operation manual, LCD projector quick reference, Sharp Advanced Presentation Software operation manual Replacement parts Standard lens unit (CLNS-0169CE02), Lamp unit (Lamp/cage module) (BQC-XGP10XU/1), Remote control (RRMCG1585CESA), AA size ... pointer of the unit. Specifications Product type LCD Projector Model XG-P10XU Video system PAL/SECAM/NTSC 3.58/NTSC 4.43/DTV 480P/DTV 720P/DTV 1080I Display method LCD panel ן3, RGB optical shutter method LCD panel Panel size: 1.3Љ (20.0 ...
XGP10XU Operation Manual
Page 64
... Interface 23 I INPUT 1 port 11 INPUT 1 terminals 12 INPUT 2 port 11 INPUT button 17 Intelligent compression and expansion 3 I/P conversion 28 K Kensington Security Standard connector 49 L LAMP REPLACEMENT indicator 47 LASER POINTER button 22 Laser pointer window 5 LEFT-CLICK button 22 LENS button 20 Lens cap 50 E-63 M MENU button 23 MOUSE... mouse control cable 15 V VIDEO INPUT 3 terminal 13 VOLUME buttons 17 W Wired remote control input 22 WIRED REMOTE control input terminal 22 Wireless mouse 21 X XGA resolution 3 Appendix
... Interface 23 I INPUT 1 port 11 INPUT 1 terminals 12 INPUT 2 port 11 INPUT button 17 Intelligent compression and expansion 3 I/P conversion 28 K Kensington Security Standard connector 49 L LAMP REPLACEMENT indicator 47 LASER POINTER button 22 Laser pointer window 5 LEFT-CLICK button 22 LENS button 20 Lens cap 50 E-63 M MENU button 23 MOUSE... mouse control cable 15 V VIDEO INPUT 3 terminal 13 VOLUME buttons 17 W Wired remote control input 22 WIRED REMOTE control input terminal 22 Wireless mouse 21 X XGA resolution 3 Appendix

