XGP10XU Operation Manual
Page 1
OPERATION MANUAL MODEL XG-P10XU LCD PROJECTOR Important Information Setup & Connections Operation Useful Features Maintenance & Troubleshooting Appendix
OPERATION MANUAL MODEL XG-P10XU LCD PROJECTOR Important Information Setup & Connections Operation Useful Features Maintenance & Troubleshooting Appendix
XGP10XU Operation Manual
Page 2
... checked the contents of the carton thoroughly against harmful inter- Model No.: XG-P10XU Serial No.: There are designed to Part 15 of light, or view ... reasonable protection against the list of "Supplied Accessories" on the bottom of your new SHARP LCD Projector, using the LCD projector, please read this equip- U.S.A. ONLY E-1 CONSUMER PRODUCT SAFETY ACT To ensure that you...REDUCE THE RISK OF ELECTRIC SHOCK, DO NOT REMOVE COVER. U.S.A. OPERATION MANUAL ENGLISH IMPORTANT For your Color LCD Projector, please record the Serial Number located on page 10. WARRANTY This is ...
... checked the contents of the carton thoroughly against harmful inter- Model No.: XG-P10XU Serial No.: There are designed to Part 15 of light, or view ... reasonable protection against the list of "Supplied Accessories" on the bottom of your new SHARP LCD Projector, using the LCD projector, please read this equip- U.S.A. ONLY E-1 CONSUMER PRODUCT SAFETY ACT To ensure that you...REDUCE THE RISK OF ELECTRIC SHOCK, DO NOT REMOVE COVER. U.S.A. OPERATION MANUAL ENGLISH IMPORTANT For your Color LCD Projector, please record the Serial Number located on page 10. WARRANTY This is ...
XGP10XU Operation Manual
Page 5
...63 Operation Useful Features Maintenance & Troubleshooting Appendix E-4 only 6 Part Names 7 Setup & Connections Supplied Accessories 10 Connecting the Projector 11 Useful Features Freeze Function 33 Digital Image Magnification 34 Gamma Correction 35 Selecting the Picture Display Mode 36 Black Screen ...47 Replacing the Projection Lamp 48 Using the Kensington Lock 49 Troubleshooting 49 Appendix Optional Lenses 50 Transporting the Projector 50 Connection Pin Assignments 51 RS-232C Port Specifications 52 Wired Remote Control Terminal Specifications 54 Computer Compatibility ...
...63 Operation Useful Features Maintenance & Troubleshooting Appendix E-4 only 6 Part Names 7 Setup & Connections Supplied Accessories 10 Connecting the Projector 11 Useful Features Freeze Function 33 Digital Image Magnification 34 Gamma Correction 35 Selecting the Picture Display Mode 36 Black Screen ...47 Replacing the Projection Lamp 48 Using the Kensington Lock 49 Troubleshooting 49 Appendix Optional Lenses 50 Transporting the Projector 50 Connection Pin Assignments 51 RS-232C Port Specifications 52 Wired Remote Control Terminal Specifications 54 Computer Compatibility ...
XGP10XU Operation Manual
Page 7
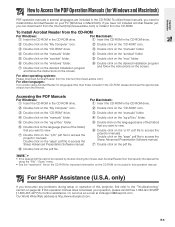
...click on the desired installation program and follow the instructions on the screen. Double click on the "saps" pdf file to access the Sharp Advanced Presentation Software manual. 8 Double click on the pdf file. To Install Acrobat Reader from the Internet. For Macintosh: 1 Insert the CD-ROM in ..."CD-ROM" drive. 4 Double click on the "manuals" folder. 5 Double click on the "xg-p10xu" folder. 6 Double click on the language (name of the folder) that you want to view. 7 Double click on the "p10" pdf file to access the projector manuals. Or, send us an e-mail at [email protected]...
...click on the desired installation program and follow the instructions on the screen. Double click on the "saps" pdf file to access the Sharp Advanced Presentation Software manual. 8 Double click on the pdf file. To Install Acrobat Reader from the Internet. For Macintosh: 1 Insert the CD-ROM in ..."CD-ROM" drive. 4 Double click on the "manuals" folder. 5 Double click on the "xg-p10xu" folder. 6 Double click on the language (name of the folder) that you want to view. 7 Double click on the "p10" pdf file to access the projector manuals. Or, send us an e-mail at [email protected]...
XGP10XU Operation Manual
Page 8
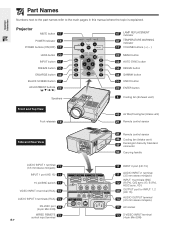
Projector MUTE button 17 POWER indicator 16 POWER buttons (ON/OFF) 17 LENS button 20 INPUT button 17 FREEZE button 33 ENLARGE button 34 BLACK SCREEN ... socket 13 S-VIDEO INPUT terminal (4-pin Mini DIN) Important Information Part Names Numbers next to the part names refer to the main pages in this manual where the topic is explained.
Projector MUTE button 17 POWER indicator 16 POWER buttons (ON/OFF) 17 LENS button 20 INPUT button 17 FREEZE button 33 ENLARGE button 34 BLACK SCREEN ... socket 13 S-VIDEO INPUT terminal (4-pin Mini DIN) Important Information Part Names Numbers next to the part names refer to the main pages in this manual where the topic is explained.
XGP10XU Operation Manual
Page 11
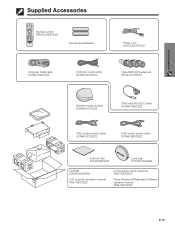
... cable QCNW-5288CEZZ PS/2 mouse control cable QCNW-5113CEZZ USB mouse control cable QCNW-5680CEZZ Extra air filter PFILD0088CEZZ Lens cap PCAPH1056CESA CD-ROM UDSKA0022CEN1 LCD projector operation manual TINS-7052CEZZ LCD projector quick reference TINS-7053CEZZ Sharp Advanced Presentation Software operation manual TINS-7054CEZZ E-10
... cable QCNW-5288CEZZ PS/2 mouse control cable QCNW-5113CEZZ USB mouse control cable QCNW-5680CEZZ Extra air filter PFILD0088CEZZ Lens cap PCAPH1056CESA CD-ROM UDSKA0022CEN1 LCD projector operation manual TINS-7052CEZZ LCD projector quick reference TINS-7053CEZZ Sharp Advanced Presentation Software operation manual TINS-7054CEZZ E-10
XGP10XU Operation Manual
Page 12
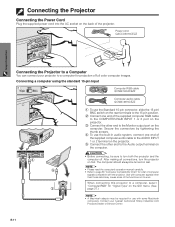
...sure to turn the projector on last. • Please read the computer's operation manual carefully. • Refer to page 55 "Computer Compatibility Chart" for projection of full color computer images. Power cord QACCU5013CEZZ Setup & Connections Connecting the Projector to the Audio output... 2 terminal on the projector. 5 Connect the other end to a Computer You can connect your nearest Authorized Sharp Industrial LCD Products Dealer or Service Center. Contact your projector to a computer for a list of the projector. E-11 Connecting the Projector Connecting the Power Cord ...
...sure to turn the projector on last. • Please read the computer's operation manual carefully. • Refer to page 55 "Computer Compatibility Chart" for projection of full color computer images. Power cord QACCU5013CEZZ Setup & Connections Connecting the Projector to the Audio output... 2 terminal on the projector. 5 Connect the other end to a Computer You can connect your nearest Authorized Sharp Industrial LCD Products Dealer or Service Center. Contact your projector to a computer for a list of the projector. E-11 Connecting the Projector Connecting the Power Cord ...
XGP10XU Operation Manual
Page 15
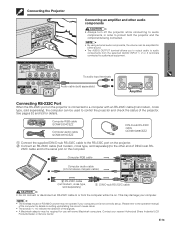
...(→, ↔) indicate the direction of the signals. • A Macintosh adaptor may not operate if your nearest Authorized Sharp Industrial LCD Products Dealer or Service Center. Computer RGB cable 1 2 Computer audio cable (3.5 mm stereo minijack cable) 3 L AUDIO... R VIDEO MONITOR 2 RS-232C cable (null modem, cross type, sold separately) Amplifier Connecting RS-232C Port When the RS-232C port on the projector is on. Please refer to the operation manual...
...(→, ↔) indicate the direction of the signals. • A Macintosh adaptor may not operate if your nearest Authorized Sharp Industrial LCD Products Dealer or Service Center. Computer RGB cable 1 2 Computer audio cable (3.5 mm stereo minijack cable) 3 L AUDIO... R VIDEO MONITOR 2 RS-232C cable (null modem, cross type, sold separately) Amplifier Connecting RS-232C Port When the RS-232C port on the projector is on. Please refer to the operation manual...
XGP10XU Operation Manual
Page 23
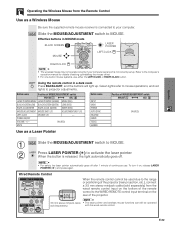
... MOUSE/ADJUSTMENT switch MOUSE ADJ. When the button is not correctly set up . Slide the MOUSE/ADJUSTMENT switch to the computer's operation manual for details of continuous use either the LEFT-CLICK or RIGHT-CLICK button. Slide the MOUSE/ADJUSTMENT switch to MOUSE. 2 Press LASER ... ENTER (RED) MOUSE/ADJUSTMENT MOUSE (NOT LIT) ADJUSTMENT (NOT LIT) LEFT-CLICK ON (NOT LIT) - To turn it on the bottom of the projector (rear projection, etc.), connect a 3.5 mm stereo minijack cable (sold separately) from the Remote Control Use as a Laser Pointer 1 MOUSE ADJ. Effective buttons...
... MOUSE/ADJUSTMENT switch MOUSE ADJ. When the button is not correctly set up . Slide the MOUSE/ADJUSTMENT switch to the computer's operation manual for details of continuous use either the LEFT-CLICK or RIGHT-CLICK button. Slide the MOUSE/ADJUSTMENT switch to MOUSE. 2 Press LASER ... ENTER (RED) MOUSE/ADJUSTMENT MOUSE (NOT LIT) ADJUSTMENT (NOT LIT) LEFT-CLICK ON (NOT LIT) - To turn it on the bottom of the projector (rear projection, etc.), connect a 3.5 mm stereo minijack cable (sold separately) from the Remote Control Use as a Laser Pointer 1 MOUSE ADJ. Effective buttons...
XGP10XU Operation Manual
Page 33
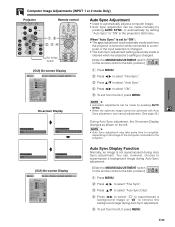
... to remove the background image during Auto Sync adjustment. 5 To exit from the GUI, press MENU. Computer Image Adjustments (INPUT 1 or 2 mode Only) Projector Remote control 1, 5 2, 3, 4 AUTO SYNC button (GUI) On-screen Display Auto Sync Adjustment • Used to automatically adjust a computer image. •... can be made by pressing AUTO SYNC. • When the optimum image cannot be made manually by pressing AUTO SYNC, or automatically by setting "Auto Sync" to "ON" in the projector's GUI menu. Operation s (GUI) On-screen Display Auto Sync Display Function Normally, an image...
... to remove the background image during Auto Sync adjustment. 5 To exit from the GUI, press MENU. Computer Image Adjustments (INPUT 1 or 2 mode Only) Projector Remote control 1, 5 2, 3, 4 AUTO SYNC button (GUI) On-screen Display Auto Sync Adjustment • Used to automatically adjust a computer image. •... can be made by pressing AUTO SYNC. • When the optimum image cannot be made manually by pressing AUTO SYNC, or automatically by setting "Auto Sync" to "ON" in the projector's GUI menu. Operation s (GUI) On-screen Display Auto Sync Display Function Normally, an image...

XGP10XU Operation Manual
Page 39
.... company logo) Black screen (Slide the MOUSE/ADJUSTMENT switch MOUSE ADJ. Please see the Sharp Advanced Presentation Software operation manual for detailed instructions. The custom image must be uploaded to the projector. The custom image must be displayed upon the projector's startup. • A custom image (i.e. your company logo) can display a custom image (i.e. Description of...
.... company logo) Black screen (Slide the MOUSE/ADJUSTMENT switch MOUSE ADJ. Please see the Sharp Advanced Presentation Software operation manual for detailed instructions. The custom image must be uploaded to the projector. The custom image must be displayed upon the projector's startup. • A custom image (i.e. your company logo) can display a custom image (i.e. Description of...
XGP10XU Operation Manual
Page 51
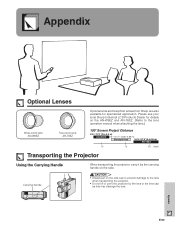
...Lenses Wide-zoom lens AN-W6EZ Tele-zoom lens AN-T6EZ Optional wide and telephoto lenses from Sharp are also available for details on the side. Please see your local Sharp Industrial LCD Products Dealer for specialized application. CAUTION • Always put on the lens cap to prevent ...damage to the lens when transporting the projector. • Do not lift or carry the projector by the carrying handle on the AN-W6EZ and AN-T6EZ. (Refer to the lens operation manual...
...Lenses Wide-zoom lens AN-W6EZ Tele-zoom lens AN-T6EZ Optional wide and telephoto lenses from Sharp are also available for details on the side. Please see your local Sharp Industrial LCD Products Dealer for specialized application. CAUTION • Always put on the lens cap to prevent ...damage to the lens when transporting the projector. • Do not lift or carry the projector by the carrying handle on the AN-W6EZ and AN-T6EZ. (Refer to the lens operation manual...
XGP10XU Operation Manual
Page 56
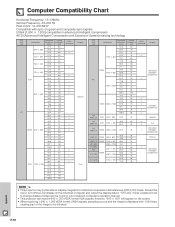
... be able to change display modes can be found in your notebook computer's operation manual. • This projector can receive 640 ן350 VESA format VGA signals, however, ...; ן Display Advanced Intelligent Compression Intelligent Compression Upscale PC/ MAC 19" XGA 1,024 ן768 48.4 60.0 60 75 True PC/ MAC 21"...8235;ן Advanced Intelligent Compression • This projector may not be blocked. Appendix E-55 Should this occur, turn off the LCD display on how to display images from notebook computers...
... be able to change display modes can be found in your notebook computer's operation manual. • This projector can receive 640 ן350 VESA format VGA signals, however, ...; ן Display Advanced Intelligent Compression Intelligent Compression Upscale PC/ MAC 19" XGA 1,024 ן768 48.4 60.0 60 75 True PC/ MAC 21"...8235;ן Advanced Intelligent Compression • This projector may not be blocked. Appendix E-55 Should this occur, turn off the LCD display on how to display images from notebook computers...
XGP10XU Operation Manual
Page 57
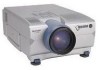
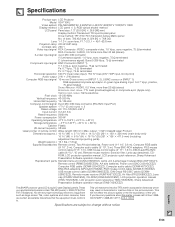
Specifications Product type LCD Projector Model XG-P10XU Video system PAL/SECAM/NTSC 3.58/NTSC 4.43/DTV 480P/DTV 720P/DTV 1080I Display method LCD panel ן3, RGB optical shutter method LCD panel Panel size: 1.3Љ (20.0 [H] &#... filter (PFILD0088CEZZ), Lens cap (PCAPH1056CESA), CD-ROM (UDSKA0022CEN1), LCD projector operation manual (TINS-7052CEZZ), LCD projector quick reference (TINS-7053CEZZ), Sharp Advanced Presentation Software operation manual (TINS-7054CEZZ) This SHARP projector uses LCD (Liquid Crystal Display) panels. These very sophisticated panels contain 786...
Specifications Product type LCD Projector Model XG-P10XU Video system PAL/SECAM/NTSC 3.58/NTSC 4.43/DTV 480P/DTV 720P/DTV 1080I Display method LCD panel ן3, RGB optical shutter method LCD panel Panel size: 1.3Љ (20.0 [H] &#... filter (PFILD0088CEZZ), Lens cap (PCAPH1056CESA), CD-ROM (UDSKA0022CEN1), LCD projector operation manual (TINS-7052CEZZ), LCD projector quick reference (TINS-7053CEZZ), Sharp Advanced Presentation Software operation manual (TINS-7054CEZZ) This SHARP projector uses LCD (Liquid Crystal Display) panels. These very sophisticated panels contain 786...


