
XG-NV7XU Operation Manual
Page 1
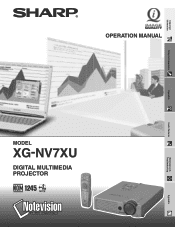
OPERATION MANUAL MODEL XG-NV7XU DIGITAL MULTIMEDIA PROJECTOR Important Information Setup & Connections Operation Useful Features Maintenance & Troubleshooting Appendix
OPERATION MANUAL MODEL XG-NV7XU DIGITAL MULTIMEDIA PROJECTOR Important Information Setup & Connections Operation Useful Features Maintenance & Troubleshooting Appendix
XG-NV7XU Operation Manual
Page 2
... could void the user's authority to comply with FCC Class A verification. Model No.: XG-NV7XU Serial No.: There are designed to provide reasonable protection against the list of your new SHARP Projector, using the projector, please read this product to assure that children do not expose this operation manual carefully. ONLY WARNING: High brightness light source. CAUTION RISK OF ELECTRIC SHOCK. The lightning flash with arrowhead symbol...
... could void the user's authority to comply with FCC Class A verification. Model No.: XG-NV7XU Serial No.: There are designed to provide reasonable protection against the list of your new SHARP Projector, using the projector, please read this product to assure that children do not expose this operation manual carefully. ONLY WARNING: High brightness light source. CAUTION RISK OF ELECTRIC SHOCK. The lightning flash with arrowhead symbol...

XG-NV7XU Operation Manual
Page 3
... its installation, use and servicing. If you to be covered or blocked by following basic rules for future reference. 3. This plug will prevent damage to the product due to defeat the safeguards incorporated into this indicates a need for service. 19. Power-Cord Protection Power-supply cords should never be walked on the product and in performance, this Projector, observe the following the operating instructions...
... its installation, use and servicing. If you to be covered or blocked by following basic rules for future reference. 3. This plug will prevent damage to the product due to defeat the safeguards incorporated into this indicates a need for service. 19. Power-Cord Protection Power-supply cords should never be walked on the product and in performance, this Projector, observe the following the operating instructions...
XG-NV7XU Operation Manual
Page 5
... Selecting the Video Input System Mode (VIDEO mode only 26 Picture Adjustments 27 Audio Adjustments 28 Computer Image Adjustments 29 Auto Sync Adjustment 30 Auto Sync Display Function 30 Saving and Selecting Adjustment Settings ... 31 Special Mode Adjustment 32 Maintenance & Troubleshooting Lamp/Maintenance Indicators 47 Replacing the Projection Lamp 48 Using the Kensington Lock 49 Troubleshooting 49 Appendix Transporting the Projector 51 Connection Pin Assignments 52 RS-232C Port Specifications 53 Input Signals (Recommended Timing 55 Specifications 57 Dimensions 58 Guide to...
... Selecting the Video Input System Mode (VIDEO mode only 26 Picture Adjustments 27 Audio Adjustments 28 Computer Image Adjustments 29 Auto Sync Adjustment 30 Auto Sync Display Function 30 Saving and Selecting Adjustment Settings ... 31 Special Mode Adjustment 32 Maintenance & Troubleshooting Lamp/Maintenance Indicators 47 Replacing the Projection Lamp 48 Using the Kensington Lock 49 Troubleshooting 49 Appendix Transporting the Projector 51 Connection Pin Assignments 52 RS-232C Port Specifications 53 Input Signals (Recommended Timing 55 Specifications 57 Dimensions 58 Guide to...
XG-NV7XU Operation Manual
Page 6
...; The cooling fan regulates the internal temperature, and its performance is harmless when directed onto the skin. Periodically the filter should be replaced and the projector should be cleaned more often. Then turn off . This is a Class II laser which may change during projector operation. This will turn off, the TEMPERATURE WARNING indicator on the power by an Authorized Sharp Industrial LCD Products Dealer or Service Center. E-5 Important...
...; The cooling fan regulates the internal temperature, and its performance is harmless when directed onto the skin. Periodically the filter should be replaced and the projector should be cleaned more often. Then turn off . This is a Class II laser which may change during projector operation. This will turn off, the TEMPERATURE WARNING indicator on the power by an Authorized Sharp Industrial LCD Products Dealer or Service Center. E-5 Important...
XG-NV7XU Operation Manual
Page 7
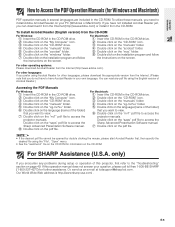
..., please download the appropriate version from the CD-ROM For Windows: 1 Insert the CD-ROM in the CD-ROM drive. 2 Double click on the "CD-ROM" icon. 3 Double click on the "manuals" folder. 4 Double click on the "xg-nv7xu" folder. 5 Double click on the language (name of the folder) that you prefer using the "File", "Open" menu. •...
..., please download the appropriate version from the CD-ROM For Windows: 1 Insert the CD-ROM in the CD-ROM drive. 2 Double click on the "CD-ROM" icon. 3 Double click on the "manuals" folder. 4 Double click on the "xg-nv7xu" folder. 5 Double click on the language (name of the folder) that you prefer using the "File", "Open" menu. •...

XG-NV7XU Operation Manual
Page 17
... use. Connect the power cord to a wall outlet. Red: Change the lamp. The POWER indicator lights up red and the projector enters standby mode. 2 Press Power ON. • The flashing green LAMP REPLACEMENT indicator shows that the lamp is warming up . Wait until the indicator stops flashing before operating the projector. • If the power is turned off and then immediately turned on again, it may be emitted from the exhaust vent. Operation Operation Basic Operations 2 1 Make the necessary connections before the lamp turns...
... use. Connect the power cord to a wall outlet. Red: Change the lamp. The POWER indicator lights up red and the projector enters standby mode. 2 Press Power ON. • The flashing green LAMP REPLACEMENT indicator shows that the lamp is warming up . Wait until the indicator stops flashing before operating the projector. • If the power is turned off and then immediately turned on again, it may be emitted from the exhaust vent. Operation Operation Basic Operations 2 1 Make the necessary connections before the lamp turns...

XG-NV7XU Operation Manual
Page 18
... displayed. 6 Press VOLUME to adjust the volume. 7 Press MUTE to turn the sound back on again by pressing POWER ON. will be adjusted to the desired size within the zoom range. 5 Press INPUT to turn off the power, wait until the image on , the POWER indicator and the LAMP REPLACEMENT indicator light green. Press POWER OFF again while the message is turned on the screen becomes clear. 4 Rotate the zoom ring. Operation Basic Operations 4 3 EXAMPLE 5 f f 6 7 8 5 INPUT 1 Mode INPUT 2 Mode VIDEO Mode 6 7 8 E-17 3 Rotate the focus...
... displayed. 6 Press VOLUME to adjust the volume. 7 Press MUTE to turn the sound back on again by pressing POWER ON. will be adjusted to the desired size within the zoom range. 5 Press INPUT to turn off the power, wait until the image on , the POWER indicator and the LAMP REPLACEMENT indicator light green. Press POWER OFF again while the message is turned on the screen becomes clear. 4 Rotate the zoom ring. Operation Basic Operations 4 3 EXAMPLE 5 f f 6 7 8 5 INPUT 1 Mode INPUT 2 Mode VIDEO Mode 6 7 8 E-17 3 Rotate the focus...
XG-NV7XU Operation Manual
Page 21
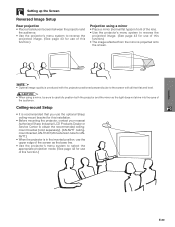
... projected onto the screen. • Optimal image quality is in the inverted position, use the upper edge of the screen as the base line. • Use the projector's menu system to select the appropriate projection mode. (See page 43 for use of the audience. Setting up the Screen Reversed Image Setup Rear projection • Place a translucent screen between the projector and the audience. • Use the projector's menu system to reverse the projected image...
... projected onto the screen. • Optimal image quality is in the inverted position, use the upper edge of the screen as the base line. • Use the projector's menu system to select the appropriate projection mode. (See page 43 for use of the audience. Setting up the Screen Reversed Image Setup Rear projection • Place a translucent screen between the projector and the audience. • Use the projector's menu system to reverse the projected image...
XG-NV7XU Operation Manual
Page 23
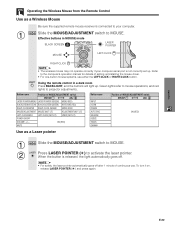
... INPUT IrCOM FREEZE AUTO SYNC ENLARGE RESIZE TOOLS GAMMA Position of MOUSE/ADJUSTMENT switch MOUSE ADJ. Slide the MOUSE/ADJUSTMENT switch to activate the laser pointer. Green lights refer to mouse operations, and red lights to the computer's operation manual for details of continuous use either the LEFT-CLICK or RIGHT-CLICK button. Using the remote control in MOUSE mode BLACK SCREEN LASER POINTER MOUSE LEFT-CLICK RIGHT-CLICK • The wireless...
... INPUT IrCOM FREEZE AUTO SYNC ENLARGE RESIZE TOOLS GAMMA Position of MOUSE/ADJUSTMENT switch MOUSE ADJ. Slide the MOUSE/ADJUSTMENT switch to activate the laser pointer. Green lights refer to mouse operations, and red lights to the computer's operation manual for details of continuous use either the LEFT-CLICK or RIGHT-CLICK button. Using the remote control in MOUSE mode BLACK SCREEN LASER POINTER MOUSE LEFT-CLICK RIGHT-CLICK • The wireless...
XG-NV7XU Operation Manual
Page 31
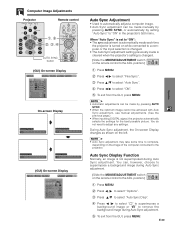
...the GUI, press MENU. on while connected to a computer or the input selection is changed. • The Auto Sync adjustment setting previously made is cleared when the projector's setting is turned on the remote control to the ADJ. Computer Image Adjustments Projector Remote control 1, 5 2, 3, 4 AUTO SYNC button (GUI) On-screen Display On-screen Display g f s (GUI) On-screen Display Auto Sync Adjustment • Used to automatically adjust a computer image. • Auto Sync adjustment can be made manually by pressing AUTO SYNC, or automatically by pressing AUTO SYNC. • When...
...the GUI, press MENU. on while connected to a computer or the input selection is changed. • The Auto Sync adjustment setting previously made is cleared when the projector's setting is turned on the remote control to the ADJ. Computer Image Adjustments Projector Remote control 1, 5 2, 3, 4 AUTO SYNC button (GUI) On-screen Display On-screen Display g f s (GUI) On-screen Display Auto Sync Adjustment • Used to automatically adjust a computer image. • Auto Sync adjustment can be made manually by pressing AUTO SYNC, or automatically by pressing AUTO SYNC. • When...

XG-NV7XU Operation Manual
Page 45
... color. 3 Press ENTER to select it around the screen. 5 Press ENTER to stamp the tool on the screen. 6 Use UNDO to individually delete tools stamped on the screen. 2, 4 3 1 When selecting Sharp default image • You can stamp each tool as many times as you emphasize keypoints within your presentation. (Slide the MOUSE/ADJUSTMENT switch MOUSE ADJ. Using the Presentation Tools Projector Remote control 2, 4 Useful Features 3, 5 6 1 On-screen Display Menu Window Red Green Blue Yellow Orange White...
... color. 3 Press ENTER to select it around the screen. 5 Press ENTER to stamp the tool on the screen. 6 Use UNDO to individually delete tools stamped on the screen. 2, 4 3 1 When selecting Sharp default image • You can stamp each tool as many times as you emphasize keypoints within your presentation. (Slide the MOUSE/ADJUSTMENT switch MOUSE ADJ. Using the Presentation Tools Projector Remote control 2, 4 Useful Features 3, 5 6 1 On-screen Display Menu Window Red Green Blue Yellow Orange White...
XG-NV7XU Operation Manual
Page 48
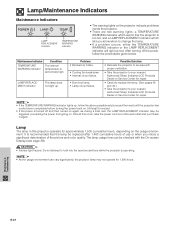
... the power from going on the usage environment. LAMP REPLACEMENT indicator The lamp does not light up red. Maintenance & Troubleshooting E-47 Problem • Blocked air intake. • Cooling fan breakdown. • Internal circuit failure. • Burnt-out lamp. • Lamp circuit failure. Maintenance Indicator Condition TEMPERATURE WARNING indicator The internal temperature is abnormally high. Should this projector operates for 1,500 hours. After turning off and then turned on again, as during a brief rest, the LAMP REPLACEMENT indicator may not operate...
... the power from going on the usage environment. LAMP REPLACEMENT indicator The lamp does not light up red. Maintenance & Troubleshooting E-47 Problem • Blocked air intake. • Cooling fan breakdown. • Internal circuit failure. • Burnt-out lamp. • Lamp circuit failure. Maintenance Indicator Condition TEMPERATURE WARNING indicator The internal temperature is abnormally high. Should this projector operates for 1,500 hours. After turning off and then turned on again, as during a brief rest, the LAMP REPLACEMENT indicator may not operate...
XG-NV7XU Operation Manual
Page 49
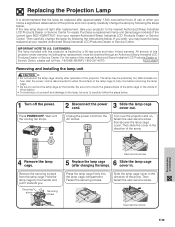
... power cord is backed by the handle and pull it towards you notice a significant deterioration of the projector. Hold the lamp cage by a 90-day parts and labor limited warranty. Then carefully change the lamp by following the steps below . Wait at your nearest Authorized Sharp Industrial LCD Products Dealer or Service Center. Securing screw Securing screw User service screw 5 6 Replace the lamp cage (after operation of the picture...
... power cord is backed by the handle and pull it towards you notice a significant deterioration of the projector. Hold the lamp cage by a 90-day parts and labor limited warranty. Then carefully change the lamp by following the steps below . Wait at your nearest Authorized Sharp Industrial LCD Products Dealer or Service Center. Securing screw Securing screw User service screw 5 6 Replace the lamp cage (after operation of the picture...
XG-NV7XU Operation Manual
Page 50
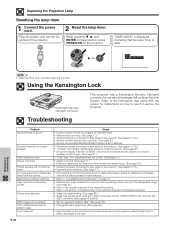
... set to minimum. (See page 17.) • If the picture is normal, the sound is distorted (except for use it to side panel of the projector. 2 Reset the lamp timer. Problem No picture and no picture appears. Picture noise appears. 480P images do not appear. Using the Kensington Lock Kensington Security Standard connector Troubleshooting This projector has a Kensington Security Standard connector for VIDEO mode). Sound is occasionally heard from the cabinet. Data...
... set to minimum. (See page 17.) • If the picture is normal, the sound is distorted (except for use it to side panel of the projector. 2 Reset the lamp timer. Problem No picture and no picture appears. Picture noise appears. 480P images do not appear. Using the Kensington Lock Kensington Security Standard connector Troubleshooting This projector has a Kensington Security Standard connector for VIDEO mode). Sound is occasionally heard from the cabinet. Data...

XG-NV7XU Operation Manual
Page 54
... response Parameter 4-digits O K Return code (0DH) Problem response (communication error or incorrect command) E R R Return code (0DH) When more than a menu display command, it sends a response code to the computer. Computer RABR _מ1 0 → ← Projector OK CONTROL ITEM AUTO POWER OFF POWER SETTING INPUT SWITCHING INPUT CHECK KEYSTONE ADJUSTMENT COMMAND PARAMETER C1 C2 C3 C4 P1 P2 P3 P4 CONTROL CONTENTS A P O W _ _ _ 0 AUTO POWER OFF A P O W _ _ _ 1 AUTO POWER ON P O W R _ _ _ 0 POWER OFF (STANDBY) P O W R _ _ _ 1 POWER ON I V E D _ _ _ 1 VIDEO...
... response Parameter 4-digits O K Return code (0DH) Problem response (communication error or incorrect command) E R R Return code (0DH) When more than a menu display command, it sends a response code to the computer. Computer RABR _מ1 0 → ← Projector OK CONTROL ITEM AUTO POWER OFF POWER SETTING INPUT SWITCHING INPUT CHECK KEYSTONE ADJUSTMENT COMMAND PARAMETER C1 C2 C3 C4 P1 P2 P3 P4 CONTROL CONTENTS A P O W _ _ _ 0 AUTO POWER OFF A P O W _ _ _ 1 AUTO POWER ON P O W R _ _ _ 0 POWER OFF (STANDBY) P O W R _ _ _ 1 POWER ON I V E D _ _ _ 1 VIDEO...

XG-NV7XU Operation Manual
Page 55
...;30) R B R D _ * * * RED (מ30 - ם30) R B B E _ * * * BLUE (מ30 - ם30) R B R E _ _ _ 0 INPUT 2 DISPLAY R B R E _ _ _ 1 RESET A A D J _ _ _ 0 AUTO SYNC OFF A A D J _ _ _ 1 AUTO SYNC ON A D J S _ _ _ 1 AUTO SYNC START CONTROL ITEM COMMAND PARAMETER C1 C2 C3 C4 P1 P2 P3 P4 CONTROL CONTENTS I N C L * * * * CLOCK (מ150 - ם150) I N P H _ * * * PHASE (מ60 - ם60) INPUT ADJUSTMENT I A H P * * * * H-POS...
...;30) R B R D _ * * * RED (מ30 - ם30) R B B E _ * * * BLUE (מ30 - ם30) R B R E _ _ _ 0 INPUT 2 DISPLAY R B R E _ _ _ 1 RESET A A D J _ _ _ 0 AUTO SYNC OFF A A D J _ _ _ 1 AUTO SYNC ON A D J S _ _ _ 1 AUTO SYNC START CONTROL ITEM COMMAND PARAMETER C1 C2 C3 C4 P1 P2 P3 P4 CONTROL CONTENTS I N C L * * * * CLOCK (מ150 - ם150) I N P H _ * * * PHASE (מ60 - ם60) INPUT ADJUSTMENT I A H P * * * * H-POS...
XG-NV7XU Operation Manual
Page 58
... Software operation manual (TINS-6888CEZZ), Sharp Advanced Presentation Software quick reference (TINS6788CEZZ), IrDA driver installation instruction sheet (TCAUZ3046CEZZ) Appendix This SHARP projector uses a DMD panel. Specifications Product type Digital Multimedia Projector Model XG-NV7XU Video system PAL/SECAM/NTSC 3.58/NTSC 4.43/DTV 480P/DTV 720P/DTV 1080I Display method Single panel Digital Micromirror Device™ (DMD™) by Dot) Audio output 2 W (monaural) Computer RGB input signal 15-PIN MINI D-SUB CONNECTOR (INPUT 1): RGB separate/composite sync/sync on the picture screen...
... Software operation manual (TINS-6888CEZZ), Sharp Advanced Presentation Software quick reference (TINS6788CEZZ), IrDA driver installation instruction sheet (TCAUZ3046CEZZ) Appendix This SHARP projector uses a DMD panel. Specifications Product type Digital Multimedia Projector Model XG-NV7XU Video system PAL/SECAM/NTSC 3.58/NTSC 4.43/DTV 480P/DTV 720P/DTV 1080I Display method Single panel Digital Micromirror Device™ (DMD™) by Dot) Audio output 2 W (monaural) Computer RGB input signal 15-PIN MINI D-SUB CONNECTOR (INPUT 1): RGB separate/composite sync/sync on the picture screen...
XG-NV7XU Operation Manual
Page 65
... Mouse control cable for Mac 15 Mouse control serial cable 15 MUTE button 17 O On-screen display language 26 P PDF 6 Phase 29 Picture adjustments 27 POWER buttons 16 Power cord 11 POWER indicator 16 Presentation tools 44 R Rear projection 20 Remote control 21 Remote control sensor 21 Remote mouse receiver 21 RESIZE button 36 RIGHT-CLICK button 22 RS-232C port 14 S Sharp Advanced Presentation Software (SAPS 25 Special mode adjustment 32 Startup image 42 Status function 45 S-VIDEO INPUT terminal 13 Sync 30 Sync on green 52 T TEMPERATURE WARNING indicator...
... Mouse control cable for Mac 15 Mouse control serial cable 15 MUTE button 17 O On-screen display language 26 P PDF 6 Phase 29 Picture adjustments 27 POWER buttons 16 Power cord 11 POWER indicator 16 Presentation tools 44 R Rear projection 20 Remote control 21 Remote control sensor 21 Remote mouse receiver 21 RESIZE button 36 RIGHT-CLICK button 22 RS-232C port 14 S Sharp Advanced Presentation Software (SAPS 25 Special mode adjustment 32 Startup image 42 Status function 45 S-VIDEO INPUT terminal 13 Sync 30 Sync on green 52 T TEMPERATURE WARNING indicator...
Quick Reference Guide
Page 1
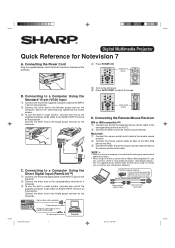
... using the remote mouse receiver with a Macintosh computer. C. AUTO SYNC button D. Digital cable (sold separately) To digital output terminal Computer audio cable (3.5 mm stereo minijack cable) To audio output terminal Computer XG-NV7XU/QR (E) 1 5 Turn on a computer. 3 To use either a PS/2 or serial cable connection. (See diagram below.) • Use the supplied mouse control cable for Mac to adjust the image. Connecting to a Computer Using the Direct Digital Input (PanelLink™) 1 Connect one end of the digital cable to the INPUT 2 port on the projector. 2 Connect the...
... using the remote mouse receiver with a Macintosh computer. C. AUTO SYNC button D. Digital cable (sold separately) To digital output terminal Computer audio cable (3.5 mm stereo minijack cable) To audio output terminal Computer XG-NV7XU/QR (E) 1 5 Turn on a computer. 3 To use either a PS/2 or serial cable connection. (See diagram below.) • Use the supplied mouse control cable for Mac to adjust the image. Connecting to a Computer Using the Direct Digital Input (PanelLink™) 1 Connect one end of the digital cable to the INPUT 2 port on the projector. 2 Connect the...


