XG-C55X Operation Manual
Page 6
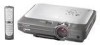
... PRECAUTIONS A OBSERVER LORS DU REMPLACEMENT DE LA LAMPE. NE REMPLACER QUE PAR UNE LAMPE SHARP DE TYPE BQC-XGC55X//1. LAMPE A HAUTE PRESSION : RISQUE D'EXPLOSION. HANDLE WITH CARE. This SHARP projector uses an LCD (Liquid Crystal Display) panel. This very sophisticated panel contains 786,432 pixels (×... within acceptable tolerances which may be sure to . Caution Concerning the Lamp Replacement See "Replacing the Lamp" on the remote control. This will help you are certain acceptable tolerances that the equipment must conform to align the label bottom and the...
... PRECAUTIONS A OBSERVER LORS DU REMPLACEMENT DE LA LAMPE. NE REMPLACER QUE PAR UNE LAMPE SHARP DE TYPE BQC-XGC55X//1. LAMPE A HAUTE PRESSION : RISQUE D'EXPLOSION. HANDLE WITH CARE. This SHARP projector uses an LCD (Liquid Crystal Display) panel. This very sophisticated panel contains 786,432 pixels (×... within acceptable tolerances which may be sure to . Caution Concerning the Lamp Replacement See "Replacing the Lamp" on the remote control. This will help you are certain acceptable tolerances that the equipment must conform to align the label bottom and the...
XG-C55X Operation Manual
Page 8
... PDF Operation Manuals (Windows, Macintosh 9 Part Names 10 Projector (Front and Top View 10 Projector (Rear View 11 Remote Control (Front View 12 Remote Control (Top View 12 Using the Remote Control 13 Available Range of the Remote Control 13 Inserting the Batteries 13 Accessories 14 Connections and... to Video Equipment 19 Connecting to an Amplifier 21 Controlling the Projector by a Computer 22 Connecting to a Monitor 23 Using as a Wired Remote Control 23 Using the Wireless Presentation Function of the Remote Control 24 Setup 25 Using the Adjustment Feet 25 Adjusting the ...
... PDF Operation Manuals (Windows, Macintosh 9 Part Names 10 Projector (Front and Top View 10 Projector (Rear View 11 Remote Control (Front View 12 Remote Control (Top View 12 Using the Remote Control 13 Available Range of the Remote Control 13 Inserting the Batteries 13 Accessories 14 Connections and... to Video Equipment 19 Connecting to an Amplifier 21 Controlling the Projector by a Computer 22 Connecting to a Monitor 23 Using as a Wired Remote Control 23 Using the Wireless Presentation Function of the Remote Control 24 Setup 25 Using the Adjustment Feet 25 Adjusting the ...
XG-C55X Operation Manual
Page 9
... 85 Removing and Installing the Lamp Unit 86 Resetting the Lamp Timer 87 Connecting Pin Assignments 88 (RS-232C) Specifications and Command Settings 89 Wired Remote Control Terminal Specifications 92 Computer Compatibility Chart 93 Troubleshooting 94 For SHARP Assistance 96 Specifications 97 Dimensions 98 Glossary 99 Index 100 -5
... 85 Removing and Installing the Lamp Unit 86 Resetting the Lamp Timer 87 Connecting Pin Assignments 88 (RS-232C) Specifications and Command Settings 89 Wired Remote Control Terminal Specifications 92 Computer Compatibility Chart 93 Troubleshooting 94 For SHARP Assistance 96 Specifications 97 Dimensions 98 Glossary 99 Index 100 -5
XG-C55X Operation Manual
Page 14
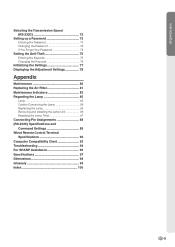
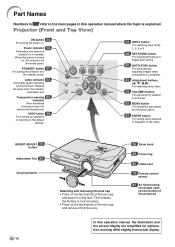
... sound level. 42 MENU button For displaying adjustment and setting screens. 42 ENTER button For setting items selected or adjusted on the bottom of the projector) In this operation manual, the illustration and the screen display are simplified for explanation, and may differ slightly from actual display. Temperature warning 83 ...; Press on the two buttons of the lens cap and remove it from the lens. 26 Zoom knob 26 Focus ring 80 Intake vent 13 Remote control sensor 81 Air filter/cooling fan (Intake vent) (on the menu. Part Names Numbers in refer to the main pages in this operation ...
... sound level. 42 MENU button For displaying adjustment and setting screens. 42 ENTER button For setting items selected or adjusted on the bottom of the projector) In this operation manual, the illustration and the screen display are simplified for explanation, and may differ slightly from actual display. Temperature warning 83 ...; Press on the two buttons of the lens cap and remove it from the lens. 26 Zoom knob 26 Focus ring 80 Intake vent 13 Remote control sensor 81 Air filter/cooling fan (Intake vent) (on the menu. Part Names Numbers in refer to the main pages in this operation ...

XG-C55X Operation Manual
Page 15
... For controlling projector using a computer. Refer to the information that came with a Kensington MicroSaver Security System. INPUT 2 terminal 17 Terminal for computer RGB and component signals. 17 AUDIO INPUT 1, 2 terminal Shared audio input terminal for INPUT 1 and 2. 23 WIRED REMOTE control input ...with an S-video terminal. 17 AC socket 80 Exhaust vent Kensington Security Standard connector 25 Adjustment Feet Using the Kensington Lock • This projector has a Kensington Security Standard connector for use with the system for INPUT 1, 2, 3 and 4. INPUT 1 terminal 17 Terminal for ...
... For controlling projector using a computer. Refer to the information that came with a Kensington MicroSaver Security System. INPUT 2 terminal 17 Terminal for computer RGB and component signals. 17 AUDIO INPUT 1, 2 terminal Shared audio input terminal for INPUT 1 and 2. 23 WIRED REMOTE control input ...with an S-video terminal. 17 AC socket 80 Exhaust vent Kensington Security Standard connector 25 Adjustment Feet Using the Kensington Lock • This projector has a Kensington Security Standard connector for use with the system for INPUT 1, 2, 3 and 4. INPUT 1 terminal 17 Terminal for ...

XG-C55X Operation Manual
Page 16
... or Digital Shift setting. ENLARGE (Enlarge/Reduce) 55 buttons For enlarging or reducing part of the room. Remote Control (Top View) Remote control signal transmitters 13 -12 23 WIRED R/C JACK For controlling the projector by connecting the remote control to the default settings. INPUT buttons 35 For switching to a computer. AUTO SYNC button 50...
... or Digital Shift setting. ENLARGE (Enlarge/Reduce) 55 buttons For enlarging or reducing part of the room. Remote Control (Top View) Remote control signal transmitters 13 -12 23 WIRED R/C JACK For controlling the projector by connecting the remote control to the default settings. INPUT buttons 35 For switching to a computer. AUTO SYNC button 50...
XG-C55X Operation Manual
Page 17
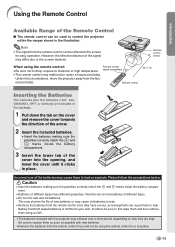
...opening, and lower the cover until it clicks in the illustration. Using the Remote Control Introduction Available Range of the Remote Control I The remote control can be used to control the projector within the ranges shown in place. This may shorten the life of new...may malfunction under a fluorescent lamp. Remote control 23' (7 m) Inserting the Batteries The batteries (two R-6 batteries ("AA" size, UM/SUM-3, HP-7 or similar)) are kept. Please follow the precautions below. Under that circumstance, move the projector away from the remote control can be reflected off a screen...
...opening, and lower the cover until it clicks in the illustration. Using the Remote Control Introduction Available Range of the Remote Control I The remote control can be used to control the projector within the ranges shown in place. This may shorten the life of new...may malfunction under a fluorescent lamp. Remote control 23' (7 m) Inserting the Batteries The batteries (two R-6 batteries ("AA" size, UM/SUM-3, HP-7 or similar)) are kept. Please follow the precautions below. Under that circumstance, move the projector away from the remote control can be reflected off a screen...

XG-C55X Operation Manual
Page 18
...232C USB cable (3'3" (1 m)) adaptor (5 57/64'' (15 cm)) QCNWG0007CEPZ QCNWGA015WJPZ Projector manual and technical reference CD-ROM UDSKAA035WJZZ Remote receiver RUNTKA061WJZZ Sharp Advanced Presentation Software quick installation guide TINS-A867WJZZ Extra air filter PFILDA005WJZZ Sharp Advanced Presentation Software CD-ROM UDSKAA036WJZZ Quick guide label TLABZA364WJZZ Operation manual (this manual) ... cord that corresponds to 15-pin D-sub cable (9'10'' (3.0 m)) AN-C3BN I 5 BNC to the wall outlet in your nearNote est Sharp Authorized Projector Dealer or Service Center. -14
...232C USB cable (3'3" (1 m)) adaptor (5 57/64'' (15 cm)) QCNWG0007CEPZ QCNWGA015WJPZ Projector manual and technical reference CD-ROM UDSKAA035WJZZ Remote receiver RUNTKA061WJZZ Sharp Advanced Presentation Software quick installation guide TINS-A867WJZZ Extra air filter PFILDA005WJZZ Sharp Advanced Presentation Software CD-ROM UDSKAA036WJZZ Quick guide label TLABZA364WJZZ Operation manual (this manual) ... cord that corresponds to 15-pin D-sub cable (9'10'' (3.0 m)) AN-C3BN I 5 BNC to the wall outlet in your nearNote est Sharp Authorized Projector Dealer or Service Center. -14
XG-C55X Operation Manual
Page 27
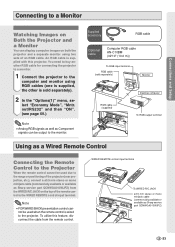
... cable (commercially available or available as Sharp service part QCNWGA013WJPZ) from the remote control. lect "Economy Mode", "Mntr. WIRED REMOTE control input terminal To WIRED R/C JACK ø3.5 mm stereo or mono minijack cable (commercially available or available as a Wired Remote Control Connecting the Remote Control to the Projector When the remote control cannot be used due to...
... cable (commercially available or available as Sharp service part QCNWGA013WJPZ) from the remote control. lect "Economy Mode", "Mntr. WIRED REMOTE control input terminal To WIRED R/C JACK ø3.5 mm stereo or mono minijack cable (commercially available or available as a Wired Remote Control Connecting the Remote Control to the Projector When the remote control cannot be used due to...

XG-C55X Operation Manual
Page 28
... while using the supplied USB cable. BACK and FORWARD buttons on the remote control will allow you to a computer, wireless presentation control is possible. Connecting the Projector to Other Devices Using the Wireless Presentation Function of the Remote Control By connecting the remote receiver to remotely navigate applicable presentation programs such as Microsoft PowerPoint®.
... while using the supplied USB cable. BACK and FORWARD buttons on the remote control will allow you to a computer, wireless presentation control is possible. Connecting the Projector to Other Devices Using the Wireless Presentation Function of the Remote Control By connecting the remote receiver to remotely navigate applicable presentation programs such as Microsoft PowerPoint®.
XG-C55X Operation Manual
Page 38
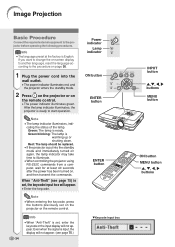
...at least 40 seconds after the power has been turned on again, the lamp indicator may take time to illuminate. • When controlling the projector using RS-232C commands from a computer, wait for at the factory is ready to start operation. Info • When "Anti-Theft" is ...Green: The lamp is put into the wall outlet. • The power indicator illuminates red, and the projector enters the standby mode. 2 ON Press on the projector or on the projector or the remote control. Image Projection Basic Procedure Connect the required external equipment to the procedure on page 36. 1 Plug...
...at least 40 seconds after the power has been turned on again, the lamp indicator may take time to illuminate. • When controlling the projector using RS-232C commands from a computer, wait for at the factory is ready to start operation. Info • When "Anti-Theft" is ...Green: The lamp is put into the wall outlet. • The power indicator illuminates red, and the projector enters the standby mode. 2 ON Press on the projector or on the projector or the remote control. Image Projection Basic Procedure Connect the required external equipment to the procedure on page 36. 1 Plug...

XG-C55X Operation Manual
Page 39
...will lower the volume. INPUT buttons VOLUME buttons -35 will be displayed. INPUT 3 Used for projecting im(Video) ages from equipment that the projector is active. "On-screen Display (Example) INPUT 1 mode Using RGB Using Component INPUT 2 mode Using RGB Using Component INPUT 3 mode ...10141; ➝ ➝ ➝ Basic Operation 4 Press or on the remote control to select the desired input mode. 3 Press , , or on the remote control to select the INPUT mode. • After pressing once on the projector, use to adjust the volume. When a signal that (RGB/ sends RGB signals...
...will lower the volume. INPUT buttons VOLUME buttons -35 will be displayed. INPUT 3 Used for projecting im(Video) ages from equipment that the projector is active. "On-screen Display (Example) INPUT 1 mode Using RGB Using Component INPUT 2 mode Using RGB Using Component INPUT 3 mode ...10141; ➝ ➝ ➝ Basic Operation 4 Press or on the remote control to select the desired input mode. 3 Press , , or on the remote control to select the INPUT mode. • After pressing once on the projector, use to adjust the volume. When a signal that (RGB/ sends RGB signals...

XG-C55X Operation Manual
Page 41
... standby mode. This can cause damage due to put the projector into the standby mode, wait until the confirmation message disappears. • The projector cannot be operated while a message "Shutting Down. Turning the Power off 1 Press STANDBY on the projector or on the remote control, then press that button again while the confirmation message...
... standby mode. This can cause damage due to put the projector into the standby mode, wait until the confirmation message disappears. • The projector cannot be operated while a message "Shutting Down. Turning the Power off 1 Press STANDBY on the projector or on the remote control, then press that button again while the confirmation message...

XG-C55X Operation Manual
Page 46
You can operate the menus from the projector or remote control using the following procedure. ENTER button "Menu Screen ENTER button ', ", \, | buttons MENU button MENU button ', ", \, | buttons -42 Using the Menu Screen This projector has two sets of menu screens that allow you to adjust the image and various projector settings. Note • The "Picture...
You can operate the menus from the projector or remote control using the following procedure. ENTER button "Menu Screen ENTER button ', ", \, | buttons MENU button MENU button ', ", \, | buttons -42 Using the Menu Screen This projector has two sets of menu screens that allow you to adjust the image and various projector settings. Note • The "Picture...

XG-C55X Operation Manual
Page 61
... position of the inset picture. • Press to stop the frame from INPUT 1 or 2. Displaying the Inset Picture 1 Press . 2 Press or on the remote control or on the projector to switch the image in the inset picture . 3 Press ', ", \ and | to set to "DOT BY DOT". • When no signals are sent to...
... position of the inset picture. • Press to stop the frame from INPUT 1 or 2. Displaying the Inset Picture 1 Press . 2 Press or on the remote control or on the projector to switch the image in the inset picture . 3 Press ', ", \ and | to set to "DOT BY DOT". • When no signals are sent to...
XG-C55X Operation Manual
Page 68
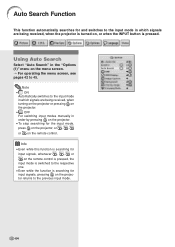
...function is searching for input signals, whenever , , or on the remote control is pressed, the input mode is switched to the respective one. • Even while the function is searching for input signals, pressing on the projector returns to the input mode in which signals are being received, when...see pages 42 to the input mode in order by pressing on the projector. • To stop searching for the input mode, press on the projector, or , , or on , or when the INPUT button is turned on the remote control. Auto Search Function This function automatically searches for and switches to ...
...function is searching for input signals, whenever , , or on the remote control is pressed, the input mode is switched to the respective one. • Even while the function is searching for input signals, pressing on the projector returns to the input mode in which signals are being received, when...see pages 42 to the input mode in order by pressing on the projector. • To stop searching for the input mode, press on the projector, or , , or on , or when the INPUT button is turned on the remote control. Auto Search Function This function automatically searches for and switches to ...

XG-C55X Operation Manual
Page 79
....) • When "Anti-Theft" is set the first digit in a safe place where only authorized users have access. The following buttons on the remote control or projector to use this function, just do not enter the keycode. Once the anti-theft function is activated, you like on the...password is turned on the menu screen. ➝ For operating the menu screen, see page 96). If you lose or forget your nearest Sharp Authorized Projector Dealer or Service Center (see pages 42 to use this function or not. Setting the Anti-Theft The anti-theft function prevents unauthorized use ...
....) • When "Anti-Theft" is set the first digit in a safe place where only authorized users have access. The following buttons on the remote control or projector to use this function, just do not enter the keycode. Once the anti-theft function is activated, you like on the...password is turned on the menu screen. ➝ For operating the menu screen, see page 96). If you lose or forget your nearest Sharp Authorized Projector Dealer or Service Center (see pages 42 to use this function or not. Setting the Anti-Theft The anti-theft function prevents unauthorized use ...

XG-C55X Operation Manual
Page 80
In the same manner, press the buttons on the projector if the buttons on the projector are used for setting the keycode. Note • If you do not want to 45. 1 Press the buttons on the remote control are used for setting the keycode. Setting the Anti-Theft 2 Enter the remaining 3 ... Select "Anti-Theft" in "Reconfirm". Note • The Keylock function will become temporarily disabled. After the password has been entered, you like on the remote control or the projector to enter the new keycode. 3 Enter the same 4-digit keycode in the "Options (2)" menu on . mote control or the...
In the same manner, press the buttons on the projector if the buttons on the projector are used for setting the keycode. Note • If you do not want to 45. 1 Press the buttons on the remote control are used for setting the keycode. Setting the Anti-Theft 2 Enter the remaining 3 ... Select "Anti-Theft" in "Reconfirm". Note • The Keylock function will become temporarily disabled. After the password has been entered, you like on the remote control or the projector to enter the new keycode. 3 Enter the same 4-digit keycode in the "Options (2)" menu on . mote control or the...
XG-C55X Operation Manual
Page 85
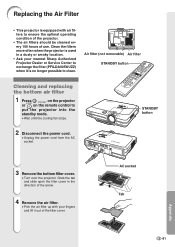
...socket Tab Appendix -81 Grab the tab and slide open the filter cover in a dusty or smoky location. • Ask your nearest Sharp Authorized Projector Dealer or Service Center to exchange the filter (PFILDA005WJZZ) when it is equipped with your fingers and lift it out of use. M4...the bottom air filter 1 Press STANDBY on the projector or on the remote control to clean. STANDBY button 3 Remove the bottom filter cover. • Turn over the projector. Replacing the Air Filter • This projector is no longer possible to put the projector into the standby mode. • Wait until...
...socket Tab Appendix -81 Grab the tab and slide open the filter cover in a dusty or smoky location. • Ask your nearest Sharp Authorized Projector Dealer or Service Center to exchange the filter (PFILDA005WJZZ) when it is equipped with your fingers and lift it out of use. M4...the bottom air filter 1 Press STANDBY on the projector or on the remote control to clean. STANDBY button 3 Remove the bottom filter cover. • Turn over the projector. Replacing the Air Filter • This projector is no longer possible to put the projector into the standby mode. • Wait until...

XG-C55X Operation Manual
Page 90
...hot and may cause burn or injury. 2 Disconnect the power cord. • Unplug the power cord from the projector right after use. Be sure not to touch the glass surface of the lamp unit or the inside of the...AC socket User service screw Regarding the Lamp Removing and Installing the Lamp Unit Info • Be sure to put the projector into the standby mode. • Wait until it has fully cooled down (about 1 hour). 3 Change the air ...refer to the installation manual included with the lamp unit. 1 Press STANDBY on the projector or on the remote control to remove the lamp unit by the handle.
...hot and may cause burn or injury. 2 Disconnect the power cord. • Unplug the power cord from the projector right after use. Be sure not to touch the glass surface of the lamp unit or the inside of the...AC socket User service screw Regarding the Lamp Removing and Installing the Lamp Unit Info • Be sure to put the projector into the standby mode. • Wait until it has fully cooled down (about 1 hour). 3 Change the air ...refer to the installation manual included with the lamp unit. 1 Press STANDBY on the projector or on the remote control to remove the lamp unit by the handle.


