
XG-C50X Operation Manual
Page 4
...local authorities or, if you are located in this projector continues to environmental considerations. NE REMPLACER QUE PAR UNE LAMPE SHARP DE TYPE BQC-XGC50X//1. Disposal of mercury. HANDLE WITH CARE. PRODUCT DISPOSAL This projector utilizes tin-lead solder, and a pressurized lamp containing ...button on the projector or on page 85. MEDIUM PRESSURE LAMP : RISK OF EXPLOSION. LAMPE A MOYENNE PRESSION : RISQUE D'EXPLOSION. During normal operation, when turning the power off . Caution Concerning the Lamp Replacement See "Replacing the Lamp" on the remote control. LAMP REPLACEMENT...
...local authorities or, if you are located in this projector continues to environmental considerations. NE REMPLACER QUE PAR UNE LAMPE SHARP DE TYPE BQC-XGC50X//1. Disposal of mercury. HANDLE WITH CARE. PRODUCT DISPOSAL This projector utilizes tin-lead solder, and a pressurized lamp containing ...button on the projector or on page 85. MEDIUM PRESSURE LAMP : RISK OF EXPLOSION. LAMPE A MOYENNE PRESSION : RISQUE D'EXPLOSION. During normal operation, when turning the power off . Caution Concerning the Lamp Replacement See "Replacing the Lamp" on the remote control. LAMP REPLACEMENT...

XG-C50X Operation Manual
Page 6
... PDF Operation Manuals (Windows, Macintosh 9 Part Names 10 Projector (Front and Top View 10 Projector (Rear View 11 Remote Control (Front View 12 Remote Control (Top View 12 Using the Remote Control 13 Available Range of the Remote Control 13 Inserting the Batteries 13 Accessories 14 Connections and... to Video Equipment 20 Connecting to an Amplifier 22 Controlling the Projector by a Computer 23 Connecting to a Monitor 24 Using the Wireless Presentation Function of the Remote Control 25 Using as a Wired Remote Control 26 Setup 27 Using the Adjustment Feet 27 Adjusting the ...
... PDF Operation Manuals (Windows, Macintosh 9 Part Names 10 Projector (Front and Top View 10 Projector (Rear View 11 Remote Control (Front View 12 Remote Control (Top View 12 Using the Remote Control 13 Available Range of the Remote Control 13 Inserting the Batteries 13 Accessories 14 Connections and... to Video Equipment 20 Connecting to an Amplifier 22 Controlling the Projector by a Computer 23 Connecting to a Monitor 24 Using the Wireless Presentation Function of the Remote Control 25 Using as a Wired Remote Control 26 Setup 27 Using the Adjustment Feet 27 Adjusting the ...
XG-C50X Operation Manual
Page 7
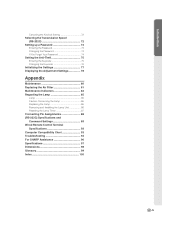
... 85 Removing and Installing the Lamp Unit 86 Resetting the Lamp Timer 87 Connecting Pin Assignments 88 (RS-232C) Specifications and Command Settings 89 Wired Remote Control Terminal Specifications 92 Computer Compatibility Chart 93 Troubleshooting 94 For SHARP Assistance 96 Specifications 97 Dimensions 98 Glossary 99 Index 100 -5
... 85 Removing and Installing the Lamp Unit 86 Resetting the Lamp Timer 87 Connecting Pin Assignments 88 (RS-232C) Specifications and Command Settings 89 Wired Remote Control Terminal Specifications 92 Computer Compatibility Chart 93 Troubleshooting 94 For SHARP Assistance 96 Specifications 97 Dimensions 98 Glossary 99 Index 100 -5

XG-C50X Operation Manual
Page 12
...remove it on the bottom of the lens cap and attach it from the lens. 28 Zoom knob 28 Focus ring 80 Intake vent 13 Remote control sensor 81 Air filter/cooling fan (Intake vent) (on the lens. HEIGHT ADJUST 27 button Adjustment foot 27 Carrying handle Attaching and ... displaying adjustment and setting screens. ENTER button 42 For setting items selected or adjusted on or off. Power indicator 34 Illuminates red, when the projector is turned on, this indicator will illuminate red. Part Names Numbers in refer to the main pages in this indicator will illuminate green. Temperature...
...remove it on the bottom of the lens cap and attach it from the lens. 28 Zoom knob 28 Focus ring 80 Intake vent 13 Remote control sensor 81 Air filter/cooling fan (Intake vent) (on the lens. HEIGHT ADJUST 27 button Adjustment foot 27 Carrying handle Attaching and ... displaying adjustment and setting screens. ENTER button 42 For setting items selected or adjusted on or off. Power indicator 34 Illuminates red, when the projector is turned on, this indicator will illuminate red. Part Names Numbers in refer to the main pages in this indicator will illuminate green. Temperature...

XG-C50X Operation Manual
Page 13
... 2. INPUT 2 terminal 18 Terminal for computer RGB and component signals. 18 AUDIO INPUT 1, 2 terminal Shared audio input terminal for INPUT 1 and 2. 26 WIRED REMOTE control input terminal 20 INPUT 3 terminal For connecting video equipment. 20 AUDIO (L/R) INPUT 3, 4 terminals Shared audio input terminals for INPUT 3 and 4. 20 INPUT ... terminal. 17 AC socket 80 Exhaust vent Kensington Security Standard connector 27 Adjustment Feet Using the Kensington Lock • This projector has a Kensington Security Standard connector for use with the system for instructions on how to use it to secure the...
... 2. INPUT 2 terminal 18 Terminal for computer RGB and component signals. 18 AUDIO INPUT 1, 2 terminal Shared audio input terminal for INPUT 1 and 2. 26 WIRED REMOTE control input terminal 20 INPUT 3 terminal For connecting video equipment. 20 AUDIO (L/R) INPUT 3, 4 terminals Shared audio input terminals for INPUT 3 and 4. 20 INPUT ... terminal. 17 AC socket 80 Exhaust vent Kensington Security Standard connector 27 Adjustment Feet Using the Kensington Lock • This projector has a Kensington Security Standard connector for use with the system for instructions on how to use it to secure the...

XG-C50X Operation Manual
Page 14
...of the brightness of the image. INPUT buttons 35 For switching to the projector. Remote Control (Top View) Remote control signal transmitters 13 -12 26 WIRED R/C JACK For controlling the projector by connecting the remote control to the respective input modes. GAMMA button 56 For correcting the ... operation or returning to a computer. AUTO SYNC button 50 For automatically adjusting images when connected to the default settings. Part Names Remote Control (Front View) KEYSTONE button 38 For adjusting Keystone or Digital Shift setting. ENLARGE (Enlarge/Reduce) 55 buttons For enlarging or...
...of the brightness of the image. INPUT buttons 35 For switching to the projector. Remote Control (Top View) Remote control signal transmitters 13 -12 26 WIRED R/C JACK For controlling the projector by connecting the remote control to the respective input modes. GAMMA button 56 For correcting the ... operation or returning to a computer. AUTO SYNC button 50 For automatically adjusting images when connected to the default settings. Part Names Remote Control (Front View) KEYSTONE button 38 For adjusting Keystone or Digital Shift setting. ENLARGE (Enlarge/Reduce) 55 buttons For enlarging or...

XG-C50X Operation Manual
Page 15
...the batteries from leaked batteries is harmful to your skin, therefore be sure to control the projector within the ranges shown in the illustration. signal transmitters 30° • The remote control may cause old batteries to leak. • Remove the batteries from the fluo-...tab of the signal may cause them to leak or explode. Under that circumstance, move the projector away from the remote control once they are included in place. Be sure to the screen material. Remote control 23' (7 m) Inserting the Batteries The batteries (two R-6 batteries ("AA" size, ...
...the batteries from leaked batteries is harmful to your skin, therefore be sure to control the projector within the ranges shown in the illustration. signal transmitters 30° • The remote control may cause old batteries to leak. • Remove the batteries from the fluo-...tab of the signal may cause them to leak or explode. Under that circumstance, move the projector away from the remote control once they are included in place. Be sure to the screen material. Remote control 23' (7 m) Inserting the Batteries The batteries (two R-6 batteries ("AA" size, ...
XG-C50X Operation Manual
Page 16
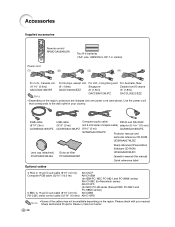
... (for NEC PC-98 series (Except NEC PC-9821 and PC-98NX series)) 5 BNC to the wall outlet in your nearest Note Sharp Authorized Projector Dealer or Service Center. -14 Use the power cord that corresponds to 15-pin D-sub cable (9'10'' (3.0 m)) AN-C3BN RS-...cable (32'10" (10.0m)) AN-C10RS • Some of the cables may not be available depending on the region, projectors are shipped only one power cord (see above). Accessories Supplied accessories Remote control RRMCGA029WJSA Two R-6 batteries ("AA" size, UM/SUM-3, HP-7 or similar) Power cord (1) (2) (3) (4) For U.S., Canada...
... (for NEC PC-98 series (Except NEC PC-9821 and PC-98NX series)) 5 BNC to the wall outlet in your nearest Note Sharp Authorized Projector Dealer or Service Center. -14 Use the power cord that corresponds to 15-pin D-sub cable (9'10'' (3.0 m)) AN-C3BN RS-...cable (32'10" (10.0m)) AN-C10RS • Some of the cables may not be available depending on the region, projectors are shipped only one power cord (see above). Accessories Supplied accessories Remote control RRMCGA029WJSA Two R-6 batteries ("AA" size, UM/SUM-3, HP-7 or similar) Power cord (1) (2) (3) (4) For U.S., Canada...

XG-C50X Operation Manual
Page 27
Using the Wireless Presentation Function 1 Connect the projector to the computer using presentation software on your computer. • Press to move the page up. • Press to move the page down. However, this ... the Microsoft Windows OS and Mac OS. It can also be used to move forward or backward when viewing images of the Remote Control The Wireless Presentation function on the projector works the same as PowerPointTM. Supplied accessory Notebook computer USB cable USB cable USB terminal 2 Press or while using the supplied...
Using the Wireless Presentation Function 1 Connect the projector to the computer using presentation software on your computer. • Press to move the page up. • Press to move the page down. However, this ... the Microsoft Windows OS and Mac OS. It can also be used to move forward or backward when viewing images of the Remote Control The Wireless Presentation function on the projector works the same as PowerPointTM. Supplied accessory Notebook computer USB cable USB cable USB terminal 2 Press or while using the supplied...

XG-C50X Operation Manual
Page 28
... Other Devices Using as a Wired Remote Control Connecting the Remote Control to the Projector When the remote control cannot be used due to the range or positioning of the projector (rear projection, etc.), connect a ø3.5 mm minijack cable (commercially available or available as Sharp service part QCNW-4870CEZZ) -26 WIRED REMOTE control input terminal To WIRED R/C JACK...
... Other Devices Using as a Wired Remote Control Connecting the Remote Control to the Projector When the remote control cannot be used due to the range or positioning of the projector (rear projection, etc.), connect a ø3.5 mm minijack cable (commercially available or available as Sharp service part QCNW-4870CEZZ) -26 WIRED REMOTE control input terminal To WIRED R/C JACK...

XG-C50X Operation Manual
Page 36
...display will appear. • Enter the keycode. Info • When "Anti-Theft" is ready to illuminate. • When controlling the projector using RS-232C commands from a computer, wait for at the factory is ready. Info • The language preset at least 30 seconds... operating the following procedures. After the lamp replacement indicator illuminates, the projector is set on page 36. Image Projection Basic Procedure Connect the required external equipment to the procedure on the projector or the remote control. Power (ON) button Power (OFF) button ENTER button Note •...
...display will appear. • Enter the keycode. Info • When "Anti-Theft" is ready to illuminate. • When controlling the projector using RS-232C commands from a computer, wait for at the factory is ready. Info • The language preset at least 30 seconds... operating the following procedures. After the lamp replacement indicator illuminates, the projector is set on page 36. Image Projection Basic Procedure Connect the required external equipment to the procedure on the projector or the remote control. Power (ON) button Power (OFF) button ENTER button Note •...

XG-C50X Operation Manual
Page 37
... Used for projecting im(S-Video) ages from equipment connected to the SVIDEO input terminal. 4 Press or on the projector, use to select the desired input mode. Pressing will be displayed. • When "Auto Search" is "...be selected. (see page 65.) About the INPUT modes INPUT 1 Used for projecting images from equipment that the projector is not preset to receive is received, "NO SIGNAL."will lower the volume. "On-screen Display (Example) ...equipment connected to the VIDEO input terminal. 3 Press , , or on the remote control to select the INPUT mode. • After pressing once on the...
... Used for projecting im(S-Video) ages from equipment connected to the SVIDEO input terminal. 4 Press or on the projector, use to select the desired input mode. Pressing will be displayed. • When "Auto Search" is "...be selected. (see page 65.) About the INPUT modes INPUT 1 Used for projecting images from equipment that the projector is not preset to receive is received, "NO SIGNAL."will lower the volume. "On-screen Display (Example) ...equipment connected to the VIDEO input terminal. 3 Press , , or on the remote control to select the INPUT mode. • After pressing once on the...

XG-C50X Operation Manual
Page 44
You can operate the menus from the projector or remote control using the following procedure. ENTER button "Menu Screen ENTER button ', ", \, | buttons MENU button MENU button ', ", \, | buttons -42 Note • The "Picture" menu screen for ... (Main Menu) Menu Selections (Adjustments) 1 Press . • The menu screen is selected. Using the Menu Screen This projector has two sets of menu screens that allow you to adjust the image and various projector settings. Menu screen for INPUT 1 or INPUT 2 RGB mode Menu screen for the selected input mode is displayed...
You can operate the menus from the projector or remote control using the following procedure. ENTER button "Menu Screen ENTER button ', ", \, | buttons MENU button MENU button ', ", \, | buttons -42 Note • The "Picture" menu screen for ... (Main Menu) Menu Selections (Adjustments) 1 Press . • The menu screen is selected. Using the Menu Screen This projector has two sets of menu screens that allow you to adjust the image and various projector settings. Menu screen for INPUT 1 or INPUT 2 RGB mode Menu screen for the selected input mode is displayed...

XG-C50X Operation Manual
Page 59
... move the inset pic- Displaying the Inset Picture 1 Press . 2 Press or on the remote control or on the same screen. Displaying Dual Pictures (Pict in Pict) Picture in Picture function allows you to display two pictures on the projector to switch the image in the inset picture . 3 Press ', ", \ and | to set to...
... move the inset pic- Displaying the Inset Picture 1 Press . 2 Press or on the remote control or on the same screen. Displaying Dual Pictures (Pict in Pict) Picture in Picture function allows you to display two pictures on the projector to switch the image in the inset picture . 3 Press ', ", \ and | to set to...

XG-C50X Operation Manual
Page 66
...function automatically searches for and switches to the input mode in order by pressing on the projector. • To stop searching for the input mode, press on the projector, or , , or on the remote control. Note • ON Automatically switches to the input mode in which signals are ...being received, when turning on the projector or pressing on the projector. • OFF For switching input modes manually in ...
...function automatically searches for and switches to the input mode in order by pressing on the projector. • To stop searching for the input mode, press on the projector, or , , or on the remote control. Note • ON Automatically switches to the input mode in which signals are ...being received, when turning on the projector or pressing on the projector. • OFF For switching input modes manually in ...

XG-C50X Operation Manual
Page 77
...will need to bring your nearest Sharp Authorized Projector Dealer or Service Center (see pages 42 to be projected. Failure to enter the correct keycode will need to enter the correct keycode each time the projector is turned on the remote control and projector cannot be selected unless "Password"...authorized users have access. Entering the Keycode • "Anti-Theft" cannot be set the first digit in the "Options (2)" menu on the remote control or projector to set as keycodes: • POWER (ON/OFF) buttons • ENTER button • UNDO button • MENU button • FORWARD...
...will need to bring your nearest Sharp Authorized Projector Dealer or Service Center (see pages 42 to be projected. Failure to enter the correct keycode will need to enter the correct keycode each time the projector is turned on the remote control and projector cannot be selected unless "Password"...authorized users have access. Entering the Keycode • "Anti-Theft" cannot be set the first digit in the "Options (2)" menu on the remote control or projector to set as keycodes: • POWER (ON/OFF) buttons • ENTER button • UNDO button • MENU button • FORWARD...

XG-C50X Operation Manual
Page 78
... keycode in "Reconfirm". Note • If you do not want to 45. 1 Press the buttons on the remote control are used for setting the keycode. In the same manner, press the buttons on the projector if the buttons on . When it appears, enter the right keycode. • Press the buttons on the... remote control if the buttons on the re- Changing the Keycode • When "Anti-Theft" is selected, the password...
... keycode in "Reconfirm". Note • If you do not want to 45. 1 Press the buttons on the remote control are used for setting the keycode. In the same manner, press the buttons on the projector if the buttons on . When it appears, enter the right keycode. • Press the buttons on the... remote control if the buttons on the re- Changing the Keycode • When "Anti-Theft" is selected, the password...

XG-C50X Operation Manual
Page 91
...code for connection.) Communication conditions Set the serial port settings of the computer to the computer. If the projector receives a command other than one code is turned on during standby with the on , and then transmit the next command... the command from the computer are sent in the following order: command, parameter, and return code. Computer RABR _ - 1 0 → ← Projector OK BUTTONS & REMOTE CONTROL KEY BUTTONS & REMOTE CONTROL KEY CONTROL CONTENTS POWER ON POWER OFF VOLUME (0 - 60) MUTE ON MUTE OFF KEYSTONE (-127 - +127) DIGITAL SHIFT (-96 - +96) COMMAND PARAMETER ...
...code for connection.) Communication conditions Set the serial port settings of the computer to the computer. If the projector receives a command other than one code is turned on during standby with the on , and then transmit the next command... the command from the computer are sent in the following order: command, parameter, and return code. Computer RABR _ - 1 0 → ← Projector OK BUTTONS & REMOTE CONTROL KEY BUTTONS & REMOTE CONTROL KEY CONTROL CONTENTS POWER ON POWER OFF VOLUME (0 - 60) MUTE ON MUTE OFF KEYSTONE (-127 - +127) DIGITAL SHIFT (-96 - +96) COMMAND PARAMETER ...

XG-C50X Operation Manual
Page 92
(RS-232C) Specifications and Command Settings BUTTONS & REMOTE CONTROL KEY CONTROL CONTENTS INPUT 1 RESIZE : NORMAL INPUT 1 RESIZE : FULL INPUT 1 RESIZE : DOT BY DOT INPUT 1 RESIZE : STRETCH INPUT 1 RESIZE : SMART STRETCH INPUT 2... I P _ _ _ 2 OK OR ERR V A P I M A S _ _ _ 0 OK OR ERR PICTURE -90 PICTURE CONTROL CONTENTS INPUT 3 BLUE (-30 - +30) INPUT 3 COLOR (-30 - +30) INPUT 3 TINT (-30 - +30) INPUT 3 SHARP (-30 - +30) INPUT 3 CLR TEMP (-3 - +3) INPUT 3 DISPLAY INPUT 3 ADJUSTMENT RESET INPUT 4 CONTRAST (-30 - +30) INPUT 4 BRIGHT (-30 - +30) INPUT 4 RED (-30 - +30) INPUT 4 BLUE (-30...
(RS-232C) Specifications and Command Settings BUTTONS & REMOTE CONTROL KEY CONTROL CONTENTS INPUT 1 RESIZE : NORMAL INPUT 1 RESIZE : FULL INPUT 1 RESIZE : DOT BY DOT INPUT 1 RESIZE : STRETCH INPUT 1 RESIZE : SMART STRETCH INPUT 2... I P _ _ _ 2 OK OR ERR V A P I M A S _ _ _ 0 OK OR ERR PICTURE -90 PICTURE CONTROL CONTENTS INPUT 3 BLUE (-30 - +30) INPUT 3 COLOR (-30 - +30) INPUT 3 TINT (-30 - +30) INPUT 3 SHARP (-30 - +30) INPUT 3 CLR TEMP (-3 - +3) INPUT 3 DISPLAY INPUT 3 ADJUSTMENT RESET INPUT 4 CONTRAST (-30 - +30) INPUT 4 BRIGHT (-30 - +30) INPUT 4 RED (-30 - +30) INPUT 4 BLUE (-30...

XG-C50X Operation Manual
Page 94
... Address Function Key Data Bit Data Expansion Mask Data Deter- Sharp remote control signal format Transmission format: 15-bit format D D ...1 00 0 0 0 00 1 0 1 0 1 0 1 1 01 1 1 1 11 1 1 1 0 1 0 1 1 00 1 1 1 01 0 1 1 0 1 0 1 1 01 1 1 1 01 0 1 1 0 1 0 1 1 00 0 1 0 11 0 1 1 0 1 0 1 1 01 0 1 0 11 0 0 1 0 1 0 1 1 00 1 1 0 11 0 0 1 0 1 0 1 1 00 1 0 0 11 0 0 1 0 1 0 1 1 01 1 0 0 11 0 0 1 0 Wired remote control function code LSB MSB C1 System Code C5 C6 1 0 1 1 0 * * Data Code * * * * C13 C14 C15 * * 1 0 • System codes C1 to D Common Data Bit Reverse in...
... Address Function Key Data Bit Data Expansion Mask Data Deter- Sharp remote control signal format Transmission format: 15-bit format D D ...1 00 0 0 0 00 1 0 1 0 1 0 1 1 01 1 1 1 11 1 1 1 0 1 0 1 1 00 1 1 1 01 0 1 1 0 1 0 1 1 01 1 1 1 01 0 1 1 0 1 0 1 1 00 0 1 0 11 0 1 1 0 1 0 1 1 01 0 1 0 11 0 0 1 0 1 0 1 1 00 1 1 0 11 0 0 1 0 1 0 1 1 00 1 0 0 11 0 0 1 0 1 0 1 1 01 1 0 0 11 0 0 1 0 Wired remote control function code LSB MSB C1 System Code C5 C6 1 0 1 1 0 * * Data Code * * * * C13 C14 C15 * * 1 0 • System codes C1 to D Common Data Bit Reverse in...


