
XG-C435X | XG-C465X Operation Manual
Page 1
Introduction Quick Start DATA PROJECTOR MODEL XG-C465X XG-C435X OPERATION MANUAL Setup Connections Basic Operation Useful Features Appendix
Introduction Quick Start DATA PROJECTOR MODEL XG-C465X XG-C435X OPERATION MANUAL Setup Connections Basic Operation Useful Features Appendix
XG-C435X | XG-C465X Operation Manual
Page 2
...the terminal which is also indicated on the pin face of in a safe manner. Carefully read through the operation instructions before operating the projector. Leggere attentamente le istruzioni per l'uso in inglese, tedesco, francese, spagnolo, italiano, olandese, svedese, portoghese, cinese e coreano. Leia... svenska, portugisiska, kinesiska och koreanska. In the unlikely event of this apparatus may occur. Lees de handleiding zorgvuldig door voor u de projector in English, German, French, Spanish, Italian, Dutch, Swedish, Portuguese, Chinese and Korean. DANGER: The fuse from the cut-off ...
...the terminal which is also indicated on the pin face of in a safe manner. Carefully read through the operation instructions before operating the projector. Leggere attentamente le istruzioni per l'uso in inglese, tedesco, francese, spagnolo, italiano, olandese, svedese, portoghese, cinese e coreano. Leia... svenska, portugisiska, kinesiska och koreanska. In the unlikely event of this apparatus may occur. Lees de handleiding zorgvuldig door voor u de projector in English, German, French, Spanish, Italian, Dutch, Swedish, Portuguese, Chinese and Korean. DANGER: The fuse from the cut-off ...
XG-C435X | XG-C465X Operation Manual
Page 3
...is a Class A product. ONLY WARNING: This is provided to persons. Introduction Before using the REGISTRATION CARD packed with the projector. 1. CONSUMER PRODUCT SAFETY ACT To ensure that the device complies with the operation manual, may be used in a residential ...Operation of important operating and maintenance (servicing) instructions in which case the user may cause harmful interference to your new SHARP Projector, using the projector, please read this equipment not expressly approved by the manufacturer could void the user's authority to correct the interference at...
...is a Class A product. ONLY WARNING: This is provided to persons. Introduction Before using the REGISTRATION CARD packed with the projector. 1. CONSUMER PRODUCT SAFETY ACT To ensure that the device complies with the operation manual, may be used in a residential ...Operation of important operating and maintenance (servicing) instructions in which case the user may cause harmful interference to your new SHARP Projector, using the projector, please read this equipment not expressly approved by the manufacturer could void the user's authority to correct the interference at...
XG-C435X | XG-C465X Operation Manual
Page 4
..., the Electronics Industries Alliance: www.eiae.org, the lamp recycling organization www.lamprecycle.org, or Sharp at 1-800-BE-SHARP. This very sophisticated panel contains 786,432 pixels (x RGB) TFT's (Thin Film Transistors). This SHARP projector uses an LCD (Liquid Crystal Display) panel. This unit has some inactive pixels within acceptable tolerances which may be...
..., the Electronics Industries Alliance: www.eiae.org, the lamp recycling organization www.lamprecycle.org, or Sharp at 1-800-BE-SHARP. This very sophisticated panel contains 786,432 pixels (x RGB) TFT's (Thin Film Transistors). This SHARP projector uses an LCD (Liquid Crystal Display) panel. This unit has some inactive pixels within acceptable tolerances which may be...
XG-C435X | XG-C465X Operation Manual
Page 5
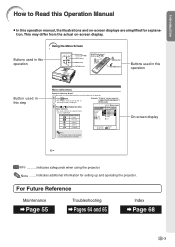
On-screen display -42 Info ...........Indicates safeguards when using the buttons on the projector. 1 Press MENU. • The "Picture" menu screen for the selected input mode is highlighted. This may differ from the actual on -screen displays are simplified...step Menu Selections Example: Adjusting "Bright" • This operation can also be performed by using the projector. RETURN ENTER END Note • The "Fine Sync" menu is not available for setting up and operating the projector. Introduction How to display the other menu screens. • The menu icon for the selected menu...
On-screen display -42 Info ...........Indicates safeguards when using the buttons on the projector. 1 Press MENU. • The "Picture" menu screen for the selected input mode is highlighted. This may differ from the actual on -screen displays are simplified...step Menu Selections Example: Adjusting "Bright" • This operation can also be performed by using the projector. RETURN ENTER END Note • The "Fine Sync" menu is not available for setting up and operating the projector. Introduction How to display the other menu screens. • The menu icon for the selected menu...
XG-C435X | XG-C465X Operation Manual
Page 6
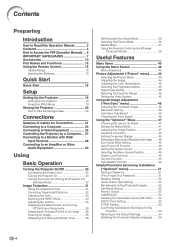
...Control 15 Usable Range 15 Inserting the Batteries 15 Quick Start Quick Start 16 Setup Setting Up the Projector 18 Setting Up the Projector 18 Projection (PRJ) Mode 19 Storing the Projector 20 How to Use the Storage Case 20 Connections Samples of Cables for Connection 21 Connecting to ...a Computer 23 Connecting to Video Equipment 25 Controlling the Projector by a Computer ... 27 Connecting to a Monitor with RGB Input Terminal 28 Connecting to an Amplifier or Other Audio Equipment 29 Using ...
...Control 15 Usable Range 15 Inserting the Batteries 15 Quick Start Quick Start 16 Setup Setting Up the Projector 18 Setting Up the Projector 18 Projection (PRJ) Mode 19 Storing the Projector 20 How to Use the Storage Case 20 Connections Samples of Cables for Connection 21 Connecting to ...a Computer 23 Connecting to Video Equipment 25 Controlling the Projector by a Computer ... 27 Connecting to a Monitor with RGB Input Terminal 28 Connecting to an Amplifier or Other Audio Equipment 29 Using ...
XG-C435X | XG-C465X Operation Manual
Page 7
... Replacing the Lamp 60 Removing and Installing the Lamp Unit 61 Resetting the Lamp Timer 62 Computer Compatibility Chart 63 Troubleshooting 64 For SHARP Assistance 66 Specifications 67 Index 68 SETUP MANUAL Refer to the "SETUP MANUAL" contained on the supplied CDROM for details. Setting up... Size and Projection Distance 3 Changing the Lens 9 Connecting Pin Assignments 11 RS-232C Specifications and Commands ... 13 Setting up the Projector Network Environment 18 Controlling the Projector via LAN 24 Setting up the Projector Using RS-232C or Telnet 29 Resetting the Lamp Timer of the...
... Replacing the Lamp 60 Removing and Installing the Lamp Unit 61 Resetting the Lamp Timer 62 Computer Compatibility Chart 63 Troubleshooting 64 For SHARP Assistance 66 Specifications 67 Index 68 SETUP MANUAL Refer to the "SETUP MANUAL" contained on the supplied CDROM for details. Setting up... Size and Projection Distance 3 Changing the Lens 9 Connecting Pin Assignments 11 RS-232C Specifications and Commands ... 13 Setting up the Projector Network Environment 18 Controlling the Projector via LAN 24 Setting up the Projector Using RS-232C or Telnet 29 Resetting the Lamp Timer of the...
XG-C435X | XG-C465X Operation Manual
Page 8
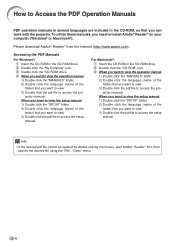
... click the "SETUP" folder. 2) Double click the language (name of the folder) that you want to view. 3) Double click the pdf file to access the projector manuals. For Macintosh®: 1 Insert the CD-ROM in the CD-ROM drive. 2 Double click the "My Computer" icon. 3 Double click the "CD-ROM"... to view the setup manual 1) Double click the "SETUP" folder. 2) Double click the language (name of the folder) that you can work with the projector. Info • If the desired pdf file cannot be opened by double clicking the mouse, start Adobe® Reader® first, then specify the desired...
... click the "SETUP" folder. 2) Double click the language (name of the folder) that you want to view. 3) Double click the pdf file to access the projector manuals. For Macintosh®: 1 Insert the CD-ROM in the CD-ROM drive. 2 Double click the "My Computer" icon. 3 Double click the "CD-ROM"... to view the setup manual 1) Double click the "SETUP" folder. 2) Double click the language (name of the folder) that you can work with the projector. Info • If the desired pdf file cannot be opened by double clicking the mouse, start Adobe® Reader® first, then specify the desired...

XG-C435X | XG-C465X Operation Manual
Page 10
... making viewing difficult. Internal cleaning should be within ±9 degrees of horizontal. Light falling directly on page 60. Rest your nearest Sharp Authorized Pro- Remove the projector power cord from 41°F to 95°F (+5°C to +35°C). ■ The storage temperature of 9 degrees. ... (see pages 58 and 59). ticles if lamp ruptures. As long as not to avoid personal injury caused by a Sharp Authorized Projector Dealer or Service Center. The projector may be installed in an area free from -4°F to 140°F (-20°C to direct sunlight or bright light...
... making viewing difficult. Internal cleaning should be within ±9 degrees of horizontal. Light falling directly on page 60. Rest your nearest Sharp Authorized Pro- Remove the projector power cord from 41°F to 95°F (+5°C to +35°C). ■ The storage temperature of 9 degrees. ... (see pages 58 and 59). ticles if lamp ruptures. As long as not to avoid personal injury caused by a Sharp Authorized Projector Dealer or Service Center. The projector may be installed in an area free from -4°F to 140°F (-20°C to direct sunlight or bright light...
XG-C435X | XG-C465X Operation Manual
Page 11
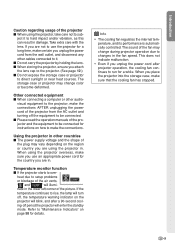
...shape of the plug may change color or become deformed. ing-off the equipment to be connected. ■ Please read the operation manuals of the projector and the equipment to use an appropriate power cord for the country you are in other audio- visual equipment to the... projector, make the connections AFTER unplugging the power cord of the projector from the wall outlet, and disconnect any other cables connected to it to make sure that the cooling fan has...
...shape of the plug may change color or become deformed. ing-off the equipment to be connected. ■ Please read the operation manuals of the projector and the equipment to use an appropriate power cord for the country you are in other audio- visual equipment to the... projector, make the connections AFTER unplugging the power cord of the projector from the wall outlet, and disconnect any other cables connected to it to make sure that the cooling fan has...
XG-C435X | XG-C465X Operation Manual
Page 12
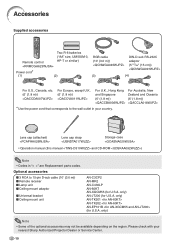
... on the region. Lens cap (attached) Lens cap strap Storage case • Operation manual (this manual and CD-ROM ) Note • Codes in your nearest Sharp Authorized Projector Dealer or Service Center. -10 Please check with your country. only) AN-JT200 (for U.S.A. Accessories Supplied accessories Remote control Two R-6 batteries ("AA" size, UM...
... on the region. Lens cap (attached) Lens cap strap Storage case • Operation manual (this manual and CD-ROM ) Note • Codes in your nearest Sharp Authorized Projector Dealer or Service Center. -10 Please check with your country. only) AN-JT200 (for U.S.A. Accessories Supplied accessories Remote control Two R-6 batteries ("AA" size, UM...
XG-C435X | XG-C465X Operation Manual
Page 13
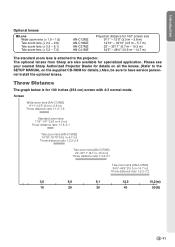
...30 40 50(ft) -11 Throw Distance The graph below is attached to have service personnel install the optional lenses. Please see your nearest Sharp Authorized Projector Dealer for details on all the lenses. (Refer to the SETUP MANUAL on the supplied CD-ROM for details.) Also, be sure to... the projector. The optional lenses from Sharp are also available for 100 inches (254 cm) screen with 4:3 normal mode. Introduction Optional lenses ■ Lens Wide-zoom lens (× 1.5 - ...
...30 40 50(ft) -11 Throw Distance The graph below is attached to have service personnel install the optional lenses. Please see your nearest Sharp Authorized Projector Dealer for details on all the lenses. (Refer to the SETUP MANUAL on the supplied CD-ROM for details.) Also, be sure to... the projector. The optional lenses from Sharp are also available for 100 inches (254 cm) screen with 4:3 normal mode. Introduction Optional lenses ■ Lens Wide-zoom lens (× 1.5 - ...
XG-C435X | XG-C465X Operation Manual
Page 14
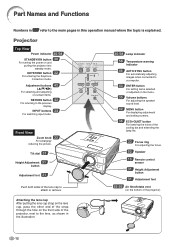
... 31 Height Adjustment button 31 Adjustment foot 55·56 Air filter/Intake vent (on the bottom of the projector) Attaching the lens cap After putting the lens cap strap on the lens cap, pass the other end of... hole on -screen items. RETURN button 43 For returning to the previous display. Projector Top View Power indicator 30·58 STANDBY/ON button 30 For turning the power on and putting the... projector into standby mode. INPUT buttons 34 For switching input mode. Part Names and Functions Numbers in...
... 31 Height Adjustment button 31 Adjustment foot 55·56 Air filter/Intake vent (on the bottom of the projector) Attaching the lens cap After putting the lens cap strap on the lens cap, pass the other end of... hole on -screen items. RETURN button 43 For returning to the previous display. Projector Top View Power indicator 30·58 STANDBY/ON button 30 For turning the power on and putting the... projector into standby mode. INPUT buttons 34 For switching input mode. Part Names and Functions Numbers in...
XG-C435X | XG-C465X Operation Manual
Page 15
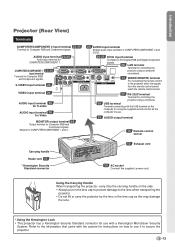
...to use with the USB terminal on the lens cap to prevent damage to the lens when transporting the projector. • Do not lift or carry the projector by the lens or the lens cap as the computer mouse. 29 AUDIO output terminal 15 Remote control sensor...DVI Digital RGB and Digital Component signals. 28 LAN terminal Terminal for controlling the projector using a computer via network. 14 WIRED REMOTE terminal For connecting the remote control to secure the projector. -13 Introduction Projector (Rear View) Terminals COMPUTER/COMPONENT 2 input terminal 23·25 Terminal for ...
...to use with the USB terminal on the lens cap to prevent damage to the lens when transporting the projector. • Do not lift or carry the projector by the lens or the lens cap as the computer mouse. 29 AUDIO output terminal 15 Remote control sensor...DVI Digital RGB and Digital Component signals. 28 LAN terminal Terminal for controlling the projector using a computer via network. 14 WIRED REMOTE terminal For connecting the remote control to secure the projector. -13 Introduction Projector (Rear View) Terminals COMPUTER/COMPONENT 2 input terminal 23·25 Terminal for ...
XG-C435X | XG-C465X Operation Manual
Page 16
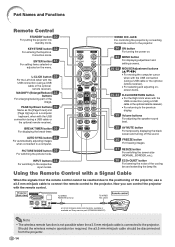
... optional remote receiver). AUTO SYNC button 46 For automatically adjusting images when connected to the projector. Using the Remote Control with the remote control. PAGE Up/Down buttons 39 Same as Sharp service part QCNWGA038WJPZ) Note • The wireless remote function is not possible when the... ø3.5 mm minijack cable is connected to the projector. PICTURE MODE button 36 For switching the picture mode. KEYSTONE...
... optional remote receiver). AUTO SYNC button 46 For automatically adjusting images when connected to the projector. Using the Remote Control with the remote control. PAGE Up/Down buttons 39 Same as Sharp service part QCNWGA038WJPZ) Note • The wireless remote function is not possible when the... ø3.5 mm minijack cable is connected to the projector. PICTURE MODE button 36 For switching the picture mode. KEYSTONE...

XG-C435X | XG-C465X Operation Manual
Page 17
... polarities correctly match the and marks inside the battery compart- Caution • Danger of explosion if battery is harmful to leak. In this projector may malfunction under a fluorescent lamp. Please follow the precautions below. ment. • Batteries of different types. • Do not mix new...be used to leak or explode. Note • The signal from leaked batteries is incorrectly replaced. Replace only with this case, move the projector away from the remote control once they are kept. flected off a screen for a long time. • Comply with the rules (ordinance)...
... polarities correctly match the and marks inside the battery compart- Caution • Danger of explosion if battery is harmful to leak. In this projector may malfunction under a fluorescent lamp. Please follow the precautions below. ment. • Batteries of different types. • Do not mix new...be used to leak or explode. Note • The signal from leaked batteries is incorrectly replaced. Replace only with this case, move the projector away from the remote control once they are kept. flected off a screen for a long time. • Comply with the rules (ordinance)...
XG-C435X | XG-C465X Operation Manual
Page 18
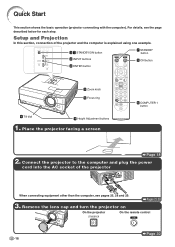
..., see pages 25, 28 and 29. Remove the lens cap and turn the projector on On the projector On the remote control Page 30 -16 Setup and Projection In this section, connection of the projector When connecting equipment other than the computer, see the page described below for each... step. Pages 23, 30 3. Place the projector facing a screen 6 COMPUTER 1 button Page 18 2. Connect the projector to the computer and plug the power cord into the AC socket of the projector and the computer is explained using one example. 3 7 STANDBY/ON button 6 ...
..., see pages 25, 28 and 29. Remove the lens cap and turn the projector on On the projector On the remote control Page 30 -16 Setup and Projection In this section, connection of the projector When connecting equipment other than the computer, see the page described below for each... step. Pages 23, 30 3. Place the projector facing a screen 6 COMPUTER 1 button Page 18 2. Connect the projector to the computer and plug the power cord into the AC socket of the projector and the computer is explained using one example. 3 7 STANDBY/ON button 6 ...
XG-C435X | XG-C465X Operation Manual
Page 19
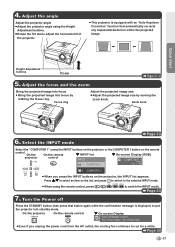
...1024 × 768 2 COMPUTER 2 • When you unplug the power cord from the AC outlet, the cooling fan continues to put the projector into focus by moving the zoom knob. Quick Start Height Adjustment buttons Tilt dial Pages 31, 32 5. Turn the Power off Press the STANDBY ...confirmation message is equipped with an "Auto Keystone Correction" function that automatically corrects any trapezoidal distortion within the projected image. On the projector On the remote control " On-screen Display • Even if you press the INPUT buttons on the remote control. Adjust ...
...1024 × 768 2 COMPUTER 2 • When you unplug the power cord from the AC outlet, the cooling fan continues to put the projector into focus by moving the zoom knob. Quick Start Height Adjustment buttons Tilt dial Pages 31, 32 5. Turn the Power off Press the STANDBY ...confirmation message is equipped with an "Auto Keystone Correction" function that automatically corrects any trapezoidal distortion within the projected image. On the projector On the remote control " On-screen Display • Even if you press the INPUT buttons on the remote control. Adjust ...
XG-C435X | XG-C465X Operation Manual
Page 20
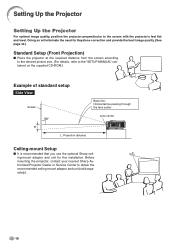
...For details, refer to obtain the recommended ceiling-mount adaptor and unit (sold separately). -18 Before mounting the projector, contact your nearest Sharp Authorized Projector Dealer or Service Center to the "SETUP MANUAL" contained on the supplied CD-ROM.) Example of standard setup Side...Ceiling-mount Setup ■ It is recommended that you use the optional Sharp ceiling-mount adaptor and unit for this installation. Setting Up the Projector Setting Up the Projector For optimal image quality, position the projector perpendicular to the screen with the projector's feet flat and level.
...For details, refer to obtain the recommended ceiling-mount adaptor and unit (sold separately). -18 Before mounting the projector, contact your nearest Sharp Authorized Projector Dealer or Service Center to the "SETUP MANUAL" contained on the supplied CD-ROM.) Example of standard setup Side...Ceiling-mount Setup ■ It is recommended that you use the optional Sharp ceiling-mount adaptor and unit for this installation. Setting Up the Projector Setting Up the Projector For optimal image quality, position the projector perpendicular to the screen with the projector's feet flat and level.
XG-C435X | XG-C465X Operation Manual
Page 21
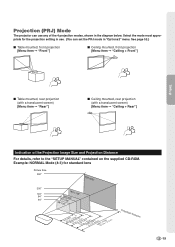
... of the Projection Image Size and Projection Distance For details, refer to the "SETUP MANUAL" contained on the supplied CD-ROM. Projection (PRJ) Mode The projector can use . (You can set the PRJ mode in "Options2" menu. See page 52.) ■ Table mounted, front projection [Menu item ➞ "Front"] ■ Ceiling...
... of the Projection Image Size and Projection Distance For details, refer to the "SETUP MANUAL" contained on the supplied CD-ROM. Projection (PRJ) Mode The projector can use . (You can set the PRJ mode in "Options2" menu. See page 52.) ■ Table mounted, front projection [Menu item ➞ "Front"] ■ Ceiling...


