
XG-C435X | XG-C465X Operation Manual
Page 1
Introduction Quick Start DATA PROJECTOR MODEL XG-C465X XG-C435X OPERATION MANUAL Setup Connections Basic Operation Useful Features Appendix
Introduction Quick Start DATA PROJECTOR MODEL XG-C465X XG-C435X OPERATION MANUAL Setup Connections Basic Operation Useful Features Appendix
XG-C435X | XG-C465X Operation Manual
Page 2
... as instruções de operação antes de operar o projetor. Carefully read through the operation instructions before operating the projector. Den medföljande CD-ROM-skivan innehåller bruksanvisningar på engelska, tyska, franska, spanska, italienska, holländska,... chino y coreano. IMPORTANT • For your assistance in reporting the loss or theft of your Projector, please record the Model and Serial Numbers located on the bottom of the projector and retain this product is fitted with a non-rewireable (moulded) plug incorporating a 10A fuse. Model...
... as instruções de operação antes de operar o projetor. Carefully read through the operation instructions before operating the projector. Den medföljande CD-ROM-skivan innehåller bruksanvisningar på engelska, tyska, franska, spanska, italienska, holländska,... chino y coreano. IMPORTANT • For your assistance in reporting the loss or theft of your Projector, please record the Model and Serial Numbers located on the bottom of the projector and retain this product is fitted with a non-rewireable (moulded) plug incorporating a 10A fuse. Model...
XG-C435X | XG-C465X Operation Manual
Page 3
... equilateral triangle, is intended to alert the user to the presence of uninsulated "dangerous voltage" within a triangle is to assure that SHARP may be required to persons. CAUTION: TO REDUCE THE RISK OF ELECTRIC SHOCK, DO NOT REMOVE COVER. The exclamation point within the... manual, may cause harmful interference to provide reasonable protection against harmful interference when the equipment is provided to your new SHARP Projector, using the projector, please read this equipment not expressly approved by the manufacturer could void the user's authority to comply with the limits...
... equilateral triangle, is intended to alert the user to the presence of uninsulated "dangerous voltage" within a triangle is to assure that SHARP may be required to persons. CAUTION: TO REDUCE THE RISK OF ELECTRIC SHOCK, DO NOT REMOVE COVER. The exclamation point within the... manual, may cause harmful interference to provide reasonable protection against harmful interference when the equipment is provided to your new SHARP Projector, using the projector, please read this equipment not expressly approved by the manufacturer could void the user's authority to comply with the limits...
XG-C435X | XG-C465X Operation Manual
Page 4
... BY DISCONNECTING THE POWER CORD. nies. During normal operation, when putting the projector into standby mode always use the STANDBY button on the projector or on page 60. Disposal of Apple Computer, Inc. This SHARP projector uses an LCD (Liquid Crystal Display) panel. This will not affect the picture quality or the life expectancy of...
... BY DISCONNECTING THE POWER CORD. nies. During normal operation, when putting the projector into standby mode always use the STANDBY button on the projector or on page 60. Disposal of Apple Computer, Inc. This SHARP projector uses an LCD (Liquid Crystal Display) panel. This will not affect the picture quality or the life expectancy of...
XG-C435X | XG-C465X Operation Manual
Page 5
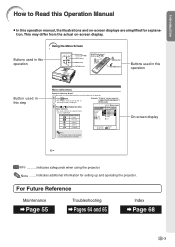
...Operation Manual • In this step Menu Selections Example: Adjusting "Bright" • This operation can also be performed by using the projector. For Future Reference Maintenance Page 55 Troubleshooting Pages 64 and 65 Index Page 68 -3 Buttons used in this operation Using the Menu ...the actual on -screen displays are simplified for explanation. On-screen display -42 Info ...........Indicates safeguards when using the buttons on the projector. 1 Press MENU. • The "Picture" menu screen for the selected input mode is highlighted. Menu icon Menu screen Picture Fine...
...Operation Manual • In this step Menu Selections Example: Adjusting "Bright" • This operation can also be performed by using the projector. For Future Reference Maintenance Page 55 Troubleshooting Pages 64 and 65 Index Page 68 -3 Buttons used in this operation Using the Menu ...the actual on -screen displays are simplified for explanation. On-screen display -42 Info ...........Indicates safeguards when using the buttons on the projector. 1 Press MENU. • The "Picture" menu screen for the selected input mode is highlighted. Menu icon Menu screen Picture Fine...
XG-C435X | XG-C465X Operation Manual
Page 6
...Control 15 Usable Range 15 Inserting the Batteries 15 Quick Start Quick Start 16 Setup Setting Up the Projector 18 Setting Up the Projector 18 Projection (PRJ) Mode 19 Storing the Projector 20 How to Use the Storage Case 20 Connections Samples of Cables for Connection 21 Connecting to ...a Computer 23 Connecting to Video Equipment 25 Controlling the Projector by a Computer ... 27 Connecting to a Monitor with RGB Input Terminal 28 Connecting to an Amplifier or Other Audio Equipment 29 Using ...
...Control 15 Usable Range 15 Inserting the Batteries 15 Quick Start Quick Start 16 Setup Setting Up the Projector 18 Setting Up the Projector 18 Projection (PRJ) Mode 19 Storing the Projector 20 How to Use the Storage Case 20 Connections Samples of Cables for Connection 21 Connecting to ...a Computer 23 Connecting to Video Equipment 25 Controlling the Projector by a Computer ... 27 Connecting to a Monitor with RGB Input Terminal 28 Connecting to an Amplifier or Other Audio Equipment 29 Using ...
XG-C435X | XG-C465X Operation Manual
Page 7
... Replacing the Lamp 60 Removing and Installing the Lamp Unit 61 Resetting the Lamp Timer 62 Computer Compatibility Chart 63 Troubleshooting 64 For SHARP Assistance 66 Specifications 67 Index 68 SETUP MANUAL Refer to the "SETUP MANUAL" contained on the supplied CDROM for details. Setting up... Size and Projection Distance 3 Changing the Lens 9 Connecting Pin Assignments 11 RS-232C Specifications and Commands ... 13 Setting up the Projector Network Environment 18 Controlling the Projector via LAN 24 Setting up the Projector Using RS-232C or Telnet 29 Resetting the Lamp Timer of the...
... Replacing the Lamp 60 Removing and Installing the Lamp Unit 61 Resetting the Lamp Timer 62 Computer Compatibility Chart 63 Troubleshooting 64 For SHARP Assistance 66 Specifications 67 Index 68 SETUP MANUAL Refer to the "SETUP MANUAL" contained on the supplied CDROM for details. Setting up... Size and Projection Distance 3 Changing the Lens 9 Connecting Pin Assignments 11 RS-232C Specifications and Commands ... 13 Setting up the Projector Network Environment 18 Controlling the Projector via LAN 24 Setting up the Projector Using RS-232C or Telnet 29 Resetting the Lamp Timer of the...
XG-C435X | XG-C465X Operation Manual
Page 8
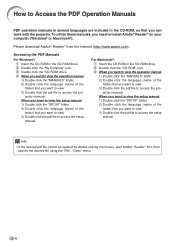
...the "MANUALS" folder. 2) Double click the language (name of the folder) that you want to view. 3) Double click the pdf file to access the projector manuals. To utilize these manuals, you want to view. 3) Double click the pdf file to access the setup manual. Please download Adobe® Reader®... operation manuals in several languages are included in the CD-ROM, so that you want to view. 3) Double click the pdf file to access the projector manuals. When you want to view the setup manual 1) Double click the "SETUP" folder. 2) Double click the language (name of the folder) that ...
...the "MANUALS" folder. 2) Double click the language (name of the folder) that you want to view. 3) Double click the pdf file to access the projector manuals. To utilize these manuals, you want to view. 3) Double click the pdf file to access the setup manual. Please download Adobe® Reader®... operation manuals in several languages are included in the CD-ROM, so that you want to view. 3) Double click the pdf file to access the projector manuals. When you want to view the setup manual 1) Double click the "SETUP" folder. 2) Double click the language (name of the folder) that ...
XG-C435X | XG-C465X Operation Manual
Page 10
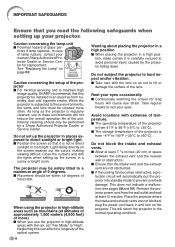
...not to hit or damage the surface of glass par- tion, make certain it is carefully secured to avoid personal injury caused by a Sharp Authorized Projector Dealer or Service Center. In case of space between the exhaust vent and the nearest wall or obstruction. ■ Ensure that the ... to 140°F (-20°C to +60°C). CAUTION PRECAUCIÓN PRÉCAUTION Caution concerning the setup of the projector ■ For minimal servicing and to maintain high image quality, SHARP recommends that this can affect the longevity of horizontal. Do not set "Fan Mode" to "High". The...
...not to hit or damage the surface of glass par- tion, make certain it is carefully secured to avoid personal injury caused by a Sharp Authorized Projector Dealer or Service Center. In case of space between the exhaust vent and the nearest wall or obstruction. ■ Ensure that the ... to 140°F (-20°C to +60°C). CAUTION PRECAUCIÓN PRÉCAUTION Caution concerning the setup of the projector ■ For minimal servicing and to maintain high image quality, SHARP recommends that this can affect the longevity of horizontal. Do not set "Fan Mode" to "High". The...
XG-C435X | XG-C465X Operation Manual
Page 11
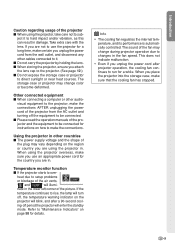
... due to run for a while. If the temperature continues to rise, the lamp will turn off, the temperature warning indicator on the projector will blink, and after projector operation, the cooling fan continues to changes in the fan speed. The sound of the fan may change color or become deformed. If ... or blockage of the air vents, " " and " " will enter the standby mode. This does not indicate malfunction. • Even if you are using the projector, take care not to hard impact and/or vibration, as this can result in damage. Temperature monitor function ■ If the...
... due to run for a while. If the temperature continues to rise, the lamp will turn off, the temperature warning indicator on the projector will blink, and after projector operation, the cooling fan continues to changes in the fan speed. The sound of the fan may change color or become deformed. If ... or blockage of the air vents, " " and " " will enter the standby mode. This does not indicate malfunction. • Even if you are using the projector, take care not to hard impact and/or vibration, as this can result in damage. Temperature monitor function ■ If the...
XG-C435X | XG-C465X Operation Manual
Page 12
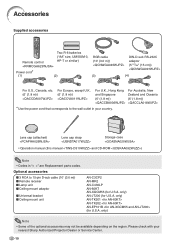
... Replacement parts codes. Lens cap (attached) Lens cap strap Storage case • Operation manual (this manual and CD-ROM ) Note • Codes in your nearest Sharp Authorized Projector Dealer or Service Center. -10
... Replacement parts codes. Lens cap (attached) Lens cap strap Storage case • Operation manual (this manual and CD-ROM ) Note • Codes in your nearest Sharp Authorized Projector Dealer or Service Center. -10
XG-C435X | XG-C465X Operation Manual
Page 13
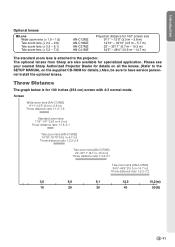
...' - 33'11" (6.7 m - 10.3 m) 34'5" - 48'4" (10.5 m - 14.7 m) The standard zoom lens is for 100 inches (254 cm) screen with 4:3 normal mode. Please see your nearest Sharp Authorized Projector Dealer for details on all the lenses. (Refer to the SETUP MANUAL on the supplied CD-ROM for specialized application. The optional lenses from...
...' - 33'11" (6.7 m - 10.3 m) 34'5" - 48'4" (10.5 m - 14.7 m) The standard zoom lens is for 100 inches (254 cm) screen with 4:3 normal mode. Please see your nearest Sharp Authorized Projector Dealer for details on all the lenses. (Refer to the SETUP MANUAL on the supplied CD-ROM for specialized application. The optional lenses from...
XG-C435X | XG-C465X Operation Manual
Page 14
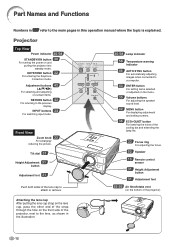
...button 31 Adjustment foot 55·56 Air filter/Intake vent (on the bottom of the projector) Attaching the lens cap After putting the lens cap strap on the lens cap, pass the other end of the... projector, next to the lens, as shown in this operation manual where the topic is explained. Adjustment buttons ... 34 For switching input mode. Front View Zoom knob 33 For enlarging/ reducing the picture. Projector Top View Power indicator 30·58 STANDBY/ON button 30 For turning the power on and putting the...
...button 31 Adjustment foot 55·56 Air filter/Intake vent (on the bottom of the projector) Attaching the lens cap After putting the lens cap strap on the lens cap, pass the other end of the... projector, next to the lens, as shown in this operation manual where the topic is explained. Adjustment buttons ... 34 For switching input mode. Front View Zoom knob 33 For enlarging/ reducing the picture. Projector Top View Power indicator 30·58 STANDBY/ON button 30 For turning the power on and putting the...
XG-C435X | XG-C465X Operation Manual
Page 15
...the system for use it by the carrying handle on the side. • Always put on how to secure the projector. -13 Using the Carrying Handle When transporting the projector, carry it to use with the USB terminal on the computer for using the supplied remote control as this may ... a Kensington Security Standard connector for instructions on the lens cap to prevent damage to the lens when transporting the projector. • Do not lift or carry the projector by the lens or the lens cap as the computer mouse. 29 AUDIO output terminal 15 Remote control sensor Carrying handle Intake...
...the system for use it by the carrying handle on the side. • Always put on how to secure the projector. -13 Using the Carrying Handle When transporting the projector, carry it to use with the USB terminal on the computer for using the supplied remote control as this may ... a Kensington Security Standard connector for instructions on the lens cap to prevent damage to the lens when transporting the projector. • Do not lift or carry the projector by the lens or the lens cap as the computer mouse. 29 AUDIO output terminal 15 Remote control sensor Carrying handle Intake...
XG-C435X | XG-C465X Operation Manual
Page 16
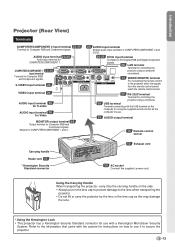
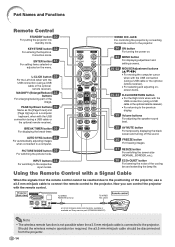
... be reached due to the positioning of the projector, use a ø3.5 mm minijack cable to connect the remote control to the projector. KEYSTONE button 32 For entering the Keystone Correction mode. PAGE Up/Down buttons 39 Same as Sharp service part QCNWGA038WJPZ) Note • The wireless... remote function is not possible when the ø3.5 mm minijack cable is connected to the projector. INPUT buttons 34 For switching to a computer. Using the Remote Control...
... be reached due to the positioning of the projector, use a ø3.5 mm minijack cable to connect the remote control to the projector. KEYSTONE button 32 For entering the Keystone Correction mode. PAGE Up/Down buttons 39 Same as Sharp service part QCNWGA038WJPZ) Note • The wireless... remote function is not possible when the ø3.5 mm minijack cable is connected to the projector. INPUT buttons 34 For switching to a computer. Using the Remote Control...

XG-C435X | XG-C465X Operation Manual
Page 17
...control Inserting the Batteries 1 Pull down in place. Using the Remote Control Introduction Usable Range The remote control can be used to control the projector within the ranges shown in can be using the remote control for easy operation. flected off a screen for a long time. • Comply... from the remote control once they are kept. Note • The signal from the fluorescent lamp. Replace only with this case, move the projector away from the remote control can cause them using a cloth. • The batteries included with alkaline or manganese batteries. • Insert the...
...control Inserting the Batteries 1 Pull down in place. Using the Remote Control Introduction Usable Range The remote control can be used to control the projector within the ranges shown in can be using the remote control for easy operation. flected off a screen for a long time. • Comply... from the remote control once they are kept. Note • The signal from the fluorescent lamp. Replace only with this case, move the projector away from the remote control can cause them using a cloth. • The batteries included with alkaline or manganese batteries. • Insert the...
XG-C435X | XG-C465X Operation Manual
Page 18
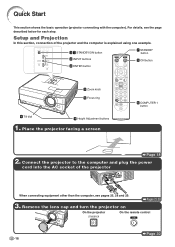
... ON button 5 Zoom knob 5 Focus ring 4 Tilt dial 4 Height Adjustment buttons 1. Pages 23, 30 3. Remove the lens cap and turn the projector on On the projector On the remote control Page 30 -16 For details, see pages 25, 28 and 29. Quick Start This section shows the basic operation... (projector connecting with the computer). Setup and Projection In this section, connection of the projector When connecting equipment other than the computer, see the page described below for each step. Place the...
... ON button 5 Zoom knob 5 Focus ring 4 Tilt dial 4 Height Adjustment buttons 1. Pages 23, 30 3. Remove the lens cap and turn the projector on On the projector On the remote control Page 30 -16 For details, see pages 25, 28 and 29. Quick Start This section shows the basic operation... (projector connecting with the computer). Setup and Projection In this section, connection of the projector When connecting equipment other than the computer, see the page described below for each step. Place the...
XG-C435X | XG-C465X Operation Manual
Page 19
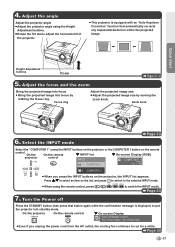
... on the list, and press to switch to the selected INPUT mode. • When using the INPUT buttons on the projector or the COMPUTER 1 button on the projector, the INPUT list appears. Zoom knob Zoom out Zoom in Page 33 6. Select the INPUT mode Select the "COMPUTER 1"... using the remote control, press / / / / to adjust the horizontal tilt of the projector. • This projector is displayed, to run for a while. Page 34 7. 4. Quick Start Height Adjustment buttons Tilt dial Pages 31, 32 5. Turn the Power off ...
... on the list, and press to switch to the selected INPUT mode. • When using the INPUT buttons on the projector or the COMPUTER 1 button on the projector, the INPUT list appears. Zoom knob Zoom out Zoom in Page 33 6. Select the INPUT mode Select the "COMPUTER 1"... using the remote control, press / / / / to adjust the horizontal tilt of the projector. • This projector is displayed, to run for a while. Page 34 7. 4. Quick Start Height Adjustment buttons Tilt dial Pages 31, 32 5. Turn the Power off ...
XG-C435X | XG-C465X Operation Manual
Page 20
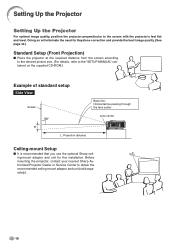
... you use the optional Sharp ceiling-mount adaptor and unit for this installation. Doing so will eliminate the need for Keystone correction and provide the best image quality. (See page 32.) Standard Setup (Front Projection) ■ Place the projector at the required distance from... the screen according to the desired picture size. (For details, refer to the screen with the projector's feet flat and level. Before mounting the projector, contact your nearest Sharp Authorized Projector Dealer or Service Center to obtain ...
... you use the optional Sharp ceiling-mount adaptor and unit for this installation. Doing so will eliminate the need for Keystone correction and provide the best image quality. (See page 32.) Standard Setup (Front Projection) ■ Place the projector at the required distance from... the screen according to the desired picture size. (For details, refer to the screen with the projector's feet flat and level. Before mounting the projector, contact your nearest Sharp Authorized Projector Dealer or Service Center to obtain ...
XG-C435X | XG-C465X Operation Manual
Page 21
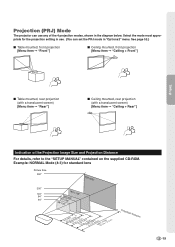
...;"60" 7'0("2-.81'm59"-'12(03.6."0-m1m)1-'11301.6"'(93m".6)-1m4-'124".33'(5m7.")1-2m8-'18".6 m5)8'(717"-.97m0'4-"21.4 m) Projection Distance -19 Projection (PRJ) Mode The projector can set the PRJ mode in "Options2" menu.
...;"60" 7'0("2-.81'm59"-'12(03.6."0-m1m)1-'11301.6"'(93m".6)-1m4-'124".33'(5m7.")1-2m8-'18".6 m5)8'(717"-.97m0'4-"21.4 m) Projection Distance -19 Projection (PRJ) Mode The projector can set the PRJ mode in "Options2" menu.


