XG-C330X , XG-C335X , XG-C430X Operation Manual
Page 1
Introduction Quick Start LCD PROJECTOR MODEL XG-C430X XG-C335X XG-C330X OPERATION MANUAL Setup Connections Basic Operation Useful Features Appendix
Introduction Quick Start LCD PROJECTOR MODEL XG-C430X XG-C335X XG-C330X OPERATION MANUAL Setup Connections Basic Operation Useful Features Appendix

XG-C330X , XG-C335X , XG-C430X Operation Manual
Page 3
.... In a domestic environment this operation manual carefully. CONSUMER PRODUCT SAFETY ACT To ensure that you immediately receive the full benefit of the parts, service and labor warranty applicable to your new SHARP Projector, using the projector, please read this product may be of...safety notification of inspection, modification, or recall that may be required to take adequate measures. -1 U.S.A. See bottom of projector. ment. ONLY WARNING: High brightness light source. Introduction Before using the REGISTRATION CARD packed with the limits for prompt ...
.... In a domestic environment this operation manual carefully. CONSUMER PRODUCT SAFETY ACT To ensure that you immediately receive the full benefit of the parts, service and labor warranty applicable to your new SHARP Projector, using the projector, please read this product may be of...safety notification of inspection, modification, or recall that may be required to take adequate measures. -1 U.S.A. See bottom of projector. ment. ONLY WARNING: High brightness light source. Introduction Before using the REGISTRATION CARD packed with the limits for prompt ...

XG-C330X , XG-C335X , XG-C430X Operation Manual
Page 5
... 1 (RGB) mode 2 Press | or \ to Read this Operation Manual • In this step Menu Selections Example: Adjusting "Bright" • This operation can also be performed by using the projector. Note ........Indicates additional information for explanation. Menu icon Menu screen Picture Fine...Options2 Language SEL./ADJ. This may differ from the actual on -screen displays are simplified for setting up and operating the projector. Buttons used in this operation Using the Menu Screen Adjustment buttons ('/"/\/|) ENTER button MENU button RETURN button MOUSE/Adjustment buttons...
... 1 (RGB) mode 2 Press | or \ to Read this Operation Manual • In this step Menu Selections Example: Adjusting "Bright" • This operation can also be performed by using the projector. Note ........Indicates additional information for explanation. Menu icon Menu screen Picture Fine...Options2 Language SEL./ADJ. This may differ from the actual on -screen displays are simplified for setting up and operating the projector. Buttons used in this operation Using the Menu Screen Adjustment buttons ('/"/\/|) ENTER button MENU button RETURN button MOUSE/Adjustment buttons...
XG-C330X , XG-C335X , XG-C430X Operation Manual
Page 6
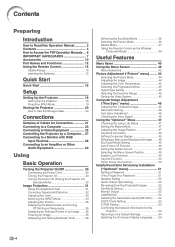
... How to Read this Operation Manual 3 Contents 4 How to Access the PDF Operation Manuals ... 6 IMPORTANT SAFEGUARDS 7 Accessories 10 Part Names and Functions 12 Using the Remote Control 15 Usable Range 15 Inserting the Batteries 15 Quick Start Quick Start 16 Setup Setting Up the Projector 18 Setting Up the Projector 18 Projection (PRJ) Mode...
... How to Read this Operation Manual 3 Contents 4 How to Access the PDF Operation Manuals ... 6 IMPORTANT SAFEGUARDS 7 Accessories 10 Part Names and Functions 12 Using the Remote Control 15 Usable Range 15 Inserting the Batteries 15 Quick Start Quick Start 16 Setup Setting Up the Projector 18 Setting Up the Projector 18 Projection (PRJ) Mode...
XG-C330X , XG-C335X , XG-C430X Operation Manual
Page 7
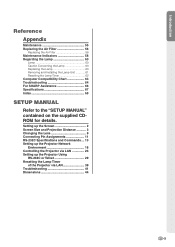
...Assignments 11 RS-232C Specifications and Commands ... 13 Setting up the Projector Network Environment 18 Controlling the Projector via LAN 24 Setting up the Projector Using RS-232C or Telnet 29 Resetting the Lamp Timer of the Projector via LAN 39 Troubleshooting 41 Dimensions 44 -5 Introduction Reference Appendix ...Removing and Installing the Lamp Unit 61 Resetting the Lamp Timer 62 Computer Compatibility Chart 63 Troubleshooting 64 For SHARP Assistance 66 Specifications 67 Index 68 SETUP MANUAL Refer to the "SETUP MANUAL" contained on the supplied CDROM for details.
...Assignments 11 RS-232C Specifications and Commands ... 13 Setting up the Projector Network Environment 18 Controlling the Projector via LAN 24 Setting up the Projector Using RS-232C or Telnet 29 Resetting the Lamp Timer of the Projector via LAN 39 Troubleshooting 41 Dimensions 44 -5 Introduction Reference Appendix ...Removing and Installing the Lamp Unit 61 Resetting the Lamp Timer 62 Computer Compatibility Chart 63 Troubleshooting 64 For SHARP Assistance 66 Specifications 67 Index 68 SETUP MANUAL Refer to the "SETUP MANUAL" contained on the supplied CDROM for details.
XG-C330X , XG-C335X , XG-C430X Operation Manual
Page 8
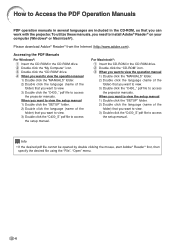
...folder. 2) Double click the language (name of the folder) that you want to view. 3) Double click the "C430_S" pdf file to access the projector manuals. Info • If the desired pdf file cannot be opened by double clicking the mouse, start Adobe® Reader® first, then specify the... of the folder) that you want to view. 3) Double click the "C430_S" pdf file to access the projector manuals. To utilize these manuals, you need to Access the PDF Operation Manuals PDF operation manuals in several languages are included in the CD-ROM drive. 2 Double click the "CD-ROM" icon. 3 When...
...folder. 2) Double click the language (name of the folder) that you want to view. 3) Double click the "C430_S" pdf file to access the projector manuals. Info • If the desired pdf file cannot be opened by double clicking the mouse, start Adobe® Reader® first, then specify the... of the folder) that you want to view. 3) Double click the "C430_S" pdf file to access the projector manuals. To utilize these manuals, you need to Access the PDF Operation Manuals PDF operation manuals in several languages are included in the CD-ROM drive. 2 Double click the "CD-ROM" icon. 3 When...
XG-C330X , XG-C335X , XG-C430X Operation Manual
Page 11
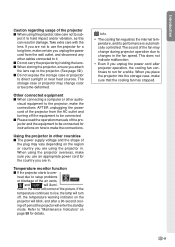
..., make sure you unplug the power cord from the AC outlet and turning off the equipment to be connected. ■ Please read the operation manuals of the projector and the equipment to be connected for details. heat due to setup problems or blockage of the air vents, " " and " " will blink..., and after projector operation, the cooling fan continues to use the projector for a long time, make sure that the cooling fan has stopped. -9 If you are not to run for the country you...
..., make sure you unplug the power cord from the AC outlet and turning off the equipment to be connected. ■ Please read the operation manuals of the projector and the equipment to be connected for details. heat due to setup problems or blockage of the air vents, " " and " " will blink..., and after projector operation, the cooling fan continues to use the projector for a long time, make sure that the cooling fan has stopped. -9 If you are not to run for the country you...

XG-C330X , XG-C335X , XG-C430X Operation Manual
Page 12
..." (15 cm)) QCNWGA015WJPZ Lens cap (attached) Lens cap strap PCAPHA026WJSA UBNDTA017WJZZ Storage case GCASNA020WJSA • Operation manual (this manual (TINS-D048WJZZ) and CD-ROM (UDSKAA087WJZZ)) Optional accessories ■ 3 RCA to the wall outlet in your nearest Sharp Authorized Projector Dealer or Service Center. -10 Accessories Supplied accessories Remote control RRMCGA502WJSA Two R-6 batteries ("AA" size...
..." (15 cm)) QCNWGA015WJPZ Lens cap (attached) Lens cap strap PCAPHA026WJSA UBNDTA017WJZZ Storage case GCASNA020WJSA • Operation manual (this manual (TINS-D048WJZZ) and CD-ROM (UDSKAA087WJZZ)) Optional accessories ■ 3 RCA to the wall outlet in your nearest Sharp Authorized Projector Dealer or Service Center. -10 Accessories Supplied accessories Remote control RRMCGA502WJSA Two R-6 batteries ("AA" size...
XG-C330X , XG-C335X , XG-C430X Operation Manual
Page 13
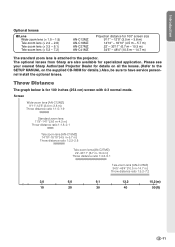
... (10.5 m-14.7 m) Throw distance ratio 1:5.2-7.2 3.0 6.0 9.1 12.2 15.2(m) 10 20 30 40 50(ft) -11 The optional lenses from Sharp are also available for 100 inches (254 cm) screen with 4:3 normal mode. Throw Distance The graph below is attached to have service personnel install the... optional lenses. Please see your nearest Sharp Authorized Projector Dealer for details on all the lenses. (Refer to the SETUP MANUAL on the supplied CD-ROM for details.) Also, be sure to the projector. Introduction Optional lenses ■ Lens Wide-zoom lens (× ...
... (10.5 m-14.7 m) Throw distance ratio 1:5.2-7.2 3.0 6.0 9.1 12.2 15.2(m) 10 20 30 40 50(ft) -11 The optional lenses from Sharp are also available for 100 inches (254 cm) screen with 4:3 normal mode. Throw Distance The graph below is attached to have service personnel install the... optional lenses. Please see your nearest Sharp Authorized Projector Dealer for details on all the lenses. (Refer to the SETUP MANUAL on the supplied CD-ROM for details.) Also, be sure to the projector. Introduction Optional lenses ■ Lens Wide-zoom lens (× ...

XG-C330X , XG-C335X , XG-C430X Operation Manual
Page 14
...31 Adjustment foot 55·56 Air filter/Intake vent (on the bottom of the projector) Attaching the lens cap After putting the lens cap strap on the lens cap, pass the other end of... the projector, next to the main pages in the illustration. -12 INPUT buttons 34 For switching input mode....picture. Part Names and Functions Numbers in refer to the lens, as shown in this operation manual where the topic is explained. Projector Top View Power indicator 30·58 STANDBY/ON button 30 For turning the power on and ...
...31 Adjustment foot 55·56 Air filter/Intake vent (on the bottom of the projector) Attaching the lens cap After putting the lens cap strap on the lens cap, pass the other end of... the projector, next to the main pages in the illustration. -12 INPUT buttons 34 For switching input mode....picture. Part Names and Functions Numbers in refer to the lens, as shown in this operation manual where the topic is explained. Projector Top View Power indicator 30·58 STANDBY/ON button 30 For turning the power on and ...
XG-C330X , XG-C335X , XG-C430X Operation Manual
Page 20
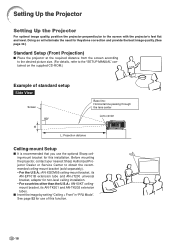
..., refer to the "SETUP MANUAL" contained on the supplied CD-ROM.) Example of this installation. Before mounting the projector, contact your nearest Sharp Authorized Projector Dealer or Service Center to the screen with the projector's feet flat and level. Setting Up the Projector Setting Up the Projector For optimal image quality, position the projector perpendicular to obtain the...
..., refer to the "SETUP MANUAL" contained on the supplied CD-ROM.) Example of this installation. Before mounting the projector, contact your nearest Sharp Authorized Projector Dealer or Service Center to the screen with the projector's feet flat and level. Setting Up the Projector Setting Up the Projector For optimal image quality, position the projector perpendicular to obtain the...
XG-C330X , XG-C335X , XG-C430X Operation Manual
Page 21
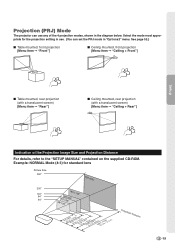
..."-'12(03.6."0-m1m)1-'11301.6"'(93m".6)-1m4-'124".33'(5m7.")1-2m8-'18".6 m5)8'(717"-.97m0'4-"21.4 m) Projection Distance -19 Projection (PRJ) Mode The projector can use . (You can set the PRJ mode in the diagram below. Example: NORMAL Mode (4:3) for the projection setting in use any ...of the Projection Image Size and Projection Distance For details, refer to the "SETUP MANUAL" contained on the supplied CD-ROM. See page 52.) ■ Table mounted, front projection [Menu item ➞ "Front"] ■ Ceiling mounted...
..."-'12(03.6."0-m1m)1-'11301.6"'(93m".6)-1m4-'124".33'(5m7.")1-2m8-'18".6 m5)8'(717"-.97m0'4-"21.4 m) Projection Distance -19 Projection (PRJ) Mode The projector can use . (You can set the PRJ mode in the diagram below. Example: NORMAL Mode (4:3) for the projection setting in use any ...of the Projection Image Size and Projection Distance For details, refer to the "SETUP MANUAL" contained on the supplied CD-ROM. See page 52.) ■ Table mounted, front projection [Menu item ➞ "Front"] ■ Ceiling mounted...

XG-C330X , XG-C335X , XG-C430X Operation Manual
Page 23
... 2 Terminal Connect with the cable adaptor, etc. Equipment Computer Terminal on connected equipment RGB cable (supplied) Cable Terminal on the projector COMPUTER/ COMPONENT 1, 2 RGB output terminal Audio-visual equipment DVI digital video output terminal Audio output terminal DVI Digital cable (commercially ... stereo or mono audio cable (commercially available or available as Sharp service part QCNWGA038WJPZ) DVI-D AUDIO (for Connection • For more details of connection and cables, refer to the operation manual of the connecting equipment. • You may need other cables...
... 2 Terminal Connect with the cable adaptor, etc. Equipment Computer Terminal on connected equipment RGB cable (supplied) Cable Terminal on the projector COMPUTER/ COMPONENT 1, 2 RGB output terminal Audio-visual equipment DVI digital video output terminal Audio output terminal DVI Digital cable (commercially ... stereo or mono audio cable (commercially available or available as Sharp service part QCNWGA038WJPZ) DVI-D AUDIO (for Connection • For more details of connection and cables, refer to the operation manual of the connecting equipment. • You may need other cables...

XG-C330X , XG-C335X , XG-C430X Operation Manual
Page 25
...To COMPUTER/ COMPONENT 1 input terminal To AUDIO input terminal RGB cable * ø3.5 mm stereo or mono audio cable (commercially available or available as Sharp service part QCNWGA038WJPZ) * When using the ø3.5 mm mono audio cable, the volume level will be half of when using the ø3.5 mm... signals other devices. Connecting to a Computer Before connecting, ensure the power cord of the projector from the AC outlet is unplugged, and that it is the last device to enable your computer's operation manual to be turned on after all connections, turn on the computer you are using...
...To COMPUTER/ COMPONENT 1 input terminal To AUDIO input terminal RGB cable * ø3.5 mm stereo or mono audio cable (commercially available or available as Sharp service part QCNWGA038WJPZ) * When using the ø3.5 mm mono audio cable, the volume level will be half of when using the ø3.5 mm... signals other devices. Connecting to a Computer Before connecting, ensure the power cord of the projector from the AC outlet is unplugged, and that it is the last device to enable your computer's operation manual to be turned on after all connections, turn on the computer you are using...
XG-C330X , XG-C335X , XG-C430X Operation Manual
Page 29
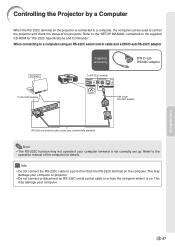
...the status of the computer for "RS-232C Specifications and Commands". Info • Do not connect the RS-232C cable to the operation manual of the projector. This may damage your computer terminal is on. This may not operate if your computer. Refer to a port other than the RS-232C...cable (cross type, commercially available) Note • The RS-232C function may damage your computer or projector. • Do not connect or disconnect an RS-232C serial control cable to the "SETUP MANUAL" contained on the computer. Refer to or from the computer while it is not correctly set up....
...the status of the computer for "RS-232C Specifications and Commands". Info • Do not connect the RS-232C cable to the operation manual of the projector. This may damage your computer terminal is on. This may not operate if your computer. Refer to a port other than the RS-232C...cable (cross type, commercially available) Note • The RS-232C function may damage your computer or projector. • Do not connect or disconnect an RS-232C serial control cable to the "SETUP MANUAL" contained on the computer. Refer to or from the computer while it is not correctly set up....

XG-C330X , XG-C335X , XG-C430X Operation Manual
Page 33
... site is adjustable within approximately 2 degrees. • When adjusting the height of the projector, trapezoidal distortion occurs. When you want to adjust the automatically corrected image, use the manual keystone correction. (See page 32.) Top View Height Adjustment button Info • Do ...not press the Height Adjustment button when the adjustment feet come out. 2 Lift the projector to get your hands from the Height Adjustment...
... site is adjustable within approximately 2 degrees. • When adjusting the height of the projector, trapezoidal distortion occurs. When you want to adjust the automatically corrected image, use the manual keystone correction. (See page 32.) Top View Height Adjustment button Info • Do ...not press the Height Adjustment button when the adjustment feet come out. 2 Lift the projector to get your hands from the Height Adjustment...

XG-C330X , XG-C335X , XG-C430X Operation Manual
Page 34
... of the Keystone Correction mode will disappear. • You can also use KEYSTONE on the projector. -32 KEYSTONE button MOUSE/Adjustment buttons ('/"/\/|) RETURN button "On-screen Display (Keystone Correction mode) Compresses upper side. Note • The Manual Keystone Correction can be adjusted up to an angle of approximately ±40 degrees and...
... of the Keystone Correction mode will disappear. • You can also use KEYSTONE on the projector. -32 KEYSTONE button MOUSE/Adjustment buttons ('/"/\/|) RETURN button "On-screen Display (Keystone Correction mode) Compresses upper side. Note • The Manual Keystone Correction can be adjusted up to an angle of approximately ±40 degrees and...

XG-C330X , XG-C335X , XG-C430X Operation Manual
Page 41
...Versions earlier than Windows® NT4.0 • Versions earlier than XGA are being input and you cannot operate the mouse function. -39 Using the Remote Control as the Wireless Computer Mouse When connecting the projector and the computer with a USB cable USB terminal Computer Basic Operation... Point the remote control at or the USB remote receiver (AN-MR2, optional) To USB terminal USB cable (commercially available or available as Sharp service part QCNWGA014WJPZ) The...
...Versions earlier than Windows® NT4.0 • Versions earlier than XGA are being input and you cannot operate the mouse function. -39 Using the Remote Control as the Wireless Computer Mouse When connecting the projector and the computer with a USB cable USB terminal Computer Basic Operation... Point the remote control at or the USB remote receiver (AN-MR2, optional) To USB terminal USB cable (commercially available or available as Sharp service part QCNWGA014WJPZ) The...

XG-C330X , XG-C335X , XG-C430X Operation Manual
Page 50
Using the "Options1" Menu 4 Keystone Correction When the image is active. Manual Correction \ button | button Menu operation Page 42 6 Selecting a Startup and Background Image Selectable items Description Logo SHARP default image Blue Blue screen None Black screen 7 Eco/Quiet Mode Setting Selectable ... Note • When "Eco/Quiet Mode" is detected for correcting trapezoidal distortion is set to turn the on-screen messages on Projector are displayed. will extend. (Projection brightness decreases 20%.) • You can be disabled. Off • INPUT mode/VOLUME/AV ...
Using the "Options1" Menu 4 Keystone Correction When the image is active. Manual Correction \ button | button Menu operation Page 42 6 Selecting a Startup and Background Image Selectable items Description Logo SHARP default image Blue Blue screen None Black screen 7 Eco/Quiet Mode Setting Selectable ... Note • When "Eco/Quiet Mode" is detected for correcting trapezoidal distortion is set to turn the on-screen messages on Projector are displayed. will extend. (Projection brightness decreases 20%.) • You can be disabled. Off • INPUT mode/VOLUME/AV ...

XG-C330X , XG-C335X , XG-C430X Operation Manual
Page 52
...the operation with the remote control buttons. • You cannot use the keylock function while the projector is warming up. ■ Taking the Keylock Off Hold down ENTER and STANDBY/ON on the projector simultaneously for about 5 seconds. Info • You can release the keylock by holding down ...when signals are entered to start projection. Failure to enter the keycode will not be displayed, even if the projector receives the input signal. Disable The projector is turned on manually (see page 30), and does not turn on automatically when the power cord is plugged into the AC ...
...the operation with the remote control buttons. • You cannot use the keylock function while the projector is warming up. ■ Taking the Keylock Off Hold down ENTER and STANDBY/ON on the projector simultaneously for about 5 seconds. Info • You can release the keylock by holding down ...when signals are entered to start projection. Failure to enter the keycode will not be displayed, even if the projector receives the input signal. Disable The projector is turned on manually (see page 30), and does not turn on automatically when the power cord is plugged into the AC ...


