
XG-C330X , XG-C335X , XG-C430X Operation Manual
Page 3
... DO NOT REMOVE SCREWS EXCEPT SPECIFIED USER SERVICE SCREW. WARNING: FCC Regulations state that SHARP may cause harmful interference to operate this product to the presence of the parts, service and labor warranty applicable to ensure that children do not expose this equip-... "LIMITED WARRANTY" CLAUSE. NO USER-SERVICEABLE PARTS EXCEPT LAMP UNIT. The exclamation point within the product's enclosure that may be required to persons. ONLY WARNING: This is provided to your new SHARP Projector, using the projector, please read this operation manual carefully. WARNING...
... DO NOT REMOVE SCREWS EXCEPT SPECIFIED USER SERVICE SCREW. WARNING: FCC Regulations state that SHARP may cause harmful interference to operate this product to the presence of the parts, service and labor warranty applicable to ensure that children do not expose this equip-... "LIMITED WARRANTY" CLAUSE. NO USER-SERVICEABLE PARTS EXCEPT LAMP UNIT. The exclamation point within the product's enclosure that may be required to persons. ONLY WARNING: This is provided to your new SHARP Projector, using the projector, please read this operation manual carefully. WARNING...
XG-C330X , XG-C335X , XG-C430X Operation Manual
Page 6
... IMPORTANT SAFEGUARDS 7 Accessories 10 Part Names and Functions 12 Using the Remote Control 15 Usable Range 15 Inserting the Batteries 15 Quick Start Quick Start 16 Setup Setting Up the Projector 18 Setting Up the Projector 18 Projection (PRJ) Mode 19 Storing the Projector 20 How to Use the ...Storage Case 20 Connections Samples of Cables for Connection 21 Connecting to a Computer 23 Connecting to Video Equipment 25 Controlling the Projector by a Computer ... 27 Connecting to a Monitor with RGB Input Terminal 28 Connecting to an Amplifier or Other Audio Equipment 29 Using...
... IMPORTANT SAFEGUARDS 7 Accessories 10 Part Names and Functions 12 Using the Remote Control 15 Usable Range 15 Inserting the Batteries 15 Quick Start Quick Start 16 Setup Setting Up the Projector 18 Setting Up the Projector 18 Projection (PRJ) Mode 19 Storing the Projector 20 How to Use the ...Storage Case 20 Connections Samples of Cables for Connection 21 Connecting to a Computer 23 Connecting to Video Equipment 25 Controlling the Projector by a Computer ... 27 Connecting to a Monitor with RGB Input Terminal 28 Connecting to an Amplifier or Other Audio Equipment 29 Using...

XG-C330X , XG-C335X , XG-C430X Operation Manual
Page 9
... use instructions should be walked on a bed, sofa, rug, or other products (including amplifiers) that the service technician has used replacement parts specified by the manufacturer. 9. Water and Moisture Do not use a mounting accessory recommended by the manufacturer or have the same characteristics as ...has been dropped or damaged in damage and will only fit into the power outlet, please contact your personal safety. f. Replacement Parts When replacement parts are not likely to . 11. Wall or Ceiling Mounting This product should be mounted to a wall or ceiling only as ...
... use instructions should be walked on a bed, sofa, rug, or other products (including amplifiers) that the service technician has used replacement parts specified by the manufacturer. 9. Water and Moisture Do not use a mounting accessory recommended by the manufacturer or have the same characteristics as ...has been dropped or damaged in damage and will only fit into the power outlet, please contact your personal safety. f. Replacement Parts When replacement parts are not likely to . 11. Wall or Ceiling Mounting This product should be mounted to a wall or ceiling only as ...

XG-C330X , XG-C335X , XG-C430X Operation Manual
Page 14
.... 52 Speaker 15 Remote control sensor 31 Height Adjustment button 31 Adjustment foot 55·56 Air filter/Intake vent (on the bottom of the projector) Attaching the lens cap After putting the lens cap strap on the lens cap, pass the other end of the strap through the hole on... standby mode. Projector Top View Power indicator 30·58 STANDBY/ON button 30 For turning the power on the front side of the projector, next to the previous display. KEYSTONE button 32 For entering the Keystone Correction mode. Part Names and Functions Numbers in refer to the main pages in the illustration...
.... 52 Speaker 15 Remote control sensor 31 Height Adjustment button 31 Adjustment foot 55·56 Air filter/Intake vent (on the bottom of the projector) Attaching the lens cap After putting the lens cap strap on the lens cap, pass the other end of the strap through the hole on... standby mode. Projector Top View Power indicator 30·58 STANDBY/ON button 30 For turning the power on the front side of the projector, next to the previous display. KEYSTONE button 32 For entering the Keystone Correction mode. Part Names and Functions Numbers in refer to the main pages in the illustration...
XG-C330X , XG-C335X , XG-C430X Operation Manual
Page 16
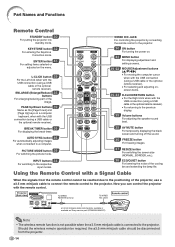
... Using the Remote Control with the remote control. Now you can control the projector with a Signal Cable When the signals from the projector. -14 ENLARGE (Enlarge/Reduce) 35 buttons For enlarging/reducing part of the cooling fan and extending the lamp life. PICTURE MODE button 36 ... ø3.5 mm minijack cable to connect the remote control to the projector. Part Names and Functions Remote Control STANDBY button 30 For putting the projector into standby mode. PAGE Up/Down buttons 39 Same as Sharp service part QCNWGA038WJPZ) Note • The wireless remote function is not possible when...
... Using the Remote Control with the remote control. Now you can control the projector with a Signal Cable When the signals from the projector. -14 ENLARGE (Enlarge/Reduce) 35 buttons For enlarging/reducing part of the cooling fan and extending the lamp life. PICTURE MODE button 36 ... ø3.5 mm minijack cable to connect the remote control to the projector. Part Names and Functions Remote Control STANDBY button 30 For putting the projector into standby mode. PAGE Up/Down buttons 39 Same as Sharp service part QCNWGA038WJPZ) Note • The wireless remote function is not possible when...

XG-C330X , XG-C335X , XG-C430X Operation Manual
Page 23
... equipment RGB cable (supplied) Cable Terminal on the projector COMPUTER/ COMPONENT 1, 2 RGB output terminal Audio-visual equipment DVI digital video output terminal Audio output terminal DVI Digital cable (commercially available) ø3.5 mm stereo or mono audio cable (commercially available or available as Sharp service part QCNWGA038WJPZ) DVI-D AUDIO (for COMPUTER/ COMPONENT 1, 2, DVI-D) DVI...
... equipment RGB cable (supplied) Cable Terminal on the projector COMPUTER/ COMPONENT 1, 2 RGB output terminal Audio-visual equipment DVI digital video output terminal Audio output terminal DVI Digital cable (commercially available) ø3.5 mm stereo or mono audio cable (commercially available or available as Sharp service part QCNWGA038WJPZ) DVI-D AUDIO (for COMPUTER/ COMPONENT 1, 2, DVI-D) DVI...

XG-C330X , XG-C335X , XG-C430X Operation Manual
Page 25
... a list of computer signals compatible with computer signals other devices. Connecting to a Computer Before connecting, ensure the power cord of the projector from the AC outlet is for the former.) Supplied accessory RGB cable Computer To audio output terminal To RGB output terminal To COMPUTER/ ...COMPONENT 1 input terminal To AUDIO input terminal RGB cable * ø3.5 mm stereo or mono audio cable (commercially available or available as Sharp service part QCNWGA038WJPZ) * When using the ø3.5 mm mono audio cable, the volume level will be half of when using the ø3.5 mm...
... a list of computer signals compatible with computer signals other devices. Connecting to a Computer Before connecting, ensure the power cord of the projector from the AC outlet is for the former.) Supplied accessory RGB cable Computer To audio output terminal To RGB output terminal To COMPUTER/ ...COMPONENT 1 input terminal To AUDIO input terminal RGB cable * ø3.5 mm stereo or mono audio cable (commercially available or available as Sharp service part QCNWGA038WJPZ) * When using the ø3.5 mm mono audio cable, the volume level will be half of when using the ø3.5 mm...

XG-C330X , XG-C335X , XG-C430X Operation Manual
Page 26
... direct input of when using the ø3.5 mm stereo audio cable. -24 Connecting to a Computer When connecting with a DVI digital cable The projector employs the DVI digital input terminal for DVI-D) DVI Digital cable (commercially available) To DVI-D input terminal * ø3.5 mm stereo or mono ...audio cable (commercially available or available as Sharp service part QCNWGA038WJPZ) * When using the ø3.5 mm mono audio cable, the volume level will be half of Digital Video signals from a computer.
... direct input of when using the ø3.5 mm stereo audio cable. -24 Connecting to a Computer When connecting with a DVI digital cable The projector employs the DVI digital input terminal for DVI-D) DVI Digital cable (commercially available) To DVI-D input terminal * ø3.5 mm stereo or mono ...audio cable (commercially available or available as Sharp service part QCNWGA038WJPZ) * When using the ø3.5 mm mono audio cable, the volume level will be half of Digital Video signals from a computer.

XG-C330X , XG-C335X , XG-C430X Operation Manual
Page 41
... mouse function. -39 Using the Remote Control as the Wireless Computer Mouse When connecting the projector and the computer with a USB cable, you can be operated in the following operation systems...the USB connection. • If "Resize" is displayed when signals having a higher resolution than XGA are being input and you have common function. ■ When using [Page Up] or [...clicking Press R-CLICK. ■ When your computer supports only a one-click mouse (such as Sharp service part QCNWGA014WJPZ) The mouse pointer can use this function does not work with the following way after it...
... mouse function. -39 Using the Remote Control as the Wireless Computer Mouse When connecting the projector and the computer with a USB cable, you can be operated in the following operation systems...the USB connection. • If "Resize" is displayed when signals having a higher resolution than XGA are being input and you have common function. ■ When using [Page Up] or [...clicking Press R-CLICK. ■ When your computer supports only a one-click mouse (such as Sharp service part QCNWGA014WJPZ) The mouse pointer can use this function does not work with the following way after it...

XG-C330X , XG-C335X , XG-C430X Operation Manual
Page 62
...in the picture and color quality. Replacing the Lamp Caution • Do not remove the lamp unit from the projector right after replacement, take your nearest Sharp Authorized Projector Dealer or Service Center to fully cool before removing the lamp unit. ■ Carefully change the lamp by a... 90-day parts and labor limited warranty. The lamp will be attributed to the nearest Sharp Authorized Projector Dealer or Service Center for repair. -60 IMPORTANT NOTE TO U.S. CUSTOMERS: The lamp included with a...
...in the picture and color quality. Replacing the Lamp Caution • Do not remove the lamp unit from the projector right after replacement, take your nearest Sharp Authorized Projector Dealer or Service Center to fully cool before removing the lamp unit. ■ Carefully change the lamp by a... 90-day parts and labor limited warranty. The lamp will be attributed to the nearest Sharp Authorized Projector Dealer or Service Center for repair. -60 IMPORTANT NOTE TO U.S. CUSTOMERS: The lamp included with a...

XG-C330X , XG-C335X , XG-C430X Operation Manual
Page 63
... has fully cooled down (2) and remove the lamp unit cover (3). 4 Remove the lamp unit. • Loosen the securing screws from the pro- The lamp and parts around the lamp will be very hot and may cause burn or injury. Removing and Installing the Lamp Unit Warning! • Do not remove the... Lamp unit AN-C430LP STANDBY/ON button AC socket 2 3 1 User service screw (for the lamp unit cover and lamp unit. 1 Press STANDBY/ON on the projector or STANDBY on the remote control to the lamp, make sure you carefully follow the steps below. • Do not loosen other screws except for...
... has fully cooled down (2) and remove the lamp unit cover (3). 4 Remove the lamp unit. • Loosen the securing screws from the pro- The lamp and parts around the lamp will be very hot and may cause burn or injury. Removing and Installing the Lamp Unit Warning! • Do not remove the... Lamp unit AN-C430LP STANDBY/ON button AC socket 2 3 1 User service screw (for the lamp unit cover and lamp unit. 1 Press STANDBY/ON on the projector or STANDBY on the remote control to the lamp, make sure you carefully follow the steps below. • Do not loosen other screws except for...
XG-C330X , XG-C335X , XG-C430X Operation Manual
Page 69
... Storage case, Lens cap, Lens cap strap, Projector manual and technical reference CD-ROM, Operation manual As a part of policy of production units. The performance specification figures indicated are nominal values of continuous improvement, SHARP reserves the right to +60°C) Cabinet Plastic... HORIZONTAL SYNC. There may be some deviations from these values in individual units. -67 Appendix Specifications Product type LCD Projector Model XG-C430X/XG-C335X/XG-C330X Video system NTSC3.58/NTSC4.43/PAL/PAL-M/PAL-N/PAL-60/SECAM/ DTV480I/DTV480P/DTV540P/DTV576I/DTV576P/DTV720P/DTV1035I/...
... Storage case, Lens cap, Lens cap strap, Projector manual and technical reference CD-ROM, Operation manual As a part of policy of production units. The performance specification figures indicated are nominal values of continuous improvement, SHARP reserves the right to +60°C) Cabinet Plastic... HORIZONTAL SYNC. There may be some deviations from these values in individual units. -67 Appendix Specifications Product type LCD Projector Model XG-C430X/XG-C335X/XG-C330X Video system NTSC3.58/NTSC4.43/PAL/PAL-M/PAL-N/PAL-60/SECAM/ DTV480I/DTV480P/DTV540P/DTV576I/DTV576P/DTV720P/DTV1035I/...

XGC330X|XGC430X Operation Manual
Page 3
... has been tested and found to comply with the limits for prompt warranty registration of the parts, service and labor warranty applicable to your new SHARP Projector, using the projector, please read this product may cause radio interference in accordance with the device. ONLY The enclosed...or moisture. Do not stare into the beam of light, or view directly. Be especially careful that SHARP may cause harmful interference to the presence of projector. DO NOT REMOVE SCREWS EXCEPT SPECIFIED USER SERVICE SCREW. WARNING: FCC Regulations state that the device complies ...
... has been tested and found to comply with the limits for prompt warranty registration of the parts, service and labor warranty applicable to your new SHARP Projector, using the projector, please read this product may cause radio interference in accordance with the device. ONLY The enclosed...or moisture. Do not stare into the beam of light, or view directly. Be especially careful that SHARP may cause harmful interference to the presence of projector. DO NOT REMOVE SCREWS EXCEPT SPECIFIED USER SERVICE SCREW. WARNING: FCC Regulations state that the device complies ...

XGC330X|XGC430X Operation Manual
Page 6
... IMPORTANT SAFEGUARDS 7 Accessories 10 Part Names and Functions 12 Using the Remote Control 15 Usable Range 15 Inserting the Batteries 15 Quick Start Quick Start 16 Setup Setting Up the Projector 18 Setting Up the Projector 18 Projection (PRJ) Mode 19 Storing the Projector 20 How to Use the ...Storage Case 20 Connections Samples of Cables for Connection 21 Connecting to a Computer 23 Connecting to Video Equipment 25 Controlling the Projector by a Computer ... 27 Connecting to a Monitor with RGB Input Terminal 28 Connecting to an Amplifier or Other Audio Equipment 29 Using...
... IMPORTANT SAFEGUARDS 7 Accessories 10 Part Names and Functions 12 Using the Remote Control 15 Usable Range 15 Inserting the Batteries 15 Quick Start Quick Start 16 Setup Setting Up the Projector 18 Setting Up the Projector 18 Projection (PRJ) Mode 19 Storing the Projector 20 How to Use the ...Storage Case 20 Connections Samples of Cables for Connection 21 Connecting to a Computer 23 Connecting to Video Equipment 25 Controlling the Projector by a Computer ... 27 Connecting to a Monitor with RGB Input Terminal 28 Connecting to an Amplifier or Other Audio Equipment 29 Using...

XGC330X|XGC430X Operation Manual
Page 9
...of time, unplug it from battery power, or other products (including amplifiers) that the service technician has used replacement parts specified by a qualified technician to restore the product to the operating instructions. 12. IMPORTANT SAFEGUARDS Introduction CAUTION: Please ...the product exhibits a distinct change in a fire or electric shock. Replacement Parts When replacement parts are covered by the manufacturer. 22. Unauthorized substitutions may touch dangerous voltage points or short-out parts that they may result in proper operating condition. 21. Safety Check Upon ...
...of time, unplug it from battery power, or other products (including amplifiers) that the service technician has used replacement parts specified by a qualified technician to restore the product to the operating instructions. 12. IMPORTANT SAFEGUARDS Introduction CAUTION: Please ...the product exhibits a distinct change in a fire or electric shock. Replacement Parts When replacement parts are covered by the manufacturer. 22. Unauthorized substitutions may touch dangerous voltage points or short-out parts that they may result in proper operating condition. 21. Safety Check Upon ...

XGC330X|XGC430X Operation Manual
Page 14
...For selecting and adjusting on and putting the projector into standby mode. KEYSTONE button 32 For entering... Adjustment foot 55·56 Air filter/Intake vent (on the bottom of the projector) Attaching the lens cap After putting the lens cap strap on the lens cap,...the other end of the strap through the hole on the front side of the projector, next to the lens, as shown in this operation manual where the topic is ...For switching input mode. Front View Zoom knob 33 For enlarging/ reducing the picture. Projector Top View Power indicator 30·58 STANDBY/ON button 30 For turning the power ...
...For selecting and adjusting on and putting the projector into standby mode. KEYSTONE button 32 For entering... Adjustment foot 55·56 Air filter/Intake vent (on the bottom of the projector) Attaching the lens cap After putting the lens cap strap on the lens cap,...the other end of the strap through the hole on the front side of the projector, next to the lens, as shown in this operation manual where the topic is ...For switching input mode. Front View Zoom knob 33 For enlarging/ reducing the picture. Projector Top View Power indicator 30·58 STANDBY/ON button 30 For turning the power ...

XGC330X|XGC430X Operation Manual
Page 16
...Remote Control STANDBY button 30 For putting the projector into standby mode. ENLARGE (Enlarge/Reduce) 35 buttons For enlarging/reducing part of the cooling fan and extending the lamp life. PAGE Up/Down buttons 39 Same as Sharp service part QCNWGA038WJPZ) Note • The wireless remote function... is not possible when the ø3.5 mm minijack cable is connected to the projector. BREAK TIMER button 36 For displaying the break timer. ENTER ...
...Remote Control STANDBY button 30 For putting the projector into standby mode. ENLARGE (Enlarge/Reduce) 35 buttons For enlarging/reducing part of the cooling fan and extending the lamp life. PAGE Up/Down buttons 39 Same as Sharp service part QCNWGA038WJPZ) Note • The wireless remote function... is not possible when the ø3.5 mm minijack cable is connected to the projector. BREAK TIMER button 36 For displaying the break timer. ENTER ...

XGC330X|XGC430X Operation Manual
Page 23
... equipment RGB cable (supplied) Cable Terminal on the projector COMPUTER/ COMPONENT 1, 2 RGB output terminal Audio-visual equipment DVI digital video output terminal Audio output terminal DVI Digital cable (commercially available) ø3.5 mm stereo or mono audio cable (commercially available or available as Sharp service part QCNWGA038WJPZ) DVI-D AUDIO (for using the 3 RCA to...
... equipment RGB cable (supplied) Cable Terminal on the projector COMPUTER/ COMPONENT 1, 2 RGB output terminal Audio-visual equipment DVI digital video output terminal Audio output terminal DVI Digital cable (commercially available) ø3.5 mm stereo or mono audio cable (commercially available or available as Sharp service part QCNWGA038WJPZ) DVI-D AUDIO (for using the 3 RCA to...

XGC330X|XGC430X Operation Manual
Page 25
...have been read before making all connections, turn on after all the connections are using a SHARP notebook computer). After making connections. Use with some Macintosh computers. When connecting with the projector. Press "Fn" and "F5" keys simultaneously when using , an image may be required...COMPONENT 1 input terminal To AUDIO input terminal RGB cable * ø3.5 mm stereo or mono audio cable (commercially available or available as Sharp service part QCNWGA038WJPZ) * When using the ø3.5 mm mono audio cable, the volume level will be half of when using the ø3.5 ...
...have been read before making all connections, turn on after all the connections are using a SHARP notebook computer). After making connections. Use with some Macintosh computers. When connecting with the projector. Press "Fn" and "F5" keys simultaneously when using , an image may be required...COMPONENT 1 input terminal To AUDIO input terminal RGB cable * ø3.5 mm stereo or mono audio cable (commercially available or available as Sharp service part QCNWGA038WJPZ) * When using the ø3.5 mm mono audio cable, the volume level will be half of when using the ø3.5 ...

XGC330X|XGC430X Operation Manual
Page 26
Connecting to a Computer When connecting with a DVI digital cable The projector employs the DVI digital input terminal for DVI-D) DVI Digital cable (commercially available) To DVI-D input terminal * ø3.5 mm stereo or mono audio cable (commercially available or available as Sharp service part QCNWGA038WJPZ) * When using the ø3.5 mm mono audio cable, the volume...
Connecting to a Computer When connecting with a DVI digital cable The projector employs the DVI digital input terminal for DVI-D) DVI Digital cable (commercially available) To DVI-D input terminal * ø3.5 mm stereo or mono audio cable (commercially available or available as Sharp service part QCNWGA038WJPZ) * When using the ø3.5 mm mono audio cable, the volume...


