
UP-700 Operation Manual
Page 9
... Main UPC File 198 Reading of Options ...223 17. PLU Updating (in handling the recording paper 216 Installing and Removing the Paper Roll 217 Recording paper specifications 217 Installing the paper roll ...217 Removing the paper roll ...218 Removing the paper jam ...220 Cleaning the Print Head ...221 Removing the Till and the Drawer ...222 Operating...
... Main UPC File 198 Reading of Options ...223 17. PLU Updating (in handling the recording paper 216 Installing and Removing the Paper Roll 217 Recording paper specifications 217 Installing the paper roll ...217 Removing the paper roll ...218 Removing the paper jam ...220 Cleaning the Print Head ...221 Removing the Till and the Drawer ...222 Operating...

UP-700 Operation Manual
Page 10
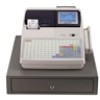
1 Part Names and Functions This chapter describes the part names and functions of this POS terminal. External View Front view Journal cover Receipt paper Customer display (Pop-up type) Operator display Contrast control Power switch Drawer Drawer lock Mode switch Keyboard Rear view Power switch Rear cover 8
1 Part Names and Functions This chapter describes the part names and functions of this POS terminal. External View Front view Journal cover Receipt paper Customer display (Pop-up type) Operator display Contrast control Power switch Drawer Drawer lock Mode switch Keyboard Rear view Power switch Rear cover 8
UP-700 Operation Manual
Page 11
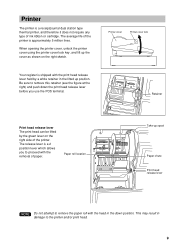
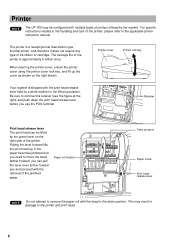
...printer cover, unlock the printer cover using the printer cover lock key, and lift up position. Paper roll location Take-up spool Paper chute Print head release lever NOTE Do not attempt to remove the paper roll with the print head release lever held by the green lever on the right sketch. The... head release lever The print head can be lifted by a white retainer in the lifted up the cover as shown on the right side of paper. Your register is a 2 position lever which allows you to remove this retainer (see the figure at the right) and push down position. Printer The ...
...printer cover, unlock the printer cover using the printer cover lock key, and lift up position. Paper roll location Take-up spool Paper chute Print head release lever NOTE Do not attempt to remove the paper roll with the print head release lever held by the green lever on the right sketch. The... head release lever The print head can be lifted by a white retainer in the lifted up the cover as shown on the right side of paper. Your register is a 2 position lever which allows you to remove this retainer (see the figure at the right) and push down position. Printer The ...

UP-700 Operation Manual
Page 12
...evenly under the keyboard cover. • If you want to change without notice. 10 If you require a new keyboard sheet, please contact your authorized SHARP dealer. • Keyboard layout is dirty or broken, replace the cover with a new one if by chance it might tear the tabs. •...11 12 13 14 15 16 17 1 ENTER 2 3 CH # FINAL 1 2 3 4 5 6 7 8 0 00 000 SBTL CA/AT NOTE • All the keys but the receipt paper feed and journal paper feed keys can be re-positioned. For details, contact your keyboard cover is subject to use only SHARPsupplied keyboard sheets.
...evenly under the keyboard cover. • If you want to change without notice. 10 If you require a new keyboard sheet, please contact your authorized SHARP dealer. • Keyboard layout is dirty or broken, replace the cover with a new one if by chance it might tear the tabs. •...11 12 13 14 15 16 17 1 ENTER 2 3 CH # FINAL 1 2 3 4 5 6 7 8 0 00 000 SBTL CA/AT NOTE • All the keys but the receipt paper feed and journal paper feed keys can be re-positioned. For details, contact your keyboard cover is subject to use only SHARPsupplied keyboard sheets.

UP-700 Operation Manual
Page 13
... key Cash tip key Charge tip key Tip paid key EAT IN 3 Eat in the figure of the standard keyboard layout. RECEIPT Receipt paper feed key JOURNAL Journal paper feed key 09 Numeric keys 00 000 • Decimal point key CL Clear key @ FOR RCPT Multiplication key Receipt print key TAX SHIFT... 2 keys DEPOSIT RF AUTO 2 AUTO 25 Automatic sequencing 2 thru 25 keys TAX Deposit refund key Manual tax key 11 For details, please consult your authorized SHARP dealer.
... key Cash tip key Charge tip key Tip paid key EAT IN 3 Eat in the figure of the standard keyboard layout. RECEIPT Receipt paper feed key JOURNAL Journal paper feed key 09 Numeric keys 00 000 • Decimal point key CL Clear key @ FOR RCPT Multiplication key Receipt print key TAX SHIFT... 2 keys DEPOSIT RF AUTO 2 AUTO 25 Automatic sequencing 2 thru 25 keys TAX Deposit refund key Manual tax key 11 For details, please consult your authorized SHARP dealer.

UP-700 Operation Manual
Page 20
...including-tax subtotal exceeds eight digits: Clear the error display by pressing the CL key and press a media key to section "Installing and Removing the Paper Roll" under "Operator Maintenance." Clear the error state by press the • key. When the function is in the OFF status, the receipt ...POS terminal will print reports regardless of the receipt state. 4 Prior to Entries REG MODE Preparations for Entries Receipt and journal paper rolls If the receipt and journal paper rolls are not set in the machine or the existing rolls are low in supply, install new ones according to finalize ...
...including-tax subtotal exceeds eight digits: Clear the error display by pressing the CL key and press a media key to section "Installing and Removing the Paper Roll" under "Operator Maintenance." Clear the error state by press the • key. When the function is in the OFF status, the receipt ...POS terminal will print reports regardless of the receipt state. 4 Prior to Entries REG MODE Preparations for Entries Receipt and journal paper rolls If the receipt and journal paper rolls are not set in the machine or the existing rolls are low in supply, install new ones according to finalize ...
UP-700 Operation Manual
Page 217
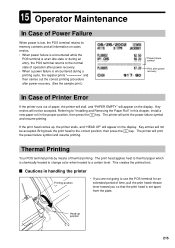
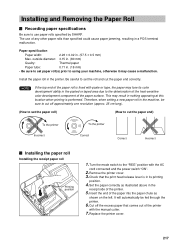
... certain level. Cautions in the proper position, then press the CL key. Key entries will not be accepted. The print head applies heat to thermal paper which is chemically treated to change color when heated to the correct position, then press the CL key. Head-up , the printer stalls, and "... (See the sample print.) Power failure symbol Print after power recovery In Case of Printer Error If the printer runs out of paper, the printer will stall, and "PAPER EMPTY" will appear on the display. The printer will print the power failure symbol and resume printing. Key entries will appear on...
... certain level. Cautions in the proper position, then press the CL key. Key entries will not be accepted. The print head applies heat to thermal paper which is chemically treated to change color when heated to the correct position, then press the CL key. Head-up , the printer stalls, and "... (See the sample print.) Power failure symbol Print after power recovery In Case of Printer Error If the printer runs out of paper, the printer will stall, and "PAPER EMPTY" will appear on the display. The printer will print the power failure symbol and resume printing. Key entries will appear on...
UP-700 Operation Manual
Page 218
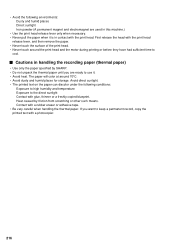
... dusty and humid places for storage. Cautions in contact with the print head. Avoid direct sunlight. • The printed text on the paper can discolor under the following environments: Dusty and humid places Direct sunlight Iron powder (A permanent magnet and electromagnet are ready to use it.... • Avoid heat. Heat caused by SHARP. • Do not unpack the thermal paper until you want to cool. Contact with a photocopier. 216 • Avoid the following conditions: Exposure to high humidity...
... dusty and humid places for storage. Cautions in contact with the print head. Avoid direct sunlight. • The printed text on the paper can discolor under the following environments: Dusty and humid places Direct sunlight Iron powder (A permanent magnet and electromagnet are ready to use it.... • Avoid heat. Heat caused by SHARP. • Do not unpack the thermal paper until you want to cool. Contact with a photocopier. 216 • Avoid the following conditions: Exposure to high humidity...
UP-700 Operation Manual
Page 219
... printer. 6. Check that comes out of the printer with paste or tape, the paper may lose its printing position. 4. It will automatically be sure to cut the paper end correctly. The use paper rolls specified by SHARP. Therefore, when setting a new paper roll in . (18 mm) • Be sure to set the roll and cut...
... printer. 6. Check that comes out of the printer with paste or tape, the paper may lose its printing position. 4. It will automatically be sure to cut the paper end correctly. The use paper rolls specified by SHARP. Therefore, when setting a new paper roll in . (18 mm) • Be sure to set the roll and cut...

UP-700 Operation Manual
Page 220
...key until it comes out of the printer. 4. NOTE Do not pull the paper through the printer. 6. Set the paper correctly as described for an extended period of paper while your POS terminal for automatic installation. 5. Wind the paper two or three turns around the spool shaft. 8. Return the print head ...release lever to lift up the print head. 2. Insert the end of the paper into the paper chute until the paper remaining in the journal side of the printer. Pull the print head release lever toward you plan not to use your machine is...
...key until it comes out of the printer. 4. NOTE Do not pull the paper through the printer. 6. Set the paper correctly as described for an extended period of paper while your POS terminal for automatic installation. 5. Wind the paper two or three turns around the spool shaft. 8. Return the print head ...release lever to lift up the print head. 2. Insert the end of the paper into the paper chute until the paper remaining in the journal side of the printer. Pull the print head release lever toward you plan not to use your machine is...

UP-700 Operation Manual
Page 221
.... 5. Remove the printed journal roll from the back of the printer. NOTE Do not pull the paper through the printer. 7. Remove the outer side of the way. 3. Press the JOURNAL key until its printed part is out of the take-up spool ...as shown on the left. 8. Remove the printer cover. 2. Remove the paper roll from the take -up spool. 219 Removing the journal paper roll Area to advance the journal paper until the paper remaining in the printer comes out completely. 6. Press the JOURNAL key to cut 1. Cut the...
.... 5. Remove the printed journal roll from the back of the printer. NOTE Do not pull the paper through the printer. 7. Remove the outer side of the way. 3. Press the JOURNAL key until its printed part is out of the take-up spool ...as shown on the left. 8. Remove the printer cover. 2. Remove the paper roll from the take -up spool. 219 Removing the journal paper roll Area to advance the journal paper until the paper remaining in the printer comes out completely. 6. Press the JOURNAL key to cut 1. Cut the...

UP-700 Operation Manual
Page 222
...be hot. Pull all the way forward (after printing, because the head may still be pulled forward any shreds of paper that may remain in "Installing the paper roll". 6. Pull the print head release lever all the way forward 1. Return the print head release lever to avoid ...cutting yourself. Reset the paper roll(s) correctly by following the steps in the printer. 4. Check for and remove any further). 3. Replace the printer cover. 220 Remove the paper jam. Remove the printer cover. 2. Removing a paper jam Precaution: Be very careful with the manual...
...be hot. Pull all the way forward (after printing, because the head may still be pulled forward any shreds of paper that may remain in "Installing the paper roll". 6. Pull the print head release lever all the way forward 1. Return the print head release lever to avoid ...cutting yourself. Reset the paper roll(s) correctly by following the steps in the printer. 4. Check for and remove any further). 3. Replace the printer cover. 220 Remove the paper jam. Remove the printer cover. 2. Removing a paper jam Precaution: Be very careful with the manual...

UP-700 Operation Manual
Page 223
... way forward 1. Cleaning the Print Head When the printed text is getting dark or faint, paper dust may damage the head. 221 Remove the printer cover. 3. Reset the paper roll(s) correctly by following the steps in "Installing the paper roll". 7. Replace the printer cover. Precautions: Never touch the print head with ethyl alcohol...
... way forward 1. Cleaning the Print Head When the printed text is getting dark or faint, paper dust may damage the head. 221 Remove the printer cover. 3. Reset the paper roll(s) correctly by following the steps in "Installing the paper roll". 7. Replace the printer cover. Precautions: Never touch the print head with ethyl alcohol...

UP-700 Operation Manual
Page 225
... Options For your UP-700 POS terminal, the following options are available: For details, contact your authorized SHARP dealer. Remote customer display model UP-P16DP (Pole type) 5. Do not try to the POS terminal? • Is the mode switch set properly at the printing position? • Is the paper roll properly installed? 16...
... Options For your UP-700 POS terminal, the following options are available: For details, contact your authorized SHARP dealer. Remote customer display model UP-P16DP (Pole type) 5. Do not try to the POS terminal? • Is the mode switch set properly at the printing position? • Is the paper roll properly installed? 16...

UP-700 Operation Manual
Page 226
17 Specifications Model: Dimensions: Weight: Power source: Power consumption: Working temperatures: Electronics: Built-in battery: Display: Printer: Paper roll: Cash drawer: Accessories: UP-700 17.5 (W) x 19.1 (D) x 12.3 (H) in . (57.5 ± 0.5 mm) Max. Rechargeable battery pack, memory holding...slots for bill and 5 for coin denominations Manager key Submanger key Operator key Printer cover lock key Standard keyboard sheet Programming keyboard sheet Paper roll Take-up spool Leaflet Drawer lock key Ferrite cores 2 2 2 2 1 (placed under keyboard cover) 1 (placed under keyboard cover) ...
17 Specifications Model: Dimensions: Weight: Power source: Power consumption: Working temperatures: Electronics: Built-in battery: Display: Printer: Paper roll: Cash drawer: Accessories: UP-700 17.5 (W) x 19.1 (D) x 12.3 (H) in . (57.5 ± 0.5 mm) Max. Rechargeable battery pack, memory holding...slots for bill and 5 for coin denominations Manager key Submanger key Operator key Printer cover lock key Standard keyboard sheet Programming keyboard sheet Paper roll Take-up spool Leaflet Drawer lock key Ferrite cores 2 2 2 2 1 (placed under keyboard cover) 1 (placed under keyboard cover) ...
Instruction Manual
Page 4
... item cash sale (SICS)/single item finalize (SIF) entries 30 Scale entries 30 Non-turnover sales 33 Special Entries for Entries 20 Receipt and journal paper rolls 20 Receipt ON/OFF function 20 Clerk assignment 20 Error Warning 21 Item Selection from the Menu 22 Starting Cash Memory Entry 23 4. Prior...
... item cash sale (SICS)/single item finalize (SIF) entries 30 Scale entries 30 Non-turnover sales 33 Special Entries for Entries 20 Receipt and journal paper rolls 20 Receipt ON/OFF function 20 Clerk assignment 20 Error Warning 21 Item Selection from the Menu 22 Starting Cash Memory Entry 23 4. Prior...

Instruction Manual
Page 8
... Error 188 Thermal Printing 188 Cautions in handling the printer 188 Cautions in handling the recording paper 189 Installing and Removing the Paper Roll 190 Recording paper specifications 190 Installing the paper roll 190 Removing the paper roll 191 Removing a paper jam 193 Cleaning the Print Head 194 Removing the Till and the Drawer 195 Operating...
... Error 188 Thermal Printing 188 Cautions in handling the printer 188 Cautions in handling the recording paper 189 Installing and Removing the Paper Roll 190 Recording paper specifications 190 Installing the paper roll 190 Removing the paper roll 191 Removing a paper jam 193 Cleaning the Print Head 194 Removing the Till and the Drawer 195 Operating...

Instruction Manual
Page 9
External View s Front view Journal cover Receipt paper Customer display (Pop-up type) Operator display Contrast control Power switch Drawer Drawer lock Mode switch Keyboard Clerk switch s Rear view s Front view Power switch Rear cover (The machine with drawer) s Rear view (The machine without drawer) 7 1 Part Names and Functions This chapter describes the part names and functions of this POS terminal.
External View s Front view Journal cover Receipt paper Customer display (Pop-up type) Operator display Contrast control Power switch Drawer Drawer lock Mode switch Keyboard Clerk switch s Rear view s Front view Power switch Rear cover (The machine with drawer) s Rear view (The machine without drawer) 7 1 Part Names and Functions This chapter describes the part names and functions of this POS terminal.
Instruction Manual
Page 10
... ribbon or cartridge. Retainer Print head release lever The print head can pull the lever even further toward you use the POS terminal. If the paper becomes jammed and you need to move the head farther forward, you can be configured with multiple types of printers offered by the green lever... the applicable printer instruction manual. Be sure to remove this retainer (see the figure at the right) and push down position. Printer NOTE The UP-700 may result in the lifted up the cover as shown on the right side of the printer. Printer cover Printer lock key Your register is...
... ribbon or cartridge. Retainer Print head release lever The print head can pull the lever even further toward you use the POS terminal. If the paper becomes jammed and you need to move the head farther forward, you can be configured with multiple types of printers offered by the green lever... the applicable printer instruction manual. Be sure to remove this retainer (see the figure at the right) and push down position. Printer NOTE The UP-700 may result in the lifted up the cover as shown on the right side of the printer. Printer cover Printer lock key Your register is...

Instruction Manual
Page 11
... 47 56 65 74 83 92 1 10 19 28 37 46 55 64 73 82 91 NOTE All the keys but the receipt paper feed and journal paper feed keys can be re-positioned. s Standard keyboard layout G.C. Thick or hard sheets make key operation Cabinet difficult. • Smooth... the keyboard sheet evenly under the keyboard cover, without any folds or wrinkles, to ensure easier operation. • If you want to use only SHARP- For...
... 47 56 65 74 83 92 1 10 19 28 37 46 55 64 73 82 91 NOTE All the keys but the receipt paper feed and journal paper feed keys can be re-positioned. s Standard keyboard layout G.C. Thick or hard sheets make key operation Cabinet difficult. • Smooth... the keyboard sheet evenly under the keyboard cover, without any folds or wrinkles, to ensure easier operation. • If you want to use only SHARP- For...


