
UP-700 Operation Manual
Page 9
... sequence ...199 Sample printouts ...200 Data Clear ...212 14. PLU Updating (in handling the recording paper 216 Installing and Removing the Paper Roll 217 Recording paper specifications 217 Installing the paper roll ...217 Removing the paper roll ...218 Removing the paper jam ...220 Cleaning the Print Head ...221 Removing the Till and the Drawer ...222 Operating...
... sequence ...199 Sample printouts ...200 Data Clear ...212 14. PLU Updating (in handling the recording paper 216 Installing and Removing the Paper Roll 217 Recording paper specifications 217 Installing the paper roll ...217 Removing the paper roll ...218 Removing the paper jam ...220 Cleaning the Print Head ...221 Removing the Till and the Drawer ...222 Operating...

UP-700 Operation Manual
Page 10
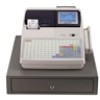
1 Part Names and Functions This chapter describes the part names and functions of this POS terminal. External View Front view Journal cover Receipt paper Customer display (Pop-up type) Operator display Contrast control Power switch Drawer Drawer lock Mode switch Keyboard Rear view Power switch Rear cover 8
1 Part Names and Functions This chapter describes the part names and functions of this POS terminal. External View Front view Journal cover Receipt paper Customer display (Pop-up type) Operator display Contrast control Power switch Drawer Drawer lock Mode switch Keyboard Rear view Power switch Rear cover 8
UP-700 Operation Manual
Page 11
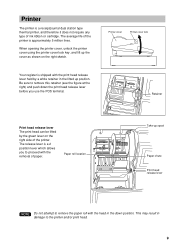
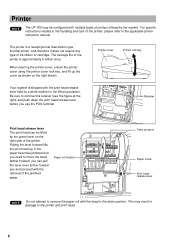
... the printer cover lock key, and lift up the cover as shown on the right side of paper. Be sure to remove this retainer (see the figure at the right) and push down position. Printer The ...allows you use the POS terminal. The release lever is shipped with the head in the lifted up spool Paper chute Print head release lever NOTE Do not attempt to the printer and/or print head. 9 This may result ...in damage to remove the paper roll with the print head release lever held by the green lever on the right sketch. Printer cover...
... the printer cover lock key, and lift up the cover as shown on the right side of paper. Be sure to remove this retainer (see the figure at the right) and push down position. Printer The ...allows you use the POS terminal. The release lever is shipped with the head in the lifted up spool Paper chute Print head release lever NOTE Do not attempt to the printer and/or print head. 9 This may result ...in damage to remove the paper roll with the print head release lever held by the green lever on the right sketch. Printer cover...

UP-700 Operation Manual
Page 12
... the layout, contact your keyboard cover is subject to use only SHARPsupplied keyboard sheets. If your authorized SHARP dealer. • Keyboard layout is dirty or broken, replace the cover with a new one . Keyboard... one if by chance it gets wet. If you require a new keyboard sheet, please contact your authorized SHARP dealer. For details, contact your dealer. • The keyboard cover will eventually wear out. NOTE •...2 3 4 5 6 7 8 0 00 000 SBTL CA/AT NOTE • All the keys but the receipt paper feed and journal paper feed keys can be re-positioned.
... the layout, contact your keyboard cover is subject to use only SHARPsupplied keyboard sheets. If your authorized SHARP dealer. • Keyboard layout is dirty or broken, replace the cover with a new one . Keyboard... one if by chance it gets wet. If you require a new keyboard sheet, please contact your authorized SHARP dealer. For details, contact your dealer. • The keyboard cover will eventually wear out. NOTE •...2 3 4 5 6 7 8 0 00 000 SBTL CA/AT NOTE • All the keys but the receipt paper feed and journal paper feed keys can be re-positioned.

UP-700 Operation Manual
Page 13
RECEIPT Receipt paper feed key JOURNAL Journal paper feed key 09 Numeric keys 00 000 • Decimal point key CL Clear key @ FOR RCPT Multiplication key Receipt print key TAX SHIFT RFND Tax 1 ... tip key Charge tip key Tip paid key EAT IN 3 Eat in the figure of the standard keyboard layout. For details, please consult your authorized SHARP dealer.
RECEIPT Receipt paper feed key JOURNAL Journal paper feed key 09 Numeric keys 00 000 • Decimal point key CL Clear key @ FOR RCPT Multiplication key Receipt print key TAX SHIFT RFND Tax 1 ... tip key Charge tip key Tip paid key EAT IN 3 Eat in the figure of the standard keyboard layout. For details, please consult your authorized SHARP dealer.

UP-700 Operation Manual
Page 20
... key and select RCP S.W. Date Consecutive no . This means that the receipt roll should be possible to section "Installing and Removing the Paper Roll" under "Operator Maintenance." Sample Receipt The print format will print reports regardless of the receipt state. Error Warning In the following examples...When an including-tax subtotal exceeds eight digits: Clear the error display by pressing the CL key and press a media key to save paper using the receipt function. When the function is in the REG mode to finalize the transaction. Receipt ON/OFF function You can disable...
... key and select RCP S.W. Date Consecutive no . This means that the receipt roll should be possible to section "Installing and Removing the Paper Roll" under "Operator Maintenance." Sample Receipt The print format will print reports regardless of the receipt state. Error Warning In the following examples...When an including-tax subtotal exceeds eight digits: Clear the error display by pressing the CL key and press a media key to save paper using the receipt function. When the function is in the REG mode to finalize the transaction. Receipt ON/OFF function You can disable...
UP-700 Operation Manual
Page 217
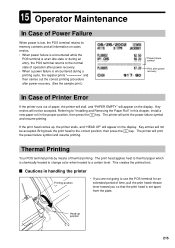
...entries will appear on the display. The printer will print the power failure symbol and resume printing. The print head applies heat to thermal paper which is encountered during an entry, the POS terminal returns to the normal state of operation after power recovery In Case of Printer Error ...the print head to use the POS terminal for an extended period of thermal printing. Referring to "Installing and Removing the Paper Roll" in this chapter, install a new paper roll in handling the printer Printing position • If you are not going to the correct position, then press the CL...
...entries will appear on the display. The printer will print the power failure symbol and resume printing. The print head applies heat to thermal paper which is encountered during an entry, the POS terminal returns to the normal state of operation after power recovery In Case of Printer Error ...the print head to use the POS terminal for an extended period of thermal printing. Referring to "Installing and Removing the Paper Roll" in this chapter, install a new paper roll in handling the printer Printing position • If you are not going to the correct position, then press the CL...
UP-700 Operation Manual
Page 218
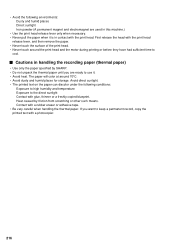
... humid places Direct sunlight Iron powder (A permanent magnet and electromagnet are ready to use it is in handling the recording paper (thermal paper) • Use only the paper specified by friction from scratching or other such means. Contact with the print head release lever, and then remove the... print head. • Never touch around 70°C. • Avoid dusty and humid places for storage. Heat caused by SHARP. • Do not unpack the thermal paper until you want to keep a permanent record, copy the printed text with glue, thinner or a freshly copied blueprint. First ...
... humid places Direct sunlight Iron powder (A permanent magnet and electromagnet are ready to use it is in handling the recording paper (thermal paper) • Use only the paper specified by friction from scratching or other such means. Contact with the print head release lever, and then remove the... print head. • Never touch around 70°C. • Avoid dusty and humid places for storage. Heat caused by SHARP. • Do not unpack the thermal paper until you want to keep a permanent record, copy the printed text with glue, thinner or a freshly copied blueprint. First ...
UP-700 Operation Manual
Page 219
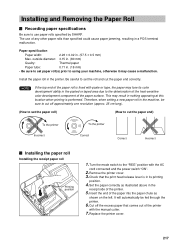
...This may cause a malfunction. Replace the printer cover. 217 Installing and Removing the Paper Roll Recording paper specifications Be sure to use of any other paper rolls than specified could cause paper jamming, resulting in a POS terminal malfunction. Turn the mode switch to the ...paper end correctly. NOTE If the top end of the paper roll is in its color development ability in the receipt side of the paper surface. Paper specification Paper width: 2.26 ± 0.02 in the printer. Set the paper correctly as shown on the left. The use paper rolls specified by SHARP...
...This may cause a malfunction. Replace the printer cover. 217 Installing and Removing the Paper Roll Recording paper specifications Be sure to use of any other paper rolls than specified could cause paper jamming, resulting in a POS terminal malfunction. Turn the mode switch to the ...paper end correctly. NOTE If the top end of the paper roll is in its color development ability in the receipt side of the paper surface. Paper specification Paper width: 2.26 ± 0.02 in the printer. Set the paper correctly as shown on the left. The use paper rolls specified by SHARP...

UP-700 Operation Manual
Page 220
...cord connected and the power switch "ON". 2. Cut the paper behind the printer and near the paper roll. 3. It will automatically be fed through the printer. 218 Insert the end of the paper into the paper chute until the paper remaining in the appropriate place. Press the RECEIPT key until...print head release lever to lift up spool. (Press the JOURNAL key to the "REG" position with a new one. Remove the paper roll from the back of paper while your POS terminal for automatic installation. 5. Replace the printer cover. • When you to its printing position. 4. Cut or...
...cord connected and the power switch "ON". 2. Cut the paper behind the printer and near the paper roll. 3. It will automatically be fed through the printer. 218 Insert the end of the paper into the paper chute until the paper remaining in the appropriate place. Press the RECEIPT key until...print head release lever to lift up spool. (Press the JOURNAL key to the "REG" position with a new one. Remove the paper roll from the back of paper while your POS terminal for automatic installation. 5. Replace the printer cover. • When you to its printing position. 4. Cut or...

UP-700 Operation Manual
Page 221
.... 5. Remove the outer side of the take -up spool. 4. Cut the paper and remove the take -up spool. 219 Remove the paper roll from the take-up spool as shown on the left. 8. NOTE Do not pull the paper through the printer. 7. Remove the printed journal roll from the back of the way... the printer cover. 2. Press the JOURNAL key until its printed part is out of the printer. Press the JOURNAL key to cut 1. Removing the journal paper roll Area to advance the journal paper until the paper remaining in the printer comes out completely. 6.
.... 5. Remove the outer side of the take -up spool. 4. Cut the paper and remove the take -up spool. 219 Remove the paper roll from the take-up spool as shown on the left. 8. NOTE Do not pull the paper through the printer. 7. Remove the printed journal roll from the back of the way... the printer cover. 2. Press the JOURNAL key until its printed part is out of the printer. Press the JOURNAL key to cut 1. Removing the journal paper roll Area to advance the journal paper until the paper remaining in the printer comes out completely. 6.

UP-700 Operation Manual
Page 222
Pull all the way forward (after printing, because the head may remain in "Installing the paper roll". 6. Check for and remove any further). 3. Return the print head release lever to avoid cutting yourself. Never touch the print head immediately after it ...stops at one position, continue pulling forward until it stops again and cannot be pulled forward any shreds of paper that may still be hot. Remove the paper jam. Replace the printer cover. 220 Removing a paper jam Precaution: Be very careful with the manual cutter to its original position. 5. Reset the...
Pull all the way forward (after printing, because the head may remain in "Installing the paper roll". 6. Check for and remove any further). 3. Return the print head release lever to avoid cutting yourself. Never touch the print head immediately after it ...stops at one position, continue pulling forward until it stops again and cannot be pulled forward any shreds of paper that may still be hot. Remove the paper jam. Replace the printer cover. 220 Removing a paper jam Precaution: Be very careful with the manual cutter to its original position. 5. Reset the...

UP-700 Operation Manual
Page 223
...". 7. Precautions: Never touch the print head with ethyl alcohol or isopropyl alcohol. 5. Cleaning the Print Head When the printed text is getting dark or faint, paper dust may damage the head. 221 Clean the print head with a soft rag moist with a tool or anything hard as follows: Pull all the way...
...". 7. Precautions: Never touch the print head with ethyl alcohol or isopropyl alcohol. 5. Cleaning the Print Head When the printed text is getting dark or faint, paper dust may damage the head. 221 Clean the print head with a soft rag moist with a tool or anything hard as follows: Pull all the way...

UP-700 Operation Manual
Page 225
...than "OFF". • The display is illuminated, but the whole machine refuses entries. • No receipt is issued. • No journal paper is taken up. • Printing is therefore advisable to refer to the "Checking" section shown in the right-hand column before calling for Service...? • Is there a paper jam? • Is the receipt function in the left-hand column below, labeled "Fault," do not necessarily indicate functional faults of Options For your UP-700 POS terminal, the following options are available: For details, contact your authorized SHARP dealer. Remote drawer model ER...
...than "OFF". • The display is illuminated, but the whole machine refuses entries. • No receipt is issued. • No journal paper is taken up. • Printing is therefore advisable to refer to the "Checking" section shown in the right-hand column before calling for Service...? • Is there a paper jam? • Is the receipt function in the left-hand column below, labeled "Fault," do not necessarily indicate functional faults of Options For your UP-700 POS terminal, the following options are available: For details, contact your authorized SHARP dealer. Remote drawer model ER...

UP-700 Operation Manual
Page 226
17 Specifications Model: Dimensions: Weight: Power source: Power consumption: Working temperatures: Electronics: Built-in battery: Display: Printer: Paper roll: Cash drawer: Accessories: UP-700 17.5 (W) x 19.1 (D) x 12.3 (H) in . (57.5 ± 0.5 mm) Max. Rechargeable battery pack, memory...thickness) 7 slots for bill and 5 for coin denominations Manager key Submanger key Operator key Printer cover lock key Standard keyboard sheet Programming keyboard sheet Paper roll Take-up spool Leaflet Drawer lock key Ferrite cores 2 2 2 2 1 (placed under keyboard cover) 1 (placed under keyboard cover)...
17 Specifications Model: Dimensions: Weight: Power source: Power consumption: Working temperatures: Electronics: Built-in battery: Display: Printer: Paper roll: Cash drawer: Accessories: UP-700 17.5 (W) x 19.1 (D) x 12.3 (H) in . (57.5 ± 0.5 mm) Max. Rechargeable battery pack, memory...thickness) 7 slots for bill and 5 for coin denominations Manager key Submanger key Operator key Printer cover lock key Standard keyboard sheet Programming keyboard sheet Paper roll Take-up spool Leaflet Drawer lock key Ferrite cores 2 2 2 2 1 (placed under keyboard cover) 1 (placed under keyboard cover)...
Instruction Manual
Page 4
...#1-KP#9 15 Type of receipts 15 Sorted Receipt Function 18 3. Receipts 15 Built-in Printer Sample Receipt 15 Receipt for Entries 20 Receipt and journal paper rolls 20 Receipt ON/OFF function 20 Clerk assignment 20 Error Warning 21 Item Selection from the Menu 22 Starting Cash Memory Entry 23 4. Entries...
...#1-KP#9 15 Type of receipts 15 Sorted Receipt Function 18 3. Receipts 15 Built-in Printer Sample Receipt 15 Receipt for Entries 20 Receipt and journal paper rolls 20 Receipt ON/OFF function 20 Clerk assignment 20 Error Warning 21 Item Selection from the Menu 22 Starting Cash Memory Entry 23 4. Entries...

Instruction Manual
Page 8
... 159 Entertainment bill message 159 Device Configuration Programming 160 R/J printer (Built-in handling the recording paper 189 Installing and Removing the Paper Roll 190 Recording paper specifications 190 Installing the paper roll 190 Removing the paper roll 191 Removing a paper jam 193 Cleaning the Print Head 194 Removing the Till and the Drawer 195 Operating the...
... 159 Entertainment bill message 159 Device Configuration Programming 160 R/J printer (Built-in handling the recording paper 189 Installing and Removing the Paper Roll 190 Recording paper specifications 190 Installing the paper roll 190 Removing the paper roll 191 Removing a paper jam 193 Cleaning the Print Head 194 Removing the Till and the Drawer 195 Operating the...

Instruction Manual
Page 9
1 Part Names and Functions This chapter describes the part names and functions of this POS terminal. External View s Front view Journal cover Receipt paper Customer display (Pop-up type) Operator display Contrast control Power switch Drawer Drawer lock Mode switch Keyboard Clerk switch s Rear view s Front view Power switch Rear cover (The machine with drawer) s Rear view (The machine without drawer) 7
1 Part Names and Functions This chapter describes the part names and functions of this POS terminal. External View s Front view Journal cover Receipt paper Customer display (Pop-up type) Operator display Contrast control Power switch Drawer Drawer lock Mode switch Keyboard Clerk switch s Rear view s Front view Power switch Rear cover (The machine with drawer) s Rear view (The machine without drawer) 7
Instruction Manual
Page 10
... head up the cover as shown on the right side of the jammed paper. Paper roll location Take-up position. Printer NOTE The UP-700 may result in damage to remove the paper roll with the head in the lifted up spool Paper chute Print head release lever NOTE Do not attempt to the printer... lock key, and lift up . This may be lifted by the green lever on the right sketch. The printer is approximately 5 million lines. If the paper becomes jammed and you need to move the head farther forward, you can be configured with the removal of the printer. The average life of...
... head up the cover as shown on the right side of the jammed paper. Paper roll location Take-up position. Printer NOTE The UP-700 may result in damage to remove the paper roll with the head in the lifted up spool Paper chute Print head release lever NOTE Do not attempt to the printer... lock key, and lift up . This may be lifted by the green lever on the right sketch. The printer is approximately 5 million lines. If the paper becomes jammed and you need to move the head farther forward, you can be configured with the removal of the printer. The average life of...

Instruction Manual
Page 11
... 28 37 46 55 64 73 82 91 NOTE All the keys but the receipt paper feed and journal paper feed keys can be re-positioned. If you require a new keyboard sheet, please contact your authorized SHARP dealer. 9 Use of the keyboard cover into the slots in the cabinet. For ... sheet evenly under the keyboard cover, without any folds or wrinkles, to ensure easier operation. • If you want to use only SHARP- If your authorized SHARP dealer. Keyboard s Inserting the keyboard sheet Insert the keyboard sheet between the keyboard cover and the cabinet as it gets wet. NOTE ...
... 28 37 46 55 64 73 82 91 NOTE All the keys but the receipt paper feed and journal paper feed keys can be re-positioned. If you require a new keyboard sheet, please contact your authorized SHARP dealer. 9 Use of the keyboard cover into the slots in the cabinet. For ... sheet evenly under the keyboard cover, without any folds or wrinkles, to ensure easier operation. • If you want to use only SHARP- If your authorized SHARP dealer. Keyboard s Inserting the keyboard sheet Insert the keyboard sheet between the keyboard cover and the cabinet as it gets wet. NOTE ...


