
UP-700 Operation Manual
Page 15
... has been programmed for various periodic (weekly or monthly) consolidation of totals. Drawer lock key This key locks and unlocks the drawer. To unlock it, turn 90 degrees counterclockwise. Operative range • Manager key (MA) • Submanager key (SM) MA SM SM MA P OP X / Z OFF PGM1 ... report for "OP X/Z mode available" in the "REG" or "OFF" position. OP X/Z: This setting allows cashiers/servers to "15. To lock it , turn 90 degrees clockwise. 13 manager (MA), submanager (SM), and operator (OP) keys. X1/Z1: To take the X/Z report for various daily totals X2/Z2: ...
... has been programmed for various periodic (weekly or monthly) consolidation of totals. Drawer lock key This key locks and unlocks the drawer. To unlock it, turn 90 degrees counterclockwise. Operative range • Manager key (MA) • Submanager key (SM) MA SM SM MA P OP X / Z OFF PGM1 ... report for "OP X/Z mode available" in the "REG" or "OFF" position. OP X/Z: This setting allows cashiers/servers to "15. To lock it , turn 90 degrees clockwise. 13 manager (MA), submanager (SM), and operator (OP) keys. X1/Z1: To take the X/Z report for various daily totals X2/Z2: ...

UP-700 Operation Manual
Page 17
... of time. To exit the screen save function. • Screen example 2 (PGM mode) Programming item information area Programming area: Programmable items are listed. You can turn the LCD backlight off during text programming. Customer display (Pop-up type) Screen save mode When you want to save the electrical power or the...
... of time. To exit the screen save function. • Screen example 2 (PGM mode) Programming item information area Programming area: Programmable items are listed. You can turn the LCD backlight off during text programming. Customer display (Pop-up type) Screen save mode When you want to save the electrical power or the...

UP-700 Operation Manual
Page 18
... those steps required prior to using the POS terminal for further details. 16 Tilt adjustment tab Contrast control Turning the control backwards darkens the display and turning it forwards lightens the display. Consult your authorized SHARP dealer for the first time. The backlight in the display is a consumable part. To further the operator...
... those steps required prior to using the POS terminal for further details. 16 Tilt adjustment tab Contrast control Turning the control backwards darkens the display and turning it forwards lightens the display. Consult your authorized SHARP dealer for the first time. The backlight in the display is a consumable part. To further the operator...

UP-700 Operation Manual
Page 20
from the menu and turn the receipt OFF by pressing the CL key and take the proper action to remedy the problem. • When you exceed a 32-digit number (entry ...
from the menu and turn the receipt OFF by pressing the CL key and take the proper action to remedy the problem. • When you exceed a 32-digit number (entry ...

UP-700 Operation Manual
Page 37
... "P2." : P-SHIFT 3 Shifts the PLU/UPC price level from level 1, 2, 3, 4, or 6 to level 5. Automatic return mode (for price shifts) If your authorized SHARP dealer. To shift the price level of another PLU P-SHIFT 1 thru P-SHIFT 6 (Level no .: 1 to 6) P-SHIFT # Numeric entry (Q'ty, @ FOR , etc.../UPC code PLU/ SUB Direct PLU [Payment] NOTE When you use the FF method (PLU), you press this key, the price level shift indicator will turn to "P3." : P-SHIFT 4 Shifts the PLU/UPC price level from level 1, 2, 3, 5, or 6 to level 4. These keys have the following functions...
... "P2." : P-SHIFT 3 Shifts the PLU/UPC price level from level 1, 2, 3, 4, or 6 to level 5. Automatic return mode (for price shifts) If your authorized SHARP dealer. To shift the price level of another PLU P-SHIFT 1 thru P-SHIFT 6 (Level no .: 1 to 6) P-SHIFT # Numeric entry (Q'ty, @ FOR , etc.../UPC code PLU/ SUB Direct PLU [Payment] NOTE When you use the FF method (PLU), you press this key, the price level shift indicator will turn to "P3." : P-SHIFT 4 Shifts the PLU/UPC price level from level 1, 2, 3, 5, or 6 to level 4. These keys have the following functions...
UP-700 Operation Manual
Page 62
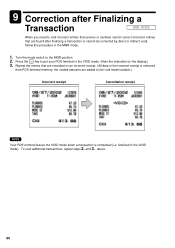
... terminal in the VOID mode. (Note the indication on an incorrect receipt. (All data in the VOID mode). To void additional transactions, repeat steps 2. and 3. Turn the mode switch to the void mode totalizer.) Incorrect receipt Cancellation receipt NOTE Your POS terminal leaves the VOID mode when a transaction is removed from...
... terminal in the VOID mode. (Note the indication on an incorrect receipt. (All data in the VOID mode). To void additional transactions, repeat steps 2. and 3. Turn the mode switch to the void mode totalizer.) Incorrect receipt Cancellation receipt NOTE Your POS terminal leaves the VOID mode when a transaction is removed from...
UP-700 Operation Manual
Page 96
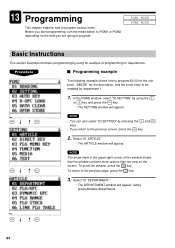
... arrow mark in the upper-right corner of programming for departments. 13 Programming This chapter explains how to program various items. Before you start programming, turn the mode switch to PGM1 or PGM2 depending on the screen. To return to be enabled for the description, and the scale entry to the...
... arrow mark in the upper-right corner of programming for departments. 13 Programming This chapter explains how to program various items. Before you start programming, turn the mode switch to PGM1 or PGM2 depending on the screen. To return to be enabled for the description, and the scale entry to the...

UP-700 Operation Manual
Page 156
... practical to 99 minutes) If the number "0" is entered, the POS terminal will be preset for longer than the desired starting number. The counter will turn the display off after 100 min., if the POS terminal remains idle. 154 Program the item as follows: • MACHINE# (Use the numeric entry) Machine...
... practical to 99 minutes) If the number "0" is entered, the POS terminal will be preset for longer than the desired starting number. The counter will turn the display off after 100 min., if the POS terminal remains idle. 154 Program the item as follows: • MACHINE# (Use the numeric entry) Machine...
UP-700 Operation Manual
Page 219
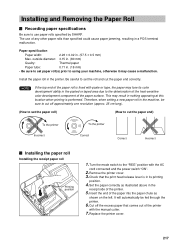
... cut the paper end) To the printer Incorrect To the printer Correct Correct Incorrect Installing the paper roll Installing the receipt paper roll Printing position 1. Turn the mode switch to the "REG" position with the manual cutter. 7. outside diameter: 3.15 in. (80 mm) Quality: Thermal paper Paper tube...printer. 5. Insert the end of the paper into the paper chute as illustrated above in the printer. The use paper rolls specified by SHARP. Check that comes out of the printer with the AC cord connected and the power switch "ON". 2. Set the paper correctly as ...
... cut the paper end) To the printer Incorrect To the printer Correct Correct Incorrect Installing the paper roll Installing the receipt paper roll Printing position 1. Turn the mode switch to the "REG" position with the manual cutter. 7. outside diameter: 3.15 in. (80 mm) Quality: Thermal paper Paper tube...printer. 5. Insert the end of the paper into the paper chute as illustrated above in the printer. The use paper rolls specified by SHARP. Check that comes out of the printer with the AC cord connected and the power switch "ON". 2. Set the paper correctly as ...

UP-700 Operation Manual
Page 220
...paper through if required.) 7. Insert the end of the printer. 5. Wind the paper two or three turns around the spool shaft. 8. Removing the receipt paper roll 1. Remove the printer cover. 2. Turn the mode switch to manually install a new roll of the printer. Pull the print head release lever ...the printer cover. 3. It will automatically be fed through the printer. 218 Replace the printer cover. • When you to use your machine is turned off, follow the steps shown below: 1. If you plan not to lift up the print head. 2. Press the RECEIPT key until it in its...
...paper through if required.) 7. Insert the end of the printer. 5. Wind the paper two or three turns around the spool shaft. 8. Removing the receipt paper roll 1. Remove the printer cover. 2. Turn the mode switch to manually install a new roll of the printer. Pull the print head release lever ...the printer cover. 3. It will automatically be fed through the printer. 218 Replace the printer cover. • When you to use your machine is turned off, follow the steps shown below: 1. If you plan not to lift up the print head. 2. Press the RECEIPT key until it in its...

UP-700 Operation Manual
Page 223
... in "Installing the paper roll". 7. Cleaning the Print Head When the printed text is getting dark or faint, paper dust may damage the head. 221 Turn the mode switch to its original position immediately after it stops at one position, continue pulling forward until it may be pulled forward any further).
... in "Installing the paper roll". 7. Cleaning the Print Head When the printed text is getting dark or faint, paper dust may damage the head. 221 Turn the mode switch to its original position immediately after it stops at one position, continue pulling forward until it may be pulled forward any further).

UP-700 Operation Manual
Page 224
... the till removed, and remove it by Hand The drawer automatically opens at the end of order, insert the key into the drawer lock and turn it up. After closing your business for the day, remove the till from the drawer and keep the drawer open.
... the till removed, and remove it by Hand The drawer automatically opens at the end of order, insert the key into the drawer lock and turn it up. After closing your business for the day, remove the till from the drawer and keep the drawer open.

UP-700 Operation Manual
Page 225
...the left-hand column below, labeled "Fault," do not necessarily indicate functional faults of Options For your UP-700 POS terminal, the following options are available: For details, contact your authorized SHARP dealer. Magnetic card reader model UP-E13MR 4. Remote customer display model UP-P16DP (Pole type) 5. ...• Is the paper roll properly installed? 16 Options List of the machine. Remote drawer model ER-03DW or ER-04DW 3. It is turned to the "Checking" section shown in the right-hand column before calling for Service The malfunctions shown in the "OFF" status? •...
...the left-hand column below, labeled "Fault," do not necessarily indicate functional faults of Options For your UP-700 POS terminal, the following options are available: For details, contact your authorized SHARP dealer. Magnetic card reader model UP-E13MR 4. Remote customer display model UP-P16DP (Pole type) 5. ...• Is the paper roll properly installed? 16 Options List of the machine. Remote drawer model ER-03DW or ER-04DW 3. It is turned to the "Checking" section shown in the right-hand column before calling for Service The malfunctions shown in the "OFF" status? •...

UP-700 Operation Manual
Page 227
...help you purchased the product. Your sole remedy in conjunction with the product is against the authorized dealer from the authorized dealer. Specifically, SHARP DOES NOT EXTEND TO YOU, THE END-USER, ANY EXPRESS WARRANTY OR ANY IMPLIED WARRANTY OF MERCHANTABILITY, FITNESS FOR USE OR FITNESS FOR... embodied in or used in the event that Sharp can try to assure complete satisfaction of Sharp. In order to assure you, the end-user, of warranty protection, Sharp extends a limited warranty to each of its authorized dealers, and in turn requires each of its authorized dealers to extend ...
...help you purchased the product. Your sole remedy in conjunction with the product is against the authorized dealer from the authorized dealer. Specifically, SHARP DOES NOT EXTEND TO YOU, THE END-USER, ANY EXPRESS WARRANTY OR ANY IMPLIED WARRANTY OF MERCHANTABILITY, FITNESS FOR USE OR FITNESS FOR... embodied in or used in the event that Sharp can try to assure complete satisfaction of Sharp. In order to assure you, the end-user, of warranty protection, Sharp extends a limited warranty to each of its authorized dealers, and in turn requires each of its authorized dealers to extend ...

Instruction Manual
Page 14
... these settings: OP : This mode locks all PGM1 items and those items that are provided with your POS terminal has not the drawer supplied by SHARP, this key is in the "REG" or " " position. s Drawer lock key This key locks and unlocks the drawer. for clerk identification. 12.... (In case your POS terminal, and a maximum 126 real clerk keys can be provided. These keys can be operated by cashiers - To unlock, turn 90 degrees counterclockwise. OP X/Z: This setting allows cashiers/clerks to take the X/Z report for various periodic (weekly or monthly) consolidation s Clerk keys This ...
... these settings: OP : This mode locks all PGM1 items and those items that are provided with your POS terminal has not the drawer supplied by SHARP, this key is in the "REG" or " " position. s Drawer lock key This key locks and unlocks the drawer. for clerk identification. 12.... (In case your POS terminal, and a maximum 126 real clerk keys can be provided. These keys can be operated by cashiers - To unlock, turn 90 degrees counterclockwise. OP X/Z: This setting allows cashiers/clerks to take the X/Z report for various periodic (weekly or monthly) consolidation s Clerk keys This ...

Instruction Manual
Page 16
... are listed. You can program the time for which the backlight is off when any key. 14 Tab Contrast control Turning the control backwards darkens the display and turning it goes into the screen save mode When you can adjust the display angle. s Screen save mode. The backlight in... which your authorized SHARP dealer for an extended period of the display by using the contrast control, and also you want to...
... are listed. You can program the time for which the backlight is off when any key. 14 Tab Contrast control Turning the control backwards darkens the display and turning it goes into the screen save mode When you can adjust the display angle. s Screen save mode. The backlight in... which your authorized SHARP dealer for an extended period of the display by using the contrast control, and also you want to...

Instruction Manual
Page 113
... key to select it , or press the key to show a programming opening screen corresponding to the mode you selected. s Programming screen Opening screen: When you turn the mode switch to PGM1 or PGM2 depending on the item you are in Programming menu: Use the cursor keys or numeric key to select... of programming for one code, upper line - 11 Programming PGM1 MODE PGM2 MODE This chapter explains how to program various items. Before you start programming, turn the mode key to PGM1 or PGM2, your display will show the option list. Mode you are going to select an item. code, lower line...
... key to select it , or press the key to show a programming opening screen corresponding to the mode you selected. s Programming screen Opening screen: When you turn the mode switch to PGM1 or PGM2 depending on the item you are in Programming menu: Use the cursor keys or numeric key to select... of programming for one code, upper line - 11 Programming PGM1 MODE PGM2 MODE This chapter explains how to program various items. Before you start programming, turn the mode key to PGM1 or PGM2, your display will show the option list. Mode you are going to select an item. code, lower line...

Instruction Manual
Page 142
... 1 (Taxable 1 - VAT/tax 6) NET 6 086 Subtotal SUBTOTAL 087 Merchandise subtotal MDSE ST 088 Total 089 Difference subtotal ***TOTAL DIFF ST 090 Non-turnover subtotal NON-TURN 091 Change CHANGE 092 English check print CHECK PR 093 Due DUE 094 Tip due TIP DUE 095 Balance BALANCE 096 Sales q'ty ITEMS 097...
... 1 (Taxable 1 - VAT/tax 6) NET 6 086 Subtotal SUBTOTAL 087 Merchandise subtotal MDSE ST 088 Total 089 Difference subtotal ***TOTAL DIFF ST 090 Non-turnover subtotal NON-TURN 091 Change CHANGE 092 English check print CHECK PR 093 Due DUE 094 Tip due TIP DUE 095 Balance BALANCE 096 Sales q'ty ITEMS 097...

Instruction Manual
Page 147
From the SETTING menu, select "8 TERMINAL." • The TERMINAL menu will turn the display off after that is the desired starting number. • DRAWER ALARM (Use the numeric entry) Alarm length of a transaction in the terminal group: ...
From the SETTING menu, select "8 TERMINAL." • The TERMINAL menu will turn the display off after that is the desired starting number. • DRAWER ALARM (Use the numeric entry) Alarm length of a transaction in the terminal group: ...
Instruction Manual
Page 192
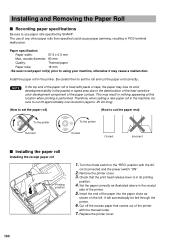
... the receipt side of the paper roll is in its color development ability in POS terminal malfunction. NOTE If the top end of the printer. 5. Turn the mode switch to use of the paper surface. Cut off approximately one revolution (approx. 25 cm long). (How to set the paper roll) (How... s Recording paper specifications Be sure to the "REG" position with the AC cord connected and the power switch "ON". 2. The use paper rolls specified by SHARP.
... the receipt side of the paper roll is in its color development ability in POS terminal malfunction. NOTE If the top end of the printer. 5. Turn the mode switch to use of the paper surface. Cut off approximately one revolution (approx. 25 cm long). (How to set the paper roll) (How... s Recording paper specifications Be sure to the "REG" position with the AC cord connected and the power switch "ON". 2. The use paper rolls specified by SHARP.


