User Manual
Page 4
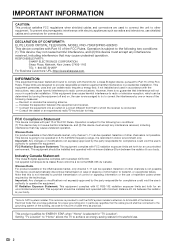
...achieve an energy-saving status for an uncontrolled environment. Setting "TV Location" to "Home" allows the TV to operate the equipment. RESPONSIBLE PARTY: SHARP ELECTRONICS CORPORATION Sharp Plaza, Mahwah, New Jersey 07495-1163 TEL: 1-800-BE-SHARP For Business Customers: URL http://www.sharpusa.com ... 1-11 can be determined by the party responsible for "TV Location". DECLARATION OF CONFORMITY: ELITE LIQUID CRYSTAL TELEVISION, MODEL PRO-70X5FD/PRO-60X5FD This device complies with minimum distance 20 cm between the radiator & your body. This equipment should be connected to the grounding...
...achieve an energy-saving status for an uncontrolled environment. Setting "TV Location" to "Home" allows the TV to operate the equipment. RESPONSIBLE PARTY: SHARP ELECTRONICS CORPORATION Sharp Plaza, Mahwah, New Jersey 07495-1163 TEL: 1-800-BE-SHARP For Business Customers: URL http://www.sharpusa.com ... 1-11 can be determined by the party responsible for "TV Location". DECLARATION OF CONFORMITY: ELITE LIQUID CRYSTAL TELEVISION, MODEL PRO-70X5FD/PRO-60X5FD This device complies with minimum distance 20 cm between the radiator & your body. This equipment should be connected to the grounding...
User Manual
Page 6
... hand on the top or near a bath tub, wash bowl, kitchen sink, or laundry tub; Also, do not place the AC cord under the TV set or other similar surface, since insufficient ventilation can break when the product is made of candle or flames on each side of... dripping or splashing. Do not use this television equipment during a lightning storm, or when it is left unattended and unused for example, near the TV set. • To prevent fire or shock hazard, do not allow the cabinet to follow the manufacturer's instructions. Do not place the product on an...
... hand on the top or near a bath tub, wash bowl, kitchen sink, or laundry tub; Also, do not place the AC cord under the TV set or other similar surface, since insufficient ventilation can break when the product is made of candle or flames on each side of... dripping or splashing. Do not use this television equipment during a lightning storm, or when it is left unattended and unused for example, near the TV set. • To prevent fire or shock hazard, do not allow the cabinet to follow the manufacturer's instructions. Do not place the product on an...

User Manual
Page 7
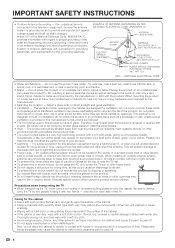
... block construction. IMPORTANT SAFETY INSTRUCTIONS Caring for the front panel • Turn off the main power and unplug the AC cord from Sharp in mind: THE ISSUE • The home theater entertainment experience is appropriate. If you have any doubts about your ability to the...a hard cloth or using strong force may scratch the surface of this product. • Don't allow children to walls with furniture and television sets. • Don't place flat panel displays are not always supported on the proper stands or installed according to the manufacturer's recommendations. ...
... block construction. IMPORTANT SAFETY INSTRUCTIONS Caring for the front panel • Turn off the main power and unplug the AC cord from Sharp in mind: THE ISSUE • The home theater entertainment experience is appropriate. If you have any doubts about your ability to the...a hard cloth or using strong force may scratch the surface of this product. • Don't allow children to walls with furniture and television sets. • Don't place flat panel displays are not always supported on the proper stands or installed according to the manufacturer's recommendations. ...

User Manual
Page 10
...Entering Text (Software Keyboard 74 Using the Browser 75-78 Using Applications via the Internet 79-80 Appendix Removing the Stand 81 Setting the TV on the PRO-60X5FD model. 8 Contents IMPORTANT INFORMATION 1 DEAR ELITE CUSTOMER 3 IMPORTANT SAFETY INSTRUCTIONS 3-6 Trademarks 6-7 Supplied Accessories 9 QUICK REFERENCE Attaching...63 Link Operation Menu 64-65 Using a PC Displaying a PC Image on the Screen 66 Adjusting the PC Image 67 Setting Audio Input 67 PC Compatibility Chart 67 Control of Connection 14 Displaying an External Equipment Image 14 Connecting to External Equipment ...
...Entering Text (Software Keyboard 74 Using the Browser 75-78 Using Applications via the Internet 79-80 Appendix Removing the Stand 81 Setting the TV on the PRO-60X5FD model. 8 Contents IMPORTANT INFORMATION 1 DEAR ELITE CUSTOMER 3 IMPORTANT SAFETY INSTRUCTIONS 3-6 Trademarks 6-7 Supplied Accessories 9 QUICK REFERENCE Attaching...63 Link Operation Menu 64-65 Using a PC Displaying a PC Image on the Screen 66 Adjusting the PC Image 67 Setting Audio Input 67 PC Compatibility Chart 67 Control of Connection 14 Displaying an External Equipment Image 14 Connecting to External Equipment ...
User Manual
Page 11
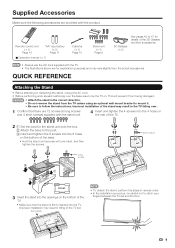
...the TV. • The illustrations above are for the stand unit onto the box. 2 Attach the base to catch your fingers between the TV set . QUICK REFERENCE Attaching the Stand • Before attaching (or detaching) the stand, unplug the AC cord. • Before performing work spread cushioning over ...the TV unless using an optional wall mount bracket to mount it. • Be sure to lay the TV on. Incorrect installation of the TV set and the floor. 9 Supplied Accessories Make sure the following accessories are 12 screws (8 long screws and 4 short screws) supplied with the ...
...the TV. • The illustrations above are for the stand unit onto the box. 2 Attach the base to catch your fingers between the TV set . QUICK REFERENCE Attaching the Stand • Before attaching (or detaching) the stand, unplug the AC cord. • Before performing work spread cushioning over ...the TV unless using an optional wall mount bracket to mount it. • Be sure to lay the TV on. Incorrect installation of the TV set and the floor. 9 Supplied Accessories Make sure the following accessories are 12 screws (8 long screws and 4 short screws) supplied with the ...
User Manual
Page 13
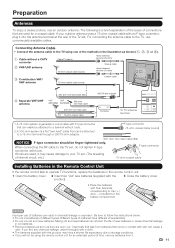
... may cause damage to your outdoor antenna uses a 75-ohm coaxial cable with skin can be finger-tightened only. If your TV set. (The breaking of connections that can cause a rash. F-type connector 75-ohm coaxial cable (round) 300-ohm twin-lead cable (fl... 3 Close the battery cover. • Place the batteries with tools. The following is a flat ) NOTICE F-type connector should be attached to the TV set . For connecting the antenna cable to the (e) and (f) indications in old batteries. • Remove batteries as soon as shown (1, 2, 3 or 4). 1 Cable ...
... may cause damage to your outdoor antenna uses a 75-ohm coaxial cable with skin can be finger-tightened only. If your TV set. (The breaking of connections that can cause a rash. F-type connector 75-ohm coaxial cable (round) 300-ohm twin-lead cable (fl... 3 Close the battery cover. • Place the batteries with tools. The following is a flat ) NOTICE F-type connector should be attached to the TV set . For connecting the antenna cable to the (e) and (f) indications in old batteries. • Remove batteries as soon as shown (1, 2, 3 or 4). 1 Cable ...
User Manual
Page 15
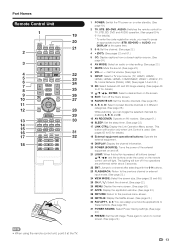
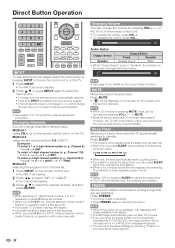
... pressed, all buttons (except a/b/c/d and the buttons under the cover) on the remote control unit will turn off the menu screen. 27 13 FAVORITE CH: Set the favorite channels. (See page 36.) 14 A, B, C, D: Select 4 preset favorite channels in 4 different categories. (See page 36.) 28 While watching, ... image. Press again to return to normal screen. (See page 22.) • When using the remote control unit, point it at the same time. 21 3 0-9: Set the channel. (See page 22.) 4 • (DOT): (See pages 22 and 61.) 5 CC: Display captions from a closed-caption source. (See page 24.)...
... pressed, all buttons (except a/b/c/d and the buttons under the cover) on the remote control unit will turn off the menu screen. 27 13 FAVORITE CH: Set the favorite channels. (See page 36.) 14 A, B, C, D: Select 4 preset favorite channels in 4 different categories. (See page 36.) 28 While watching, ... image. Press again to return to normal screen. (See page 22.) • When using the remote control unit, point it at the same time. 21 3 0-9: Set the channel. (See page 22.) 4 • (DOT): (See pages 22 and 61.) 5 CC: Display captions from a closed-caption source. (See page 24.)...
User Manual
Page 17
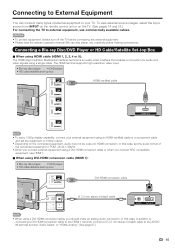
... use HDMI 1. ■ When using DVI-HDMI conversion cable (HDMI 1): • Blu-ray disc player • DVD player • HD cable/satellite set-top box DVI-HDMI conversion cable Ø 3.5 mm stereo minijack cable AUDIO DVI OUT • When using a DVI-HDMI conversion cable, you should make ...an analog audio connection. Connecting a Blu-ray Disc/DVD Player or HD Cable/Satellite Set-top Box ■ When using HDMI cable (HDMI 1, 2, 3, 4 or 5): The HDMI (High Definition Multimedia Interface) terminal is an audio-...
... use HDMI 1. ■ When using DVI-HDMI conversion cable (HDMI 1): • Blu-ray disc player • DVD player • HD cable/satellite set-top box DVI-HDMI conversion cable Ø 3.5 mm stereo minijack cable AUDIO DVI OUT • When using a DVI-HDMI conversion cable, you should make ...an analog audio connection. Connecting a Blu-ray Disc/DVD Player or HD Cable/Satellite Set-top Box ■ When using HDMI cable (HDMI 1, 2, 3, 4 or 5): The HDMI (High Definition Multimedia Interface) terminal is an audio-...

User Manual
Page 18
Connecting to External Equipment ■ When using Component cable (COMPONENT): • Blu-ray disc player • DVD player • HD cable/satellite set-top box Audio cable AUDIO-R (Red) AUDIO-L (White) PR (Red) Y (Green) PB (Blue) Component video cable COMPONENT OUT • To... using Composite cable (VIDEO 1 or 2): • Game console • Camcorder • VCR • Cable/Satellite set -top box to the HDMI terminal. Connecting a VCR, Game Console, Camcorder or Cable/Satellite Set-top Box ■ When using an HDMI-certified cable or a component cable and...
Connecting to External Equipment ■ When using Component cable (COMPONENT): • Blu-ray disc player • DVD player • HD cable/satellite set-top box Audio cable AUDIO-R (Red) AUDIO-L (White) PR (Red) Y (Green) PB (Blue) Component video cable COMPONENT OUT • To... using Composite cable (VIDEO 1 or 2): • Game console • Camcorder • VCR • Cable/Satellite set -top box to the HDMI terminal. Connecting a VCR, Game Console, Camcorder or Cable/Satellite Set-top Box ■ When using an HDMI-certified cable or a component cable and...

User Manual
Page 19
...Connecting a Surround System/Audio System ■ When connecting an AV amplifier for surround system HDMI-certified cable *1 HD Cable/Satellite set the audio formats of the connected surround system. ■ When connecting an Audio amplifier It is possible to RCA audio cable • See... page 33 for details.) PCM audio outputs from the DIGITAL AUDIO OUTPUT terminal in HDMI connection. In this case, set -top box HDMI OUT OPTICAL DIGITAL AUDIO INPUT HDMI OUT HDMI IN Optical fiber cable *2 • Letting the TV output the audio to...
...Connecting a Surround System/Audio System ■ When connecting an AV amplifier for surround system HDMI-certified cable *1 HD Cable/Satellite set the audio formats of the connected surround system. ■ When connecting an Audio amplifier It is possible to RCA audio cable • See... page 33 for details.) PCM audio outputs from the DIGITAL AUDIO OUTPUT terminal in HDMI connection. In this case, set -top box HDMI OUT OPTICAL DIGITAL AUDIO INPUT HDMI OUT HDMI IN Optical fiber cable *2 • Letting the TV output the audio to...

User Manual
Page 20
...case, in addition to connecting a DVI-HDMI conversion cable to the HDMI 1 terminal, connect a Ø 3.5 mm stereo minijack cable to the AUDIO IN terminal and set "Audio Select" to "HDMI+Analog". (See page 67.) ■ When using analog RGB cable (PC IN): Analog RGB cable (D-sub 15-pin cable or VGA...addition to connecting an HDMI-certified cable to the HDMI 1 terminal, connect a Ø 3.5 mm stereo minijack cable to the AUDIO IN terminal and set "Audio Select" to the AUDIO IN terminal of PC signals compatible with the TV. ■ When using an analog RGB cable, input the audio signal...
...case, in addition to connecting a DVI-HDMI conversion cable to the HDMI 1 terminal, connect a Ø 3.5 mm stereo minijack cable to the AUDIO IN terminal and set "Audio Select" to "HDMI+Analog". (See page 67.) ■ When using analog RGB cable (PC IN): Analog RGB cable (D-sub 15-pin cable or VGA...addition to connecting an HDMI-certified cable to the HDMI 1 terminal, connect a Ø 3.5 mm stereo minijack cable to the AUDIO IN terminal and set "Audio Select" to the AUDIO IN terminal of PC signals compatible with the TV. ■ When using an analog RGB cable, input the audio signal...
User Manual
Page 21
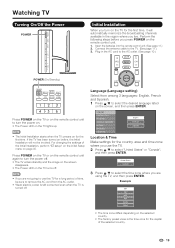
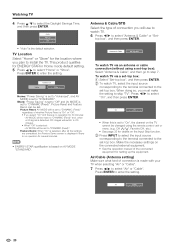
...TV lights up. • The Initial Installation starts when the TV powers on for the first time. For changing the settings of time, be invoked. Language (Language setting) Select from the AC outlet. • Weak electric power is still consumed even when the TV is the time zone for the...11.) 3. Language Location & Time TV Location Antenna & Cable/STB Air/Cable CH Search Completed English Français Español Location & Time Make settings for the country, area and time zone where you use this TV for a long period of the Initial Installation, perform "EZ setup" on the Initial...
...TV lights up. • The Initial Installation starts when the TV powers on for the first time. For changing the settings of time, be invoked. Language (Language setting) Select from the AC outlet. • Weak electric power is still consumed even when the TV is the time zone for the...11.) 3. Language Location & Time TV Location Antenna & Cable/STB Air/Cable CH Search Completed English Français Español Location & Time Make settings for the country, area and time zone where you use this TV for a long period of the Initial Installation, perform "EZ setup" on the Initial...
User Manual
Page 22
...Fixed)" and, when a 3D signal is detected, 3D images will switch to install the TV. Feature Demo: When "On" is selected, after all the settings are completed, the Feature Demo screen is displayed if there is "On" or "Off". • If you plan to 2D images. • When "...select "On", and then press ENTER. Picture Reset: AV MODE will use to select "Air" or "Cable". Press c/d to enter the setting. Make the necessary settings on the connected external equipment. • See the operation manual of whether Picture Reset is no operation for 30 minutes: - TV Location Select...
...Fixed)" and, when a 3D signal is detected, 3D images will switch to install the TV. Feature Demo: When "On" is selected, after all the settings are completed, the Feature Demo screen is displayed if there is "On" or "Off". • If you plan to 2D images. • When "...select "On", and then press ENTER. Picture Reset: AV MODE will use to select "Air" or "Cable". Press c/d to enter the setting. Make the necessary settings on the connected external equipment. • See the operation manual of whether Picture Reset is no operation for 30 minutes: - TV Location Select...
User Manual
Page 23
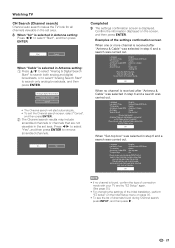
... carried out. Closed caption, sub-channel audio and channel selection need to select "Start", and then press ENTER. Yes No Completed 9 The settings confirmation screen is received after "Antenna & Cable" was selected in step 6 and a search was carried out. Antenna/Cable are... connecting your Antenna/Cable connection and Air/Cable setup. Please check your set area. Analog & Digital Search Start Analog Search Start Cancel • The Channel search will start automatically. • To exit the Channel ...
... carried out. Closed caption, sub-channel audio and channel selection need to select "Start", and then press ENTER. Yes No Completed 9 The settings confirmation screen is received after "Antenna & Cable" was selected in step 6 and a search was carried out. Antenna/Cable are... connecting your Antenna/Cable connection and Air/Cable setup. Please check your set area. Analog & Digital Search Start Analog Search Start Cancel • The Channel search will start automatically. • To exit the Channel ...
User Manual
Page 24
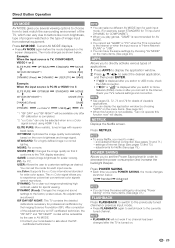
... press SLEEP, the remaining time switches as shown below . g., Channel 115): Press 1 1 5 ENT. Changing Volume You can change the time setting. • When it is not necessary to press 0 before the time expires, the remaining time will happen. • Complete the above steps ...• (DOT). To select a 3-digit channel number (e. g., Channel 22.1): Press 2 2 • (DOT) 1 ENT. Sleep Timer Allows you to set , the time automatically starts counting down. • If you are watching. Be sure to connect the equipment beforehand. • See pages 14 to adjust the...
... press SLEEP, the remaining time switches as shown below . g., Channel 115): Press 1 1 5 ENT. Changing Volume You can change the time setting. • When it is not necessary to press 0 before the time expires, the remaining time will happen. • Complete the above steps ...• (DOT). To select a 3-digit channel number (e. g., Channel 22.1): Press 2 2 • (DOT) 1 ENT. Sleep Timer Allows you to set , the time automatically starts counting down. • If you are watching. Be sure to connect the equipment beforehand. • See pages 14 to adjust the...
User Manual
Page 25
...increase the backlight lifespan. GAME: Lowers image brightness for sports viewing. No adjustments are allowed. DYNAMIC (Fixed): Changes the image and sound settings to customize settings as shown below : Example: When the input source is TV, COMPONENT, VIDEO 1 or 2 ELITE PURE OPTIMUM STANDARD MOVIE ISF DAY...lighting. Press NETFLIX. • To enjoy Netflix, you need to make: -a broadband Internet connection (See pages 70 and 71.) -settings of Internet Setup (See pages 72 and 73.) -adjustments for Netflix (See page 79.) POWER SAVING Allows you play games, "GAME"...
...increase the backlight lifespan. GAME: Lowers image brightness for sports viewing. No adjustments are allowed. DYNAMIC (Fixed): Changes the image and sound settings to customize settings as shown below : Example: When the input source is TV, COMPONENT, VIDEO 1 or 2 ELITE PURE OPTIMUM STANDARD MOVIE ISF DAY...lighting. Press NETFLIX. • To enjoy Netflix, you need to make: -a broadband Internet connection (See pages 70 and 71.) -settings of Internet Setup (See pages 72 and 73.) -adjustments for Netflix (See page 79.) POWER SAVING Allows you play games, "GAME"...

User Manual
Page 26
... available only on the channel information window. In the Closed Caption system, the "Text1" or "Text2" services display text that is set to "Standard" or "Advanced", the Power Saving leaf icon appears on digital TV programs (also at the discretion of "1/2/ENG". •... "1/3(CC1)". A closed caption service appears in parentheses because the service you have the same settings by the appearance of Power Saving settings. • See page 34 for detailed closed caption settings. • When the program contains no closed caption, "--" displays in the closed caption service...
... available only on the channel information window. In the Closed Caption system, the "Text1" or "Text2" services display text that is set to "Standard" or "Advanced", the Power Saving leaf icon appears on digital TV programs (also at the discretion of "1/2/ENG". •... "1/3(CC1)". A closed caption service appears in parentheses because the service you have the same settings by the appearance of Power Saving settings. • See page 34 for detailed closed caption settings. • When the program contains no closed caption, "--" displays in the closed caption service...

User Manual
Page 27
...:1 DVDs. Suitable for viewing widescreen 2.35:1 anamorphic DVDs in programs to fill the screen. screen. Full Screen (720p only): You can have the same settings by an original size. 25 Please change the View Mode while in 3D mode. Displays an image by choosing "View Mode" on the screen. Direct...
...:1 DVDs. Suitable for viewing widescreen 2.35:1 anamorphic DVDs in programs to fill the screen. screen. Full Screen (720p only): You can have the same settings by an original size. 25 Please change the View Mode while in 3D mode. Displays an image by choosing "View Mode" on the screen. Direct...
User Manual
Page 28
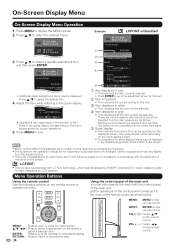
... currently selected. • Press ENTER to go to the adjustment screen for this item. 2 Item in brackets • This indicates the current setting for explanation purposes (some selected items may vary slightly from the actual screens. • The order of the items on the displayed screen. On... be selected, but the operating procedures are the same. • The screens in accordance with LC Font technology, which was developed by SHARP Corporation for some are as shown below. Button operations on the control panel correspond to the ones on the remote control as follows: -...
... currently selected. • Press ENTER to go to the adjustment screen for this item. 2 Item in brackets • This indicates the current setting for explanation purposes (some selected items may vary slightly from the actual screens. • The order of the items on the displayed screen. On... be selected, but the operating procedures are the same. • The screens in accordance with LC Font technology, which was developed by SHARP Corporation for some are as shown below. Button operations on the control panel correspond to the ones on the remote control as follows: -...
User Manual
Page 29
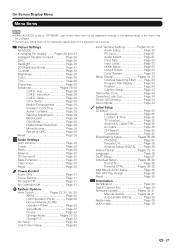
Picture Settings AV MODE (Changing Pic.Quality) ........Pages 28 and 47 Intelligent Variable Contrast Page 28 OPC Page 28 Backlight Page 28 3D Brightness Boost Page 47 Contrast Page 28 Brightness Page 28 Color Page 28 Tint Page 28 Sharpness Page 28 Advanced Pages 28-29 C.M.S.-Hue Page 28 C.M.S.-Saturation Page...33 Program Title Display Page 33 Position Page 34 Caption Setup Page 34 Game Play Time Page 34 Operation Lock Out Page 34 Power LED Setting Page 34 Demo Mode Page 34 Initial Setup EZ Setup Page 35 Language Page 35 Location & Time Page 35 TV Location Page 35 ...
Picture Settings AV MODE (Changing Pic.Quality) ........Pages 28 and 47 Intelligent Variable Contrast Page 28 OPC Page 28 Backlight Page 28 3D Brightness Boost Page 47 Contrast Page 28 Brightness Page 28 Color Page 28 Tint Page 28 Sharpness Page 28 Advanced Pages 28-29 C.M.S.-Hue Page 28 C.M.S.-Saturation Page...33 Program Title Display Page 33 Position Page 34 Caption Setup Page 34 Game Play Time Page 34 Operation Lock Out Page 34 Power LED Setting Page 34 Demo Mode Page 34 Initial Setup EZ Setup Page 35 Language Page 35 Location & Time Page 35 TV Location Page 35 ...


