Operation Manual
Page 5
... of actual set. DO NOT REMOVE SCREWS EXCEPT SPECIFIED USER SERVICE SCREWS. The lightning flash with arrowhead symbol, within an equilateral triangle, is likely to Part 15 of light, or view directly. WARNING: FCC Regulations state that may be required to the presence of your purchase. 2. U.S.A. CONSUMER PRODUCT SAFETY ACT To ensure that SHARP may cause harmful interference to your new SHARP Projector, using the projector, please...
... of actual set. DO NOT REMOVE SCREWS EXCEPT SPECIFIED USER SERVICE SCREWS. The lightning flash with arrowhead symbol, within an equilateral triangle, is likely to Part 15 of light, or view directly. WARNING: FCC Regulations state that may be required to the presence of your purchase. 2. U.S.A. CONSUMER PRODUCT SAFETY ACT To ensure that SHARP may cause harmful interference to your new SHARP Projector, using the projector, please...
Operation Manual
Page 6
... REPORTER AU MODE D'EMPLOI. -2 LAMP REPLACEMENT CAUTION BEFORE REMOVING THE SCREW, DISCONNECT POWER CORD. UV RADIATION : CAN CAUSE EYE DAMAGE. During normal operation, when turning the power off . DEBRANCHER LE CORDON D'ALIMENTATION AVANT DE RETIRER LES VIS. LAMPE A MOYENNE PRESSION : RISQUE D'EXPLOSION. FAILURE TO OBSERVE THIS WILL RESULT IN PREMATURE LAMP FAILURE. POTENTIAL HAZARD OF GLASS PARTICLES IF LAMP HAS RUPTURED. WARNING: The cooling fan in the...
... REPORTER AU MODE D'EMPLOI. -2 LAMP REPLACEMENT CAUTION BEFORE REMOVING THE SCREW, DISCONNECT POWER CORD. UV RADIATION : CAN CAUSE EYE DAMAGE. During normal operation, when turning the power off . DEBRANCHER LE CORDON D'ALIMENTATION AVANT DE RETIRER LES VIS. LAMPE A MOYENNE PRESSION : RISQUE D'EXPLOSION. FAILURE TO OBSERVE THIS WILL RESULT IN PREMATURE LAMP FAILURE. POTENTIAL HAZARD OF GLASS PARTICLES IF LAMP HAS RUPTURED. WARNING: The cooling fan in the...

Operation Manual
Page 7
... source signals. • New Edge Up-Scaling Reduces jaggies and flickering when up to 160 Hz and a wide range of synchronous signals. • Using Advanced Intelligent Compression Technology, computer screens of the motion detect I /P conversion algorithm enhances the performance of SXGA+ (1,400 #1,050) resolution can be displayed with Fujinon™ optical lens system • Newly developed DDR (Double Data Rate) chip eliminates Color...
... source signals. • New Edge Up-Scaling Reduces jaggies and flickering when up to 160 Hz and a wide range of synchronous signals. • Using Advanced Intelligent Compression Technology, computer screens of the motion detect I /P conversion algorithm enhances the performance of SXGA+ (1,400 #1,050) resolution can be displayed with Fujinon™ optical lens system • Newly developed DDR (Double Data Rate) chip eliminates Color...

Operation Manual
Page 8
... 13 Accessories 14 Setup and Connections Setup 16 Using the Adjustment Feet 16 Setting up the Screen 17 Screen Size and Projection Distance 18 Projecting a Reversed/Inverted Image 19 Connecting the Projector to Other Devices .... 20 Before Connecting 20 This projector can be connected to 20 Connecting the Power Cord 20 Connecting the Projector to a Computer .......... 21 Connecting to Video Equipment 23 Connecting to a Monitor 25 Using the Wireless Presentation Function of the Remote Control 26 Basic Operation Setting with the Buttons Image Projection 28 Basic...
... 13 Accessories 14 Setup and Connections Setup 16 Using the Adjustment Feet 16 Setting up the Screen 17 Screen Size and Projection Distance 18 Projecting a Reversed/Inverted Image 19 Connecting the Projector to Other Devices .... 20 Before Connecting 20 This projector can be connected to 20 Connecting the Power Cord 20 Connecting the Projector to a Computer .......... 21 Connecting to Video Equipment 23 Connecting to a Monitor 25 Using the Wireless Presentation Function of the Remote Control 26 Basic Operation Setting with the Buttons Image Projection 28 Basic...

Operation Manual
Page 9
Introduction Setting the Anti-Theft 63 Entering the Keycode 63 Changing the Keycode 64 Initializing the Settings 65 Displaying the Adjustment Settings 66 Appendix Carrying the Projector 68 Maintenance 69 Maintenance Indicators 70 Regarding the Lamp 71 Lamp 71 Caution Concerning the Lamp 71 Replacing the Lamp 71 Removing and Installing the Lamp Unit 72 Resetting the Lamp Timer 73 Connecting Pin Assignments 74 Computer Compatibility Chart 75 Troubleshooting 76 For SHARP Assistance 78 Specifications 79 Dimensions 80 Glossary 81 Index 82 -5
Introduction Setting the Anti-Theft 63 Entering the Keycode 63 Changing the Keycode 64 Initializing the Settings 65 Displaying the Adjustment Settings 66 Appendix Carrying the Projector 68 Maintenance 69 Maintenance Indicators 70 Regarding the Lamp 71 Lamp 71 Caution Concerning the Lamp 71 Replacing the Lamp 71 Removing and Installing the Lamp Unit 72 Resetting the Lamp Timer 73 Connecting Pin Assignments 74 Computer Compatibility Chart 75 Troubleshooting 76 For SHARP Assistance 78 Specifications 79 Dimensions 80 Glossary 81 Index 82 -5
Operation Manual
Page 11
... Instruments, Inc. • Microsoft and Windows are required, be mounted to SHARP Corporation by the manufacturer or have the same characteristics as an improper adjustment of the Software licensed under the following the operating instructions. Lineo will often require extensive work by following conditions: a. ments. c. LINEO, Inc. • DLP™ (Digital Light Processing) and DMD™ (Digital Micromirror Device) are trademarks of Apple...
... Instruments, Inc. • Microsoft and Windows are required, be mounted to SHARP Corporation by the manufacturer or have the same characteristics as an improper adjustment of the Software licensed under the following the operating instructions. Lineo will often require extensive work by following conditions: a. ments. c. LINEO, Inc. • DLP™ (Digital Light Processing) and DMD™ (Digital Micromirror Device) are trademarks of Apple...
Operation Manual
Page 12
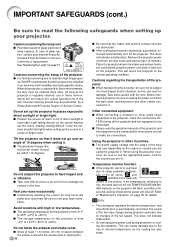
... setting up the screen in places exposed to direct sunlight or bright light. I If the projector starts to overheat due to hard impact and/ or vibration. This will blink, and after a 90- CAUTION PRECAUCI N PR CAUTION BQC-PGM20X//1 Cautions concerning the setup of glass particles if lamp ruptures. I The operating temperature for instructions on how to make the connections AFTER turning off , the TEMPERATURE WARN...
... setting up the screen in places exposed to direct sunlight or bright light. I If the projector starts to overheat due to hard impact and/ or vibration. This will blink, and after a 90- CAUTION PRECAUCI N PR CAUTION BQC-PGM20X//1 Cautions concerning the setup of glass particles if lamp ruptures. I The operating temperature for instructions on how to make the connections AFTER turning off , the TEMPERATURE WARN...
Operation Manual
Page 14
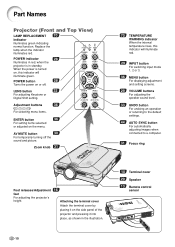
... red. Part Names Projector (Front and Top View) LAMP REPLACEMENT 70 indicator Illuminates green indicating normal function. Zoom knob 31 70 TEMPERATURE WARNING indicator When the internal temperature rises, this indicator will illuminate red. 29 INPUT button For switching input mode 1, 2 or 3. 36 MENU button For displaying adjustment and setting screens. 29 VOLUME buttons For adjusting the speaker sound level. 33 UNDO button For undoing an operation or returning to the default settings. 44 AUTO SYNC button For automatically adjusting images when connected to a computer. 31 Focus...
... red. Part Names Projector (Front and Top View) LAMP REPLACEMENT 70 indicator Illuminates green indicating normal function. Zoom knob 31 70 TEMPERATURE WARNING indicator When the internal temperature rises, this indicator will illuminate red. 29 INPUT button For switching input mode 1, 2 or 3. 36 MENU button For displaying adjustment and setting screens. 29 VOLUME buttons For adjusting the speaker sound level. 33 UNDO button For undoing an operation or returning to the default settings. 44 AUTO SYNC button For automatically adjusting images when connected to a computer. 31 Focus...

Operation Manual
Page 21
... image. Setup and Connections Setting up the screen in front of the screen. P.18 • The default setting can be used , when plac- P.60 • Place the projector so that the horizontal line that it is reversed or inverted, re- Light falling directly on the size of the lens is not perpendicular to the screen, the image will be centered in direct sunlight or room light. adjust the setting...
... image. Setup and Connections Setting up the screen in front of the screen. P.18 • The default setting can be used , when plac- P.60 • Place the projector so that the horizontal line that it is reversed or inverted, re- Light falling directly on the size of the lens is not perpendicular to the screen, the image will be centered in direct sunlight or room light. adjust the setting...

Operation Manual
Page 32
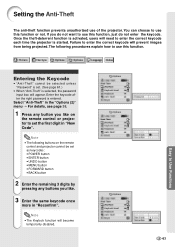
... set , enter the keycode or the input display will not appear. -28 MProjector indicators LAMP REPLACEMENT indicator POWER indicator POWER button INPUT button MENU button buttons ENTER button POWER button INPUT 1/2/3 buttons MENU button buttons ENTER button MKeycode input box Image Projection Basic Procedure Connect the required external equipment to start operation. If you want to change the on-screen display to another language, reset the language according to the procedure on again, the LAMP REPLACEMENT indicator may take time to illuminate. When "Anti-Theft" is turned...
... set , enter the keycode or the input display will not appear. -28 MProjector indicators LAMP REPLACEMENT indicator POWER indicator POWER button INPUT button MENU button buttons ENTER button POWER button INPUT 1/2/3 buttons MENU button buttons ENTER button MKeycode input box Image Projection Basic Procedure Connect the required external equipment to start operation. If you want to change the on-screen display to another language, reset the language according to the procedure on again, the LAMP REPLACEMENT indicator may take time to illuminate. When "Anti-Theft" is turned...
Operation Manual
Page 67
... . 3 Enter the same keycode once more in "New Code". Note • The following procedures explain how to set as keycodes: • POWER button • ENTER button • UNDO button • MENU button • FORWARD button • BACK button 2 Enter the remaining 3 digits by pressing any button you do not want to enter the correct keycode each time the projector is selected, the password input box will appear.
... . 3 Enter the same keycode once more in "New Code". Note • The following procedures explain how to set as keycodes: • POWER button • ENTER button • UNDO button • MENU button • FORWARD button • BACK button 2 Enter the remaining 3 digits by pressing any button you do not want to enter the correct keycode each time the projector is selected, the password input box will appear.
Operation Manual
Page 74
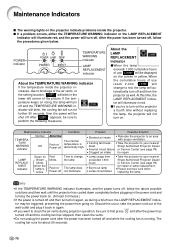
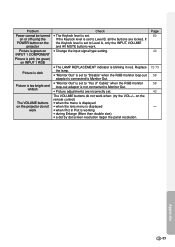
... the TEMPERATURE WARNING indicator or the LAMP REPLACEMENT indicator will illuminate red, and the power will blink in - creases, due to blockage of the air vents, or the setting location, " " will turn off . After " " appears, be shut off not illuminate. • Lamp usage time exceeded 1,900 hours • Burnt-out lamp • Lamp circuit failure • Take the projector to your nearest down completely before plugging in the power cord and turning the power back...
... the TEMPERATURE WARNING indicator or the LAMP REPLACEMENT indicator will illuminate red, and the power will blink in - creases, due to blockage of the air vents, or the setting location, " " will turn off . After " " appears, be shut off not illuminate. • Lamp usage time exceeded 1,900 hours • Burnt-out lamp • Lamp circuit failure • Take the projector to your nearest down completely before plugging in the power cord and turning the power back...

Operation Manual
Page 75
... projector. I When the LAMP REPLACEMENT indicator and on-screen display icon are illuminated or flash, it can be checked with this projector is backed by following the instructions described in this projector under warranty, including lamp replacement, must be obtained through a Sharp Autho- The lamp usage time can lead to burn or injury. • Wait at your projector to the nearest Sharp Authorized Projector Dealer or Service Center for repair. All service...
... projector. I When the LAMP REPLACEMENT indicator and on-screen display icon are illuminated or flash, it can be checked with this projector is backed by following the instructions described in this projector under warranty, including lamp replacement, must be obtained through a Sharp Autho- The lamp usage time can lead to burn or injury. • Wait at your projector to the nearest Sharp Authorized Projector Dealer or Service Center for repair. All service...
Operation Manual
Page 77
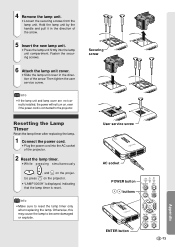
... direction of the arrow. 5 Insert the new lamp unit. • Press the lamp unit firmly into the AC socket of the arrow. rectly installed, the power will not turn on the projector. • "LAMP 0000H" is displayed, indicating that the lamp timer is connected to the projector. Info • If the lamp unit and lamp cover are not cor- User service screw AC socket POWER button buttons ENTER button -73 Appendix Info • Make...
... direction of the arrow. 5 Insert the new lamp unit. • Press the lamp unit firmly into the AC socket of the arrow. rectly installed, the power will not turn on the projector. • "LAMP 0000H" is displayed, indicating that the lamp timer is connected to the projector. Info • If the lamp unit and lamp cover are not cor- User service screw AC socket POWER button buttons ENTER button -73 Appendix Info • Make...

Operation Manual
Page 80
... sound is set to interlace mode using RGB signals. -76 Check • Projector power cord is not plugged into the wall outlet. • Power to the external connected devices is off. • The selected input mode is wrong. • Cables incorrectly connected to side panel of the projector. • Remote control batteries have run out. • External output has not been set when connecting notebook computer. • The AV MUTE display appears...
... sound is set to interlace mode using RGB signals. -76 Check • Projector power cord is not plugged into the wall outlet. • Power to the external connected devices is off. • The selected input mode is wrong. • Cables incorrectly connected to side panel of the projector. • Remote control batteries have run out. • External output has not been set when connecting notebook computer. • The AV MUTE display appears...
Operation Manual
Page 81
... work . • Change the input signal type setting. • The LAMP REPLACEMENT indicator is blinking in Pict is working • during Enlarge (More than double size) • a dot by dot screen resolution larger the panel resolution. Replace the lamp. • "Monitor Out" is set to "Disable" when the RGB monitor loop-out adaptor is connected to Monitor Out. • "Monitor Out" is set . Problem Power cannot be turned on or off using the POWER button on the projector Picture is green...
... work . • Change the input signal type setting. • The LAMP REPLACEMENT indicator is blinking in Pict is working • during Enlarge (More than double size) • a dot by dot screen resolution larger the panel resolution. Replace the lamp. • "Monitor Out" is set to "Disable" when the RGB monitor loop-out adaptor is connected to Monitor Out. • "Monitor Out" is set . Problem Power cannot be turned on or off using the POWER button on the projector Picture is green...
Operation Manual
Page 82
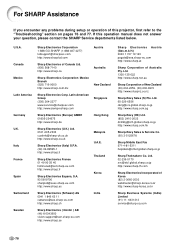
... (525) 716-9000 http://www.sharp.com.mx New Zealand Sharp Electronics Corp. Canada Mexico Latin America Germany U.K. Italy France Spain Switzerland Sweden Sharp Electronics Corporation 1-888-GO-SHARP (1-888-467-4277) [email protected] http://www.sharplcd.com Austria Sharp Electronics of this operation manual does not answer your question, please contact the SHARP Service departments listed below. Ltd...
... (525) 716-9000 http://www.sharp.com.mx New Zealand Sharp Electronics Corp. Canada Mexico Latin America Germany U.K. Italy France Spain Switzerland Sweden Sharp Electronics Corporation 1-888-GO-SHARP (1-888-467-4277) [email protected] http://www.sharplcd.com Austria Sharp Electronics of this operation manual does not answer your question, please contact the SHARP Service departments listed below. Ltd...
Operation Manual
Page 83
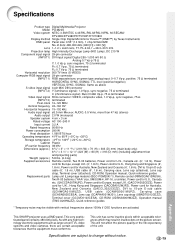
...), USB cable (QCNWG0001WJPZ), Carrying case (GCASN0005CESA), Lens cap (CCAPHA001WJ01), Lens cap strap (UBNDT0013CEZZ), Terminal cover (GCOVD0103CESA), CD-ROM (UDSKAA009WJZZ), Operation manual (TINS-A209WJZZ), Quick reference guides * Temporary noise may result in inactive dots on green type analog input: 0-0.7 Vp-p, positive, 75 Ω terminated HORIZONTAL SYNC. Specifications Product type Digital Multimedia Projector Model PG-M20S Video system NTSC 3.58/NTSC 4.43/PAL/PAL-M/PAL-N/PAL 60/SECAM/ DTV480I/DTV480P/DTV720P/DTV1080I Display...
...), USB cable (QCNWG0001WJPZ), Carrying case (GCASN0005CESA), Lens cap (CCAPHA001WJ01), Lens cap strap (UBNDT0013CEZZ), Terminal cover (GCOVD0103CESA), CD-ROM (UDSKAA009WJZZ), Operation manual (TINS-A209WJZZ), Quick reference guides * Temporary noise may result in inactive dots on green type analog input: 0-0.7 Vp-p, positive, 75 Ω terminated HORIZONTAL SYNC. Specifications Product type Digital Multimedia Projector Model PG-M20S Video system NTSC 3.58/NTSC 4.43/PAL/PAL-M/PAL-N/PAL 60/SECAM/ DTV480I/DTV480P/DTV720P/DTV1080I Display...

Operation Manual
Page 85
... Temp (Color temperature) Function that also supports Analog interfaces. Smart Stretch Projects the image fully in a 16:9 screen by the IEC (International Electrotechnical Commission). Password A password is turned on keystone images and compresses the image not only horizontally but - Progressive Mode The progressive display projects a smoother video image. RESIZE Allows you with the same resolution. Anti-theft In case the projector is incorrect. There are displayed in the middle part of image input to adjust...
... Temp (Color temperature) Function that also supports Analog interfaces. Smart Stretch Projects the image fully in a 16:9 screen by the IEC (International Electrotechnical Commission). Password A password is turned on keystone images and compresses the image not only horizontally but - Progressive Mode The progressive display projects a smoother video image. RESIZE Allows you with the same resolution. Anti-theft In case the projector is incorrect. There are displayed in the middle part of image input to adjust...

Operation Manual
Page 86
... POWER button 28 Power cord 20 POWER indicator 28 Power Save Mode 52 PRJ mode 60 Progressive Mode 41 Remote control 12 Remote control sensor 13 Remote control signal transmitter 12 Replacing the lamp 71 RESIZE button 46 Reversing/Inverting Images 60 Save Setting 42 Select Setting 43 Signal Info 43 Signal Type 40 SMART STRETCH 47 Speaker 29 Special Mode adjustment 43 sRGB 53 Startup image 57 Status 66 STRETCH 47 Supplied accessories 14 TEMPERATURE WARNING indicator 70 Terminal cover 10 UNDO button 33 USB cable 26 USB port...
... POWER button 28 Power cord 20 POWER indicator 28 Power Save Mode 52 PRJ mode 60 Progressive Mode 41 Remote control 12 Remote control sensor 13 Remote control signal transmitter 12 Replacing the lamp 71 RESIZE button 46 Reversing/Inverting Images 60 Save Setting 42 Select Setting 43 Signal Info 43 Signal Type 40 SMART STRETCH 47 Speaker 29 Special Mode adjustment 43 sRGB 53 Startup image 57 Status 66 STRETCH 47 Supplied accessories 14 TEMPERATURE WARNING indicator 70 Terminal cover 10 UNDO button 33 USB cable 26 USB port...


