Operation Manual
Page 5
only 6 Part Names 7 Setup & Connections Supplied Accessories 10 Connecting the Projector 11 Useful Features Freeze Function 33 Digital Image Magnification 34 Gamma Correction 35 Selecting the Picture Display Mode...49 Troubleshooting 49 Appendix Optional Lenses 50 Transporting the Projector 50 Connection Pin Assignments 51 RS-232C Port Specifications 52 Computer Compatibility Chart 54 Specifications 55 Dimensions 56 Guide to Access the PDF Operation Manuals (for Windows and Macintosh 6 For SHARP Assistance (U.S.A. Important Information Setup & Connections Contents Important...
only 6 Part Names 7 Setup & Connections Supplied Accessories 10 Connecting the Projector 11 Useful Features Freeze Function 33 Digital Image Magnification 34 Gamma Correction 35 Selecting the Picture Display Mode...49 Troubleshooting 49 Appendix Optional Lenses 50 Transporting the Projector 50 Connection Pin Assignments 51 RS-232C Port Specifications 52 Computer Compatibility Chart 54 Specifications 55 Dimensions 56 Guide to Access the PDF Operation Manuals (for Windows and Macintosh 6 For SHARP Assistance (U.S.A. Important Information Setup & Connections Contents Important...

Operation Manual
Page 24
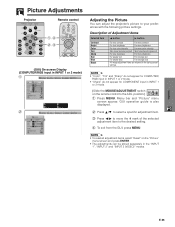
... INPUT 1, 2 or 3 mode menu bar. 2 Press ß/© to select an adjustment menu on the remote control to select a specific adjustment item. 4 To display a single adjustment item, press ENTER after selecting the item. Only the menu bar and the selected adjustment item will... appear. 5 Press ß/© to adjust the item. 6 Press UNDO to return to the previous screen. 7 Press MENU to adjust the image and various projector settings. INPUT 1 or 2 (COMPUTER/RGB) mode 1 ß 2 © (GUI) On-screen Display INPUT 3 (VIDEO) mode 1 ß 2 © ∂ 3 ƒ ß 5 &#...
... INPUT 1, 2 or 3 mode menu bar. 2 Press ß/© to select an adjustment menu on the remote control to select a specific adjustment item. 4 To display a single adjustment item, press ENTER after selecting the item. Only the menu bar and the selected adjustment item will... appear. 5 Press ß/© to adjust the item. 6 Press UNDO to return to the previous screen. 7 Press MENU to adjust the image and various projector settings. INPUT 1 or 2 (COMPUTER/RGB) mode 1 ß 2 © (GUI) On-screen Display INPUT 3 (VIDEO) mode 1 ß 2 © ∂ 3 ƒ ß 5 &#...

Operation Manual
Page 26
...be changed to the ADJ. on the remote control to the video system of the source signal. on the remote control to a specific system mode, if the selected system mode is not compatible with the connected audiovisual equipment. (Slide the MOUSE/ADJUSTMENT switch MOUSE ADJ...• When the system mode is the preset language for the On-screen Display. Operation Selecting the Video Input System Mode (INPUT 3 (VIDEO) mode only) Projector Remote control 1, 6 2, 3, 4 5 (GUI) On-screen Display The video input system mode is now programed to "Auto"; position.) 1 Press MENU. 2...
...be changed to the ADJ. on the remote control to the video system of the source signal. on the remote control to a specific system mode, if the selected system mode is not compatible with the connected audiovisual equipment. (Slide the MOUSE/ADJUSTMENT switch MOUSE ADJ...• When the system mode is the preset language for the On-screen Display. Operation Selecting the Video Input System Mode (INPUT 3 (VIDEO) mode only) Projector Remote control 1, 6 2, 3, 4 5 (GUI) On-screen Display The video input system mode is now programed to "Auto"; position.) 1 Press MENU. 2...
Operation Manual
Page 27
...GUI operation guide is also displayed. 2 Press ∂/ƒ to select a specific adjustment item. 3 Press ß/© to move the mark of Adjustment Items Selected item Contrast Bright Color Tint Sharp Red Blue Reset ß button © button For less contrast For more contrast...Picture" menu screen and press ENTER. • The adjustments can adjust the projector's picture to the factory preset settings. • "Color", "Tint" and "Sharp" do not appear for COMPUTER/ RGB input in INPUT 1 or 2 mode. • "Sharp" do not appear for COMPONENT input in the "INPUT 1", "INPUT 2" ...
...GUI operation guide is also displayed. 2 Press ∂/ƒ to select a specific adjustment item. 3 Press ß/© to move the mark of Adjustment Items Selected item Contrast Bright Color Tint Sharp Red Blue Reset ß button © button For less contrast For more contrast...Picture" menu screen and press ENTER. • The adjustments can adjust the projector's picture to the factory preset settings. • "Color", "Tint" and "Sharp" do not appear for COMPUTER/ RGB input in INPUT 1 or 2 mode. • "Sharp" do not appear for COMPONENT input in the "INPUT 1", "INPUT 2" ...

Operation Manual
Page 29
...Interlaced mode creates a single image through the activation of a video signal. This projector's audio is also displayed. 2 Press ß/© to select "Audio". 3 Press ∂/ƒ to select a specific adjustment item. 4 Press ß/© to move the mark of Adjustment ...it to save the setting. 6 To exit from the GUI, press MENU. However, you to the ADJ. Operation Picture Adjustments Projector Remote control 1, 6 2, 3, 4 5 (GUI) On-screen Display Audio Adjustments Projector Remote control 1, 5 2, 3, 4 (GUI) On-screen Display 2 3 I /P Conversion", and then press ©. 4...
...Interlaced mode creates a single image through the activation of a video signal. This projector's audio is also displayed. 2 Press ß/© to select "Audio". 3 Press ∂/ƒ to select a specific adjustment item. 4 Press ß/© to move the mark of Adjustment ...it to save the setting. 6 To exit from the GUI, press MENU. However, you to the ADJ. Operation Picture Adjustments Projector Remote control 1, 6 2, 3, 4 5 (GUI) On-screen Display Audio Adjustments Projector Remote control 1, 5 2, 3, 4 (GUI) On-screen Display 2 3 I /P Conversion", and then press ©. 4...

Operation Manual
Page 30
Computer Image Adjustments (INPUT 1 or 2 mode Only) Projector Remote control 1, 5 2, 3, 4 Adjusting the Computer Image When displaying computer patterns which are very detailed (tiling, vertical stripes, etc.), interference may occur between the LCD pixels, causing flickering, vertical stripes, or contrast irregularities in portions of Adjustment Items ...GUI operation guide is also displayed. 2 Press ß/© to select "Fine Sync". 3 Press ∂/ƒ to select a specific adjustment item. 4 Press ß/© to move the mark of the selected adjustment item to the left or right.
Computer Image Adjustments (INPUT 1 or 2 mode Only) Projector Remote control 1, 5 2, 3, 4 Adjusting the Computer Image When displaying computer patterns which are very detailed (tiling, vertical stripes, etc.), interference may occur between the LCD pixels, causing flickering, vertical stripes, or contrast irregularities in portions of Adjustment Items ...GUI operation guide is also displayed. 2 Press ß/© to select "Fine Sync". 3 Press ∂/ƒ to select a specific adjustment item. 4 Press ß/© to move the mark of the selected adjustment item to the left or right.

Operation Manual
Page 35
... input signal is changed during digital image magnification, the image will return to display a detailed portion of an image. on the remote control to magnify a specific portion of the image. (Slide the MOUSE/ADJUSTMENT switch MOUSE ADJ. Each time ENLARGE is pressed, the image will be magnified. 2 When the image is... the input signal is changed (a) when INPUT is pressed, (b) when the input signal is useful when you to the ADJ.) 1 Press ENLARGE. Digital Image Magnification Projector Remote control 2 1 3 This function allows you want to ן1.
... input signal is changed during digital image magnification, the image will return to display a detailed portion of an image. on the remote control to magnify a specific portion of the image. (Slide the MOUSE/ADJUSTMENT switch MOUSE ADJ. Each time ENLARGE is pressed, the image will be magnified. 2 When the image is... the input signal is changed (a) when INPUT is pressed, (b) when the input signal is useful when you to the ADJ.) 1 Press ENLARGE. Digital Image Magnification Projector Remote control 2 1 3 This function allows you want to ן1.
Operation Manual
Page 53
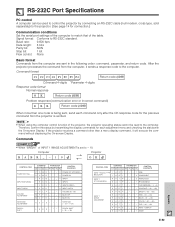
...send each adjustment menu and checking the status with the On-screen Display. Computer RABR _מ1 0 → ← Projector OK CONTROL ITEM POWER SETTING INPUT SWITCHING INPUT CHECK VOLUME ADJUSTMENT KEYSTONE ADJUSTMENT DIGITAL SHIFT COMMAND PARAMETER C1 C2 C3 C4 P1 P2 P3...from the computer, it will execute the command without displaying the On-screen Display. RS-232C Port Specifications PC control A computer can be used to control the projector by transmitting the display commands for each command only after the OK response code for connection.) Communication ...
...send each adjustment menu and checking the status with the On-screen Display. Computer RABR _מ1 0 → ← Projector OK CONTROL ITEM POWER SETTING INPUT SWITCHING INPUT CHECK VOLUME ADJUSTMENT KEYSTONE ADJUSTMENT DIGITAL SHIFT COMMAND PARAMETER C1 C2 C3 C4 P1 P2 P3...from the computer, it will execute the command without displaying the On-screen Display. RS-232C Port Specifications PC control A computer can be used to control the projector by transmitting the display commands for each command only after the OK response code for connection.) Communication ...

Operation Manual
Page 54
... range indicated in brackets under CONTROL CONTENTS. • INPUT ADJUSTMENT can only be set in the parameter column, enter a space. Appendix E-53 RS-232C Port Specifications CONTROL ITEM COMMAND PARAMETER C1 C2 C3 C4 P1 P2 P3 P4 CONTROL CONTENTS INPUT2 SIGNAL TYPE I B S I _ _ _ 1 RGB SELECTION I B S I _ _ _ ...;30 - ם30) V A T I _ * * * TINT (מ30 - ם30) V A S H _ * * * SHARPNESS (מ30 - ם30) V A R D _ * * * RED (מ30 - ם30) V A B E _ *...
... range indicated in brackets under CONTROL CONTENTS. • INPUT ADJUSTMENT can only be set in the parameter column, enter a space. Appendix E-53 RS-232C Port Specifications CONTROL ITEM COMMAND PARAMETER C1 C2 C3 C4 P1 P2 P3 P4 CONTROL CONTENTS INPUT2 SIGNAL TYPE I B S I _ _ _ 1 RGB SELECTION I B S I _ _ _ ...;30 - ם30) V A T I _ * * * TINT (מ30 - ם30) V A S H _ * * * SHARPNESS (מ30 - ם30) V A R D _ * * * RED (מ30 - ם30) V A B E _ *...
Operation Manual
Page 56
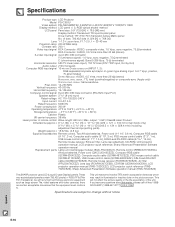
...), Air filter (PFILD0076CEZZ), Lens cap (PCAPH1307CESB), CD-ROM (UDSKA0019CEN1), LCD projector operation manual (TINS-7023CEZZ), LCD projector quick reference (TINS7025CEZZ), Sharp Advanced Presentation Software operation manual (TINS-7054CEZZ) This SHARP projector uses LCD (Liquid Crystal Display) panels. Appendix E-55 These very sophisticated panels contain... D-SUB CONNECTOR (INPUT 1, 2): RGB separate/composite sync/sync on the picture screen. Specifications Product type LCD Projector Model PG-C30XU Video system PAL/SECAM/NTSC 3.58/NTSC 4.43/DTV 480P/DTV 720P/DTV 1080I Display method...
...), Air filter (PFILD0076CEZZ), Lens cap (PCAPH1307CESB), CD-ROM (UDSKA0019CEN1), LCD projector operation manual (TINS-7023CEZZ), LCD projector quick reference (TINS7025CEZZ), Sharp Advanced Presentation Software operation manual (TINS-7054CEZZ) This SHARP projector uses LCD (Liquid Crystal Display) panels. Appendix E-55 These very sophisticated panels contain... D-SUB CONNECTOR (INPUT 1, 2): RGB separate/composite sync/sync on the picture screen. Specifications Product type LCD Projector Model PG-C30XU Video system PAL/SECAM/NTSC 3.58/NTSC 4.43/DTV 480P/DTV 720P/DTV 1080I Display method...