

Operation Manual
Page 5
...product to rain or moisture. CAUTION RISK OF ELECTRIC SHOCK. NO USER-SERVICEABLE PARTS EXCEPT LAMP UNIT. The exclamation point within a triangle is intended to alert the user to Part... are two important reasons for a Class A digital device, pursuant to the presence of light. PG-A20X_E_PDF_P01_03.p65 1 -1 03.4.23, 9:54 AM ment. CONSUMER PRODUCT SAFETY ACT To ensure that...risk of sufficient magnitude to constitute a risk or electric shock to your new SHARP Projector, using the projector, please read this product may cause radio interference in which case the user ...
...product to rain or moisture. CAUTION RISK OF ELECTRIC SHOCK. NO USER-SERVICEABLE PARTS EXCEPT LAMP UNIT. The exclamation point within a triangle is intended to alert the user to Part... are two important reasons for a Class A digital device, pursuant to the presence of light. PG-A20X_E_PDF_P01_03.p65 1 -1 03.4.23, 9:54 AM ment. CONSUMER PRODUCT SAFETY ACT To ensure that...risk of sufficient magnitude to constitute a risk or electric shock to your new SHARP Projector, using the projector, please read this product may cause radio interference in which case the user ...
Operation Manual
Page 6
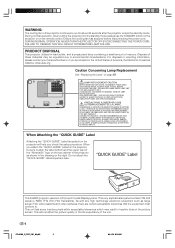
.... -2 PG-A20X_E_PDF_P01_03.p65 2 03.4.23, 9:54 AM Caution Concerning Lamp Replacement See "Replacing the Lamp" on the picture screen. HANDLE WITH CARE. SEE OPERATION MANUAL. ETEINDRE LA LAMPE AVANT DE PROCEDER A L'ENTRETIEN. When Attaching the "QUICK GUIDE" Label Attaching the "QUICK GUIDE" Label (supplied) on the right. "QUICK GUIDE" Label This SHARP projector uses an LCD (Liquid...
.... -2 PG-A20X_E_PDF_P01_03.p65 2 03.4.23, 9:54 AM Caution Concerning Lamp Replacement See "Replacing the Lamp" on the picture screen. HANDLE WITH CARE. SEE OPERATION MANUAL. ETEINDRE LA LAMPE AVANT DE PROCEDER A L'ENTRETIEN. When Attaching the "QUICK GUIDE" Label Attaching the "QUICK GUIDE" Label (supplied) on the right. "QUICK GUIDE" Label This SHARP projector uses an LCD (Liquid...

Operation Manual
Page 7
...Keylock • The Anti-Theft function renders the projector useless to prevent unauthorized use until a keycode is entered. • The... while also extending lamp life. 5. High Brightness Despite Compact Size • Use of 100" at just 3.3 meters (10' 10"). 3. XXXXXXXX • XXXXXXX -3 PG-A20X_E_PDF_P01_03.p65 3... 03.4.23, 9:54 AM Wide Input Signal Compatibility • Video systems compatible (NTSC3.58, PAL, SECAM, PAL-N, PAL-M, PAL-60 and NTSC4.43) • HD input compatible (1080I, 720P and 480P) • Computer input compatible (VGA, SVGA, XGA...
...Keylock • The Anti-Theft function renders the projector useless to prevent unauthorized use until a keycode is entered. • The... while also extending lamp life. 5. High Brightness Despite Compact Size • Use of 100" at just 3.3 meters (10' 10"). 3. XXXXXXXX • XXXXXXX -3 PG-A20X_E_PDF_P01_03.p65 3... 03.4.23, 9:54 AM Wide Input Signal Compatibility • Video systems compatible (NTSC3.58, PAL, SECAM, PAL-N, PAL-M, PAL-60 and NTSC4.43) • HD input compatible (1080I, 720P and 480P) • Computer input compatible (VGA, SVGA, XGA...

Operation Manual
Page 8
...Setup Connecting the Projector to Other Devices .... 15 Before Connecting 15 This projector can be connected to 15 Connecting the Power Cord 15 Connecting the Projector to a Computer 16 Connecting to Video Equipment 18 Controlling the Projector Using a ...Locking the operation Buttons 43 Taking the Keylock off 43 Using the "Options" Menu 44 Lamp Timer (Life) (Checking the Lamp Life Status 44 Keystone (Setting the Keystone Correction Mode 44 OSD Display (Setting On-screen... /Inverting Projected Images 50 Setting the Projection Mode 50 PG-A20X_E_PDF_P04_05.p65 4 03.4.23, 9:54 AM
...Setup Connecting the Projector to Other Devices .... 15 Before Connecting 15 This projector can be connected to 15 Connecting the Power Cord 15 Connecting the Projector to a Computer 16 Connecting to Video Equipment 18 Controlling the Projector Using a ...Locking the operation Buttons 43 Taking the Keylock off 43 Using the "Options" Menu 44 Lamp Timer (Life) (Checking the Lamp Life Status 44 Keystone (Setting the Keystone Correction Mode 44 OSD Display (Setting On-screen... /Inverting Projected Images 50 Setting the Projection Mode 50 PG-A20X_E_PDF_P04_05.p65 4 03.4.23, 9:54 AM

Operation Manual
Page 9
... Caution Concerning the Lamp 57 Replacing the Lamp 57 Removing and Installing the Lamp Unit 58 Resetting the Lamp Timer 59 Connecting Pin Assignments 60 RS-232C Specifications and Command Settings 61 Computer Compatibility Chart 62 Troubleshooting 63 For SHARP Assistance 65 Specifications 66 Dimensions 67 Glossary 68 Index 69 PG-A20X_E_PDF_P04_05.p65 5 -5 03.4.23, 9:54...
... Caution Concerning the Lamp 57 Replacing the Lamp 57 Removing and Installing the Lamp Unit 58 Resetting the Lamp Timer 59 Connecting Pin Assignments 60 RS-232C Specifications and Command Settings 61 Computer Compatibility Chart 62 Troubleshooting 63 For SHARP Assistance 65 Specifications 66 Dimensions 67 Glossary 68 Index 69 PG-A20X_E_PDF_P04_05.p65 5 -5 03.4.23, 9:54...

Operation Manual
Page 12
...stops. Internal cleaning should be safely tilted to rise, the lamp will enter the standby mode. The projector may change during projection or cooling fan operation. This will...it . When using the projector in internal temperature, as the projector is subjected to make the connections AFTER unplugging the power cord of temperature. PG-A20X_E_PDF_P06_14.p65 8 03.4.23... maintain high image qual- Rest your nearest Sharp Authorized Projector Dealer or Service Center for long hours will cause eye strain. Remove the projector power cord from humidity, dust and cigarette ...
...stops. Internal cleaning should be safely tilted to rise, the lamp will enter the standby mode. The projector may change during projection or cooling fan operation. This will...it . When using the projector in internal temperature, as the projector is subjected to make the connections AFTER unplugging the power cord of temperature. PG-A20X_E_PDF_P06_14.p65 8 03.4.23... maintain high image qual- Rest your nearest Sharp Authorized Projector Dealer or Service Center for long hours will cause eye strain. Remove the projector power cord from humidity, dust and cigarette ...

Operation Manual
Page 14
...26 Illuminates red when the projector is in place. • Press on the bottom of the projector) In this operation manual, the illustration and the screen display are simplified for explanation, and may differ slightly from the lens. -10 PG-A20X_E_PDF_P06_14.p65 10 22 Zoom ... 39 For automatically adjusting images when connected to a computer. 55 Lamp indicator Illuminates green indicating normal function. KEYSTONE button 29 For entering the Keystone Correction mode. STANDBY button 28 For putting the projector into the standby mode. When the power is explained. Remote control...
...26 Illuminates red when the projector is in place. • Press on the bottom of the projector) In this operation manual, the illustration and the screen display are simplified for explanation, and may differ slightly from the lens. -10 PG-A20X_E_PDF_P06_14.p65 10 22 Zoom ... 39 For automatically adjusting images when connected to a computer. 55 Lamp indicator Illuminates green indicating normal function. KEYSTONE button 29 For entering the Keystone Correction mode. STANDBY button 28 For putting the projector into the standby mode. When the power is explained. Remote control...
Operation Manual
Page 17
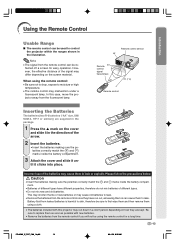
...types have run down in the illustration. Incorrect use of the batteries may malfunction under a fluorescent lamp. Battery fluid from leaked batteries is harmful to skin, therefore be sure to first wipe them...compartment. 3 Attach the cover and slide it clicks into place. In this projector may differ depending on the screen material. Using the Remote Control Introduction Usable Range I The...; Do not mix new and old batteries. flected off a screen for a long time. -13 PG-A20X_E_PDF_P06_14.p65 13 03.4.23, 9:55 AM Be sure to leak or explode. However, the effective...
...types have run down in the illustration. Incorrect use of the batteries may malfunction under a fluorescent lamp. Battery fluid from leaked batteries is harmful to skin, therefore be sure to first wipe them...compartment. 3 Attach the cover and slide it clicks into place. In this projector may differ depending on the screen material. Using the Remote Control Introduction Usable Range I The...; Do not mix new and old batteries. flected off a screen for a long time. -13 PG-A20X_E_PDF_P06_14.p65 13 03.4.23, 9:55 AM Be sure to leak or explode. However, the effective...

Operation Manual
Page 30
... projector enters standby mode. 2 Press on the projector or on page 48. ON button STANDBY button Power Lamp indicator indicator INPUT button Volume buttons Note •The lamp indicator illuminates, indicating the status of the lamp. After the lamp indicator illuminates, the projector is set on the projector ...Blinking in green: The lamp is English. Note • When entering the keycode, press the buttons previously set , the keycode input box will appear. Volume buttons MKeycode input box ON button AV MUTE button INPUT buttons -26 PG-A20X_E_PDF_P26_31.p65 26 03.4....
... projector enters standby mode. 2 Press on the projector or on page 48. ON button STANDBY button Power Lamp indicator indicator INPUT button Volume buttons Note •The lamp indicator illuminates, indicating the status of the lamp. After the lamp indicator illuminates, the projector is set on the projector ...Blinking in green: The lamp is English. Note • When entering the keycode, press the buttons previously set , the keycode input box will appear. Volume buttons MKeycode input box ON button AV MUTE button INPUT buttons -26 PG-A20X_E_PDF_P26_31.p65 26 03.4....
Operation Manual
Page 34
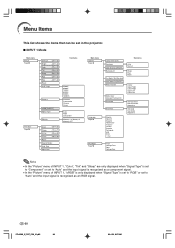
...Auto" and the input signal is recognized as an RGB signal. -30 PG-A20X_E_PDF_P26_31.p65 30 03.4.23, 9:57 AM I INPUT 1 Mode Main...;30 +30 Color −30 +30 Tint −30 +30 Sharp −30 +30 Red −30 +30 Blue −30...Component Memory 1 Memory 5 Memory OFF Main menu Options Page 44 Language Page 28 Lamp Timer (Life) Keystone OSD Display [ON/OFF] Background Eco Mode [Eco/Standard... Italiano Svenska Português Sub menu Auto Manual Sharp Blue None Center Upper Right Lower Right Upper Left..."Color", "Tint" and "Sharp" are only displayed when "Signal Type" is set to "Component"...
...Auto" and the input signal is recognized as an RGB signal. -30 PG-A20X_E_PDF_P26_31.p65 30 03.4.23, 9:57 AM I INPUT 1 Mode Main...;30 +30 Color −30 +30 Tint −30 +30 Sharp −30 +30 Red −30 +30 Blue −30...Component Memory 1 Memory 5 Memory OFF Main menu Options Page 44 Language Page 28 Lamp Timer (Life) Keystone OSD Display [ON/OFF] Background Eco Mode [Eco/Standard... Italiano Svenska Português Sub menu Auto Manual Sharp Blue None Center Upper Right Lower Right Upper Left..."Color", "Tint" and "Sharp" are only displayed when "Signal Type" is set to "Component"...

Operation Manual
Page 48
Example: "Options" menu screen for the Keystone Correction. For lamp replacement, contact your nearest Sharp Authorized Projector Dealer or Service Center. • The table above indicates rough estimates in the case of the menu screen, see page 40)). -44 PG-A20X_E_PDF_P40_50.p65 44 03.4.23, 9:58 AM stone Correction Mode) Select "Keystone" on the frequency...
Example: "Options" menu screen for the Keystone Correction. For lamp replacement, contact your nearest Sharp Authorized Projector Dealer or Service Center. • The table above indicates rough estimates in the case of the menu screen, see page 40)). -44 PG-A20X_E_PDF_P40_50.p65 44 03.4.23, 9:58 AM stone Correction Mode) Select "Keystone" on the frequency...

Operation Manual
Page 49
..."Auto"; are improved when "Eco Mode" is factory preset to the projector. Select "Video System" on or off. Video System (Setting the Video System) The video input system mode is preset to Use Functions PG-A20X_E_PDF_P40_50.p65 45 03.4.23, 9:58 AM screen Display) This function ...When connected to turn the on-screen messages on the "Options" menu and the appropriate video system. Sharp Blue None Description of Eco Mode Selectable settings Brightness Power consumption (When using AC 110V) Lamp life (Eco mode) 80% 190 W 4,500 hours (Standard mode) 100% 240 W 3,000 ...
..."Auto"; are improved when "Eco Mode" is factory preset to the projector. Select "Video System" on or off. Video System (Setting the Video System) The video input system mode is preset to Use Functions PG-A20X_E_PDF_P40_50.p65 45 03.4.23, 9:58 AM screen Display) This function ...When connected to turn the on-screen messages on the "Options" menu and the appropriate video system. Sharp Blue None Description of Eco Mode Selectable settings Brightness Power consumption (When using AC 110V) Lamp life (Eco mode) 80% 190 W 4,500 hours (Standard mode) 100% 240 W 3,000 ...

Operation Manual
Page 57
... used in a dusty or smoky location. • Ask your nearest Sharp Authorized Projector Dealer or Service Center to exchange the filter (PFILDA008WJZZ) when it is equipped with your fingers and lift it out of use. " Bottom view " Rear ... remote control to put the projector into the standby mode. • Wait until the cooling fan stops. Replacing the Air Filter • This projector is no longer possible to clean. Loosen the user service screw (1) that secures the filter/lamp unit cover. AC socket 1 3 User service screw 2 Tab Appendix PG-A20X_E_PDF_P51_62.p65 53 03...
... used in a dusty or smoky location. • Ask your nearest Sharp Authorized Projector Dealer or Service Center to exchange the filter (PFILDA008WJZZ) when it is equipped with your fingers and lift it out of use. " Bottom view " Rear ... remote control to put the projector into the standby mode. • Wait until the cooling fan stops. Replacing the Air Filter • This projector is no longer possible to clean. Loosen the user service screw (1) that secures the filter/lamp unit cover. AC socket 1 3 User service screw 2 Tab Appendix PG-A20X_E_PDF_P51_62.p65 53 03...

Operation Manual
Page 58
...unless it while pressing the tab (2) to secure the filter/ lamp unit cover. Replacing the Air Filter 5 Clean the air filter. • Clean the dust off the air filter and cover with a vacuum cleaner extension hose. 1 2 Tab 3 -54 PG-A20X_E_PDF_P51_62.p65 54 User service screw 03.4.23, 9:59 AM... The power will not turn on the filter/lamp unit cover (1) and place it is securely installed.
...unless it while pressing the tab (2) to secure the filter/ lamp unit cover. Replacing the Air Filter 5 Clean the air filter. • Clean the dust off the air filter and cover with a vacuum cleaner extension hose. 1 2 Tab 3 -54 PG-A20X_E_PDF_P51_62.p65 54 User service screw 03.4.23, 9:59 AM... The power will not turn on the filter/lamp unit cover (1) and place it is securely installed.

Operation Manual
Page 59
..., due to your nearest Sharp Authorized Projector Dealer or Service Center for repair. • Lamp circuit failure • Please exercise care when replacing the lamp. Problem Possible Solution • Blocked air intake • Relocate the projector to an area with "Standard Mode" (see page 65) • Burnt-out lamp for advice. -55 PG-A20X_E_PDF_P51_62.p65 55 03...
..., due to your nearest Sharp Authorized Projector Dealer or Service Center for repair. • Lamp circuit failure • Please exercise care when replacing the lamp. Problem Possible Solution • Blocked air intake • Relocate the projector to an area with "Standard Mode" (see page 65) • Burnt-out lamp for advice. -55 PG-A20X_E_PDF_P51_62.p65 55 03...

Operation Manual
Page 60
... for about 90 seconds. -56 PG-A20X_E_PDF_P51_62.p65 56 03.4.23, 9:59 AM In this case, unplug the power cord from the AC outlet, replace the power cord in red and the lamp may not be sure to power outage or some other cause while using the projector, and the power supply recovers... immediately after the projector has entered the standby mode and while the cooling fan is running. The cooling...
... for about 90 seconds. -56 PG-A20X_E_PDF_P51_62.p65 56 03.4.23, 9:59 AM In this case, unplug the power cord from the AC outlet, replace the power cord in red and the lamp may not be sure to power outage or some other cause while using the projector, and the power supply recovers... immediately after the projector has entered the standby mode and while the cooling fan is running. The cooling...
Operation Manual
Page 61
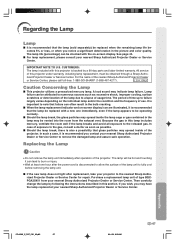
... injury. • Wait at your nearest Sharp Authorized Projector Dealer or Service Center. Appendix PG-A20X_E_PDF_P51_62.p65 57 03.4.23, 9:59 AM -57 It is recommended you contact your nearest Sharp Authorized Projector Dealer or Service Center to a lapse of use. Replacing the Lamp Caution • Do not remove the lamp unit immediately after operation of exposure...
... injury. • Wait at your nearest Sharp Authorized Projector Dealer or Service Center. Appendix PG-A20X_E_PDF_P51_62.p65 57 03.4.23, 9:59 AM -57 It is recommended you contact your nearest Sharp Authorized Projector Dealer or Service Center to a lapse of use. Replacing the Lamp Caution • Do not remove the lamp unit immediately after operation of exposure...

Operation Manual
Page 62
...• Change the air filter whenever you install the lamp unit (see pages 53 and 54). 4 Remove the filter/lamp unit cover. • Turn the projector over. Regarding the Lamp Removing and Installing the Lamp Unit Info • Be sure to the lamp, be very hot and may cause burn or injury....touch the glass surface of the lamp unit or the inside of the projector. • To avoid injury to yourself and damage to remove the lamp unit using the handle. Pressing the tab (2), remove the filter/lamp unit cover (3). -58 PG-A20X_E_PDF_P51_62.p65 58 Lamp unit BQC-PGA20X//1 STANDBY button ...
...• Change the air filter whenever you install the lamp unit (see pages 53 and 54). 4 Remove the filter/lamp unit cover. • Turn the projector over. Regarding the Lamp Removing and Installing the Lamp Unit Info • Be sure to the lamp, be very hot and may cause burn or injury....touch the glass surface of the lamp unit or the inside of the projector. • To avoid injury to yourself and damage to remove the lamp unit using the handle. Pressing the tab (2), remove the filter/lamp unit cover (3). -58 PG-A20X_E_PDF_P51_62.p65 58 Lamp unit BQC-PGA20X//1 STANDBY button ...

Operation Manual
Page 63
... the lamp unit compartment. PG-A20X_E_PDF_P51_62.p65 59 Handle Securing screws 3 1 2 User service screw AC socket ON button Volume buttons AUTO SYNC button 03.4.23, 9:59 AM -59 Appendix 5 Remove the lamp unit. • Loosen the securing screws from the lamp unit. At this may cause the lamp to the projector. Info • If the lamp unit...
... the lamp unit compartment. PG-A20X_E_PDF_P51_62.p65 59 Handle Securing screws 3 1 2 User service screw AC socket ON button Volume buttons AUTO SYNC button 03.4.23, 9:59 AM -59 Appendix 5 Remove the lamp unit. • Loosen the securing screws from the lamp unit. At this may cause the lamp to the projector. Info • If the lamp unit...

Operation Manual
Page 65
... _ _ _ 1 0~100 T L P S _ _ _ 1 0:Off, 1:On, 2:Retry, 3:Waiting, 4:Lamp Error T A B N _ _ _ 1 0:Normal, 1:Temp High, 2:Fan Err, 4:Filter Cover Err, 8:Lamp Life 5% or less, 16:Lamp Burnt-out, 32:Lamp Not Lit, 64:Temp Abnormally High T N A M _ _ _ 1 PROJECTOR NAME I M B K _ _ _ 0 OK or ERR I M B K _ _ _ 1 OK or ...ERR A D J S _ _ _ 1 OK or ERR Note • If an underbar (_) appears in brackets under CONTROL CONTENTS. -61 PG...
... _ _ _ 1 0~100 T L P S _ _ _ 1 0:Off, 1:On, 2:Retry, 3:Waiting, 4:Lamp Error T A B N _ _ _ 1 0:Normal, 1:Temp High, 2:Fan Err, 4:Filter Cover Err, 8:Lamp Life 5% or less, 16:Lamp Burnt-out, 32:Lamp Not Lit, 64:Temp Abnormally High T N A M _ _ _ 1 PROJECTOR NAME I M B K _ _ _ 0 OK or ERR I M B K _ _ _ 1 OK or ...ERR A D J S _ _ _ 1 OK or ERR Note • If an underbar (_) appears in brackets under CONTROL CONTENTS. -61 PG...

