
Operation Manual
Page 6
... SERVICING. When Attaching the "QUICK GUIDE" Label Attaching the "QUICK GUIDE" Label (supplied) on the projector will help you attach the "QUICK GUIDE" Label on the right. DURING NORMAL OPERATION, NEVER TURN THE PROJECTOR OFF BY DISCONNECTING THE POWER CORD. ALLOW 1 HOUR TO COOL BEFORE REPLACING THE LAMP. NE REMPLACER QUE PAR UNE LAMPE SHARP DE TYPE BQC-PGA10X//1. When you check the setup procedure. LAMP REPLACEMENT CAUTION BEFORE REMOVING THE SCREW, DISCONNECT POWER CORD...
... SERVICING. When Attaching the "QUICK GUIDE" Label Attaching the "QUICK GUIDE" Label (supplied) on the projector will help you attach the "QUICK GUIDE" Label on the right. DURING NORMAL OPERATION, NEVER TURN THE PROJECTOR OFF BY DISCONNECTING THE POWER CORD. ALLOW 1 HOUR TO COOL BEFORE REPLACING THE LAMP. NE REMPLACER QUE PAR UNE LAMPE SHARP DE TYPE BQC-PGA10X//1. When you check the setup procedure. LAMP REPLACEMENT CAUTION BEFORE REMOVING THE SCREW, DISCONNECT POWER CORD...

Operation Manual
Page 7
... easily lock the operation buttons on the projector to location. 2. High Brightness Despite Compact Size • Use of 100" at just 3.2 meters (10' 6"). 3. Simply and Easy Operation • Color-coded connections allows for hassle-free set-up. • Frequently used buttons, lens placement are positioned for image size of 165 W SHP lamp achieves excellent color uniformity and high brightness. • The Eco mode function reduces noise levels and power consumption while also extending lamp life. 5. Light and...
... easily lock the operation buttons on the projector to location. 2. High Brightness Despite Compact Size • Use of 100" at just 3.2 meters (10' 6"). 3. Simply and Easy Operation • Color-coded connections allows for hassle-free set-up. • Frequently used buttons, lens placement are positioned for image size of 165 W SHP lamp achieves excellent color uniformity and high brightness. • The Eco mode function reduces noise levels and power consumption while also extending lamp life. 5. Light and...

Operation Manual
Page 8
... Adjustment Settings 37 Computer Image Adjustment 38 Adjusting the Computer Image 38 Special Modes (Special Mode Settings 38 Signal Info (Checking the Input Signal 39 4 Easy to Use Functions Picture Display Mode 40 Switching the Picture Display Mode 40 Still and Zoom Image 42 Freezing a Moving Image 42 Displaying an Enlarged Portion of an Image 42 Keylock Function 43 Locking the operation Buttons 43 Taking the Keylock off 43 Using the "Options" Menu 44 Lamp Timer (Life) (Checking the Lamp Life Status 44 OSD Display (Setting On-screen Display 44 Video System (Setting the Video...
... Adjustment Settings 37 Computer Image Adjustment 38 Adjusting the Computer Image 38 Special Modes (Special Mode Settings 38 Signal Info (Checking the Input Signal 39 4 Easy to Use Functions Picture Display Mode 40 Switching the Picture Display Mode 40 Still and Zoom Image 42 Freezing a Moving Image 42 Displaying an Enlarged Portion of an Image 42 Keylock Function 43 Locking the operation Buttons 43 Taking the Keylock off 43 Using the "Options" Menu 44 Lamp Timer (Life) (Checking the Lamp Life Status 44 OSD Display (Setting On-screen Display 44 Video System (Setting the Video...

Operation Manual
Page 9
... Carrying the Projector 51 How to Use the Carrying Case 51 Maintenance 52 Replacing the Air Filter 53 Cleaning and Replacing the Air Filter 53 Maintenance Indicators 55 Regarding the Lamp 57 Lamp 57 Caution Concerning the Lamp 57 Replacing the Lamp 57 Removing and Installing the Lamp Unit 58 Resetting the Lamp Timer 59 Connecting Pin Assignments 60 RS-232C Specifications and Command Settings 61 Computer Compatibility Chart 62 Troubleshooting 63 For SHARP Assistance 65 Specifications 66...
... Carrying the Projector 51 How to Use the Carrying Case 51 Maintenance 52 Replacing the Air Filter 53 Cleaning and Replacing the Air Filter 53 Maintenance Indicators 55 Regarding the Lamp 57 Lamp 57 Caution Concerning the Lamp 57 Replacing the Lamp 57 Removing and Installing the Lamp Unit 58 Resetting the Lamp Timer 59 Connecting Pin Assignments 60 RS-232C Specifications and Command Settings 61 Computer Compatibility Chart 62 Troubleshooting 63 For SHARP Assistance 65 Specifications 66...

Operation Manual
Page 12
... the lights when setting up your nearest Sharp Authorized Projector Dealer or Service Center for instructions on the projector. I Potential hazard of glass particles if lamp ruptures. Be sure to hard impact and/ or vibration. Avoid locations with the lens. I The operating temperature of the projector is subjected to the normal operating condition. When using the projector in places exposed to maintain high image qual- age of the air...
... the lights when setting up your nearest Sharp Authorized Projector Dealer or Service Center for instructions on the projector. I Potential hazard of glass particles if lamp ruptures. Be sure to hard impact and/ or vibration. Avoid locations with the lens. I The operating temperature of the projector is subjected to the normal operating condition. When using the projector in places exposed to maintain high image qual- age of the air...

Operation Manual
Page 14
When the power is explained. Part Names Numbers in refer to lock it in place. • Press on the two buttons of the lens cap and remove it to the lens, then release the buttons to the main pages in standby. Replace the lamp when the indicator illuminates red. 55 Temperature warning indicator When the internal temperature rises, this indicator will illuminate red. 27 INPUT button For switching input mode 1, 2 or 3. 27 Volume buttons For adjusting the speaker...
When the power is explained. Part Names Numbers in refer to lock it in place. • Press on the two buttons of the lens cap and remove it to the lens, then release the buttons to the main pages in standby. Replace the lamp when the indicator illuminates red. 55 Temperature warning indicator When the internal temperature rises, this indicator will illuminate red. 27 INPUT button For switching input mode 1, 2 or 3. 27 Volume buttons For adjusting the speaker...

Operation Manual
Page 27
... Downloaded from the screen to "Front" in the "PRJ Mode" menu. Note • The projector lens should be centered in front of the screen. Light falling directly on the size of the screen. If the projected im- age is reversed or inverted, readjust the setting to the projector may vary depending on the screen washes out the colors, making viewing difficult. • For an optimal image, position the screen...
... Downloaded from the screen to "Front" in the "PRJ Mode" menu. Note • The projector lens should be centered in front of the screen. Light falling directly on the size of the screen. If the projected im- age is reversed or inverted, readjust the setting to the projector may vary depending on the screen washes out the colors, making viewing difficult. • For an optimal image, position the screen...

Operation Manual
Page 30
...; The lamp replacement indicator illuminates, indicating the status of the lamp. Blinking in green: The lamp is ready. Power ON button Power OFF button Lamp Power replacement indicator indicator INPUT button Volume buttons MWarming up and shutting down. Red: The lamp should be operated while the warming up message on the display disappears, the projector is set on -screen display to another language, reset the language according to illuminate. • When controlling the projector using RS-232C commands from www.Manualslib.com manuals search engine Image Projection Basic...
...; The lamp replacement indicator illuminates, indicating the status of the lamp. Blinking in green: The lamp is ready. Power ON button Power OFF button Lamp Power replacement indicator indicator INPUT button Volume buttons MWarming up and shutting down. Red: The lamp should be operated while the warming up message on the display disappears, the projector is set on -screen display to another language, reset the language according to illuminate. • When controlling the projector using RS-232C commands from www.Manualslib.com manuals search engine Image Projection Basic...
Operation Manual
Page 44
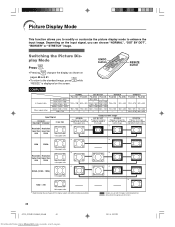
...", "DOT BY DOT", "BORDER" or "STRETCH" image. Switching the Picture Display Mode Press . • Pressing changes the display as shown on pages 40 and 41. • To return to enhance the input image. STRETCH PG-A10X PG-A10S 1024 × 576 800 × 450 960 × 576 750 × 450 1024 × 576 800 × 450 Input Signal Computer PG-A10X PG-A10S Image type Resolution Resolution lower than lower than XGA SVGA 4:3 aspect...
...", "DOT BY DOT", "BORDER" or "STRETCH" image. Switching the Picture Display Mode Press . • Pressing changes the display as shown on pages 40 and 41. • To return to enhance the input image. STRETCH PG-A10X PG-A10S 1024 × 576 800 × 450 960 × 576 750 × 450 1024 × 576 800 × 450 Input Signal Computer PG-A10X PG-A10S Image type Resolution Resolution lower than lower than XGA SVGA 4:3 aspect...
Operation Manual
Page 48
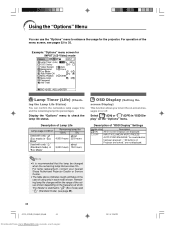
... is switched to " " (Eco mode) and " " (Standard mode) (see pages 32 to enhance the usage for INPUT 2 (S-Video) mode Lamp Timer (Life) (Check- ing the Lamp Life Status) You can use the "Options" menu to 35. Display the "Options" menu to turn the on-screen messages on the "Options" menu. For lamp replacement, contact your nearest Sharp Authorized Projector Dealer or Service Center. • The table above indicates rough estimates in "Eco Mode" Remaining lamp life 100% 5% about 4,500 hours 225 hours...
... is switched to " " (Eco mode) and " " (Standard mode) (see pages 32 to enhance the usage for INPUT 2 (S-Video) mode Lamp Timer (Life) (Check- ing the Lamp Life Status) You can use the "Options" menu to 35. Display the "Options" menu to turn the on-screen messages on the "Options" menu. For lamp replacement, contact your nearest Sharp Authorized Projector Dealer or Service Center. • The table above indicates rough estimates in "Eco Mode" Remaining lamp life 100% 5% about 4,500 hours 225 hours...

Operation Manual
Page 52
... place where only authorized users have access. put box will cause images to set as keycodes: • POWER ON/OFF buttons • ENTER button • UNDO button • MENU button • FORWARD button • BACK button 2 Enter the remaining 3 digits by pressing any button you like on the remote control are used for INPUT 2 (S-Video) mode Anti-Theft (Setting the Anti- Using the "Options" Menu Example: "Options" menu screen for setting the keycode. Theft) The...
... place where only authorized users have access. put box will cause images to set as keycodes: • POWER ON/OFF buttons • ENTER button • UNDO button • MENU button • FORWARD button • BACK button 2 Enter the remaining 3 digits by pressing any button you like on the remote control are used for INPUT 2 (S-Video) mode Anti-Theft (Setting the Anti- Using the "Options" Menu Example: "Options" menu screen for setting the keycode. Theft) The...

Operation Manual
Page 57
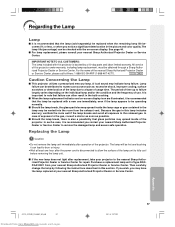
" Bottom view " Rear view Air filter Air filter Air filter (not removable) (not removable) Cleaning and Replacing the Air Filter 1 Turn off the power and discon- ing fan stops. Loosen the user service screw (1) that secures the filter/lamp unit cover. Wait until the cool- Clean the filters more often when the projector is used in a dusty or smoky location. • Ask your fingers and lift it is no longer possible to clean. Power OFF button Power OFF button 2 Remove the filter/lamp unit cover. • Turn the projector over...
" Bottom view " Rear view Air filter Air filter Air filter (not removable) (not removable) Cleaning and Replacing the Air Filter 1 Turn off the power and discon- ing fan stops. Loosen the user service screw (1) that secures the filter/lamp unit cover. Wait until the cool- Clean the filters more often when the projector is used in a dusty or smoky location. • Ask your fingers and lift it is no longer possible to clean. Power OFF button Power OFF button 2 Remove the filter/lamp unit cover. • Turn the projector over...

Operation Manual
Page 59
... Projector Dealer or Service Center for repair. • Lamp circuit failure • Please exercise care when replacing the lamp. Maintenance indicator Normal Abnormal Condition Problem Possible Solution Temperature warning indicator Off Red on/ Power off The internal temperature is abnormally high. • Blocked air intake • Relocate the projector to change to blockage of the picture. After the power has been turned off . If the temperature keeps on . • The filter/lamp unit cover is open. • Securely install...
... Projector Dealer or Service Center for repair. • Lamp circuit failure • Please exercise care when replacing the lamp. Maintenance indicator Normal Abnormal Condition Problem Possible Solution Temperature warning indicator Off Red on/ Power off The internal temperature is abnormally high. • Blocked air intake • Relocate the projector to change to blockage of the picture. After the power has been turned off . If the temperature keeps on . • The filter/lamp unit cover is open. • Securely install...
Operation Manual
Page 61
... nearest Sharp Authorized Projector Dealer or Service Center to failure largely varies depending on -screen display. Then carefully change the lamp by a 90-day parts and labor limited warranty. All service of the projector. For the name of use. The period of time up to remove the damaged lamp and assure safe operation. Appendix A10X_A10S#E_Print#p51_62.p65 57 Downloaded from your nearest Sharp Authorized Projector Dealer or Service Center...
... nearest Sharp Authorized Projector Dealer or Service Center to failure largely varies depending on -screen display. Then carefully change the lamp by a 90-day parts and labor limited warranty. All service of the projector. For the name of use. The period of time up to remove the damaged lamp and assure safe operation. Appendix A10X_A10S#E_Print#p51_62.p65 57 Downloaded from your nearest Sharp Authorized Projector Dealer or Service Center...

Operation Manual
Page 63
...; Make sure to secure the filter/ lamp unit cover. Info • If the lamp unit and filter/lamp unit cover are not correctly installed, the power will not turn on the projector. • "LAMP 0000H" is displayed, indicating that the lamp timer is connected to the projector. 5 Remove the lamp unit. • Loosen the securing screws from www.Manualslib.com manuals search engine AC socket Power ON button Volume buttons AUTO SYNC button 59 03.2.4, 2:07 PM Hold...
...; Make sure to secure the filter/ lamp unit cover. Info • If the lamp unit and filter/lamp unit cover are not correctly installed, the power will not turn on the projector. • "LAMP 0000H" is displayed, indicating that the lamp timer is connected to the projector. 5 Remove the lamp unit. • Loosen the securing screws from www.Manualslib.com manuals search engine AC socket Power ON button Volume buttons AUTO SYNC button 59 03.2.4, 2:07 PM Hold...

Operation Manual
Page 65
...; Projector OK BUTTONS & REMOTE CONTROL KEY CONTROL CONTENTS Power Off (Standby) Power On INPUT1 INPUT2 INPUT3 Lamp Usage Time (hour) Remaining Lamp Life (Percentage) Lamp Status Unit Status Model Name Check AV Mute Off AV Mute On Auto Sync Start COMMAND PARAMETER RETURN P O W R _ _ _ 0 OK or ERR P O W R _ _ _ 1 OK or ERR I R G B _ _ _ 1 OK or ERR I V E D _ _ _ 1 OK or ERR I V E D _ _ _ 2 OK or ERR T L T T _ _ _ 1 0~9999 T L T L _ _ _ 1 0~100 T L P S _ _ _ 1 0:Off, 1:On, 2:Retry, 3:Waiting, 4:Lamp Error T A B N _ _ _ 1 0:Normal, 1:Temp High, 2:Fan Err, 4:Filter Cover Err, 8:Lamp...
...; Projector OK BUTTONS & REMOTE CONTROL KEY CONTROL CONTENTS Power Off (Standby) Power On INPUT1 INPUT2 INPUT3 Lamp Usage Time (hour) Remaining Lamp Life (Percentage) Lamp Status Unit Status Model Name Check AV Mute Off AV Mute On Auto Sync Start COMMAND PARAMETER RETURN P O W R _ _ _ 0 OK or ERR P O W R _ _ _ 1 OK or ERR I R G B _ _ _ 1 OK or ERR I V E D _ _ _ 1 OK or ERR I V E D _ _ _ 2 OK or ERR T L T T _ _ _ 1 0~9999 T L T L _ _ _ 1 0~100 T L P S _ _ _ 1 0:Off, 1:On, 2:Retry, 3:Waiting, 4:Lamp Error T A B N _ _ _ 1 0:Normal, 1:Temp High, 2:Fan Err, 4:Filter Cover Err, 8:Lamp...

Operation Manual
Page 67
...; The filter/lamp unit cover is not installed correctly. • Cables incorrectly connected to the rear panel of projector. • Volume is set to ON, all the buttons are incorrectly set. (Video Input only) • Video input system is incorrectly set. (INPUT 1 only) • Input signal type (RGB/Component) is incorrectly set to minimum. 36 45 37 22 24 38 38 - 16-20 27 Picture appears but no sound or projector does not start...
...; The filter/lamp unit cover is not installed correctly. • Cables incorrectly connected to the rear panel of projector. • Volume is set to ON, all the buttons are incorrectly set. (Video Input only) • Video input system is incorrectly set. (INPUT 1 only) • Input signal type (RGB/Component) is incorrectly set to minimum. 36 45 37 22 24 38 38 - 16-20 27 Picture appears but no sound or projector does not start...
Operation Manual
Page 69
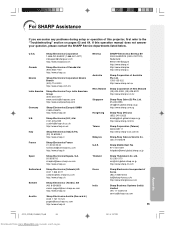
... vision.support@sen.sharp-eu.com http://www.sharp.se Austria Sharp Electronics Austria (Ges.m.b.H.) 0043 1 727 19 123 pogats@sea.sharp-eu.com http://www.sharp.at Benelux Australia New Zealand Singapore Hong Kong Taiwan Malaysia U.A.E. For SHARP Assistance If you encounter any problems during setup or operation of this operation manual does not answer your question, please contact the SHARP Service departments listed...
... vision.support@sen.sharp-eu.com http://www.sharp.se Austria Sharp Electronics Austria (Ges.m.b.H.) 0043 1 727 19 123 pogats@sea.sharp-eu.com http://www.sharp.at Benelux Australia New Zealand Singapore Hong Kong Taiwan Malaysia U.A.E. For SHARP Assistance If you encounter any problems during setup or operation of this operation manual does not answer your question, please contact the SHARP Service departments listed...
Operation Manual
Page 70
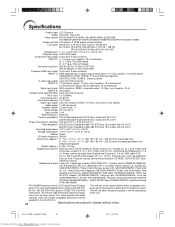
... (QACCBA015WJPZ), Power cord for Australia, New Zealand and Oceania (QACCLA005WJPZ), RGB cable (QCNWGA012WJPZ), DIN-D-sub RS-232C adaptor (QCNWGA015WJPZ), Carrying case (GCASNA006WJSA), Lens cap (CCAPHA007WJ01), Air filter (PFILDA008WJZZ), Projector manual and technical reference CD-ROM (UDSKAA022WJN1), "QUICK GUIDE" label (TLABZA191WJZZ), Operation manual (TINS-A505WJN1) This SHARP projector uses an LCD (Liquid Crystal Display) This unit has some inactive pixels within acceptable toler- A10X) / 480,000 (PG-A10S) pixels (×...
... (QACCBA015WJPZ), Power cord for Australia, New Zealand and Oceania (QACCLA005WJPZ), RGB cable (QCNWGA012WJPZ), DIN-D-sub RS-232C adaptor (QCNWGA015WJPZ), Carrying case (GCASNA006WJSA), Lens cap (CCAPHA007WJ01), Air filter (PFILDA008WJZZ), Projector manual and technical reference CD-ROM (UDSKAA022WJN1), "QUICK GUIDE" label (TLABZA191WJZZ), Operation manual (TINS-A505WJN1) This SHARP projector uses an LCD (Liquid Crystal Display) This unit has some inactive pixels within acceptable toler- A10X) / 480,000 (PG-A10S) pixels (×...

Operation Manual
Page 73
... Lamp replacement indicator 55 Lamp Timer (Life 44 Language (on-screen display language 28 Lens cap 10 Memory 37 MENU button 32 Menu Color 46 Menu Position 46 NORMAL 40 Optional accessories 14 Options 44 OSD Display 44 Password 47 PDF 9 Phase 38 Picture Adjustment 36 Power buttons 26 Power cord 15 Power indicator 26 PRJ mode (Reversing/Inverting Projected Images) .... 50 Red 36 Remote control 12 Remote control sensor 13 Replacing the lamp 57 RESIZE button 40 RGB cable 16 RS-232C terminal 20 Sharp 36 Signal Info 39 Signal...
... Lamp replacement indicator 55 Lamp Timer (Life 44 Language (on-screen display language 28 Lens cap 10 Memory 37 MENU button 32 Menu Color 46 Menu Position 46 NORMAL 40 Optional accessories 14 Options 44 OSD Display 44 Password 47 PDF 9 Phase 38 Picture Adjustment 36 Power buttons 26 Power cord 15 Power indicator 26 PRJ mode (Reversing/Inverting Projected Images) .... 50 Red 36 Remote control 12 Remote control sensor 13 Replacing the lamp 57 RESIZE button 40 RGB cable 16 RS-232C terminal 20 Sharp 36 Signal Info 39 Signal...


