
LC-42D65U | LC-46D65U | LC-52D65U Operation Manual
Page 8
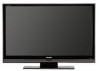
... is for the stand unit as shown below and attach the stand to lay the TV on the rear of the stand may result in single (00Z-LCD-CLOTH) or triple (00Z-LCD-CLOTH-3) packs. Incorrect installation of the TV. Hex key 2 Attach the supporting post for the stand unit onto the ...will prevent it on the base. CAUTION • Attach the stand in the correct direction. • Do not remove the stand from the TV unless using it from Sharp in the TV falling over the base area to the TV with the product. SHARP ELECTRONICS CORPORATION, LATIN AMERICA GROUP 6100 Blue Lagoon Drive, Suite ...
... is for the stand unit as shown below and attach the stand to lay the TV on the rear of the stand may result in single (00Z-LCD-CLOTH) or triple (00Z-LCD-CLOTH-3) packs. Incorrect installation of the TV. Hex key 2 Attach the supporting post for the stand unit onto the ...will prevent it on the base. CAUTION • Attach the stand in the correct direction. • Do not remove the stand from the TV unless using it from Sharp in the TV falling over the base area to the TV with the product. SHARP ELECTRONICS CORPORATION, LATIN AMERICA GROUP 6100 Blue Lagoon Drive, Suite ...
LC-42D65U | LC-46D65U | LC-52D65U Operation Manual
Page 11
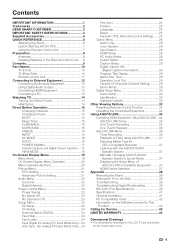
...SHARP CUSTOMER 3 IMPORTANT SAFETY INSTRUCTIONS 3 Supplied Accessories 6 QUICK REFERENCE 6 Attaching the Stand 6 QUICK INSTALLATION TIPS 7 Using the Remote Control Unit 7 Preparation 8 Antennas 8 Installing Batteries in the Remote Control Unit......8 Contents 9 Part Names 10 TV (Front 10 TV... of AQUOS LINK-Compatible Equipment ........37 HDMI Device Selection 37 Appendix 38 Removing the Stand 38 Setting the TV on the Wall 38 Troubleshooting 39 Troubleshooting-Digital Broadcasting 39 RS-232C Port...The dimensional drawings for the LCD TV set are shown on the inside back cover. 9
...SHARP CUSTOMER 3 IMPORTANT SAFETY INSTRUCTIONS 3 Supplied Accessories 6 QUICK REFERENCE 6 Attaching the Stand 6 QUICK INSTALLATION TIPS 7 Using the Remote Control Unit 7 Preparation 8 Antennas 8 Installing Batteries in the Remote Control Unit......8 Contents 9 Part Names 10 TV (Front 10 TV... of AQUOS LINK-Compatible Equipment ........37 HDMI Device Selection 37 Appendix 38 Removing the Stand 38 Setting the TV on the Wall 38 Troubleshooting 39 Troubleshooting-Digital Broadcasting 39 RS-232C Port...The dimensional drawings for the LCD TV set are shown on the inside back cover. 9

LC-42D65U | LC-46D65U | LC-52D65U Operation Manual
Page 40
...bracket to secure the bracket to the rear of the display. Setting the TV on the Wall CAUTION • This TV should only be mounted on the rear of the TV, and then use of the display. LC-46D65U • The "b" position is at the center of other wall ...cause serious injuries. • Installing the TV requires special skill that results in reverse order. Appendix Removing the Stand • Before detaching (or attaching) the stand, unplug the AC cord from the TV unless using an optional wall mount bracket to mount it. SHARP bears no responsibility for improper mounting or ...
...bracket to secure the bracket to the rear of the display. Setting the TV on the Wall CAUTION • This TV should only be mounted on the rear of the TV, and then use of the display. LC-46D65U • The "b" position is at the center of other wall ...cause serious injuries. • Installing the TV requires special skill that results in reverse order. Appendix Removing the Stand • Before detaching (or attaching) the stand, unplug the AC cord from the TV unless using an optional wall mount bracket to mount it. SHARP bears no responsibility for improper mounting or ...


