Operation Manual
Page 9
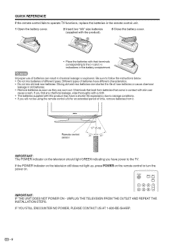
... indications in chemical leakage or explosion. IMPORTANT: IF THE UNIT DOES NOT POWER ON - QUICK REFERENCE If the remote control fails to operate TV functions, replace the batteries in the remote control unit. 1 Open the battery cover. 2 Insert two "AA" size batteries (supplied with the product). 3 ... Place the batteries with their terminals corresponding to the TV. Different types of time, remove batteries from batteries that leak from it. IF YOU STILL ENCOUNTER NO POWER, PLEASE CONTACT US AT 1-800-BE-SHARP. _-8 Remote control sensor 30° 30° IMPORTANT: The POWER...
... indications in chemical leakage or explosion. IMPORTANT: IF THE UNIT DOES NOT POWER ON - QUICK REFERENCE If the remote control fails to operate TV functions, replace the batteries in the remote control unit. 1 Open the battery cover. 2 Insert two "AA" size batteries (supplied with the product). 3 ... Place the batteries with their terminals corresponding to the TV. Different types of time, remove batteries from batteries that leak from it. IF YOU STILL ENCOUNTER NO POWER, PLEASE CONTACT US AT 1-800-BE-SHARP. _-8 Remote control sensor 30° 30° IMPORTANT: The POWER...
Operation Manual
Page 10
Contents IMPORTANT INFORMATION 1 DEAR SHARP CUSTOMER 3 IMPO RTANT SAFETY INSTRUCTIONS 3 Supplied accessories 6 QUICK REFERENCE 6 Attaching the stand 6 Contents 9 Part names 10 TV (Front 10 TV (Rear 10 Remote control unit 11 Preparation 12 Using the remote control unit 12 Cautions regarding remote control unit 12 Antennas 12 Using ... 24 Troubleshooting-Digital broadcasting 24 Troubleshooting-PC mode 24 Specifications 25 Calling for Service 26 LIMITED WARRANTY 26 Dimensional Drawings = The dimensional drawings for the TV set are shown on the inside back cover. (_) - 9
Contents IMPORTANT INFORMATION 1 DEAR SHARP CUSTOMER 3 IMPO RTANT SAFETY INSTRUCTIONS 3 Supplied accessories 6 QUICK REFERENCE 6 Attaching the stand 6 Contents 9 Part names 10 TV (Front 10 TV (Rear 10 Remote control unit 11 Preparation 12 Using the remote control unit 12 Cautions regarding remote control unit 12 Antennas 12 Using ... 24 Troubleshooting-Digital broadcasting 24 Troubleshooting-PC mode 24 Specifications 25 Calling for Service 26 LIMITED WARRANTY 26 Dimensional Drawings = The dimensional drawings for the TV set are shown on the inside back cover. (_) - 9

Operation Manual
Page 11
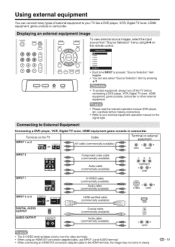
COAXIAL DIGITAL AUDIO OUTPUT terminal INPUT 5 terminals INPUT 4 terminals INPUT 6 terminals -INPUT 1 terminals _ INPUT 23 teerrmmiinnaalsls INPUT • The illustrations in this operation manual provides a description based on the remote control. Part names L¸ - Fundamentally, this operation manual are for explanation purposes and may vary slightly from the actual operations. _=10 ol I I Remote control sensor POWER indicator • The buttons on the main unit have the same functions as the same buttons on operation using the remote control.
COAXIAL DIGITAL AUDIO OUTPUT terminal INPUT 5 terminals INPUT 4 terminals INPUT 6 terminals -INPUT 1 terminals _ INPUT 23 teerrmmiinnaalsls INPUT • The illustrations in this operation manual provides a description based on the remote control. Part names L¸ - Fundamentally, this operation manual are for explanation purposes and may vary slightly from the actual operations. _=10 ol I I Remote control sensor POWER indicator • The buttons on the main unit have the same functions as the same buttons on operation using the remote control.

Operation Manual
Page 12
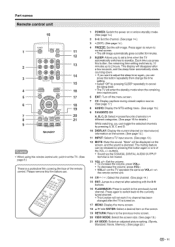
...10 7 8-- 9_ POWER DISPLAY INPUT _13 1112 FREEZE SLEEP FLASHBACK MENU / 14 15 16 18 19 20 -- 21 • When using the remote control unit, point it at the TV. (See page 8.) There is not muted. 13 VOL +/-: Set the volume. • To increase the volume, press VOL+. • To... decrease the volume, press VOL-. • VOL+/- Please remove this button again or one of the remote control. POWER: Switch the power on the TV operates the same as VOL+/- Press again to return to normal screen. • The still image automatically goes out after selecting with...
...10 7 8-- 9_ POWER DISPLAY INPUT _13 1112 FREEZE SLEEP FLASHBACK MENU / 14 15 16 18 19 20 -- 21 • When using the remote control unit, point it at the TV. (See page 8.) There is not muted. 13 VOL +/-: Set the volume. • To increase the volume, press VOL+. • To... decrease the volume, press VOL-. • VOL+/- Please remove this button again or one of the remote control. POWER: Switch the power on the TV operates the same as VOL+/- Press again to return to normal screen. • The still image automatically goes out after selecting with...

Operation Manual
Page 13
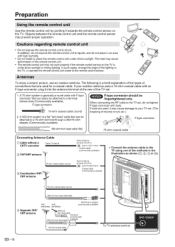
...do not tighten F-type connector with an F-type connector, plug it may prevent proper operation, • Do not expose the remote control unit to the TV set . '-1. The following is a brief explanation of the types of the methods in an area with F-type connector that can..., use an outdoor antenna. In such cases, change the angle of the remote control unit. • The remote control unit may cause deformation of the lighting or the TV, or operate the remote control unit closer to the TV using one of connections that can easily be fingertightened only. UHF antenna _axiai...
...do not tighten F-type connector with an F-type connector, plug it may prevent proper operation, • Do not expose the remote control unit to the TV set . '-1. The following is a brief explanation of the types of the methods in an area with F-type connector that can..., use an outdoor antenna. In such cases, change the angle of the remote control unit. • The remote control unit may cause deformation of the lighting or the TV, or operate the remote control unit closer to the TV using one of connections that can easily be fingertightened only. UHF antenna _axiai...

Operation Manual
Page 14
..., HDMI equipment game console or camcorder. Terminal on the TV INPUT 1 or 2 _}AV Cable cable (commercially available) _ Terminal on the remote control. 1.Input1 2.Input2 3.Input3 4.Input4 5.Input5 6.Input6 Each time INPUT is pressed, "Source Selection" item ...cable (commercially available) Audio cable (commercially available) Y PB PR @@@ COMPONENT ,@@. To protect equipment, always turn off the TV before connecting a DVD player, VCR, Digital TV tuner, HDMI equipment, game console, camcorder or other external equipment. • Please read the relevant operation manual (DVD player...
..., HDMI equipment game console or camcorder. Terminal on the TV INPUT 1 or 2 _}AV Cable cable (commercially available) _ Terminal on the remote control. 1.Input1 2.Input2 3.Input3 4.Input4 5.Input5 6.Input6 Each time INPUT is pressed, "Source Selection" item ...cable (commercially available) Audio cable (commercially available) Y PB PR @@@ COMPONENT ,@@. To protect equipment, always turn off the TV before connecting a DVD player, VCR, Digital TV tuner, HDMI equipment, game console, camcorder or other external equipment. • Please read the relevant operation manual (DVD player...

Operation Manual
Page 15
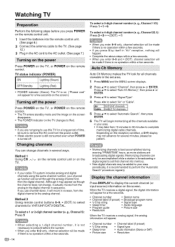
...i_!i!i_ii_i__i,_i!i!_ii_i__i,_i!i!_ii_i__,ii!i!_i_i_i!i_ Press POWER on the TV, or POWER on the remote control. • The TV enters standby mode and the image on the screen 5 disappears. • The POWER indicator on the remote control unit. 1 Insert the batteries into memory. • New digital ...channels available in your channel up function will begin memorizing all channels viewable in the set that channel into the remote control unit. (See page 8.) 2 Connect the antenna cable to the TV. (See page 12.) 3 Plug in the AC cord to the digital channel in "Air" reception, ...
...i_!i!i_ii_i__i,_i!i!_ii_i__i,_i!i!_ii_i__,ii!i!_i_i_i!i_ Press POWER on the TV, or POWER on the remote control. • The TV enters standby mode and the image on the screen 5 disappears. • The POWER indicator on the remote control unit. 1 Insert the batteries into memory. • New digital ...channels available in your channel up function will begin memorizing all channels viewable in the set that channel into the remote control unit. (See page 8.) 2 Connect the antenna cable to the TV. (See page 12.) 3 Plug in the AC cord to the digital channel in "Air" reception, ...
Operation Manual
Page 22
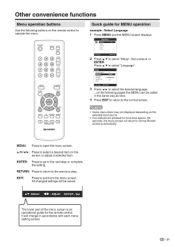
or ENTER, Press A/v to select"Setup", then press _- i >> 16 _, Off >> 3 Press POWER CDCD DISPLAY INPUT MUTE CD 8 FREEZE ® SLEEP FLASHBACK ® MENU Audio Char,r,el Look Setup ,. • •: Press A/v to select"Language". °_ Video bzbel B_klig_ Auto ShutOff Reset ".. Other convenience functions ii}i iii! !ii i i } Use the following buttons on the remote control to operate the menu. i!ii!!!!i i i!iiii'i!i!!iiilijii !i iii i iii i i!ii !!i!ia example : Select Language 1 Press MENU and the MENU screen displays.
or ENTER, Press A/v to select"Setup", then press _- i >> 16 _, Off >> 3 Press POWER CDCD DISPLAY INPUT MUTE CD 8 FREEZE ® SLEEP FLASHBACK ® MENU Audio Char,r,el Look Setup ,. • •: Press A/v to select"Language". °_ Video bzbel B_klig_ Auto ShutOff Reset ".. Other convenience functions ii}i iii! !ii i i } Use the following buttons on the remote control to operate the menu. i!ii!!!!i i i!iiii'i!i!!iiilijii !i iii i iii i i!ii !!i!ia example : Select Language 1 Press MENU and the MENU screen displays.

Operation Manual
Page 23
...Mode View Mode Film Mode PC Setting* (see page 23) DNR Brightness / Contrast / Sharpness / Color/Tint Color Temperature Sports Standard Movie Memory On / Off Her Position/Ver Position ... / vertical position of the picture. (This function is available only for this setting. on the remote control unit or VOL -/+ on the screen background. See pages 18-20. Press A/v to select the...a highly defined image in a digital signal, you can reduce the roughness of the image on the TV. • Sound via speaker and AUIDO OUTPUT terminal are included in a normal lighting. Each video...
...Mode View Mode Film Mode PC Setting* (see page 23) DNR Brightness / Contrast / Sharpness / Color/Tint Color Temperature Sports Standard Movie Memory On / Off Her Position/Ver Position ... / vertical position of the picture. (This function is available only for this setting. on the remote control unit or VOL -/+ on the screen background. See pages 18-20. Press A/v to select the...a highly defined image in a digital signal, you can reduce the roughness of the image on the TV. • Sound via speaker and AUIDO OUTPUT terminal are included in a normal lighting. Each video...
Operation Manual
Page 24
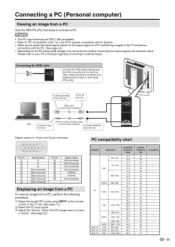
... INPUT6 (PC) terminals to connect a PC. • The PC input terminals are DDC1/2B-compatible. • Refer to "PC compatibility chart" for a list of the TV set . (See page 13.) (_) Select the PC input signal. (_) Adjust the "Picture." O O O O O (_) O (_) Signal name R G B Not connected GND (Ground) GND (Ground) GND ...signal of a PC and the input signal of PC signals compatible with the PC. (See page 22.) • Depending on the remote control or the TV set before connecting with the System. • Make sure to select the same signal values for 15-pin mini D-sub connecter iiii!!i!ili...
... INPUT6 (PC) terminals to connect a PC. • The PC input terminals are DDC1/2B-compatible. • Refer to "PC compatibility chart" for a list of the TV set . (See page 13.) (_) Select the PC input signal. (_) Adjust the "Picture." O O O O O (_) O (_) Signal name R G B Not connected GND (Ground) GND (Ground) GND ...signal of a PC and the input signal of PC signals compatible with the PC. (See page 22.) • Depending on the remote control or the TV set before connecting with the System. • Make sure to select the same signal values for 15-pin mini D-sub connecter iiii!!i!ili...
Operation Manual
Page 25
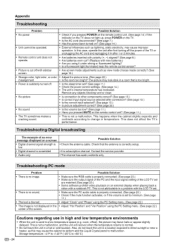
....) • Adjust "Hor Position" and "Ver Position" using it under strong or fluorescent lighting? • Is a fluorescent light illuminated near the remote control sensor? • Are screen mode adjustments such as view mode choose made correctly? (See page 15.) • Adjust the picture tone. (See...• It is scrambled • Audio only Possible Solution • Check the antenna cable. The example of the LCD TV set ? (See page 11 .) • Check the power control settings. (See page 14.) • The unit's internal temperature has increased. room, office), the picture may look...
....) • Adjust "Hor Position" and "Ver Position" using it under strong or fluorescent lighting? • Is a fluorescent light illuminated near the remote control sensor? • Are screen mode adjustments such as view mode choose made correctly? (See page 15.) • Adjust the picture tone. (See...• It is scrambled • Audio only Possible Solution • Check the antenna cable. The example of the LCD TV set ? (See page 11 .) • Check the power control settings. (See page 14.) • The unit's internal temperature has increased. room, office), the picture may look...
Operation Manual
Page 26
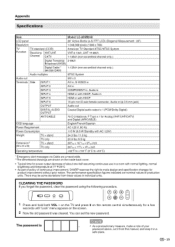
Appendix Item Model: LC-26SB24U LCD panel Resolution 26" Active Matrix (a-Si TFT LCD) (Diagonal Measurement : 26") 1,049,088 pixels (1366 x 768) TV Function TV-standard (CCIR) Receiving VHF/UHF American TV Standard ATSC/NTSC System VHF2-13ch, UHF 14-69ch Channel ... values of continuous improvement, SHARP reserves the right to make a note of your password above, cut it in individual units. You can set the new password. on the TV and press 0 on the...for a few seconds until "Lock" menu appears on the remote control simultaneously for product improvement without prior notice.
Appendix Item Model: LC-26SB24U LCD panel Resolution 26" Active Matrix (a-Si TFT LCD) (Diagonal Measurement : 26") 1,049,088 pixels (1366 x 768) TV Function TV-standard (CCIR) Receiving VHF/UHF American TV Standard ATSC/NTSC System VHF2-13ch, UHF 14-69ch Channel ... values of continuous improvement, SHARP reserves the right to make a note of your password above, cut it in individual units. You can set the new password. on the TV and press 0 on the...for a few seconds until "Lock" menu appears on the remote control simultaneously for product improvement without prior notice.
Operation Manual
Page 28
... express warranty to earphones, paper. negligence, accident, improper instaflation or inappropriate (b) Any Sharp product tampered with, modified, adjusted or repaired by an Authorized Sharp Dealer; remote controls, AC adapters, batteries, temperature probe, stylus, trays, filters, belts, ribbons, cables...extent the law permits, Sharp disclaims any and all obligations and responsibilities of Sharp to an Authorized Sharp Service Centre or an Authorized Sharp Servicing Dealer. strict WARRANTY PER|ODS: Audio Product Camcorder DVD Product Projector LCD TV Microwave Oven Air Purifier...
... express warranty to earphones, paper. negligence, accident, improper instaflation or inappropriate (b) Any Sharp product tampered with, modified, adjusted or repaired by an Authorized Sharp Dealer; remote controls, AC adapters, batteries, temperature probe, stylus, trays, filters, belts, ribbons, cables...extent the law permits, Sharp disclaims any and all obligations and responsibilities of Sharp to an Authorized Sharp Service Centre or an Authorized Sharp Servicing Dealer. strict WARRANTY PER|ODS: Audio Product Camcorder DVD Product Projector LCD TV Microwave Oven Air Purifier...

Operation Manual
Page 39
... can shorten the life of batteries have different characteristics. • Do not mix old and new batteries. QUICK REFERENCE If the remote control fails to operate TV functions, replace the batteries in the remote control unit. 1 Open the battery cover. 2 Insert two "AA" size batteries (supplied with the product). 3 Close the battery ...cover. • Place the batteries with their terminals corresponding to turn the power on. Be sure to the TV. Improper use of different types. IF YOU STILL ENCOUNTER NO POWER, PLEASE CONTACT US AT 1-800-BE-SHARP. _-8
... can shorten the life of batteries have different characteristics. • Do not mix old and new batteries. QUICK REFERENCE If the remote control fails to operate TV functions, replace the batteries in the remote control unit. 1 Open the battery cover. 2 Insert two "AA" size batteries (supplied with the product). 3 Close the battery ...cover. • Place the batteries with their terminals corresponding to turn the power on. Be sure to the TV. Improper use of different types. IF YOU STILL ENCOUNTER NO POWER, PLEASE CONTACT US AT 1-800-BE-SHARP. _-8

Operation Manual
Page 40
Contents IMPORTANT INFORMATION 1 DEAR SHARP CUSTOMER 3 IMPO RTANT SAFETY INSTRUCTIONS 3 Supplied accessories 6 QUICK REFERENCE 6 Attaching the stand 6 Contents 9 Part names 10 TV (Front 10 TV (Rear 10 Remote control unit 11 Preparation 12 Using the remote control unit 12 Cautions regarding remote control unit 12 Antennas 12 Using ... 24 Troubleshooting-Digital broadcasting 24 Troubleshooting-PC mode 24 Specifications 25 Calling for Service 26 LIMITED WARRANTY 26 Dimensional Drawings = The dimensional drawings for the TV set are shown on the inside back cover. (_) - 9
Contents IMPORTANT INFORMATION 1 DEAR SHARP CUSTOMER 3 IMPO RTANT SAFETY INSTRUCTIONS 3 Supplied accessories 6 QUICK REFERENCE 6 Attaching the stand 6 Contents 9 Part names 10 TV (Front 10 TV (Rear 10 Remote control unit 11 Preparation 12 Using the remote control unit 12 Cautions regarding remote control unit 12 Antennas 12 Using ... 24 Troubleshooting-Digital broadcasting 24 Troubleshooting-PC mode 24 Specifications 25 Calling for Service 26 LIMITED WARRANTY 26 Dimensional Drawings = The dimensional drawings for the TV set are shown on the inside back cover. (_) - 9

Operation Manual
Page 41
Part names L¸ - ol I I Remote control sensor POWER indicator • The buttons on the main unit have the same functions as the same buttons on operation using the remote control. Fundamentally, this operation manual are for explanation purposes and may vary slightly from the actual operations. _=10 COAXIAL DIGITAL AUDIO OUTPUT terminal INPUT 5 terminals INPUT 4 terminals INPUT 6 terminals -INPUT 1 terminals _ INPUT 23 teerrmmiinnaalsls INPUT • The illustrations in this operation manual provides a description based on the remote control.
Part names L¸ - ol I I Remote control sensor POWER indicator • The buttons on the main unit have the same functions as the same buttons on operation using the remote control. Fundamentally, this operation manual are for explanation purposes and may vary slightly from the actual operations. _=10 COAXIAL DIGITAL AUDIO OUTPUT terminal INPUT 5 terminals INPUT 4 terminals INPUT 6 terminals -INPUT 1 terminals _ INPUT 23 teerrmmiinnaalsls INPUT • The illustrations in this operation manual provides a description based on the remote control.
Operation Manual
Page 42
... 7 8-- 9_ POWER DISPLAY INPUT _13 1112 FREEZE SLEEP FLASHBACK MENU / 14 15 16 18 19 20 -- 21 • When using the remote control unit, point it at the TV. (See page 8.) There is a protective film covering the face of the VOL +/- Press again to return to the previous menu screen. 20...The muting feature can be displayed on the screen. (See page 14.) 11 INPUT: Select a TV input source. (See page 13.) 12 MUTE: Mute the sound. Please remove this button again or one of the remote control. "Mute" will enter the standby mode when the remaining time reaches zero. 6 EXIT: Turn ...
... 7 8-- 9_ POWER DISPLAY INPUT _13 1112 FREEZE SLEEP FLASHBACK MENU / 14 15 16 18 19 20 -- 21 • When using the remote control unit, point it at the TV. (See page 8.) There is a protective film covering the face of the VOL +/- Press again to return to the previous menu screen. 20...The muting feature can be displayed on the screen. (See page 14.) 11 INPUT: Select a TV input source. (See page 13.) 12 MUTE: Mute the sound. Please remove this button again or one of the remote control. "Mute" will enter the standby mode when the remaining time reaches zero. 6 EXIT: Turn ...
Operation Manual
Page 43
... cabte (commercially available) • Connect the antenna cable to the TV using one of the remote control unit. • The remote control unit may not work properly if the remote control sensor on the TV. Preparation Use the remote control unit by pointing it may cause damage to your outdoor antenna uses ...coaxial cable with an F-type connector, plug it into the antenna terminal at the rear of the lighting or the TV, or operate the remote control unit closer to the remote control sensor. /-x ¸" G To enjoy a clearer picture, use an outdoor antenna. In such cases, change the...
... cabte (commercially available) • Connect the antenna cable to the TV using one of the remote control unit. • The remote control unit may not work properly if the remote control sensor on the TV. Preparation Use the remote control unit by pointing it may cause damage to your outdoor antenna uses ...coaxial cable with an F-type connector, plug it into the antenna terminal at the rear of the lighting or the TV, or operate the remote control unit closer to the remote control sensor. /-x ¸" G To enjoy a clearer picture, use an outdoor antenna. In such cases, change the...
Operation Manual
Page 44
... m HDMI-certified cable (commercially available) Coaxial cable (commercially available) Audio cable (commercially available) HDMI DIGITAL AUDIO INPUT ,@@. Terminal on the TV INPUT 1 or 2 _}AV Cable cable (commercially available) _ Terminal on the remote control. 1.Input1 2.Input2 3.Input3 4.Input4 5.Input5 6.Input6 Each time INPUT is pressed, "Source Selection" item toggles. • You can connect many...
... m HDMI-certified cable (commercially available) Coaxial cable (commercially available) Audio cable (commercially available) HDMI DIGITAL AUDIO INPUT ,@@. Terminal on the TV INPUT 1 or 2 _}AV Cable cable (commercially available) _ Terminal on the remote control. 1.Input1 2.Input2 3.Input3 4.Input4 5.Input5 6.Input6 Each time INPUT is pressed, "Source Selection" item toggles. • You can connect many...
Operation Manual
Page 45
... the channel does not change channels in reverse, from the analog to the AC outlet. (See page 7.) Press POWER on the TV, or POWER on the remote control unit. 1 Insert the batteries into memory. • New digital channels may be sure to select "Channel", then press _ or...!_!i,!l;ii_ii_i_i_!il,i'!i_!i!_!ii!!i!!i_i_ilii_illiiiiiij_i!i!_,ii__!iii__i,i_!i!i_ii_i__i,_i!i!_ii_i__i,_i!i!_ii_i__,ii!i!_i_i_i!i_ Press POWER on the TV, or POWER on the remote control. • The TV enters standby mode and the image on the screen 5 disappears. • The POWER indicator on . ("Please wait...
... the channel does not change channels in reverse, from the analog to the AC outlet. (See page 7.) Press POWER on the TV, or POWER on the remote control unit. 1 Insert the batteries into memory. • New digital channels may be sure to select "Channel", then press _ or...!_!i,!l;ii_ii_i_i_!il,i'!i_!i!_!ii!!i!!i_i_ilii_illiiiiiij_i!i!_,ii__!iii__i,i_!i!i_ii_i__i,_i!i!_ii_i__i,_i!i!_ii_i__,ii!i!_i_i_i!i_ Press POWER on the TV, or POWER on the remote control. • The TV enters standby mode and the image on the screen 5 disappears. • The POWER indicator on . ("Please wait...


