Operation Manual
Page 1
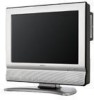
LC-26DV20U COMBINATION LIQUID CRYSTAL TELEVISION AND DVD/CD PLAYER OPERATION MANUAL • The ... • Menu items that are not selectable are located at the rear of loss or theft, please record the TV/DVD's model and serial numbers in the space provided. DO J RISK OF ELECTRIC SHOCK DO NOT OPEN CAUTION: ...the presence of electric shock to constitute a risk of important operating and maintenance (servicing) instructions in case of the TV/DVD. REFER SERVICING TO QUALIFIED SERVICE PERSONNEL. IMPORTANT: To aid reporting in the literature accompanying the product. The numbers...
LC-26DV20U COMBINATION LIQUID CRYSTAL TELEVISION AND DVD/CD PLAYER OPERATION MANUAL • The ... • Menu items that are not selectable are located at the rear of loss or theft, please record the TV/DVD's model and serial numbers in the space provided. DO J RISK OF ELECTRIC SHOCK DO NOT OPEN CAUTION: ...the presence of electric shock to constitute a risk of important operating and maintenance (servicing) instructions in case of the TV/DVD. REFER SERVICING TO QUALIFIED SERVICE PERSONNEL. IMPORTANT: To aid reporting in the literature accompanying the product. The numbers...
Operation Manual
Page 6
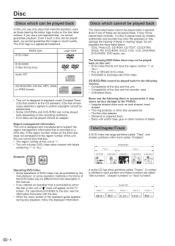
... video _ R4R7 DIGITAL AUO[O CD-R/CD-RW (CD-DA, MP3, WMA or JPEG format) I)_]_@ _@ • This unit is "1". • The unit will appear on the TV screen. If the region number written on the disc label surface. A number is played back by the manufacturer, or some operation methods or functions of... be played back correctly. Even if one of the DVD-Video may be played back, we cannot guarantee playback. If a disc is allotted to the TV/DVD. • Irregular shaped discs such as those in general. CDG, Photo-CD, CD-ROM, CD-TEXT, CD-EXTRA, SACD, PD, DVD-ROM, SVCD, CVD...
... video _ R4R7 DIGITAL AUO[O CD-R/CD-RW (CD-DA, MP3, WMA or JPEG format) I)_]_@ _@ • This unit is "1". • The unit will appear on the TV screen. If the region number written on the disc label surface. A number is played back by the manufacturer, or some operation methods or functions of... be played back correctly. Even if one of the DVD-Video may be played back, we cannot guarantee playback. If a disc is allotted to the TV/DVD. • Irregular shaped discs such as those in general. CDG, Photo-CD, CD-ROM, CD-TEXT, CD-EXTRA, SACD, PD, DVD-ROM, SVCD, CVD...
Operation Manual
Page 8
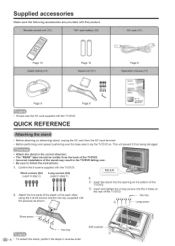
... 10 Page 10 Page 9 Page 9 % Page 8 • Always use the AC cord supplied with the product. over the base area to lay the TV/DVD on. This will prevent it from being damaged. • Attach the stand in the correct direction. • The "REAR" label should be visible ... unit to follow the instructions. Insert and tighten the 4 long screws into the opening on the rear of the TV/DVD. Supplied accessories Make sure the following accessories are provided with the TV/DVD. Confirm the 8 screws supplied with the product) as shown. [ REAR This side faces the rear 3, Insert ...
... 10 Page 10 Page 9 Page 9 % Page 8 • Always use the AC cord supplied with the product. over the base area to lay the TV/DVD on. This will prevent it from being damaged. • Attach the stand in the correct direction. • The "REAR" label should be visible ... unit to follow the instructions. Insert and tighten the 4 long screws into the opening on the rear of the TV/DVD. Supplied accessories Make sure the following accessories are provided with the TV/DVD. Confirm the 8 screws supplied with the product) as shown. [ REAR This side faces the rear 3, Insert ...
Operation Manual
Page 9
... POWER o_ POWER B) POWER GREEN. POWER indicator • Speaker cannot be used with a cable clamp. To safely remove the TV/DVD from the TV/DVD. • TV/DVD angle cannot be scratched or broken when dropped or impacted. Lift onto installation location as the diagram illustrates. Connect the AC ...plug for stability. 1. indicator on the TV/DVD for AC use only and should be detached from the box It's best to use liquid or aerosol cleaners. \ \ I // ...
... POWER o_ POWER B) POWER GREEN. POWER indicator • Speaker cannot be used with a cable clamp. To safely remove the TV/DVD from the TV/DVD. • TV/DVD angle cannot be scratched or broken when dropped or impacted. Lift onto installation location as the diagram illustrates. Connect the AC ...plug for stability. 1. indicator on the TV/DVD for AC use only and should be detached from the box It's best to use liquid or aerosol cleaners. \ \ I // ...
Operation Manual
Page 10
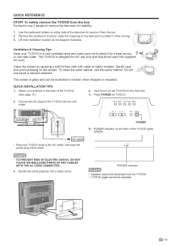
...that leak from it. Q=I0 Be sure to follow the instructions below. • Do not mix batteries of batteries have power to the TV/DVD. chemical skin can shorten the life of batteries can result in chemical leakage or explosion. If the POWER indicator on the television still... FROM THE OUTLET AND REPEAT THE INSTALLATION STEPS, IF YOU STILL ENCOUNTER NO POWER, PLEASE CONTACT US AT 1-800-BE-SHARP. QUICK REFERENCE If the remote control fails to operate TV/DVD functions, replace the batteries in the remote control unit, 1 Open the battery cover. 2 Insert two "AA" size...
...that leak from it. Q=I0 Be sure to follow the instructions below. • Do not mix batteries of batteries have power to the TV/DVD. chemical skin can shorten the life of batteries can result in chemical leakage or explosion. If the POWER indicator on the television still... FROM THE OUTLET AND REPEAT THE INSTALLATION STEPS, IF YOU STILL ENCOUNTER NO POWER, PLEASE CONTACT US AT 1-800-BE-SHARP. QUICK REFERENCE If the remote control fails to operate TV/DVD functions, replace the batteries in the remote control unit, 1 Open the battery cover. 2 Insert two "AA" size...
Operation Manual
Page 11
...SHARP CUSTOMER 3 iMPORTANT SAFETY iNSTRUCTiONS 3 DiSC 6 Discs which can be played back 6 Discs which cannot be played back 6 Title/Chapter/Track 6 Handling discs 7 Supplied accessories 8 QUICK REFERENCE 8 Attaching the stand 8 Contents 11 Part names 12 TV/DVD (Front 12 TV/DVD (Right 12 TV...external equipment 25 Displaying an external equipment image .......... 25 Connecting a digital TV STB (Air or Cable) ....... 26 Connecting a VCR, game console or camcorder, 26 Using digital audio output 26 Connecting HDMI equipment 27 Displaying an image from HDMI equipment ...... 27 ...
...SHARP CUSTOMER 3 iMPORTANT SAFETY iNSTRUCTiONS 3 DiSC 6 Discs which can be played back 6 Discs which cannot be played back 6 Title/Chapter/Track 6 Handling discs 7 Supplied accessories 8 QUICK REFERENCE 8 Attaching the stand 8 Contents 11 Part names 12 TV/DVD (Front 12 TV/DVD (Right 12 TV...external equipment 25 Displaying an external equipment image .......... 25 Connecting a digital TV STB (Air or Cable) ....... 26 Connecting a VCR, game console or camcorder, 26 Using digital audio output 26 Connecting HDMI equipment 27 Displaying an image from HDMI equipment ...... 27 ...

Operation Manual
Page 12
VOL 4- Q-12 Part names PLAY (p) button SKiP (|44/_,-_) buttons STOP (m) button EJECT (_,) button SKiP -- V CR /N iNPUT POWER Volume _ = ' __[_ button s (VO L-l+ _ _NtPtoUT Channel buttons (CH v/A) POWER button Disc slot POWER Remote control sensor POWER indicator* *See page 16 for TV/DVD status indicator.
VOL 4- Q-12 Part names PLAY (p) button SKiP (|44/_,-_) buttons STOP (m) button EJECT (_,) button SKiP -- V CR /N iNPUT POWER Volume _ = ' __[_ button s (VO L-l+ _ _NtPtoUT Channel buttons (CH v/A) POWER button Disc slot POWER Remote control sensor POWER indicator* *See page 16 for TV/DVD status indicator.
Operation Manual
Page 14
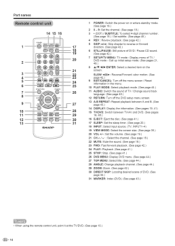
...: Turn off the menu screen / Reset information in the menu. 10 PLAY MODE: Select playback mode. (See page 44.) 11 AUDIO: Switch the sound of TV / Change sound track language. (See page 45.) 12 RETURN: Turn off the DVD setup menu screen. 13 A-B REPEAT: Repeat playback between A and B. (See page 43... the sound. (See page 19.) 23 FWD: Fast forward playback. (See page 42.) 24 PLAY: Playback. (See page 41.) 25 STOP: Stop. (See page 41.) 26 DVD MENU: Display DVD menu. (See page 44.) 27 TOP MENU: Select title. (See page 44.) 28 ANGLE: Change playback channel. (See page 44.) 29...
...: Turn off the menu screen / Reset information in the menu. 10 PLAY MODE: Select playback mode. (See page 44.) 11 AUDIO: Switch the sound of TV / Change sound track language. (See page 45.) 12 RETURN: Turn off the DVD setup menu screen. 13 A-B REPEAT: Repeat playback between A and B. (See page 43... the sound. (See page 19.) 23 FWD: Fast forward playback. (See page 42.) 24 PLAY: Playback. (See page 41.) 25 STOP: Stop. (See page 41.) 26 DVD MENU: Display DVD menu. (See page 44.) 27 TOP MENU: Select title. (See page 44.) 28 ANGLE: Change playback channel. (See page 44.) 29...
Operation Manual
Page 15
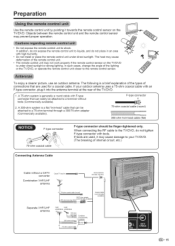
... remote control unit. • The remote control unit may not work properly if the remote control sensor on the TV/DVD. The following is a brief explanation of the types of the TV/DVD. A 75-ohm system is generally a round cable with an F-type connector, plug it into the antenna ... connector should be attached to the remote control sensor. Preparation Use the remote control unit by pointing it towards the remote control sensor on the TV/DVD is under direct sunlight. To enjoy a clearer picture, use an outdoor antenna. cable that are used for a coaxial cable. If tools are ...
... remote control unit. • The remote control unit may not work properly if the remote control sensor on the TV/DVD. The following is a brief explanation of the types of the TV/DVD. A 75-ohm system is generally a round cable with an F-type connector, plug it into the antenna ... connector should be attached to the remote control sensor. Preparation Use the remote control unit by pointing it towards the remote control sensor on the TV/DVD is under direct sunlight. To enjoy a clearer picture, use an outdoor antenna. cable that are used for a coaxial cable. If tools are ...

Operation Manual
Page 16
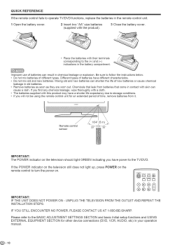
...page 17.) setup menu will automatically shut itself off . • if a station being viewed stops broadcasting, the TV/DVD will appear automatically is pressed on for watching a TV program. _PLAY mSTOP =_SKIP_ 00000 dEJECT VOL + _v" CIE /_ INPUT POWZR CI3E3Z30 POWER I ! Connect the antenna...Insert the batteries into the remote control unit. (See page 10.) 2. POWER indicator TV/DVD status indicator (POWER) ON Lighting (Green) OFF/Standby Lighting (Red) POWER On/Standby) TV/DVD CD CD CD @@@ TV MENU -- ®@0 Q SKIP REV FWD SKIP STILL/PAUSE PLAY CSD S[TUP/TVMENU...
...page 17.) setup menu will automatically shut itself off . • if a station being viewed stops broadcasting, the TV/DVD will appear automatically is pressed on for watching a TV program. _PLAY mSTOP =_SKIP_ 00000 dEJECT VOL + _v" CIE /_ INPUT POWZR CI3E3Z30 POWER I ! Connect the antenna...Insert the batteries into the remote control unit. (See page 10.) 2. POWER indicator TV/DVD status indicator (POWER) ON Lighting (Green) OFF/Standby Lighting (Red) POWER On/Standby) TV/DVD CD CD CD @@@ TV MENU -- ®@0 Q SKIP REV FWD SKIP STILL/PAUSE PLAY CSD S[TUP/TVMENU...

Operation Manual
Page 17
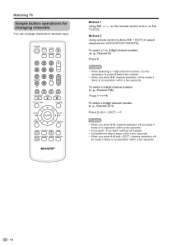
... the desired language from channel memory: Select "CLEAR ALL" after step 3, and the press 4/_'. The TV/DVD will appear automatically. After setting the date and time correctly, press ENTER. Press TV MENU and the MENU screen displays. Press A/Y to select "AUTO CH MEMORY" SETUP LANGUAGE CLOCKSET AIRJCABLE ...then press V to move to the next. Set the DAY, YEAR and TIME (hour and minute) as above step. Q"17 Watching TV Language setting When you want to add. SETUP CLOCKSET AIR/CABLE CABLE AUTO CH MEMORY ADDJDELETE L_):SELECT ;_):ADJUST Clock setting Please set channel ...
... the desired language from channel memory: Select "CLEAR ALL" after step 3, and the press 4/_'. The TV/DVD will appear automatically. After setting the date and time correctly, press ENTER. Press TV MENU and the MENU screen displays. Press A/Y to select "AUTO CH MEMORY" SETUP LANGUAGE CLOCKSET AIRJCABLE ...then press V to move to the next. Set the DAY, YEAR and TIME (hour and minute) as above step. Q"17 Watching TV Language setting When you want to add. SETUP CLOCKSET AIR/CABLE CABLE AUTO CH MEMORY ADDJDELETE L_):SELECT ;_):ADJUST Clock setting Please set channel ...
Operation Manual
Page 18
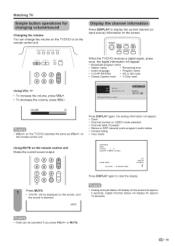
... 5 • When selecting a 1-digit channel number, it is no operation within a few seconds. (_)- 18 To select a 3-digit channel number (e. Watching TV You can change channels in several ways. POWER CD_ DISPLAY TV/DVD EJECT SLEEP VIEWMODE INPUT CD CD CD ®®® SUBTITLE MUTE ®®O Q SKIP REV FWD SKIP (E_...
... 5 • When selecting a 1-digit channel number, it is no operation within a few seconds. (_)- 18 To select a 3-digit channel number (e. Watching TV You can change channels in several ways. POWER CD_ DISPLAY TV/DVD EJECT SLEEP VIEWMODE INPUT CD CD CD ®®® SUBTITLE MUTE ®®O Q SKIP REV FWD SKIP (E_...
Operation Manual
Page 19
... the volume, press VOL+. * To decrease the volume, press VOL-. When the TV/DVD receives a digital signal, once, the digital information will display for approx. 4 seconds. or MUTE. (_=19 Watching TV Changing the volume You can be displayed the sound is silenced. Press DISPLAY to clear... approx. 10 seconds. • Mute can change the volume on the TV/DVD or on the remote control unit Mutes the current sound output. ®@@ @@@ STEREO SAP TV-PG SLEEP L TIMER V 2hOOm SIDE BAR CLOCK 12:00AM SUN TV ABCD CABLE 7 A(9®@®@8 5 Press MUTE. • "MUTE...
... the volume, press VOL+. * To decrease the volume, press VOL-. When the TV/DVD receives a digital signal, once, the digital information will display for approx. 4 seconds. or MUTE. (_=19 Watching TV Changing the volume You can be displayed the sound is silenced. Press DISPLAY to clear... approx. 10 seconds. • Mute can change the volume on the TV/DVD or on the remote control unit Mutes the current sound output. ®@@ @@@ STEREO SAP TV-PG SLEEP L TIMER V 2hOOm SIDE BAR CLOCK 12:00AM SUN TV ABCD CABLE 7 A(9®@®@8 5 Press MUTE. • "MUTE...
Operation Manual
Page 20
... • Stereo broadcasts View programs like live sporting events, shows and concerts in dynamic stereo sound. • SAP broadcasts Receive TV broadcasts in another language or something completely different like weather information. You can receive mono sound, stereo sound and Secondary Audio Programs (...SAP). when the sleep SOLhEOE7Prn 1 • Select "0h00m" by pressing SLEEP repeatedly to cancel the sleep timer. • The TV/DVD will disappear after a few seconds, the sleep timer automatically starts counting down. • If you want to adjust the sleep timer ...
... • Stereo broadcasts View programs like live sporting events, shows and concerts in dynamic stereo sound. • SAP broadcasts Receive TV broadcasts in another language or something completely different like weather information. You can receive mono sound, stereo sound and Secondary Audio Programs (...SAP). when the sleep SOLhEOE7Prn 1 • Select "0h00m" by pressing SLEEP repeatedly to cancel the sleep timer. • The TV/DVD will disappear after a few seconds, the sleep timer automatically starts counting down. • If you want to adjust the sleep timer ...
Operation Manual
Page 21
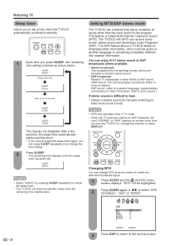
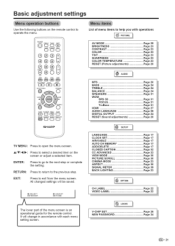
...will change in accordance with i PICTURE operations AV MODE Page 29 BRIGHTNESS Page 23 CONTRAST Page 23 COLOR Page 23 TINT Page 23 SHARPNESS Page 23 COLOR TEMPERATURE Page 23 RESET (Picture adjustments Page 28 I® AUO,O MTS Page 20 BASS Page 24 TREBLE Page 24...FWD SKIP STILL/PAUSE PLAY 5D GD SETVP/TMVENU STOP C_ DVOMENU AUDIO PLAYMODE ANGLE ZOOM (:Z9C:) CE:)C:) RETURN A-BREPEAT MARKERDIRESTSKIP _ CD CD C} SHARP TV MENU: Press to the previous step. It will be saved. Basic adjustment settings Use the following buttons on the screen or adjust a selected item. ...
...will change in accordance with i PICTURE operations AV MODE Page 29 BRIGHTNESS Page 23 CONTRAST Page 23 COLOR Page 23 TINT Page 23 SHARPNESS Page 23 COLOR TEMPERATURE Page 23 RESET (Picture adjustments Page 28 I® AUO,O MTS Page 20 BASS Page 24 TREBLE Page 24...FWD SKIP STILL/PAUSE PLAY 5D GD SETVP/TMVENU STOP C_ DVOMENU AUDIO PLAYMODE ANGLE ZOOM (:Z9C:) CE:)C:) RETURN A-BREPEAT MARKERDIRESTSKIP _ CD CD C} SHARP TV MENU: Press to the previous step. It will be saved. Basic adjustment settings Use the following buttons on the screen or adjust a selected item. ...
Operation Manual
Page 22
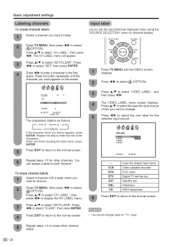
...to return to select "CH LABEL", then press 4/_'. INPUT3 4. Press A/V to the normal screen. to display the CH LABEL menu. Repeat steps 1-5 for "TV" input. Press A/Y to select "CH LABEL", then press "_/1_ to enter a character in the first space. INPUT4 {_=:SELECT I_qADJUST VCR DVD DTV SAT CBL ...name, press ENTER. To erase channel labels Select a channel with a label which you want to change label for other channel labels. (_)- 22 Press TV MENU, then press 4/1_ to each channel. The CH LABEL menu will appear. When you want to remove. You can assign a label to ...
...to return to select "CH LABEL", then press 4/_'. INPUT3 4. Press A/V to the normal screen. to display the CH LABEL menu. Repeat steps 1-5 for "TV" input. Press A/Y to select "CH LABEL", then press "_/1_ to enter a character in the first space. INPUT4 {_=:SELECT I_qADJUST VCR DVD DTV SAT CBL ...name, press ENTER. To erase channel labels Select a channel with a label which you want to change label for other channel labels. (_)- 22 Press TV MENU, then press 4/1_ to each channel. The CH LABEL menu will appear. When you want to remove. You can assign a label to ...

Operation Manual
Page 23
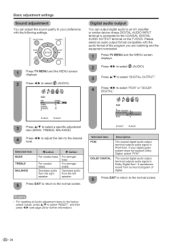
...For more contrast For more color intensity Skin tones become greenish For more sharpness Press EXIT to return to select "RESET", and then press 4/_" (see page 28 for improved picture clarity, Press TV MENU and the MENU screen displays. COOL MEDIUM WARM White with Blueish ...select "COLOR TEMPERATURE". Press A/Y to the desired level. Press EXIT to return to select a specific adjustment item (BRIGHTNESS, CONTRAST, COLOR, TINT, SHARPNESS). Press A/V to the normal screen. Press 4/1_ to adjust the screen brightness. Q" 23 Press 4/1_ to select the mode you view a DVD...
...For more contrast For more color intensity Skin tones become greenish For more sharpness Press EXIT to return to select "RESET", and then press 4/_" (see page 28 for improved picture clarity, Press TV MENU and the MENU screen displays. COOL MEDIUM WARM White with Blueish ...select "COLOR TEMPERATURE". Press A/Y to the desired level. Press EXIT to return to select a specific adjustment item (BRIGHTNESS, CONTRAST, COLOR, TINT, SHARPNESS). Press A/V to the normal screen. Press 4/1_ to adjust the screen brightness. Q" 23 Press 4/1_ to select the mode you view a DVD...
Operation Manual
Page 24
... A/V to select _ (AUDIO). Please select an audio output format compatible with the following settings, SETUP/TVMENU DVDMENU Press TV MENU and the MENU screen displays, Press 4/1_ to select "DIGITAL OUTPUT". Press TV MENU and the MENU screen displays. The coaxial digital audio output terminal outputs audio signal in PCM form. Basic... the audio format of digital. It reproduces sound from the left speaker Press EXIT to return to the COAXIAL DIGITAL AUDIO OUTPUT terminal on the TV/DVD.
... A/V to select _ (AUDIO). Please select an audio output format compatible with the following settings, SETUP/TVMENU DVDMENU Press TV MENU and the MENU screen displays, Press 4/1_ to select "DIGITAL OUTPUT". Press TV MENU and the MENU screen displays. The coaxial digital audio output terminal outputs audio signal in PCM form. Basic... the audio format of digital. It reproduces sound from the left speaker Press EXIT to return to the COAXIAL DIGITAL AUDIO OUTPUT terminal on the TV/DVD.
Operation Manual
Page 25
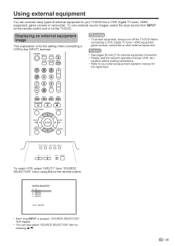
...174;@@®@®0 • To protect equipment, always turn off the TV/DVD before connecting a VCR, Digital TV tuner, HDMI equipment, game console, camcorder or other external equipment. • See pages 26 and 27 for external equipment connection. • Please read the relevant ...operation manual (VCR, etc.) carefully before making connections. • Refer to the INPUT1 terminal. TV 2. INPUT4 [0-4] : SELECT • Each time INPUT ...
...174;@@®@®0 • To protect equipment, always turn off the TV/DVD before connecting a VCR, Digital TV tuner, HDMI equipment, game console, camcorder or other external equipment. • See pages 26 and 27 for external equipment connection. • Please read the relevant ...operation manual (VCR, etc.) carefully before making connections. • Refer to the INPUT1 terminal. TV 2. INPUT4 [0-4] : SELECT • Each time INPUT ...
Operation Manual
Page 26
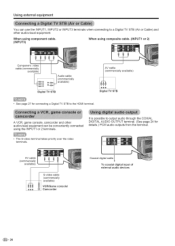
... console/ Coaxial digital cable To coaxial digital input of external audio devices (_)= 26 Using external equipment You can use the INPUT1, INPUT2 or INPUT3 terminals when connecting to a Digital TV STB (Air or Cable) and other audiovisual equipment can be conveniently connected using...(INPUT1 or 2) Component video cable (commercially available) Audio cable (commercially available) Digital TV STB AV cable (commercially available) @@@ Digital TV STB • See page 27 for connecting a Digital TV STB to output audio through the COXlAL DIGITAL AUDIO OUTPUT terminal. (See page 24 ...
... console/ Coaxial digital cable To coaxial digital input of external audio devices (_)= 26 Using external equipment You can use the INPUT1, INPUT2 or INPUT3 terminals when connecting to a Digital TV STB (Air or Cable) and other audiovisual equipment can be conveniently connected using...(INPUT1 or 2) Component video cable (commercially available) Audio cable (commercially available) Digital TV STB AV cable (commercially available) @@@ Digital TV STB • See page 27 for connecting a Digital TV STB to output audio through the COXlAL DIGITAL AUDIO OUTPUT terminal. (See page 24 ...


