
Operation Manual
Page 6
Introduction Reference Appendix Maintenance 51 Cleaning and Replacing the Dust Filters 52 Maintenance Indicators 54 Regarding the Lamp 56 Lamp 56 Caution Concerning the Lamp 56 Replacing the Lamp 56 Removing and Installing the Lamp Unit 57 Resetting the Lamp Timer 58 Connecting Pin Assignments 59 Computer Compatibility Chart 60 Troubleshooting 61 Service Information (For the U.S.) ..... 62 Specifications 63 Dimensions 64 Index 65 CONSUMER LIMITED WARRANTY (VALID IN USA ONLY 66 LIMITED WARRANTY (VALID IN CANADA ONLY 67 5
Introduction Reference Appendix Maintenance 51 Cleaning and Replacing the Dust Filters 52 Maintenance Indicators 54 Regarding the Lamp 56 Lamp 56 Caution Concerning the Lamp 56 Replacing the Lamp 56 Removing and Installing the Lamp Unit 57 Resetting the Lamp Timer 58 Connecting Pin Assignments 59 Computer Compatibility Chart 60 Troubleshooting 61 Service Information (For the U.S.) ..... 62 Specifications 63 Dimensions 64 Index 65 CONSUMER LIMITED WARRANTY (VALID IN USA ONLY 66 LIMITED WARRANTY (VALID IN CANADA ONLY 67 5

Operation Manual
Page 40
... set in the projector. S. RETURN 7500K 1 INPUT 1 Standard 3D Progressive Level 1 High Brightness Bright Single ADJ END CLR Temp Page 44 BrilliantColor™ [0/1/2] Page 43 C.M.S. S. - S. - S. IRIS Page 45 C. M. C. Saturation Lamp Setting Page 45 Reset C. Progressive DNR IRIS Lamp Setting Reset SEL./ADJ. S. - "Picture" menu PAGE 1 Picture Picture Mode Contrast 0 Bright 0 Color 0 Tint 0 Sharp 0 Red 0 Blue 0 INPUT...
... set in the projector. S. RETURN 7500K 1 INPUT 1 Standard 3D Progressive Level 1 High Brightness Bright Single ADJ END CLR Temp Page 44 BrilliantColor™ [0/1/2] Page 43 C.M.S. S. - S. - S. IRIS Page 45 C. M. C. Saturation Lamp Setting Page 45 Reset C. Progressive DNR IRIS Lamp Setting Reset SEL./ADJ. S. - "Picture" menu PAGE 1 Picture Picture Mode Contrast 0 Bright 0 Color 0 Tint 0 Sharp 0 Red 0 Blue 0 INPUT...

Operation Manual
Page 41
...English Deutsch Español Nederlands Français Italiano Svenska Português Menu Items (Continued) "Fine Sync" menu Fine Sync Clock Phase H-Pos V-Pos Reset Special Modes Auto Sync INPUT 5 0 0 0 0 1080I On Cur. "Options1" menu Options 1 Overscan H Overscan V Subtitle OSD Display Video System ...Signal Type HDMI Setting Background Auto Power Off INPUT 1 0 0 0 On Auto Auto Standard Blue On Lamp Timer(Life) SEL./ADJ. RETURN 40 ENTER END Main menu Fine Sync Page 46 Clock -150 +150 Page 46 Phase -30 +30 Page 46 ...
...English Deutsch Español Nederlands Français Italiano Svenska Português Menu Items (Continued) "Fine Sync" menu Fine Sync Clock Phase H-Pos V-Pos Reset Special Modes Auto Sync INPUT 5 0 0 0 0 1080I On Cur. "Options1" menu Options 1 Overscan H Overscan V Subtitle OSD Display Video System ...Signal Type HDMI Setting Background Auto Power Off INPUT 1 0 0 0 On Auto Auto Standard Blue On Lamp Timer(Life) SEL./ADJ. RETURN 40 ENTER END Main menu Fine Sync Page 46 Clock -150 +150 Page 46 Phase -30 +30 Page 46 ...

Operation Manual
Page 44
... brighter while the color reproduction is obtained. S. Allows you make are subject to change without notice. For more sharpness. Sharp*1 For less sharpness. BrilliantColor™*2 For making the effect stronger. *1 Item that cannot be adjusted in memory. Makes the black...your picture adjustment settings. Bright For less brightness. For stronger red. For more pronounced and vivid. Progressive DNR IRIS Lamp Setting Reset Menu operation n Page 41 7500K 1 INPUT 1 Standard 3D Progressive Level 1 High Brightness Bright Selectable items Standard Natural...
... brighter while the color reproduction is obtained. S. Allows you make are subject to change without notice. For more sharpness. Sharp*1 For less sharpness. BrilliantColor™*2 For making the effect stronger. *1 Item that cannot be adjusted in memory. Makes the black...your picture adjustment settings. Bright For less brightness. For stronger red. For more pronounced and vivid. Progressive DNR IRIS Lamp Setting Reset Menu operation n Page 41 7500K 1 INPUT 1 Standard 3D Progressive Level 1 High Brightness Bright Selectable items Standard Natural...

Operation Manual
Page 50
...) Inverted image (Projected from the front of the screen with an inverted projector) Reversed image (Projected from the rear of Projection (PRJ) Mode. Options 2 1 PRJ Mode 2 RS-232C 3 STANDBY Mode 4 Fan Mode 5 All Reset 6 Language Menu operation n Page 41 INPUT 1 Front 9600 bps Eco ... and inverted image (Projected with a mirror) See page 19 for more than 15 minutes, the projector will automatically enter standby mode. will be changed when the remaining lamp life becomes 5%. • The lamp life may vary depending on the screen to indicate the remaining minutes. 9 Checking the...
...) Inverted image (Projected from the front of the screen with an inverted projector) Reversed image (Projected from the rear of Projection (PRJ) Mode. Options 2 1 PRJ Mode 2 RS-232C 3 STANDBY Mode 4 Fan Mode 5 All Reset 6 Language Menu operation n Page 41 INPUT 1 Front 9600 bps Eco ... and inverted image (Projected with a mirror) See page 19 for more than 15 minutes, the projector will automatically enter standby mode. will be changed when the remaining lamp life becomes 5%. • The lamp life may vary depending on the screen to indicate the remaining minutes. 9 Checking the...

Operation Manual
Page 51
... - P R 115200bps Transmission speed is slow. Use "All Reset" to initialize all the adjustments you want to control the projector using the projector at altitudes of the projector to "Standard". 6 Selecting the On-screen Display Language The projector can switch the on-screen display language among 11 languages. Lamp Timer (Life) - English Deutsch Español Nederlands...
... - P R 115200bps Transmission speed is slow. Use "All Reset" to initialize all the adjustments you want to control the projector using the projector at altitudes of the projector to "Standard". 6 Selecting the On-screen Display Language The projector can switch the on-screen display language among 11 languages. Lamp Timer (Life) - English Deutsch Español Nederlands...
Operation Manual
Page 59
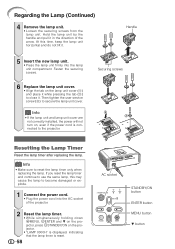
... service screw (3) to reset the lamp timer only when replacing the lamp. Info • If the lamp unit and lamp unit cover are not correctly installed, the power will not turn on the projector. • "LAMP 0000H" is displayed, indicating that the lamp timer is connected to close it in the direction of the projector. 2 Reset the lamp timer. • While...
... service screw (3) to reset the lamp timer only when replacing the lamp. Info • If the lamp unit and lamp unit cover are not correctly installed, the power will not turn on the projector. • "LAMP 0000H" is displayed, indicating that the lamp timer is connected to close it in the direction of the projector. 2 Reset the lamp timer. • While...


