
Operation Manual
Page 2
... fire or electric shock, do not stare directly into the beam of light, or view directly. ENGLISH Before using the projector, please read this product to the presence of important operating and maintenance (servicing) instructions in the literature accompanying the product. Model No.: DT-510 Serial No.: WARNING: High brightness light source. The lightning flash with arrowhead symbol, within an equilateral triangle, is intended to alert...
... fire or electric shock, do not stare directly into the beam of light, or view directly. ENGLISH Before using the projector, please read this product to the presence of important operating and maintenance (servicing) instructions in the literature accompanying the product. Model No.: DT-510 Serial No.: WARNING: High brightness light source. The lightning flash with arrowhead symbol, within an equilateral triangle, is intended to alert...

Operation Manual
Page 3
... STANDBY button on page 56. This SHARP projector uses a DLP® chip. This will not occur in a particular installation. Ensure the cooling fan has stopped before disconnecting the power cord. These limits are located in the United States of the unit. 2 Responsible Party: SHARP ELECTRONICS CORPORATION Sharp Plaza, Mahwah, New Jersey 07430-2135 TEL: 1-800-BE-SHARP (1-800-237-4277) U.S.A. Caution Concerning Lamp Replacement See "Replacing the Lamp" on the remote control...
... STANDBY button on page 56. This SHARP projector uses a DLP® chip. This will not occur in a particular installation. Ensure the cooling fan has stopped before disconnecting the power cord. These limits are located in the United States of the unit. 2 Responsible Party: SHARP ELECTRONICS CORPORATION Sharp Plaza, Mahwah, New Jersey 07430-2135 TEL: 1-800-BE-SHARP (1-800-237-4277) U.S.A. Caution Concerning Lamp Replacement See "Replacing the Lamp" on the remote control...
Operation Manual
Page 4
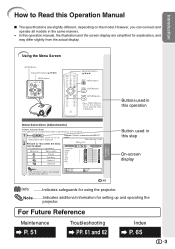
... for INPUT 1 mode Selected input mode Menu icons Picture Picture Mode Contrast Bright Color Tint Sharp Red Blue INPUT 1 Standard 0 0 0 0 0 0 0 Note • The "Fine Sync" menu is not available for the selected input mode is displayed. 2 Press Q or O to select the menu icon to adjust. • The selected icon is displayed. Buttons used in this operation Menu Selections (Adjustments) Example: Adjusting "Bright". • This operation can connect and operate all models in this step On-screen display Info ........Indicates safeguards for setting up and operating the projector...
... for INPUT 1 mode Selected input mode Menu icons Picture Picture Mode Contrast Bright Color Tint Sharp Red Blue INPUT 1 Standard 0 0 0 0 0 0 0 Note • The "Fine Sync" menu is not available for the selected input mode is displayed. 2 Press Q or O to select the menu icon to adjust. • The selected icon is displayed. Buttons used in this operation Menu Selections (Adjustments) Example: Adjusting "Bright". • This operation can connect and operate all models in this step On-screen display Info ........Indicates safeguards for setting up and operating the projector...
Operation Manual
Page 5
... Adjusting the Colors 44 Progressive 44 Reducing Image Noise (DNR 45 Switching the Iris Setting 45 Lamp Setting 45 Computer Image Adjustment ("Fine Sync" menu 46 Adjusting the Computer Image 46 Special Modes Setting 46 Auto Sync (Auto Sync Adjustment) ..... 46 Checking the Input Signal 46 Using the "Options" Menu 47 Adjusting the Overscan 47 Adjusting the Vertical Size of the Display (Subtitle Setting 47 Setting the On-screen Display 48 Setting the Video System 48 Signal Type Setting 48 Selecting the HDMI Setting 48 Selecting the Background Image ........ 48 Auto Power...
... Adjusting the Colors 44 Progressive 44 Reducing Image Noise (DNR 45 Switching the Iris Setting 45 Lamp Setting 45 Computer Image Adjustment ("Fine Sync" menu 46 Adjusting the Computer Image 46 Special Modes Setting 46 Auto Sync (Auto Sync Adjustment) ..... 46 Checking the Input Signal 46 Using the "Options" Menu 47 Adjusting the Overscan 47 Adjusting the Vertical Size of the Display (Subtitle Setting 47 Setting the On-screen Display 48 Setting the Video System 48 Signal Type Setting 48 Selecting the HDMI Setting 48 Selecting the Background Image ........ 48 Auto Power...
Operation Manual
Page 9
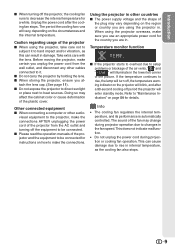
... Sharp Authorized Service Center or Dealer for a while. 8 Avoid locations with thin air, set up the projector in high-altitude areas with extremes of the unit. Close the curtains and dim the lights when setting up your eyes occasionally. Take regular breaks to hard impact and/or vibration. Do not set "Fan Mode" to +60°C). I The storage temperature of the projector is regularly cleaned, use...
... Sharp Authorized Service Center or Dealer for a while. 8 Avoid locations with thin air, set up the projector in high-altitude areas with extremes of the unit. Close the curtains and dim the lights when setting up your eyes occasionally. Take regular breaks to hard impact and/or vibration. Do not set "Fan Mode" to +60°C). I The storage temperature of the projector is regularly cleaned, use...
Operation Manual
Page 10
... the projector, make the connections. If the temperature continues to rise, the lamp will illuminate in . dicators" on page 54 for instructions on the circumstances and the internal temperature. The sound of the projector I When using the projector in the lower left corner of the picture. Caution regarding usage of the fan may change during projection or cooling fan operation. I Please read the operation manuals of the plastic cover...
... the projector, make the connections. If the temperature continues to rise, the lamp will illuminate in . dicators" on page 54 for instructions on the circumstances and the internal temperature. The sound of the projector I When using the projector in the lower left corner of the picture. Caution regarding usage of the fan may change during projection or cooling fan operation. I Please read the operation manuals of the plastic cover...
Operation Manual
Page 12
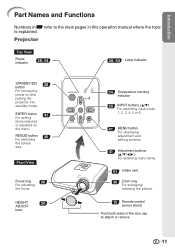
... Power indicator 28, 54 28, 54 Lamp indicator STANDBY/ON 28 button For turning the power on the menu. RESIZE button 36 For switching the screen size. Front View Focus ring 30 For adjusting the focus. HEIGHT 30 ADJUST lever 54 Temperature warning indicator 29 INPUT buttons (P/R) For switching input mode 1, 2, 3, 4, 5 or 6. 41 MENU button For displaying adjustment and setting screens. 41 Adjustment buttons (P/R/O/Q) For selecting menu items. 51 Intake vent 30 Zoom ring For enlarging/ reducing the picture. 15 Remote control sensor (front) Push both sides of the lens...
... Power indicator 28, 54 28, 54 Lamp indicator STANDBY/ON 28 button For turning the power on the menu. RESIZE button 36 For switching the screen size. Front View Focus ring 30 For adjusting the focus. HEIGHT 30 ADJUST lever 54 Temperature warning indicator 29 INPUT buttons (P/R) For switching input mode 1, 2, 3, 4, 5 or 6. 41 MENU button For displaying adjustment and setting screens. 41 Adjustment buttons (P/R/O/Q) For selecting menu items. 51 Intake vent 30 Zoom ring For enlarging/ reducing the picture. 15 Remote control sensor (front) Push both sides of the lens...
Operation Manual
Page 14
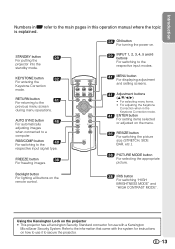
... input modes. 41 MENU button For displaying adjustment and setting screens. 41 Adjustment buttons (P/R/O/Q) • For selecting menu items. • For adjusting the Keystone Correction when in the Keystone Correction mode. 41 ENTER button For setting items selected or adjusted on the projector • This projector has a Kensington Security Standard connector for instructions on the remote control. 38 IRIS button For switching "HIGH BRIGHTNESS MODE" and "HIGH CONTRAST MODE". KEYSTONE button 32 For entering the Keystone Correction mode. RGB/COMP. STANDBY button...
... input modes. 41 MENU button For displaying adjustment and setting screens. 41 Adjustment buttons (P/R/O/Q) • For selecting menu items. • For adjusting the Keystone Correction when in the Keystone Correction mode. 41 ENTER button For setting items selected or adjusted on the projector • This projector has a Kensington Security Standard connector for instructions on the remote control. 38 IRIS button For switching "HIGH BRIGHTNESS MODE" and "HIGH CONTRAST MODE". KEYSTONE button 32 For entering the Keystone Correction mode. RGB/COMP. STANDBY button...

Operation Manual
Page 18
... on and start playback 5. Turn the video equipment on the remote control to also set the upper-right, lower-right, and lower-left positions of the projected image. 3. Adjust the projector angle using the INPUT buttons on the projector or the INPUT 4 button on the remote control also allows you confirm the lower left position, the screen adjustments will end. 8. Focus ring 7. On the On the remote projector control On-screen Display • Unplug the power cord from...
... on and start playback 5. Turn the video equipment on the remote control to also set the upper-right, lower-right, and lower-left positions of the projected image. 3. Adjust the projector angle using the INPUT buttons on the projector or the INPUT 4 button on the remote control also allows you confirm the lower left position, the screen adjustments will end. 8. Focus ring 7. On the On the remote projector control On-screen Display • Unplug the power cord from...

Operation Manual
Page 29
... Power Cord Plug the supplied power cord into the AC socket on the remote control. Then plug into standby mode and immediately turned on . Supplied accessory Power cord AC socket To AC outlet Turning the Projector on Note that the connections to start projection. Blinking in green: The lamp is the factory default language. This is normal operation as faulty operation. • If the projector is put into AC outlet. If you want to change the on-screen display...
... Power Cord Plug the supplied power cord into the AC socket on the remote control. Then plug into standby mode and immediately turned on . Supplied accessory Power cord AC socket To AC outlet Turning the Projector on Note that the connections to start projection. Blinking in green: The lamp is the factory default language. This is normal operation as faulty operation. • If the projector is put into AC outlet. If you want to change the on-screen display...

Operation Manual
Page 41
... 46 Reset Sub menu Main menu Options 1 Page 47 Special Modes Page 46 Auto Sync [On/Off] Page 46 Cur. freq Page 46 1035I 1080I The resolution changes depending on the input signal. "Options1" menu Options 1 Overscan H Overscan V Subtitle OSD Display Video System Signal Type HDMI Setting Background Auto Power Off INPUT 1 0 0 0 On Auto Auto Standard Blue On Lamp Timer(Life) SEL./ADJ. RETURN 0h ENTER END 100% *1 Item that can be set when using INPUT 3 or INPUT 4. *2 Item...
... 46 Reset Sub menu Main menu Options 1 Page 47 Special Modes Page 46 Auto Sync [On/Off] Page 46 Cur. freq Page 46 1035I 1080I The resolution changes depending on the input signal. "Options1" menu Options 1 Overscan H Overscan V Subtitle OSD Display Video System Signal Type HDMI Setting Background Auto Power Off INPUT 1 0 0 0 On Auto Auto Standard Blue On Lamp Timer(Life) SEL./ADJ. RETURN 0h ENTER END 100% *1 Item that can be set when using INPUT 3 or INPUT 4. *2 Item...

Operation Manual
Page 44
...your picture adjustment settings. Progressive DNR IRIS Lamp Setting Reset Menu operation n Page 41 7500K 1 INPUT 1 Standard 3D Progressive Level 1 High Brightness Bright Selectable items Standard Natural Dynamic Movie1 Movie2 Memory Description For standard image A balanced color image is kept at a high level. A vivid image is obtained. Allows you make are subject to the default settings. 43 For more contrast. Sharp*1 For less sharpness. Picture Adjustment ("Picture" menu) Q PAGE 1 Picture Picture Mode Contrast Bright Color Tint Sharp Red Blue INPUT 1 Standard...
...your picture adjustment settings. Progressive DNR IRIS Lamp Setting Reset Menu operation n Page 41 7500K 1 INPUT 1 Standard 3D Progressive Level 1 High Brightness Bright Selectable items Standard Natural Dynamic Movie1 Movie2 Memory Description For standard image A balanced color image is kept at a high level. A vivid image is obtained. Allows you make are subject to the default settings. 43 For more contrast. Sharp*1 For less sharpness. Picture Adjustment ("Picture" menu) Q PAGE 1 Picture Picture Mode Contrast Bright Color Tint Sharp Red Blue INPUT 1 Standard...

Operation Manual
Page 49
... levels of the image show banding or appear faded, select the option that case, switch the video signal. NTSC3.58 When connected to NTSC video equipment. 6 Selecting the HDMI Setting When there is factory preset to select the input signal type (RGB or Component) for INPUT 5 or INPUT 6. INPUT/FREEZE/AUTO SYNC/RESIZE/ PICTURE MODE/IRIS are received. Using the "Options" Menu (Continued) Menu operation n Page 41 3 Setting the On-screen Display Selectable items On...
... levels of the image show banding or appear faded, select the option that case, switch the video signal. NTSC3.58 When connected to NTSC video equipment. 6 Selecting the HDMI Setting When there is factory preset to select the input signal type (RGB or Component) for INPUT 5 or INPUT 6. INPUT/FREEZE/AUTO SYNC/RESIZE/ PICTURE MODE/IRIS are received. Using the "Options" Menu (Continued) Menu operation n Page 41 3 Setting the On-screen Display Selectable items On...

Operation Manual
Page 50
... 3 STANDBY Mode 4 Fan Mode 5 All Reset 6 Language Menu operation n Page 41 INPUT 1 Front 9600 bps Eco Normal English Settings on the screen to indicate the remaining minutes. 9 Checking the Lamp Life Status You can confirm the cumulative lamp usage time and the remaining lamp life (percentage). will appear on the Options 2 menu Note • When the Auto Power Off function is set to "On", 5 minutes before the projector enters standby mode, the message "Enter STANDBY mode in X min." Useful Features...
... 3 STANDBY Mode 4 Fan Mode 5 All Reset 6 Language Menu operation n Page 41 INPUT 1 Front 9600 bps Eco Normal English Settings on the screen to indicate the remaining minutes. 9 Checking the Lamp Life Status You can confirm the cumulative lamp usage time and the remaining lamp life (percentage). will appear on the Options 2 menu Note • When the Auto Power Off function is set to "On", 5 minutes before the projector enters standby mode, the message "Enter STANDBY mode in X min." Useful Features...

Operation Manual
Page 56
... nearest Sharp Authorized Service Center or Dealer for repair. • Please exercise care when replacing the lamp. • Securely install the cover. • If the power indicator blinks in red when the projector is turned off .) Red on The lamp does not illuminate. Time to change and this function is open. Red on The lamp does (Standby) not illuminate. Cause • Blocked air intake • Cooling fan breakdown • Internal circuit failure • Clogged air...
... nearest Sharp Authorized Service Center or Dealer for repair. • Please exercise care when replacing the lamp. • Securely install the cover. • If the power indicator blinks in red when the projector is turned off .) Red on The lamp does not illuminate. Time to change and this function is open. Red on The lamp does (Standby) not illuminate. Cause • Blocked air intake • Cooling fan breakdown • Internal circuit failure • Clogged air...
Operation Manual
Page 59
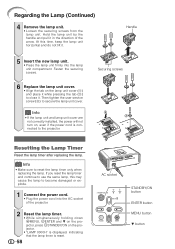
... arrow. Info • If the lamp unit and lamp unit cover are not correctly installed, the power will not turn on, even if the power cord is reset. 58 AC socket STANDBY/ON button ENTER button MENU button R button Info • Make sure to the projector. Hold the lamp unit by the handle and pull it in the direction of the projector. 2 Reset the lamp timer. • While simultaneously holding down...
... arrow. Info • If the lamp unit and lamp unit cover are not correctly installed, the power will not turn on, even if the power cord is reset. 58 AC socket STANDBY/ON button ENTER button MENU button R button Info • Make sure to the projector. Hold the lamp unit by the handle and pull it in the direction of the projector. 2 Reset the lamp timer. • While simultaneously holding down...

Operation Manual
Page 62
... focus. 30 • The projection distance exceeds the focus range. 20 Picture is not installed correctly. • The dust filter holders are incorrectly set. 43 • Make adjustments to "Color", "Tint" and "BrilliantColor™" in the "Options1" menu and change the input INPUT 5 (Component)/ signal type. Please set . INPUT 6 (Component). 48 Picture is pink (no green) on • Select "Signal Type" in "Picture Mode". (Video Input only) 48 • Video input system is green on INPUT 5 (RGB)/INPUT 6 (RGB). Picture...
... focus. 30 • The projection distance exceeds the focus range. 20 Picture is not installed correctly. • The dust filter holders are incorrectly set. 43 • Make adjustments to "Color", "Tint" and "BrilliantColor™" in the "Options1" menu and change the input INPUT 5 (Component)/ signal type. Please set . INPUT 6 (Component). 48 Picture is pink (no green) on • Select "Signal Type" in "Picture Mode". (Video Input only) 48 • Video input system is green on INPUT 5 (RGB)/INPUT 6 (RGB). Picture...

Operation Manual
Page 63
projector turns on . The lamp needs much • The lamp will not be depleted or inserted incorrectly. The remote control cannot be used. • Operate the remote control while pointing it in again after the Replace the lamp. Troubleshooting (Continued) Problem Check Page Picture is illuminating in red. The lamp does not light • The lamp indicator is too bright and • Image adjustments are inserted correctly or insert new ones. 43 48 8, 9 51-55...
projector turns on . The lamp needs much • The lamp will not be depleted or inserted incorrectly. The remote control cannot be used. • Operate the remote control while pointing it in again after the Replace the lamp. Troubleshooting (Continued) Problem Check Page Picture is illuminating in red. The lamp does not light • The lamp indicator is too bright and • Image adjustments are inserted correctly or insert new ones. 43 48 8, 9 51-55...

Operation Manual
Page 64
... specification changes for U.S. Specifications Product type Projector Model DT-510 Video system NTSC3.58/NTSC4.43/PAL/PAL-M/PAL-N/PAL-60/SECAM/DTV480I/DTV480P/ DTV540P/DTV576I/DTV576P/DTV720P/DTV1035I/DTV1080I/DTV1080I-50 Display method DLP® chip Panel size: 0.62" Drive method: Digital Light Processing (DLP®) No. There may be some deviations from these values in individual units. 63 Appendix and Canada, etc., Operation manual *1 When STANDBY Mode is set...
... specification changes for U.S. Specifications Product type Projector Model DT-510 Video system NTSC3.58/NTSC4.43/PAL/PAL-M/PAL-N/PAL-60/SECAM/DTV480I/DTV480P/ DTV540P/DTV576I/DTV576P/DTV720P/DTV1035I/DTV1080I/DTV1080I-50 Display method DLP® chip Panel size: 0.62" Drive method: Digital Light Processing (DLP®) No. There may be some deviations from these values in individual units. 63 Appendix and Canada, etc., Operation manual *1 When STANDBY Mode is set...

Operation Manual
Page 66
... 36 Auto Power Off 49 Auto Sync (Auto Sync adjustment 46 AUTO SYNC button 46 Background 48 Backlight button 13 Blue 43 Bright 43 BrilliantColor 43 Checking the Input Signal 46 CINEMA ZOOM 36, 37 Clock 46 CLR Temp (Color Temperature 44 C.M.S 44 Color 43 Contrast 43 DOT BY DOT 37 DNR 45 Dust filters 52 ENTER button 41 Exhaust vent 12, 51 Fan Mode 50 Fine Sync 46 Focus ring 30 FREEZE button 38 GEOMETRIC ADJUSTMENT 34 H & V KEYSTONE 35 HDMI Setting 48...
... 36 Auto Power Off 49 Auto Sync (Auto Sync adjustment 46 AUTO SYNC button 46 Background 48 Backlight button 13 Blue 43 Bright 43 BrilliantColor 43 Checking the Input Signal 46 CINEMA ZOOM 36, 37 Clock 46 CLR Temp (Color Temperature 44 C.M.S 44 Color 43 Contrast 43 DOT BY DOT 37 DNR 45 Dust filters 52 ENTER button 41 Exhaust vent 12, 51 Fan Mode 50 Fine Sync 46 Focus ring 30 FREEZE button 38 GEOMETRIC ADJUSTMENT 34 H & V KEYSTONE 35 HDMI Setting 48...


