DT-500 Operation Manual
Page 5
... Names and Functions 11 Inserting the Batteries 14 Usable Range 15 Quick Start Quick Start 16 Setup Setting up the Projector 18 Setting up the Projector 18 Standard Setup (Front Projection) ....... 18 Ceiling-mount Setup 18 Projection (PRJ) Mode 19 Picture (Screen) Size and Projection Distance 20 Connections Samples of Cables for Connection ..... 22...
... Names and Functions 11 Inserting the Batteries 14 Usable Range 15 Quick Start Quick Start 16 Setup Setting up the Projector 18 Setting up the Projector 18 Standard Setup (Front Projection) ....... 18 Ceiling-mount Setup 18 Projection (PRJ) Mode 19 Picture (Screen) Size and Projection Distance 20 Connections Samples of Cables for Connection ..... 22...
DT-500 Operation Manual
Page 8
... to dangerous voltage or other hazards. Refer all servicing to rain or water. Wall or Ceiling Mounting This product should be mounted to qualified service personnel under the following the operating instructions. Overloading Do not overload wall outlets..., extension cords, or integral convenience receptacles as this product yourself as radiators, heat registers, stoves, or other products (including amplifiers) that produce heat. • DLP...
... to dangerous voltage or other hazards. Refer all servicing to rain or water. Wall or Ceiling Mounting This product should be mounted to qualified service personnel under the following the operating instructions. Overloading Do not overload wall outlets..., extension cords, or integral convenience receptacles as this product yourself as radiators, heat registers, stoves, or other products (including amplifiers) that produce heat. • DLP...
DT-500 Operation Manual
Page 19
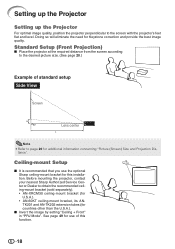
... (Front Projection) I Invert the image by setting "Ceiling + Front" in "PRJ Mode". Before mounting the projector, contact your nearest Sharp Authorized Service Center or Dealer to the screen with the projector's feet flat and level. See page 49 for use the optional Sharp ceiling-mount bracket for this function. 18 Ceiling-mount Setup I It is recommended that you use of...
... (Front Projection) I Invert the image by setting "Ceiling + Front" in "PRJ Mode". Before mounting the projector, contact your nearest Sharp Authorized Service Center or Dealer to the screen with the projector's feet flat and level. See page 49 for use the optional Sharp ceiling-mount bracket for this function. 18 Ceiling-mount Setup I It is recommended that you use of...

DT-500 Operation Manual
Page 20
... 49.) I Table mounted, front projection I Ceiling mounted, front projection Setup Menu item © "Front" I Table mounted, rear projection (with a translucent screen) Menu item © "Ceiling + Front" I Ceiling mounted, rear projection (with... a translucent screen) Menu item © "Rear" Menu item © "Ceiling + Rear" Indication of the Projection Image Size and Projection Distance Refer to page 20 for the projection setting in use any of the 4 projection modes, shown in "Options2" menu. Projection (PRJ) Mode The projector...
... 49.) I Table mounted, front projection I Ceiling mounted, front projection Setup Menu item © "Front" I Table mounted, rear projection (with a translucent screen) Menu item © "Ceiling + Front" I Ceiling mounted, rear projection (with... a translucent screen) Menu item © "Rear" Menu item © "Ceiling + Rear" Indication of the Projection Image Size and Projection Distance Refer to page 20 for the projection setting in use any of the 4 projection modes, shown in "Options2" menu. Projection (PRJ) Mode The projector...


