
DT-500 Operation Manual
Page 2
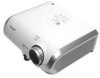
Model No.: DT-500 Serial No.: WARNING: High brightness light source. REFER SERVICING TO QUALIFIED SERVICE PERSONNEL. Introduction IMPORTANT • For your assistance in the literature accompanying the product. WARNING: FCC Regulations state that children do not expose this product to operate this equipment not expressly approved by the manufacturer could void the user's authority to rain or moisture. U.S.A. CAUTION: TO REDUCE THE RISK...
Model No.: DT-500 Serial No.: WARNING: High brightness light source. REFER SERVICING TO QUALIFIED SERVICE PERSONNEL. Introduction IMPORTANT • For your assistance in the literature accompanying the product. WARNING: FCC Regulations state that children do not expose this product to operate this equipment not expressly approved by the manufacturer could void the user's authority to rain or moisture. U.S.A. CAUTION: TO REDUCE THE RISK...

DT-500 Operation Manual
Page 3
... conformity SHARP PROJECTOR, MODEL DT-500 This device complies with the limits for a Class B digital device, pursuant to environmental considerations. These limits are located in the United States of these materials may result in a residential installation. This equipment generates, uses, and can be regulated due to Part 15 of mercury. U.S.A. Caution Concerning Lamp Replacement See "Replacing the Lamp" on the remote control. This very sophisticated panel contains...
... conformity SHARP PROJECTOR, MODEL DT-500 This device complies with the limits for a Class B digital device, pursuant to environmental considerations. These limits are located in the United States of these materials may result in a residential installation. This equipment generates, uses, and can be regulated due to Part 15 of mercury. U.S.A. Caution Concerning Lamp Replacement See "Replacing the Lamp" on the remote control. This very sophisticated panel contains...
DT-500 Operation Manual
Page 4
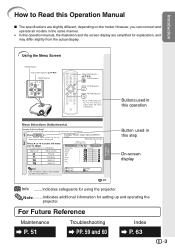
...icon Menu screen Picture Fine Sync Options1 Options2 Example: "Picture" screen menu for INPUT 1 mode Selected input mode Menu icons Picture Picture Mode Contrast Bright Color Tint Sharp Red Blue INPUT 1 Standard 0 0 0 0 0 0 0 Note • The "Fine Sync" menu is displayed. Note .........Indicates additional information for setting up and operating the projector. RETURN ENTER END 41 Useful Features Button used in the same manner. • In this operation Menu Selections (Adjustments) Example: Adjusting "Bright". • This operation can connect and operate all models in...
...icon Menu screen Picture Fine Sync Options1 Options2 Example: "Picture" screen menu for INPUT 1 mode Selected input mode Menu icons Picture Picture Mode Contrast Bright Color Tint Sharp Red Blue INPUT 1 Standard 0 0 0 0 0 0 0 Note • The "Fine Sync" menu is displayed. Note .........Indicates additional information for setting up and operating the projector. RETURN ENTER END 41 Useful Features Button used in the same manner. • In this operation Menu Selections (Adjustments) Example: Adjusting "Bright". • This operation can connect and operate all models in...
DT-500 Operation Manual
Page 5
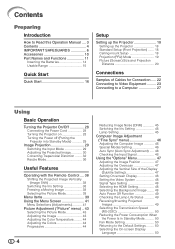
... Start Quick Start 16 Setup Setting up the Projector 18 Setting up the Projector 18 Standard Setup (Front Projection) ....... 18 Ceiling-mount Setup 18 Projection (PRJ) Mode 19 Picture (Screen) Size and Projection Distance 20 Connections Samples of Cables for Connection ..... 22 Connecting to Video Equipment ......... 23 Connecting to a Computer 27 Using Basic Operation Turning the Projector On/Off 28 Connecting the Power Cord 28 Turning the Projector on 28 Turning the Power off (Putting the Projector into Standby Mode 29 Image Projection 29 Switching the Input Mode 29 Adjusting...
... Start Quick Start 16 Setup Setting up the Projector 18 Setting up the Projector 18 Standard Setup (Front Projection) ....... 18 Ceiling-mount Setup 18 Projection (PRJ) Mode 19 Picture (Screen) Size and Projection Distance 20 Connections Samples of Cables for Connection ..... 22 Connecting to Video Equipment ......... 23 Connecting to a Computer 27 Using Basic Operation Turning the Projector On/Off 28 Connecting the Power Cord 28 Turning the Projector on 28 Turning the Power off (Putting the Projector into Standby Mode 29 Image Projection 29 Switching the Input Mode 29 Adjusting...
DT-500 Operation Manual
Page 8
... Apple Computer, Inc. Safety Check Upon completion of Texas Instruments, Inc. • Microsoft® and Windows® are covered by the manufacturer. 22. Introduction 15. Adjust only those controls that produce heat. • DLP\ (Digital Light Processing), DMD\ (Digital Micromirror Device) and BrilliantColor™ are trademarks of any kind on the product. 17. Damage Requiring Service Unplug this indicates a need for service. 19.
... Apple Computer, Inc. Safety Check Upon completion of Texas Instruments, Inc. • Microsoft® and Windows® are covered by the manufacturer. 22. Introduction 15. Adjust only those controls that produce heat. • DLP\ (Digital Light Processing), DMD\ (Digital Micromirror Device) and BrilliantColor™ are trademarks of any kind on the product. 17. Damage Requiring Service Unplug this indicates a need for service. 19.
DT-500 Operation Manual
Page 9
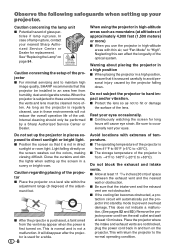
See "Replacing the Lamp" on the screen washes out the colors, making viewing difficult. As long as not to maintain high image quality, SHARP recommends that the intake vent and the exhaust vent are not blocked, plug the power cord back in high-altitude areas such as mountains (at least 10 minutes. When using the projector in and turn on the projector. Light falling directly on page...
See "Replacing the Lamp" on the screen washes out the colors, making viewing difficult. As long as not to maintain high image quality, SHARP recommends that the intake vent and the exhaust vent are not blocked, plug the power cord back in high-altitude areas such as mountains (at least 10 minutes. When using the projector in and turn on the projector. Light falling directly on page...
DT-500 Operation Manual
Page 10
... automatically controlled. Take extra care with the lens. I When connecting a computer or other cables connected to rise in . ing indicator on the region or country you are using the projector overseas, be sure to unplug the power cord from the AC outlet and turning off , the temperature warn- Before moving the projector, be sure to use an appropriate power cord for instructions on how to changes in . When using the projector...
... automatically controlled. Take extra care with the lens. I When connecting a computer or other cables connected to rise in . ing indicator on the region or country you are using the projector overseas, be sure to unplug the power cord from the AC outlet and turning off , the temperature warn- Before moving the projector, be sure to use an appropriate power cord for instructions on how to changes in . When using the projector...
DT-500 Operation Manual
Page 12
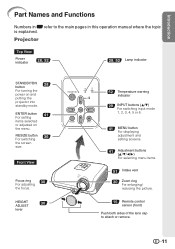
... Temperature warning indicator 29 INPUT buttons (P/R) For switching input mode 1, 2, 3, 4, 5 or 6. 41 MENU button For displaying adjustment and setting screens. 41 Adjustment buttons (P/R/O/Q) For selecting menu items. 51 Intake vent 30 Zoom ring For enlarging/ reducing the picture. 15 Remote control sensor (front) Push both sides of the lens cap to the main pages in Z refer to attach or remove. 11 RESIZE button 36 For switching the screen size. Projector Top View Power indicator 28, 52 28, 52 Lamp indicator STANDBY/ON 28 button For turning...
... Temperature warning indicator 29 INPUT buttons (P/R) For switching input mode 1, 2, 3, 4, 5 or 6. 41 MENU button For displaying adjustment and setting screens. 41 Adjustment buttons (P/R/O/Q) For selecting menu items. 51 Intake vent 30 Zoom ring For enlarging/ reducing the picture. 15 Remote control sensor (front) Push both sides of the lens cap to the main pages in Z refer to attach or remove. 11 RESIZE button 36 For switching the screen size. Projector Top View Power indicator 28, 52 28, 52 Lamp indicator STANDBY/ON 28 button For turning...
DT-500 Operation Manual
Page 14
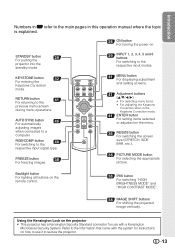
... the Keystone Correction mode. 41 ENTER button For setting items selected or adjusted on how to use with the system for instructions on the menu. 36 RESIZE button For switching the screen size (STRETCH, SIDE BAR, etc.). 38 PICTURE MODE button For selecting the appropriate picture. button 48 For switching to a computer. AUTO SYNC button 46 For automatically adjusting images when connected to the respective input signal type. Refer to the respective input modes. 41 MENU button For displaying adjustment and setting screens. 41 Adjustment buttons...
... the Keystone Correction mode. 41 ENTER button For setting items selected or adjusted on how to use with the system for instructions on the menu. 36 RESIZE button For switching the screen size (STRETCH, SIDE BAR, etc.). 38 PICTURE MODE button For selecting the appropriate picture. button 48 For switching to a computer. AUTO SYNC button 46 For automatically adjusting images when connected to the respective input signal type. Refer to the respective input modes. 41 MENU button For displaying adjustment and setting screens. 41 Adjustment buttons...
DT-500 Operation Manual
Page 18
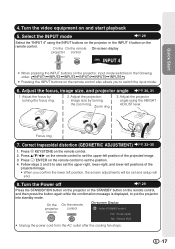
.... Adjust the projection image size by turning the focus ring. 2. Turn the Power off _P. 29 Press the STANDBY/ON button on the projector or the STANDBY button on the remote control. Adjust the focus by turning the zoom ring. Press i ENTER on the remote control also allows you confirm the lower left position, the screen adjustments will be set and setup will end. 8. On the On the remote On-screen display projector control INPUT 4 • When pressing the INPUT buttons on the projector, input mode switches...
.... Adjust the projection image size by turning the focus ring. 2. Turn the Power off _P. 29 Press the STANDBY/ON button on the projector or the STANDBY button on the remote control. Adjust the focus by turning the zoom ring. Press i ENTER on the remote control also allows you confirm the lower left position, the screen adjustments will be set and setup will end. 8. On the On the remote On-screen display projector control INPUT 4 • When pressing the INPUT buttons on the projector, input mode switches...
DT-500 Operation Manual
Page 29
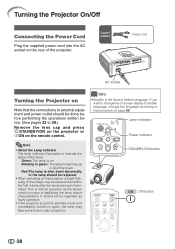
....) Remove the lens cap and press S STANDBY/ON on the projector or bON on the projector, a slight flickering of the image may take some time to the procedure on the rear of the lamp. It should be replaced. • When switching on the remote control. If you want to change the on-screen display to another language, change the language according to start projection. Blinking in green: The lamp is the factory default language...
....) Remove the lens cap and press S STANDBY/ON on the projector or bON on the projector, a slight flickering of the image may take some time to the procedure on the rear of the lamp. It should be replaced. • When switching on the remote control. If you want to change the on-screen display to another language, change the language according to start projection. Blinking in green: The lamp is the factory default language...
DT-500 Operation Manual
Page 41
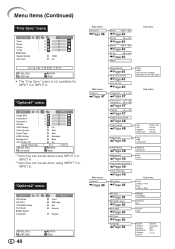
Menu Items (Continued) "Fine Sync" menu Fine Sync Clock Phase H-Pos V-Pos Reset Special Modes Auto Sync INPUT 5 0 0 0 0 1080I On Cur. RETURN ENTER END • The "Fine Sync" menu is not available for INPUT 3 or INPUT 4. "Options1" menu Options 1 Image Shift Overscan H Overscan V Subtitle OSD Display Video System Signal Type HDMI Setting Background Auto Power Off Lamp Timer(Life) SEL./ADJ. "Options2" menu Options 2 PRJ Mode RS-232C STANDBY Mode Fan Mode All Reset Language INPUT 1 Front 9600 bps Eco Normal English SEL./ADJ...
Menu Items (Continued) "Fine Sync" menu Fine Sync Clock Phase H-Pos V-Pos Reset Special Modes Auto Sync INPUT 5 0 0 0 0 1080I On Cur. RETURN ENTER END • The "Fine Sync" menu is not available for INPUT 3 or INPUT 4. "Options1" menu Options 1 Image Shift Overscan H Overscan V Subtitle OSD Display Video System Signal Type HDMI Setting Background Auto Power Off Lamp Timer(Life) SEL./ADJ. "Options2" menu Options 2 PRJ Mode RS-232C STANDBY Mode Fan Mode All Reset Language INPUT 1 Front 9600 bps Eco Normal English SEL./ADJ...
DT-500 Operation Manual
Page 44
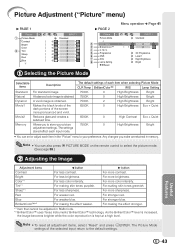
... input return to select the picture mode. (See page 38.) 2 Adjusting the Image Adjustment items O button Q button Contrast For less contrast. Note • You can set or adjust each input mode. For stronger red. Useful Features 43 Red For weaker red. Sharp*1 For less sharpness. For stronger blue. For making the effect weaker. For more pronounced and vivid. For more color intensity. Picture Adjustment ("Picture" menu) Q PAGE 1 Picture Picture Mode Contrast Bright Color Tint Sharp Red Blue INPUT 1 Standard 0 0 0 0 0 0 0 Q PAGE 2 Picture Picture Mode CLR Temp...
... input return to select the picture mode. (See page 38.) 2 Adjusting the Image Adjustment items O button Q button Contrast For less contrast. Note • You can set or adjust each input mode. For stronger red. Useful Features 43 Red For weaker red. Sharp*1 For less sharpness. For stronger blue. For making the effect weaker. For more pronounced and vivid. For more color intensity. Picture Adjustment ("Picture" menu) Q PAGE 1 Picture Picture Mode Contrast Bright Color Tint Sharp Red Blue INPUT 1 Standard 0 0 0 0 0 0 0 Q PAGE 2 Picture Picture Mode CLR Temp...

DT-500 Operation Manual
Page 49
... picture from the connected audio-visual equipment may not be selected only when INPUT 6 is factory preset to INPUT 6, an optimum picture may not be set in INPUT 3 or INPUT 4. INPUT/FREEZE/AUTO SYNC/RESIZE/ PICTURE MODE/IRIS are displayed. When reproducing NTSC signals in the best picture quality. (In most circumstances, "Standard" should occur, switch the HDMI Setting. The video input system mode is selected. 8 Selecting the Background Image Selectable items Blue None Description Blue screen - (Black screen...
... picture from the connected audio-visual equipment may not be selected only when INPUT 6 is factory preset to INPUT 6, an optimum picture may not be set in INPUT 3 or INPUT 4. INPUT/FREEZE/AUTO SYNC/RESIZE/ PICTURE MODE/IRIS are displayed. When reproducing NTSC signals in the best picture quality. (In most circumstances, "Standard" should occur, switch the HDMI Setting. The video input system mode is selected. 8 Selecting the Background Image Selectable items Blue None Description Blue screen - (Black screen...
DT-500 Operation Manual
Page 50
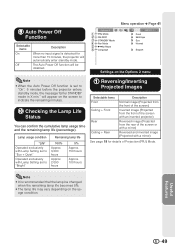
... input signal is set to "Bright" Remaining lamp life 100% Approx. 3,000 hours Approx. 2,000 hours 5% Approx. 150 hours Approx. 100 hours 1 Reversing/Inverting Projected Images Selectable items Front Ceiling + Front Rear Ceiling + Rear Description Normal image (Projected from the front of the screen) Inverted image (Projected from the front of the screen with an inverted projector) Reversed image (Projected from the rear of Projection (PRJ) Mode. Useful Features 49 will automatically enter standby mode. The Auto Power Off function will be changed...
... input signal is set to "Bright" Remaining lamp life 100% Approx. 3,000 hours Approx. 2,000 hours 5% Approx. 150 hours Approx. 100 hours 1 Reversing/Inverting Projected Images Selectable items Front Ceiling + Front Rear Ceiling + Rear Description Normal image (Projected from the front of the screen) Inverted image (Projected from the front of the screen with an inverted projector) Reversed image (Projected from the rear of Projection (PRJ) Mode. Useful Features 49 will automatically enter standby mode. The Auto Power Off function will be changed...

DT-500 Operation Manual
Page 54
... the projector to your nearest Sharp Authorized Service Center or Dealer for repair. • Please exercise care when replacing the lamp. • Securely install the cover. • If the power indicator blinks in red when the projector is controlled automatically. In this function is on. Lamp indicator Green on (Green blinks when the lamp is turned off .) Red on The lamp does not illuminate. Maintenance indicator Temperature warning indicator Normal Off Abnormal Red on (Standby) Problem The internal temperature is open. Appendix...
... the projector to your nearest Sharp Authorized Service Center or Dealer for repair. • Please exercise care when replacing the lamp. • Securely install the cover. • If the power indicator blinks in red when the projector is controlled automatically. In this function is on. Lamp indicator Green on (Green blinks when the lamp is turned off .) Red on The lamp does not illuminate. Maintenance indicator Temperature warning indicator Normal Off Abnormal Red on (Standby) Problem The internal temperature is open. Appendix...
DT-500 Operation Manual
Page 60
... set when connecting notebook computer. • The lamp unit cover is not installed correctly. • Cables incorrectly connected to the projector. • "Bright" is pink (no green) on • Select "Signal Type" in the "Options1" menu and change the input INPUT 5 (Component)/ signal type. into the wall outlet. • Power to the external connected devices is off. • The selected input mode is wrong. • Cables incorrectly connected to the projector. • Remote control...
... set when connecting notebook computer. • The lamp unit cover is not installed correctly. • Cables incorrectly connected to the projector. • "Bright" is pink (no green) on • Select "Signal Type" in the "Options1" menu and change the input INPUT 5 (Component)/ signal type. into the wall outlet. • Power to the external connected devices is off. • The selected input mode is wrong. • Cables incorrectly connected to the projector. • Remote control...

DT-500 Operation Manual
Page 61
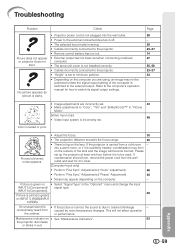
... by incorrect operation or interference. Service Information (For the U.S.) For the location of the image show banding or appear faded when INPUT 6 is illuminating in again after the Replace the lamp. The lamp does not light • The lamp indicator is selected. • Select the HDMI Setting ("Standard" or "Enhanced") that results in the best picture quality. projector turns on the projector's remote control sensor, place the projector where it...
... by incorrect operation or interference. Service Information (For the U.S.) For the location of the image show banding or appear faded when INPUT 6 is illuminating in again after the Replace the lamp. The lamp does not light • The lamp indicator is selected. • Select the HDMI Setting ("Standard" or "Enhanced") that results in the best picture quality. projector turns on the projector's remote control sensor, place the projector where it...
DT-500 Operation Manual
Page 62
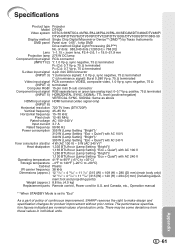
...) Replacement parts Remote control, Power cord for product improvement without prior notice. There may be some deviations from these values in individual units. 61 Appendix SIGNAL: TTL level (positive/negative) VERTICAL SYNC. Specifications Product type Projector Model DT-500 Video system NTSC3.58/NTSC4.43/PAL/PAL-M/PAL-N/PAL-60/SECAM/DTV480I/DTV480P/ DTV540P/DTV576I/DTV576P/DTV720P/DTV1035I/DTV1080I/DTV1080I-50 Display method Single Chip Digital Micromirror...
...) Replacement parts Remote control, Power cord for product improvement without prior notice. There may be some deviations from these values in individual units. 61 Appendix SIGNAL: TTL level (positive/negative) VERTICAL SYNC. Specifications Product type Projector Model DT-500 Video system NTSC3.58/NTSC4.43/PAL/PAL-M/PAL-N/PAL-60/SECAM/DTV480I/DTV480P/ DTV540P/DTV576I/DTV576P/DTV720P/DTV1035I/DTV1080I/DTV1080I-50 Display method Single Chip Digital Micromirror...

DT-500 Operation Manual
Page 64
... Adjustment buttons 41 Aspect ratio 36 Auto Power Off 49 Auto Sync (Auto Sync adjustment 46 AUTO SYNC button 46 Background 48 Backlight button 13 Blue 43 Bright 43 BrilliantColor 43 Checking the Input Signal 46 CINEMA ZOOM 36, 37 Clock 46 CLR Temp (Color Temperature 44 C.M.S 44 Color 43 Contrast 43 DOT BY DOT 37 DNR 45 ENTER button 41 Exhaust vent 12, 51 Fan Mode 50 Fine Sync 46 Focus ring 30 FREEZE button 38 GEOMETRIC ADJUSTMENT 34 H & V KEYSTONE 35 HDMI Setting...
... Adjustment buttons 41 Aspect ratio 36 Auto Power Off 49 Auto Sync (Auto Sync adjustment 46 AUTO SYNC button 46 Background 48 Backlight button 13 Blue 43 Bright 43 BrilliantColor 43 Checking the Input Signal 46 CINEMA ZOOM 36, 37 Clock 46 CLR Temp (Color Temperature 44 C.M.S 44 Color 43 Contrast 43 DOT BY DOT 37 DNR 45 ENTER button 41 Exhaust vent 12, 51 Fan Mode 50 Fine Sync 46 Focus ring 30 FREEZE button 38 GEOMETRIC ADJUSTMENT 34 H & V KEYSTONE 35 HDMI Setting...


