

CD-SW200 Operation Manual
Page 3
... Moisture - If the plug should be adhered to the product. Do not defeat the safety purpose of the grounding-type plug. 13 Power-Cord Protection - Alternate Warnings - This is operated. 2 Retain Instructions - The product is provided or the manufacturer's instructions have been ...of the polarized plug. This is a safety feature. IMPORTANT SAFETY INSTRUCTIONS CD-SW200 Important Instruction 1 Read Instructions - Do not use a mounting accessory recommended by the manufacturer that they exit from battery power, or other similar surface. If you are unable to your home, consult...
... Moisture - If the plug should be adhered to the product. Do not defeat the safety purpose of the grounding-type plug. 13 Power-Cord Protection - Alternate Warnings - This is operated. 2 Retain Instructions - The product is provided or the manufacturer's instructions have been ...of the polarized plug. This is a safety feature. IMPORTANT SAFETY INSTRUCTIONS CD-SW200 Important Instruction 1 Read Instructions - Do not use a mounting accessory recommended by the manufacturer that they exit from battery power, or other similar surface. If you are unable to your home, consult...

CD-SW200 Operation Manual
Page 4
... Damage Requiring Service - Unplug this prod- When replacement parts are covered by the manufacturer or have fallen into such power lines or circuits. An outside antenna system should be sure the service technician has used replacement parts specified by the operating...of antenna discharge unit, connection to rain or water, d) If the product does not operate normally by the manufacturer. 25 Heat - CD-SW200 IMPORTANT SAFETY INSTRUCTIONS (continued) Important Instruction 15 Outdoor Antenna Grounding - If an outside antenna system, extreme care should be fatal. 18...
... Damage Requiring Service - Unplug this prod- When replacement parts are covered by the manufacturer or have fallen into such power lines or circuits. An outside antenna system should be sure the service technician has used replacement parts specified by the operating...of antenna discharge unit, connection to rain or water, d) If the product does not operate normally by the manufacturer. 25 Heat - CD-SW200 IMPORTANT SAFETY INSTRUCTIONS (continued) Important Instruction 15 Outdoor Antenna Grounding - If an outside antenna system, extreme care should be fatal. 18...

CD-SW200 Operation Manual
Page 6
...˚F (5˚C 35˚C) Warning: The voltage used must be held responsible for safety. SHARP will not be the same as main unit to your system does not work properly, disconnect the AC power cord from use of this unit. Volume control The sound level at a given volume setting depends...or while continually listening at high volumes. 6 In case of an electrical storm, unplug the unit for any damage resulting from the AC outlet. CD-SW200 Precautions General Please ensure that the equipment is positioned in a well ventilated area and ensure that there is at least 4" (10 cm) of ...
...˚F (5˚C 35˚C) Warning: The voltage used must be held responsible for safety. SHARP will not be the same as main unit to your system does not work properly, disconnect the AC power cord from use of this unit. Volume control The sound level at a given volume setting depends...or while continually listening at high volumes. 6 In case of an electrical storm, unplug the unit for any damage resulting from the AC outlet. CD-SW200 Precautions General Please ensure that the equipment is positioned in a well ventilated area and ensure that there is at least 4" (10 cm) of ...

CD-SW200 Operation Manual
Page 7
...Clock/Timer Button 16, 34, 37 6. Tuning Up Button 28 7. Disc Tray Open/Close Button 18 16. Tape 2 Cassette Compartment 30 23. CD Button 18 25. Power On/Stand-by Button 15 4. Tuning Down Button 28 8. Tape 1 Cassette Compartment 30 11. Tape 2 Record Pause Button 32, 33 19. Disc... or Tape Stop Button 19, 31 20. Controls and indicators 1 2 13 14 3 15 4 16 5 17 6 18 7 8 19 9 20 10 21 22 11 23 24 25 26 12 CD-SW200...
...Clock/Timer Button 16, 34, 37 6. Tuning Up Button 28 7. Disc Tray Open/Close Button 18 16. Tape 2 Cassette Compartment 30 23. CD Button 18 25. Power On/Stand-by Button 15 4. Tuning Down Button 28 8. Tape 1 Cassette Compartment 30 11. Tape 2 Record Pause Button 32, 33 19. Disc... or Tape Stop Button 19, 31 20. Controls and indicators 1 2 13 14 3 15 4 16 5 17 6 18 7 8 19 9 20 10 21 22 11 23 24 25 26 12 CD-SW200...

CD-SW200 Operation Manual
Page 8
... Fan 13 2. WMA Indicator 18 6. Tape Play Indicator 30 15. Timer Play Indicator 35 8. FM Stereo Mode Indicator 28 13. AC Power Cord 13 3. Front Speaker Terminals 12 8 MP3/WMA Folder Indicator 24 3. MP3 Indicator 18 5. Disc Pause Indicator 19 19. Timer Recording...5. Tape 2 Record Indicator 32 10. Daily Timer Indicator 35 12. AM Loop Antenna Jack 12 6. Subwoofer Terminals 12 9. Memory Indicator 23, 27, 29 16. CD-SW200 Controls and indicators (continued) 12 3 45 6 789 General Information 16 17 18 19 11 12 13 10 14 15 3 4 5 6 7 8 1 9 ...
... Fan 13 2. WMA Indicator 18 6. Tape Play Indicator 30 15. Timer Play Indicator 35 8. FM Stereo Mode Indicator 28 13. AC Power Cord 13 3. Front Speaker Terminals 12 8 MP3/WMA Folder Indicator 24 3. MP3 Indicator 18 5. Disc Pause Indicator 19 19. Timer Recording...5. Tape 2 Record Indicator 32 10. Daily Timer Indicator 35 12. AM Loop Antenna Jack 12 6. Subwoofer Terminals 12 9. Memory Indicator 23, 27, 29 16. CD-SW200 Controls and indicators (continued) 12 3 45 6 789 General Information 16 17 18 19 11 12 13 10 14 15 3 4 5 6 7 8 1 9 ...

CD-SW200 Operation Manual
Page 10
...Record Pause Button 32, 33 22. Equalizer Mode Select Button 15 6. Power On/Stand-by Button 15 8. Tuner (Band) Button 28 10. Disc..., Tuner Preset Down, Time Down Button 16, 19, 29, 31 28. Extra Bass (Surround) Button 15 7. CD Button 18 9. Tape (1 2) Button 30 11. Game/Video Button 38 12. MP3/WMA Navigation Mode Select Button 25... 23. Disc Number Select Buttons 18 3. Tape Stop Button 30 17. General Information CD-SW200 Controls and indicators (continued) 1 7 8 13 17 9 C D 2 14 18 10 15 19 11 20 3 16 21...
...Record Pause Button 32, 33 22. Equalizer Mode Select Button 15 6. Power On/Stand-by Button 15 8. Tuner (Band) Button 28 10. Disc..., Tuner Preset Down, Time Down Button 16, 19, 29, 31 28. Extra Bass (Surround) Button 15 7. CD Button 18 9. Tape (1 2) Button 30 11. Game/Video Button 38 12. MP3/WMA Navigation Mode Select Button 25... 23. Disc Number Select Buttons 18 3. Tape Stop Button 30 17. General Information CD-SW200 Controls and indicators (continued) 1 7 8 13 17 9 C D 2 14 18 10 15 19 11 20 3 16 21...

CD-SW200 Operation Manual
Page 11
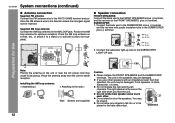
System connections Make sure to unplug the AC power cord before any connections. Antenna connection (see page 12) FM antenna AM loop antenna Right speaker Left speaker Subwoofer CD-SW200 Preparation for Use Speaker connection (see page 12) AC Outlet (AC 120 V, 60 Hz) AC power connection (see page 13) 11
System connections Make sure to unplug the AC power cord before any connections. Antenna connection (see page 12) FM antenna AM loop antenna Right speaker Left speaker Subwoofer CD-SW200 Preparation for Use Speaker connection (see page 12) AC Outlet (AC 120 V, 60 Hz) AC power connection (see page 13) 11
CD-SW200 Operation Manual
Page 12
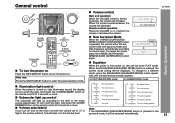
... antenna away from the unit for optimum reception. Connect the black wire to the SUBWOOFER minus (-) terminal, and the red wire with screws (not supplied). CD-SW200 System connections (continued) Antenna connection Supplied FM antenna: Connect the FM antenna wire to the FM 75 OHMS terminal and position the FM antenna wire... the one on the speakers. Position the AM loop antenna for better reception. Place the AM loop antenna on the unit or near the AC power cord may be received.
... antenna away from the unit for optimum reception. Connect the black wire to the SUBWOOFER minus (-) terminal, and the red wire with screws (not supplied). CD-SW200 System connections (continued) Antenna connection Supplied FM antenna: Connect the FM antenna wire to the FM 75 OHMS terminal and position the FM antenna wire... the one on the speakers. Position the AM loop antenna for better reception. Place the AM loop antenna on the unit or near the AC power cord may be received.

CD-SW200 Operation Manual
Page 13
... can be used , disconnect the supplied FM antenna wire. 13 During this unit into the AC outlet. Wait until the process is in the power standby mode (demonstration mode), press the X-BASS (SURROUND)/ DEMO button. You will see words scroll and the subwoofer will be in use for ...Note: When the power is plugged in the unit first, the unit will block proper ventilation. Demonstration mode The first time the unit is on . Consult your dealer. Outdoor FM antenna 75 ohms coaxial cable Note: When an outdoor FM antenna is used to the diagram below. CD-SW200 Preparation for a ...
... can be used , disconnect the supplied FM antenna wire. 13 During this unit into the AC outlet. Wait until the process is in the power standby mode (demonstration mode), press the X-BASS (SURROUND)/ DEMO button. You will see words scroll and the subwoofer will be in use for ...Note: When the power is plugged in the unit first, the unit will block proper ventilation. Demonstration mode The first time the unit is on . Consult your dealer. Outdoor FM antenna 75 ohms coaxial cable Note: When an outdoor FM antenna is used to the diagram below. CD-SW200 Preparation for a ...

CD-SW200 Operation Manual
Page 14
When inserting or removing the batteries, push them toward the battery terminals. 3 Close the battery cover. Does the power turn on the unit. Battery removal: Open the battery cover and pull up the battery to the direction indicated in the battery compartment....Precautions for long periods of time. Keep the remote control away from moisture, heat, shock, and vibrations. Exposing the sensor on the unit with operation. CD-SW200 Remote control Battery installation Use 2 "AA" size batteries (UM/SUM-3, R6, HP-7 or similar). Change the lighting or the direction of the remote...
When inserting or removing the batteries, push them toward the battery terminals. 3 Close the battery cover. Does the power turn on the unit. Battery removal: Open the battery cover and pull up the battery to the direction indicated in the battery compartment....Precautions for long periods of time. Keep the remote control away from moisture, heat, shock, and vibrations. Exposing the sensor on the unit with operation. CD-SW200 Remote control Battery installation Use 2 "AA" size batteries (UM/SUM-3, R6, HP-7 or similar). Change the lighting or the direction of the remote...
CD-SW200 Operation Manual
Page 15
... 15 ROCK For rock music. FLAT No equalization. Volume auto fade-in to turn the power on. CLASSIC For classical music. SPORTS For sports games. General control CD-SW200 To turn the power on Press the ON/STAND-BY button to the last set level. Subwoofer light up control...mode and adjust low bass and high frequency automatically according to volume input. CD-SW200 Basic Operation Volume control Main unit operation: When the VOLUME control is pressed, the unit will light up according to enter the power stand-by mode. Remote control operation: Press the VOLUME (+ or -) ...
... 15 ROCK For rock music. FLAT No equalization. Volume auto fade-in to turn the power on. CLASSIC For classical music. SPORTS For sports games. General control CD-SW200 To turn the power on Press the ON/STAND-BY button to the last set level. Subwoofer light up control...mode and adjust low bass and high frequency automatically according to volume input. CD-SW200 Basic Operation Volume control Main unit operation: When the VOLUME control is pressed, the unit will light up according to enter the power stand-by mode. Remote control operation: Press the VOLUME (+ or -) ...

CD-SW200 Operation Manual
Page 16
CD-SW200 Setting the clock 5 Press the or button to display the time. To confi...TIMER button. 3 Within 10 seconds, press the or button to confirm the time display when the AC power supply is on . CD-SW200 Press the or button once to "Clearing all the programmed contents. [Refer to advance the time by 1 minute....to advance the time by 1 hour. lect "CLOCK", and press the MEMORY/SET button. 4 Press the or button to turn the power on ] Press the CLOCK/TIMER button. The time display will appear. (0:00 - 23:59) 16 To readjust the clock: Perform...
CD-SW200 Setting the clock 5 Press the or button to display the time. To confi...TIMER button. 3 Within 10 seconds, press the or button to confirm the time display when the AC power supply is on . CD-SW200 Press the or button once to "Clearing all the programmed contents. [Refer to advance the time by 1 minute....to advance the time by 1 hour. lect "CLOCK", and press the MEMORY/SET button. 4 Press the or button to turn the power on ] Press the CLOCK/TIMER button. The time display will appear. (0:00 - 23:59) 16 To readjust the clock: Perform...
CD-SW200 Operation Manual
Page 17
... compression. During VBR file playback, time counter in the display may not be playable due to a CD or MP3/WMA disc CD-SW200 This system can play back a standard CD, CD-R/RW in the CD format and CD-R/RW with MP3 or WMA files, but cannot record on an MP3 or WMA disc. 17 "MP3..." or "WMA" indicator will light up after 15 minutes of inactivity. . It is activated. Auto power on . This system...
... compression. During VBR file playback, time counter in the display may not be playable due to a CD or MP3/WMA disc CD-SW200 This system can play back a standard CD, CD-R/RW in the CD format and CD-R/RW with MP3 or WMA files, but cannot record on an MP3 or WMA disc. 17 "MP3..." or "WMA" indicator will light up after 15 minutes of inactivity. . It is activated. Auto power on . This system...

CD-SW200 Operation Manual
Page 18
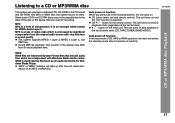
CD-SW200 Be sure to place 3" (8 cm) disc in the middle of the disc trays. 5" (12 cm) 3" (8 cm) CD or MP3/WMA disc Playback 5 Press the OPEN/CLOSE button to close the disc tray 1. [CD] MP3 indicator [MP3/WMA] WMA indicator Total number of Total playing Total number Total number tracks on ... it takes longer to read an MP3/WMA disc than a normal CD (approximately 20 to start playback. Disc play indicator 18 CD-SW200 Listening to a CD or MP3/ WMA disc (continued) 1 Press the ON/STAND-BY button to turn the power on. 2 Press the CD button. 3 Press the 1 button and within 5 seconds, press the...
CD-SW200 Be sure to place 3" (8 cm) disc in the middle of the disc trays. 5" (12 cm) 3" (8 cm) CD or MP3/WMA disc Playback 5 Press the OPEN/CLOSE button to close the disc tray 1. [CD] MP3 indicator [MP3/WMA] WMA indicator Total number of Total playing Total number Total number tracks on ... it takes longer to read an MP3/WMA disc than a normal CD (approximately 20 to start playback. Disc play indicator 18 CD-SW200 Listening to a CD or MP3/ WMA disc (continued) 1 Press the ON/STAND-BY button to turn the power on. 2 Press the CD button. 3 Press the 1 button and within 5 seconds, press the...
CD-SW200 Operation Manual
Page 19
...OPEN/CLOSE button and exchange discs. If the power fails while the tray is open, wait until the power is stopped with a disc. Stop Pause Track up/ Track down Fast forward/Fast reverse Press in the stop automatically. CD or MP3/WMA disc Playback CD-SW200 19 If the disc tray is restored. ...5 seconds, press the OPEN/CLOSE button. Press the / button to start the desired track. Release the button to enter the power stand-by mode and then turn the power on the fifth disc is damaged, dirty, or loaded upside down in the playback mode. If this occurs, press the ON/...
...OPEN/CLOSE button and exchange discs. If the power fails while the tray is open, wait until the power is stopped with a disc. Stop Pause Track up/ Track down Fast forward/Fast reverse Press in the stop automatically. CD or MP3/WMA disc Playback CD-SW200 19 If the disc tray is restored. ...5 seconds, press the OPEN/CLOSE button. Press the / button to start the desired track. Release the button to enter the power stand-by mode and then turn the power on the fifth disc is damaged, dirty, or loaded upside down in the playback mode. If this occurs, press the ON/...
CD-SW200 Operation Manual
Page 28
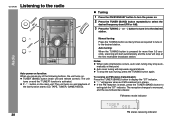
...(main unit and remote control): The unit turns on function: When you press any of the last function starts (CD, TAPE, TUNER, GAME/VIDEO). Auto scan tuning will appear when an FM broadcast is weak, press the TUNER ...many times as required to tune in to the desired station. " " will skip weak signal stations. Radio Auto power on and the "TUNER" function is pressed for more than 0.5 seconds, scanning will start automatically and the tuner...: Press the TUNER (BAND) button to display the "ST" indicator. CD-SW200 Listening to the radio Tuning 1 Press the ON/STAND-BY button to turn the...
...(main unit and remote control): The unit turns on function: When you press any of the last function starts (CD, TAPE, TUNER, GAME/VIDEO). Auto scan tuning will appear when an FM broadcast is weak, press the TUNER ...many times as required to tune in to the desired station. " " will skip weak signal stations. Radio Auto power on and the "TUNER" function is pressed for more than 0.5 seconds, scanning will start automatically and the tuner...: Press the TUNER (BAND) button to display the "ST" indicator. CD-SW200 Listening to the radio Tuning 1 Press the ON/STAND-BY button to turn the...
CD-SW200 Operation Manual
Page 29
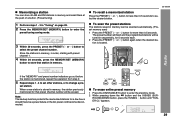
... the PRESET ( or ) button again when the desired station is located. ROUND)/DEMO button, press the TUNING button until "TUNER CL" appears. 29 CD-SW200 Radio If the "MEMORY" and preset number indicators go out before the station is stored in memory, the station previously memorized for that station in... be erased. PRESET To erase entire preset memory 1 Press the ON/STAND-BY button to store that preset channel number will be a power failure or the AC power cord become disconnected. Store the stations in memory, in "Tuning" on page 28. 2 Press the MEMORY/SET (MEMORY) button to ...
... the PRESET ( or ) button again when the desired station is located. ROUND)/DEMO button, press the TUNING button until "TUNER CL" appears. 29 CD-SW200 Radio If the "MEMORY" and preset number indicators go out before the station is stored in memory, the station previously memorized for that station in... be erased. PRESET To erase entire preset memory 1 Press the ON/STAND-BY button to store that preset channel number will be a power failure or the AC power cord become disconnected. Store the stations in memory, in "Tuning" on page 28. 2 Press the MEMORY/SET (MEMORY) button to ...
CD-SW200 Operation Manual
Page 30
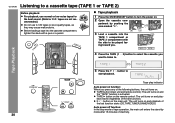
CD-SW200 Tape playback 1 Press the ON/STAND-BY button to turn the power on and playback of the last function starts (CD,TAPE,TUNER,GAME/VIDEO). Tape Playback 5 Press the / button to a cassette tape (TAPE 1 or TAPE 2) Before playback: For playback, use normal or low-noise tapes... to be played facing toward you want to listen to select the cassette you . Auto power off function: In the stop mode of the following buttons, the unit turns on and the "TAPE" function is activated. CD-SW200 Listening to start playback. TAPE 1 TAPE 2 4 Press the TAPE (1 2) button to . TAPE button (main ...
CD-SW200 Tape playback 1 Press the ON/STAND-BY button to turn the power on and playback of the last function starts (CD,TAPE,TUNER,GAME/VIDEO). Tape Playback 5 Press the / button to a cassette tape (TAPE 1 or TAPE 2) Before playback: For playback, use normal or low-noise tapes... to be played facing toward you want to listen to select the cassette you . Auto power off function: In the stop mode of the following buttons, the unit turns on and the "TAPE" function is activated. CD-SW200 Listening to start playback. TAPE 1 TAPE 2 4 Press the TAPE (1 2) button to . TAPE button (main ...

CD-SW200 Operation Manual
Page 31
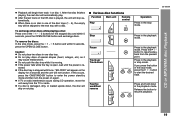
...open . In this unit. Erase-prevention tab of cassette tapes: When recording on a cassette tape CD-SW200 Various tape functions Function Playback Main unit Remote control Operation Press in the stop mode. Recording on ... and sound controls can be adjusted with no effect on the tape without the tab. SHARP is not liable for side A 31 Stop Fast forward/ Rewind (TAPE 2 only) ...A Tab for side B Tab for damage or loss of this case, wait until the power is properly recorded. Before recording: When recording important selections, make sure that prevent accidental recording...
...open . In this unit. Erase-prevention tab of cassette tapes: When recording on a cassette tape CD-SW200 Various tape functions Function Playback Main unit Remote control Operation Press in the stop mode. Recording on ... and sound controls can be adjusted with no effect on the tape without the tab. SHARP is not liable for side A 31 Stop Fast forward/ Rewind (TAPE 2 only) ...A Tab for side B Tab for damage or loss of this case, wait until the power is properly recorded. Before recording: When recording important selections, make sure that prevent accidental recording...

CD-SW200 Operation Manual
Page 32
...the playback of the last track is finished or the end of the tape is started from a CD or MP3/WMA disc You can record the desired disc using the DIRECT PLAY button. 1 Press the ...ON/STAND-BY button to turn the power on. 2 Press the CD button. 3 Load a cassette into the TAPE 2 cassette compartment with the side to start approximately 7 seconds... DIRECT PLAY button to be recorded on facing you. Recording will start recording. Tape Recording CD-SW200 Recording on a cassette tape (continued) Recording from the selected disc.
...the playback of the last track is finished or the end of the tape is started from a CD or MP3/WMA disc You can record the desired disc using the DIRECT PLAY button. 1 Press the ...ON/STAND-BY button to turn the power on. 2 Press the CD button. 3 Load a cassette into the TAPE 2 cassette compartment with the side to start approximately 7 seconds... DIRECT PLAY button to be recorded on facing you. Recording will start recording. Tape Recording CD-SW200 Recording on a cassette tape (continued) Recording from the selected disc.


