
AR-F152 Operation Manual
Page 8
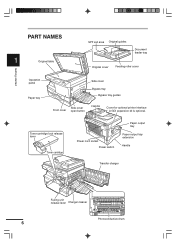
PART NAMES 1 Original table SPF exit area Original guides Document feeder tray Original cover Feeding roller cover Getting started Operation panel Paper tray Side cover Bypass tray Bypass tray guides Side cover Front cover open button Handle Cover for optional printer interface * A GDI expansion kit is optional. Toner cartridge lock release lever Toner cartridge Power cord socket Power switch Paper output tray Paper output tray extension Handle Transfer charger Fusing unit release lever Charger cleaner Photoconductive drum 6
PART NAMES 1 Original table SPF exit area Original guides Document feeder tray Original cover Feeding roller cover Getting started Operation panel Paper tray Side cover Bypass tray Bypass tray guides Side cover Front cover open button Handle Cover for optional printer interface * A GDI expansion kit is optional. Toner cartridge lock release lever Toner cartridge Power cord socket Power switch Paper output tray Paper output tray extension Handle Transfer charger Fusing unit release lever Charger cleaner Photoconductive drum 6
AR-F152 Operation Manual
Page 11
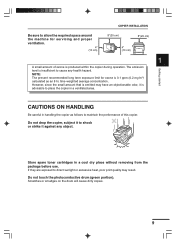
... performance of ozone is insufficient to place the copier in a ventilated area. Do not touch the photoconductive drum (green portion). However, since the small amount that is emitted may result. Scratches or smudges on the drum will cause dirty copies. 9 time-weighted average concentration. Store spare toner cartridges in handling the copier...
... performance of ozone is insufficient to place the copier in a ventilated area. Do not touch the photoconductive drum (green portion). However, since the small amount that is emitted may result. Scratches or smudges on the drum will cause dirty copies. 9 time-weighted average concentration. Store spare toner cartridges in handling the copier...
AR-F152 Operation Manual
Page 30
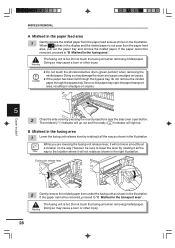
... rotating it all the way as shown in the illustration. Do not touch the fusing unit when removing misfed paper. G Do not touch the photoconductive drum (green portion) when removing the misfed paper. The fusing unit is not seen from the paper feed area, pull out the paper tray and remove... paper has been fed through the bypass tray, do not remove the misfed paper through the bypass tray.Toner on the paper may damage the drum and cause smudges on copies. The misfeed ( ) indicator will go out and the ready ( ) indicator will not move smoothly at a location on the way. B Misfeed...
... rotating it all the way as shown in the illustration. Do not touch the fusing unit when removing misfed paper. G Do not touch the photoconductive drum (green portion) when removing the misfed paper. The fusing unit is not seen from the paper feed area, pull out the paper tray and remove... paper has been fed through the bypass tray, do not remove the misfed paper through the bypass tray.Toner on the paper may damage the drum and cause smudges on copies. The misfeed ( ) indicator will go out and the ready ( ) indicator will not move smoothly at a location on the way. B Misfeed...
AR-F152 Operation Manual
Page 31
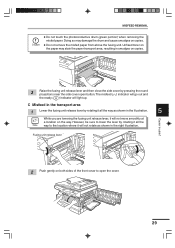
... portion) when removing the misfed paper. Unfixed toner on the paper may damage the drum and cause smudges on the way. Raise the fusing unit release lever and then close the side cover by pressing the round projections near the ...
... portion) when removing the misfed paper. Unfixed toner on the paper may damage the drum and cause smudges on the way. Raise the fusing unit release lever and then close the side cover by pressing the round projections near the ...


