
Instruction Manual, PLC-XP56
Page 2
..., ANSI/NFPA 75. Do not stare directly into a compartment or similarly enclosed, the minimum distances must be taken. If the projector is exhausted from the projection lens. THIS SYMBOL INDICATES THAT THERE ARE IMPORTANT OPERATING AND MAINTENANCE INSTRUCTIONS IN THE OWNER'S MANUAL WITH THIS... UNIT. 2 TO THE OWNER Before operating this projector, read this manual again, check operations and cable connections and try the solutions in not only shortening the product-life, but also...
..., ANSI/NFPA 75. Do not stare directly into a compartment or similarly enclosed, the minimum distances must be taken. If the projector is exhausted from the projection lens. THIS SYMBOL INDICATES THAT THERE ARE IMPORTANT OPERATING AND MAINTENANCE INSTRUCTIONS IN THE OWNER'S MANUAL WITH THIS... UNIT. 2 TO THE OWNER Before operating this projector, read this manual again, check operations and cable connections and try the solutions in not only shortening the product-life, but also...
Instruction Manual, PLC-XP56
Page 3
... indicated on the marking label. If you to lightning and power line surges. Do not attempt to service this unit to the projector. If the projector does not operate normally by the manufacturer as the original part. e. Wanneer deze leeg zijn, moet u ze niet weggooien maar inleveren..., consult your authorized dealer or local power company. Read all servicing to rest on the power cord. Do not place this projector, ask the service technician to perform routine safety checks to qualified service personnel under the following the operating instructions. Never spill liquid...
... indicated on the marking label. If you to lightning and power line surges. Do not attempt to service this unit to the projector. If the projector does not operate normally by the manufacturer as the original part. e. Wanneer deze leeg zijn, moet u ze niet weggooien maar inleveren..., consult your authorized dealer or local power company. Read all servicing to rest on the power cord. Do not place this projector, ask the service technician to perform routine safety checks to qualified service personnel under the following the operating instructions. Never spill liquid...

Instruction Manual, PLC-XP56
Page 4
...to try to defeat this safety feature. Model Number Trade Name Responsible party Address Telephone No. : PLC-XP55/PLC-XP56/PLC-XP55L/PLC-XP56L : Sanyo : SANYO FISHER COMPANY : 21605 Plummer Street, Chatsworth, California 91311 : (818)998-7322 AC POWER CORD ...REQUIREMENT The AC Power Cord supplied with the letter L or coloured red. AC Power Cord has a grounding-type AC line plug. This is of the same colour as follows: The wire which is marked with this projector...
...to try to defeat this safety feature. Model Number Trade Name Responsible party Address Telephone No. : PLC-XP55/PLC-XP56/PLC-XP55L/PLC-XP56L : Sanyo : SANYO FISHER COMPANY : 21605 Plummer Street, Chatsworth, California 91311 : (818)998-7322 AC POWER CORD ...REQUIREMENT The AC Power Cord supplied with the letter L or coloured red. AC Power Cord has a grounding-type AC line plug. This is of the same colour as follows: The wire which is marked with this projector...
Instruction Manual, PLC-XP56
Page 5
...ON-SCREEN MENU 18 FLOW OF ON-SCREEN MENU OPERATION 18 MENU BAR 19 APPENDIX 41 BASIC OPERATION TURNING ON / OFF PROJECTOR ADJUSTING SCREEN ZOOM ADJUSTMENT FOCUS ADJUSTMENT LENS SHIFT ADJUSTMENT KEYSTONE ADJUSTMENT PICTURE FREEZE FUNCTION NO SHOW FUNCTION P-TIMER FUNCTION SOUND ADJUSTMENT... 43 21 CLEANING PROJECTION LENS 43 21 LAMP REPLACEMENT 44 21 LAMP REPLACE COUNTER 45 21 TROUBLESHOOTING 46 21 INDICATORS AND PROJECTOR CONDITION 48 22 22 COMPATIBLE COMPUTER SPECIFICATION 49 22 MENU TREE 50 22 TECHNICAL SPECIFICATIONS 52 CONFIGURATIONS OF TERMINALS 53 OPTIONAL...
...ON-SCREEN MENU 18 FLOW OF ON-SCREEN MENU OPERATION 18 MENU BAR 19 APPENDIX 41 BASIC OPERATION TURNING ON / OFF PROJECTOR ADJUSTING SCREEN ZOOM ADJUSTMENT FOCUS ADJUSTMENT LENS SHIFT ADJUSTMENT KEYSTONE ADJUSTMENT PICTURE FREEZE FUNCTION NO SHOW FUNCTION P-TIMER FUNCTION SOUND ADJUSTMENT... 43 21 CLEANING PROJECTION LENS 43 21 LAMP REPLACEMENT 44 21 LAMP REPLACE COUNTER 45 21 TROUBLESHOOTING 46 21 INDICATORS AND PROJECTOR CONDITION 48 22 22 COMPATIBLE COMPUTER SPECIFICATION 49 22 MENU TREE 50 22 TECHNICAL SPECIFICATIONS 52 CONFIGURATIONS OF TERMINALS 53 OPTIONAL...
Instruction Manual, PLC-XP56
Page 6
... and weight. FEATURES AND DESIGN This Multimedia Projector is equipped with DVI 24-pin terminal for connecting DVI output from a computer between XGA (1024 x 768) and SXGA (1280 x 1024) is extremely compact in ; N Compact Design This projector is compressed into 1024 x 768 dots. ... of 16.77 million colors, and matrix liquid crystal display (LCD) technology. N Multilanguage Menu Display Operation menu is pressed. Keystone Correction solves this function ON. N Keystone Correction Positioning of a projector may result in distorted image being displayed in multimedia features, a...
... and weight. FEATURES AND DESIGN This Multimedia Projector is equipped with DVI 24-pin terminal for connecting DVI output from a computer between XGA (1024 x 768) and SXGA (1280 x 1024) is extremely compact in ; N Compact Design This projector is compressed into 1024 x 768 dots. ... of 16.77 million colors, and matrix liquid crystal display (LCD) technology. N Multilanguage Menu Display Operation menu is pressed. Keystone Correction solves this function ON. N Keystone Correction Positioning of a projector may result in distorted image being displayed in multimedia features, a...
Instruction Manual, PLC-XP56
Page 7
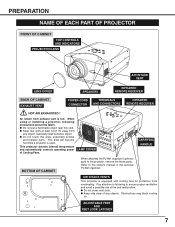
... the these parts. AIR INTAKE VENTS This projector is hot. When using or installing a projector, following to following precautions should be taken. This projector detects internal temperature and automatically controls operating power of any object, especially heat-sensitive object. G Do not ...vent is equipped with cooling fans for protection from any objects. This area will become hot while a projector is used. PREPARATION NAME OF EACH PART OF PROJECTOR FRONT OF CABINET TOP CONTROLS AND INDICATORS PROJECTION LENS AIR INTAKE VENT LENS COVER SPEAKERS INFRARED REMOTE RECEIVER...
... the these parts. AIR INTAKE VENTS This projector is hot. When using or installing a projector, following to following precautions should be taken. This projector detects internal temperature and automatically controls operating power of any object, especially heat-sensitive object. G Do not ...vent is equipped with cooling fans for protection from any objects. This area will become hot while a projector is used. PREPARATION NAME OF EACH PART OF PROJECTOR FRONT OF CABINET TOP CONTROLS AND INDICATORS PROJECTION LENS AIR INTAKE VENT LENS COVER SPEAKERS INFRARED REMOTE RECEIVER...
Instruction Manual, PLC-XP56
Page 8
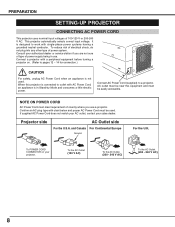
...easily accessible. Confirm an AC plug type with single-phase power systems having a grounded neutral conductor. It is not used . Consult your projector. To POWER CORD CONNECTOR on . (Refer to pages 12 ~ 14 for connection.) CAUTION For safety, unplug AC Power Cord when ... match your AC outlet, contact your sales dealer. PREPARATION SETTING-UP PROJECTOR CONNECTING AC POWER CORD This projector uses nominal input voltages of power system. AC outlet must be near this projector is in use a projector. Projector side AC Outlet side For the U.S.A. To the AC Outlet. (120...
...easily accessible. Confirm an AC plug type with single-phase power systems having a grounded neutral conductor. It is not used . Consult your projector. To POWER CORD CONNECTOR on . (Refer to pages 12 ~ 14 for connection.) CAUTION For safety, unplug AC Power Cord when ... match your AC outlet, contact your sales dealer. PREPARATION SETTING-UP PROJECTOR CONNECTING AC POWER CORD This projector uses nominal input voltages of power system. AC outlet must be near this projector is in use a projector. Projector side AC Outlet side For the U.S.A. To the AC Outlet. (120...
Instruction Manual, PLC-XP56
Page 9
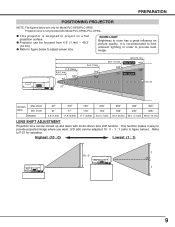
... adjust screen size. U/D ratio can be focused from 4.6' (1.4m) ~ 48.3' (14.7m). Highest (10 : 0) Lowest (1 : 1) 1 10 : 0 1 9 G Projector can be moved up and down with Model PLC-XP55L/PLC-XP56L. It is designed to P 21 for Model PLC-XP55/PLC-XP56. ROOM LIGHT Brightness in order to limit ambient lighting in room has a great influence on a flat...
... adjust screen size. U/D ratio can be focused from 4.6' (1.4m) ~ 48.3' (14.7m). Highest (10 : 0) Lowest (1 : 1) 1 10 : 0 1 9 G Projector can be moved up and down with Model PLC-XP55L/PLC-XP56L. It is designed to P 21 for Model PLC-XP55/PLC-XP56. ROOM LIGHT Brightness in order to limit ambient lighting in room has a great influence on a flat...
Instruction Manual, PLC-XP56
Page 10
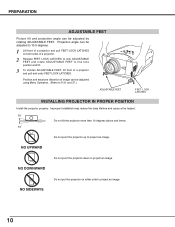
PREPARATION ADJUSTABLE FEET Picture tilt and projection angle can be adjusted by rotating ADJUSTABLE FEET. NO SIDEWAYS Do not put the projector on both sides of a projector. 2 Release FEET LOCK LATCHES to lock ADJUSTABLE FEET and rotate ADJUSTABLE FEET to fine tune position and tilt. 3 To shorten ...can be adjusted using Menu Operation. (Refer to project an image. 10 NO DOWNWARD Do not point the projector down to project an image. Position and keystone distortion of a projector and pull and undo FEET LOCK LATCHES. Projection angle can be adjusted to 10.5 degrees. 1 Lift front ...
PREPARATION ADJUSTABLE FEET Picture tilt and projection angle can be adjusted by rotating ADJUSTABLE FEET. NO SIDEWAYS Do not put the projector on both sides of a projector. 2 Release FEET LOCK LATCHES to lock ADJUSTABLE FEET and rotate ADJUSTABLE FEET to fine tune position and tilt. 3 To shorten ...can be adjusted using Menu Operation. (Refer to project an image. 10 NO DOWNWARD Do not point the projector down to project an image. Position and keystone distortion of a projector and pull and undo FEET LOCK LATCHES. Projection angle can be adjusted to 10.5 degrees. 1 Lift front ...
Instruction Manual, PLC-XP56
Page 11
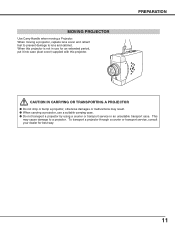
... it into case (dust cover) supplied with this projector is not in an unsuitable transport case. G When carrying a projector, use for best way. 11 MOVING PROJECTOR Use Carry Handle when moving a projector, replace lens cover and retract feet to prevent damage to a projector. When moving a Projector. G Do not transport a projector by using a courier or transport service in...
... it into case (dust cover) supplied with this projector is not in an unsuitable transport case. G When carrying a projector, use for best way. 11 MOVING PROJECTOR Use Carry Handle when moving a projector, replace lens cover and retract feet to prevent damage to a projector. When moving a Projector. G Do not transport a projector by using a courier or transport service in...
Instruction Manual, PLC-XP56
Page 12
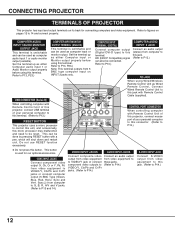
... INPUT 1 ANALOG IN/OUT DIGITAL(DVI-D) R/C JACK When using this button. Refer to this jack with Remote Control Unit of this projector, connect mouse port of your personal computer to this connector. (Refer to P13.) ✽ Do not press this terminal. CONNECTING... PROJECTOR TERMINALS OF PROJECTOR This projector has input and output terminals on its back for our optional accessories. 5 BNC INPUT JACKS Connect component video output (Y, Cb, Cr ...
... INPUT 1 ANALOG IN/OUT DIGITAL(DVI-D) R/C JACK When using this button. Refer to this jack with Remote Control Unit of this projector, connect mouse port of your personal computer to this connector. (Refer to P13.) ✽ Do not press this terminal. CONNECTING... PROJECTOR TERMINALS OF PROJECTOR This projector has input and output terminals on its back for our optional accessories. 5 BNC INPUT JACKS Connect component video output (Y, Cb, Cr ...
Instruction Manual, PLC-XP56
Page 13
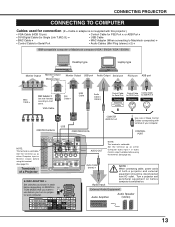
.... (See page 23.) Audio Cable (stereo) ✽ Audio Input NOTE : When connecting cable, power cords of your computer. Turn a projector and peripheral equipment on before you turn on . Set the terminal up as shown in table below . CONTROL PORT NOTE; This terminal is switchable...; for Serial Port • Audio Cables (Mini Plug (stereo) x 2) ✽ IBM-compatible computer or Macintosh computer (VGA / SVGA / XGA / SXGA) Desktop type Laptop type Monitor Output Monitor Output or Monitor Input Monitor Output USB port Audio Output Serial port PS/2 port ADB port BNC...
.... (See page 23.) Audio Cable (stereo) ✽ Audio Input NOTE : When connecting cable, power cords of your computer. Turn a projector and peripheral equipment on before you turn on . Set the terminal up as shown in table below . CONTROL PORT NOTE; This terminal is switchable...; for Serial Port • Audio Cables (Mini Plug (stereo) x 2) ✽ IBM-compatible computer or Macintosh computer (VGA / SVGA / XGA / SXGA) Desktop type Laptop type Monitor Output Monitor Output or Monitor Input Monitor Output USB port Audio Output Serial port PS/2 port ADB port BNC...
Instruction Manual, PLC-XP56
Page 14
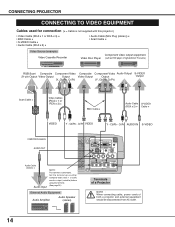
Video Disc Player (such as either Computer audio input 1 or audio monitor output (variable) before using this projector.) • Video Cable (RCA x 1 or RCA x 3) ✽ • BNC Cable ✽ • S-VIDEO Cable ✽ • Audio Cable (RCA x 2) ✽ • ...2 G B R H/V V VIDEO/Y Cb/Pb Cr/Pr INPUT 2 VIDEO/Y Cb/Pb Cr/Pr R-AUDIO-L S-VIDEO (MONO) INPUT 3 Terminals of a Projector NOTE : When connecting cable, power cords of both a projector and external equipment should be disconnected from AC outlet. 14 Cb/Pb - Cr/Pr AUDIO IN S-VIDEO COMPUTER IN ANALOG AUDIO...
Video Disc Player (such as either Computer audio input 1 or audio monitor output (variable) before using this projector.) • Video Cable (RCA x 1 or RCA x 3) ✽ • BNC Cable ✽ • S-VIDEO Cable ✽ • Audio Cable (RCA x 2) ✽ • ...2 G B R H/V V VIDEO/Y Cb/Pb Cr/Pr INPUT 2 VIDEO/Y Cb/Pb Cr/Pr R-AUDIO-L S-VIDEO (MONO) INPUT 3 Terminals of a Projector NOTE : When connecting cable, power cords of both a projector and external equipment should be disconnected from AC outlet. 14 Cb/Pb - Cr/Pr AUDIO IN S-VIDEO COMPUTER IN ANALOG AUDIO...
Instruction Manual, PLC-XP56
Page 15
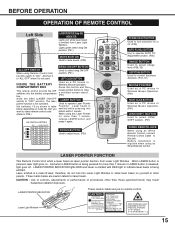
... not look into the battery compartment box. Laser Light Window 15 Lights green when drag ON position. (P41) ALL OFF MUTE BUTTON Used to turn projector on Code No. The laser pointer function is a class II laser; Laser beam is emitted while pressing this button and the mouse pointer button to...
... not look into the battery compartment box. Laser Light Window 15 Lights green when drag ON position. (P41) ALL OFF MUTE BUTTON Used to turn projector on Code No. The laser pointer function is a class II laser; Laser beam is emitted while pressing this button and the mouse pointer button to...
Instruction Manual, PLC-XP56
Page 16
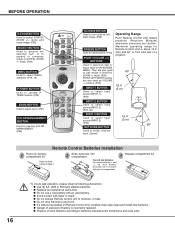
... same time. G Do not expose Remote Control Unit to select input source (INPUT 1). (P23) Operating Range Point Remote Control Unit toward projector (Receiver Window) whenever pressing any button. G Dispose of a projector. 60° 16.4' (5 m) INPUT 2 BUTTON Used to select input source (INPUT 2). (P24, 30) INPUT 3 BUTTON Used to select input source (INPUT...
... same time. G Do not expose Remote Control Unit to select input source (INPUT 1). (P23) Operating Range Point Remote Control Unit toward projector (Receiver Window) whenever pressing any button. G Dispose of a projector. 60° 16.4' (5 m) INPUT 2 BUTTON Used to select input source (INPUT 2). (P24, 30) INPUT 3 BUTTON Used to select input source (INPUT...
Instruction Manual, PLC-XP56
Page 17
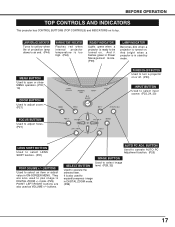
.... (P28, 32) Used to an end. (P44) WARNING TEMP. AUTO PC ADJ. It is ready to be turned on its top. And bright when a projector is turned on or off. (P20) INPUT BUTTON Used to select input source. (P23, 24, 30) FOCUS BUTTON Used to adjust focus. (P21) LENS SHIFT... stand-by mode. buttons. They are also used to select an item or adjust value in DIGITAL ZOOM +/- BEFORE OPERATION TOP CONTROLS AND INDICATORS This projector has CONTROL BUTTONS (TOP CONTROLS) and INDICATORS on . mode. (P29) POINT LEFT/RIGHT buttons are also used as VOLUME +/- And it flashes green in ...
.... (P28, 32) Used to an end. (P44) WARNING TEMP. AUTO PC ADJ. It is ready to be turned on its top. And bright when a projector is turned on or off. (P20) INPUT BUTTON Used to select input source. (P23, 24, 30) FOCUS BUTTON Used to adjust focus. (P21) LENS SHIFT... stand-by mode. buttons. They are also used to select an item or adjust value in DIGITAL ZOOM +/- BEFORE OPERATION TOP CONTROLS AND INDICATORS This projector has CONTROL BUTTONS (TOP CONTROLS) and INDICATORS on . mode. (P29) POINT LEFT/RIGHT buttons are also used as VOLUME +/- And it flashes green in ...
Instruction Manual, PLC-XP56
Page 18
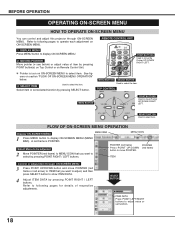
... frame is icon on ON-SCREEN MENU. BEFORE OPERATION OPERATING ON-SCREEN MENU HOW TO OPERATE ON-SCREEN MENU You can control and adjust this projector through ON-SCREEN MENU 3 Press POINT UP/DOWN button and move Pointer UP/ DOWN/ RIGHT/ LEFT. Refer to move POINTER. POINTER (red frame) POINTER Press...
... frame is icon on ON-SCREEN MENU. BEFORE OPERATION OPERATING ON-SCREEN MENU HOW TO OPERATE ON-SCREEN MENU You can control and adjust this projector through ON-SCREEN MENU 3 Press POINT UP/DOWN button and move Pointer UP/ DOWN/ RIGHT/ LEFT. Refer to move POINTER. POINTER (red frame) POINTER Press...
Instruction Manual, PLC-XP56
Page 19
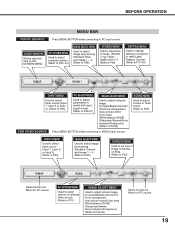
... P23, 24) IMAGE SELECT MENU Used to select image level among Standard, Cinema and Image 1 ~ 4. (Refer to P32) SCREEN MENU Used to set size of projector or reset Lamp Replace Counter. (Refer to P37-40) INPUT MENU Used to select input source (Input 1, Input 2 or Input 3). (Refer to P23) PC ADJUST...
... P23, 24) IMAGE SELECT MENU Used to select image level among Standard, Cinema and Image 1 ~ 4. (Refer to P32) SCREEN MENU Used to set size of projector or reset Lamp Replace Counter. (Refer to P37-40) INPUT MENU Used to select input source (Input 1, Input 2 or Input 3). (Refer to P23) PC ADJUST...
Instruction Manual, PLC-XP56
Page 20
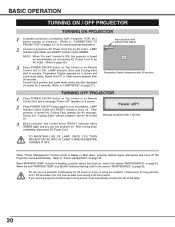
...message "Power off . When WARNING TEMP. and READY Indicator flashing, refer to turn it off the Projection Lamp automatically. TURNING OFF PROJECTOR 1 Press POWER ON-OFF button on Top Control or on page 37.) Input position and Lamp mode status 30 Preparation Display disappears ...ON-OFF button again to the section "MAINTENANCE" on a screen and count-down completely, disconnect AC Power Cord. Do not use the projector continuously for one hour at least once during a 24 hour period. When "Power Management" function mode is turned on automatically by connecting ...
...message "Power off . When WARNING TEMP. and READY Indicator flashing, refer to turn it off the Projection Lamp automatically. TURNING OFF PROJECTOR 1 Press POWER ON-OFF button on Top Control or on page 37.) Input position and Lamp mode status 30 Preparation Display disappears ...ON-OFF button again to the section "MAINTENANCE" on a screen and count-down completely, disconnect AC Power Cord. Do not use the projector continuously for one hour at least once during a 24 hour period. When "Power Management" function mode is turned on automatically by connecting ...

Instruction Manual, PLC-XP56
Page 23
If projector cannot reproduce proper image, select correct input source through MENU OPERATION (see below). MENU OPERATION 1 Press MENU button and ON-SCREEN MENU will appear. Move ... your computer is connected to select, and then press SELECT button. Monitor out If the INPUT 1 ANALOG terminal is switchable and can be changed, this projector may not display the digital content protected by pressing INPUT 1, INPUT 2 or INPUT 3 button on Top Control. HDCP (High-bandwidth Digital Content Protection) is a system...
If projector cannot reproduce proper image, select correct input source through MENU OPERATION (see below). MENU OPERATION 1 Press MENU button and ON-SCREEN MENU will appear. Move ... your computer is connected to select, and then press SELECT button. Monitor out If the INPUT 1 ANALOG terminal is switchable and can be changed, this projector may not display the digital content protected by pressing INPUT 1, INPUT 2 or INPUT 3 button on Top Control. HDCP (High-bandwidth Digital Content Protection) is a system...


