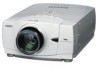
Instruction Manual, PLC-XP56
Page 2
... ELECTRIC SHOCK, DO NOT REMOVE COVER (OR BACK). NO USERSERVICEABLE PARTS INSIDE EXCEPT LAMP REPLACEMENT. G This projector produces intense light from Laser Light Window while pressing LASER button (for allowing air circulation and cooling the projector. 20cm Minimum distance should be taken. Operating the projector properly enables you purchased the projector or the service center. G Remote Control Unit, supplied to be dangerous. Improper operation may result. If the problem still persists, contact...
... ELECTRIC SHOCK, DO NOT REMOVE COVER (OR BACK). NO USERSERVICEABLE PARTS INSIDE EXCEPT LAMP REPLACEMENT. G This projector produces intense light from Laser Light Window while pressing LASER button (for allowing air circulation and cooling the projector. 20cm Minimum distance should be taken. Operating the projector properly enables you purchased the projector or the service center. G Remote Control Unit, supplied to be dangerous. Improper operation may result. If the problem still persists, contact...
Instruction Manual, PLC-XP56
Page 4
... to be connected to the terminal in a particular installation. Increase the separation between the equipment and receiver. - Model Number Trade Name Responsible party Address Telephone No. : PLC-XP55/PLC-XP56/PLC-XP55L/PLC-XP56L : Sanyo : SANYO FISHER COMPANY : 21605 Plummer Street, Chatsworth, California 91311 : (818)998-7322 AC POWER CORD REQUIREMENT The AC Power Cord supplied with this projector meets the requirement for a Class B digital device, pursuant to part 15...
... to be connected to the terminal in a particular installation. Increase the separation between the equipment and receiver. - Model Number Trade Name Responsible party Address Telephone No. : PLC-XP55/PLC-XP56/PLC-XP55L/PLC-XP56L : Sanyo : SANYO FISHER COMPANY : 21605 Plummer Street, Chatsworth, California 91311 : (818)998-7322 AC POWER CORD REQUIREMENT The AC Power Cord supplied with this projector meets the requirement for a Class B digital device, pursuant to part 15...
Instruction Manual, PLC-XP56
Page 5
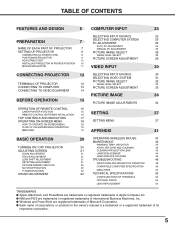
... IMAGE ADJUSTMENTS 34 OPERATION OF REMOTE CONTROL 15 LASER POINTER FUNCTION 15 REMOTE CONTROL BATTERIES INSTALLATION 16 SETTING 37 TOP CONTROLS AND INDICATORS 17 OPERATING ON-SCREEN MENU 18 SETTING MENU 37 HOW TO OPERATE ON-SCREEN MENU 18 FLOW OF ON-SCREEN MENU OPERATION 18 MENU BAR 19 APPENDIX 41 BASIC OPERATION TURNING ON / OFF PROJECTOR ADJUSTING SCREEN ZOOM ADJUSTMENT FOCUS ADJUSTMENT LENS SHIFT ADJUSTMENT KEYSTONE ADJUSTMENT PICTURE FREEZE FUNCTION NO SHOW FUNCTION P-TIMER FUNCTION SOUND ADJUSTMENT 20 OPERATING WIRELESS MOUSE 41 MAINTENANCE 42 WARNING TEMP...
... IMAGE ADJUSTMENTS 34 OPERATION OF REMOTE CONTROL 15 LASER POINTER FUNCTION 15 REMOTE CONTROL BATTERIES INSTALLATION 16 SETTING 37 TOP CONTROLS AND INDICATORS 17 OPERATING ON-SCREEN MENU 18 SETTING MENU 37 HOW TO OPERATE ON-SCREEN MENU 18 FLOW OF ON-SCREEN MENU OPERATION 18 MENU BAR 19 APPENDIX 41 BASIC OPERATION TURNING ON / OFF PROJECTOR ADJUSTING SCREEN ZOOM ADJUSTMENT FOCUS ADJUSTMENT LENS SHIFT ADJUSTMENT KEYSTONE ADJUSTMENT PICTURE FREEZE FUNCTION NO SHOW FUNCTION P-TIMER FUNCTION SOUND ADJUSTMENT 20 OPERATING WIRELESS MOUSE 41 MAINTENANCE 42 WARNING TEMP...
Instruction Manual, PLC-XP56
Page 6
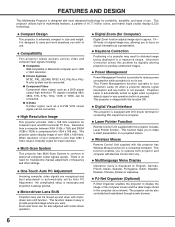
...up and down with motordriven lens shift function. N High Resolution Image This projector provides 1024 x 768 dots resolution for troublesome manual adjustment of frequency and other settings. N One-Touch Auto PC Adjustment Incoming computer video signals are recognized and best adjustment is always precise. N Keystone Correction Positioning of a projector may result in distorted image being displayed in ; N Wireless Mouse Remote Control Unit supplied with this problem by Auto PC Adjustment. N Multilanguage Menu Display Operation menu is displayed in a trapezoid shape. N Compact...
...up and down with motordriven lens shift function. N High Resolution Image This projector provides 1024 x 768 dots resolution for troublesome manual adjustment of frequency and other settings. N One-Touch Auto PC Adjustment Incoming computer video signals are recognized and best adjustment is always precise. N Keystone Correction Positioning of a projector may result in distorted image being displayed in ; N Wireless Mouse Remote Control Unit supplied with this problem by Auto PC Adjustment. N Multilanguage Menu Display Operation menu is displayed in a trapezoid shape. N Compact...
Instruction Manual, PLC-XP56
Page 13
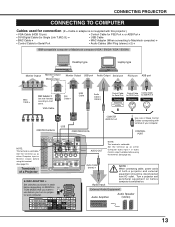
...) Control Cable for Serial Port Terminal Control Cable Control Cable for PS/2 Port ✽ for Serial Port • Audio Cables (Mini Plug (stereo) x 2) ✽ IBM-compatible computer or Macintosh computer (VGA / SVGA / XGA / SXGA) Desktop type Laptop type Monitor Output Monitor Output or Monitor Input Monitor Output USB port Audio Output Serial port PS/2 port ADB port BNC Cable ✽ MAC Adapter ✽ Set slide switches according to ON DIP use before computer is switched on projec- 123456 tor and computer. Turn a projector...
...) Control Cable for Serial Port Terminal Control Cable Control Cable for PS/2 Port ✽ for Serial Port • Audio Cables (Mini Plug (stereo) x 2) ✽ IBM-compatible computer or Macintosh computer (VGA / SVGA / XGA / SXGA) Desktop type Laptop type Monitor Output Monitor Output or Monitor Input Monitor Output USB port Audio Output Serial port PS/2 port ADB port BNC Cable ✽ MAC Adapter ✽ Set slide switches according to ON DIP use before computer is switched on projec- 123456 tor and computer. Turn a projector...
Instruction Manual, PLC-XP56
Page 15
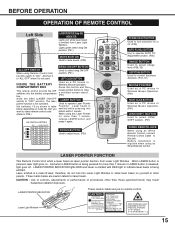
...+ MENU KEYSTONE LASER P-TIMER INPUT 1 ZOOM COLOR.M INPUT 2 INPUT 3 FOCUS LENS NETWORK POWER ON-OFF BUTTON Used to turn it is pressed, laser light goes on Code No. LASER POINTER INDICATOR These caution labels are caution labels for laser beam. FOCUS BUTTON Used to "ALL OFF" when it to adjust focus. (P21) LOCK AUTO PC ON-OFF D.ZOOM FREEZE NO SHOW MUTE IMAGE VOLUME- When LASER button is not used. Set switches 1-3 as Wired Remote Control. When using as shown in Wireless Mouse Operation. Battery installation is...
...+ MENU KEYSTONE LASER P-TIMER INPUT 1 ZOOM COLOR.M INPUT 2 INPUT 3 FOCUS LENS NETWORK POWER ON-OFF BUTTON Used to turn it is pressed, laser light goes on Code No. LASER POINTER INDICATOR These caution labels are caution labels for laser beam. FOCUS BUTTON Used to "ALL OFF" when it to adjust focus. (P21) LOCK AUTO PC ON-OFF D.ZOOM FREEZE NO SHOW MUTE IMAGE VOLUME- When LASER button is not used. Set switches 1-3 as Wired Remote Control. When using as shown in Wireless Mouse Operation. Battery installation is...
Instruction Manual, PLC-XP56
Page 16
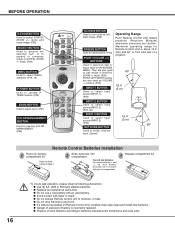
... on Remote Control Unit, carefully wipe case clean and install new batteries. mode. (P29) MENU BUTTON Used to select DIGITAL ZOOM +/- They are also used to select an item or adjust value in DIGITAL ZOOM +/- Press lid downward and slide it. 2 Slide batteries into black image. (P22) FREEZE BUTTON Used to freeze picture. (P22) POINT (VOLUME +/-) BUTTONS Used to pan image in ON-SCREEN MENU. G Dispose of a projector. 60° 16.4' (5 m) INPUT 2 BUTTON Used to select input source (INPUT 2). (P24, 30) INPUT 3 BUTTON Used...
... on Remote Control Unit, carefully wipe case clean and install new batteries. mode. (P29) MENU BUTTON Used to select DIGITAL ZOOM +/- They are also used to select an item or adjust value in DIGITAL ZOOM +/- Press lid downward and slide it. 2 Slide batteries into black image. (P22) FREEZE BUTTON Used to freeze picture. (P22) POINT (VOLUME +/-) BUTTONS Used to pan image in ON-SCREEN MENU. G Dispose of a projector. 60° 16.4' (5 m) INPUT 2 BUTTON Used to select input source (INPUT 2). (P24, 30) INPUT 3 BUTTON Used...
Instruction Manual, PLC-XP56
Page 17
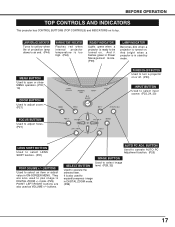
.../compress image in ON-SCREEN MENU. mode. (P29) POINT LEFT/RIGHT buttons are also used as VOLUME +/- MENU BUTTON Used to open or close MENU operation. (P18, 19) ZOOM BUTTON Used to adjust zoom. (P21) POWER ON-OFF BUTTON Used to select an item or adjust value in DIGITAL ZOOM mode. (P29) 17 It is in DIGITAL ZOOM +/- And it flashes green in Power Management mode. (P39) LAMP INDICATOR Becomes dim when a projector is ready to be turned on or off. (P20) INPUT BUTTON Used to select input source...
.../compress image in ON-SCREEN MENU. mode. (P29) POINT LEFT/RIGHT buttons are also used as VOLUME +/- MENU BUTTON Used to open or close MENU operation. (P18, 19) ZOOM BUTTON Used to adjust zoom. (P21) POWER ON-OFF BUTTON Used to select an item or adjust value in DIGITAL ZOOM mode. (P29) 17 It is in DIGITAL ZOOM +/- And it flashes green in Power Management mode. (P39) LAMP INDICATOR Becomes dim when a projector is ready to be turned on or off. (P20) INPUT BUTTON Used to select input source...
Instruction Manual, PLC-XP56
Page 18
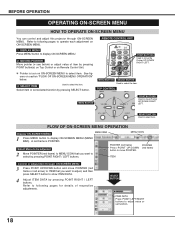
... OPERATION OPERATING ON-SCREEN MENU HOW TO OPERATE ON-SCREEN MENU You can control and adjust this projector through ON-SCREEN MENU 3 Press POINT UP/DOWN button and move POINTER. Select item or set function. 18 P-TIMERCOMPUTER 1 ZOOM COMPUTER 2 VIDEO SELECT BUTTON Used to display ON-SCREEN MENU (MENU BAR). FOCUS LENS FLOW OF ON-SCREEN MENU OPERATION Display ON-SCREEN MENU MENU BAR MENU ICON 1 Press MENU button to select item. Select Menu to be adjusted 2 Move POINTER (red frame) to MENU ICON that you want to adjust...
... OPERATION OPERATING ON-SCREEN MENU HOW TO OPERATE ON-SCREEN MENU You can control and adjust this projector through ON-SCREEN MENU 3 Press POINT UP/DOWN button and move POINTER. Select item or set function. 18 P-TIMERCOMPUTER 1 ZOOM COMPUTER 2 VIDEO SELECT BUTTON Used to display ON-SCREEN MENU (MENU BAR). FOCUS LENS FLOW OF ON-SCREEN MENU OPERATION Display ON-SCREEN MENU MENU BAR MENU ICON 1 Press MENU button to select item. Select Menu to be adjusted 2 Move POINTER (red frame) to MENU ICON that you want to adjust...
Instruction Manual, PLC-XP56
Page 19
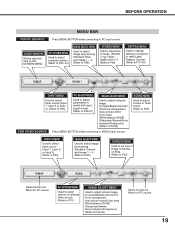
... P28) SCREEN MENU Used to adjust size of image. [Normal / True / Wide / Digital zoom +/-] (Refer to P29) SETTING MENU Used to P33) Same function as Menu for PC source. GUIDE WINDOW Shows selected item of projector or reset Lamp Replace Counter. (Refer to P37-40) INPUT MENU Used to select input source (Input 1, Input 2 or Input 3). (Refer to P23) PC ADJUST MENU Used to adjust parameters to match with input signal format. (Refer to P25-27) IMAGE ADJUST MENU Used to adjust computer image. [Contrast/Brightness/Color /Tint/Color management /Auto picture control /Color temp. /White balance...
... P28) SCREEN MENU Used to adjust size of image. [Normal / True / Wide / Digital zoom +/-] (Refer to P29) SETTING MENU Used to P33) Same function as Menu for PC source. GUIDE WINDOW Shows selected item of projector or reset Lamp Replace Counter. (Refer to P37-40) INPUT MENU Used to select input source (Input 1, Input 2 or Input 3). (Refer to P23) PC ADJUST MENU Used to adjust parameters to match with input signal format. (Refer to P25-27) IMAGE ADJUST MENU Used to adjust computer image. [Contrast/Brightness/Color /Tint/Color management /Auto picture control /Color temp. /White balance...
Instruction Manual, PLC-XP56
Page 20
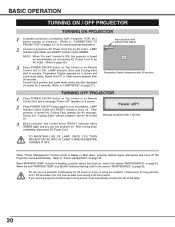
... "LAMP MODE" on Remote Control Unit, and a message "Power off , Cooling Fans operate (for 24 hours or more. During this projector is turned off ?" and READY Indicator flashing, refer to operate. If you can excessively shorten the life of the lamp. 20 Refer to turn off the Projection Lamp automatically. Signal from PC or Video source appears after 30 seconds. appears on a screen. 2 Press POWER ON-OFF button again to "Power management" on screen for connecting that equipment.) 2 Connect a projector...
... "LAMP MODE" on Remote Control Unit, and a message "Power off , Cooling Fans operate (for 24 hours or more. During this projector is turned off ?" and READY Indicator flashing, refer to operate. If you can excessively shorten the life of the lamp. 20 Refer to turn off the Projection Lamp automatically. Signal from PC or Video source appears after 30 seconds. appears on a screen. 2 Press POWER ON-OFF button again to "Power management" on screen for connecting that equipment.) 2 Connect a projector...
Instruction Manual, PLC-XP56
Page 39
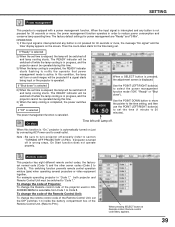
... automatically turned on the screen. When a SELECT button is pressed, the adjustment screen is selectable from Code 1 to section "TURNING OFF PROJECTOR" on and images will be operated during this function is "On," projector is completed, the power switches off and lamp cooling starts. Note ; Remote control This projector has eight different remote control codes; For example operating projector in ONSCREEN MENU is displayed. To change the remote control code of Projector; To change the code of the Remote Control Unit, set the time (1 minute to Code 8).
... automatically turned on the screen. When a SELECT button is pressed, the adjustment screen is selectable from Code 1 to section "TURNING OFF PROJECTOR" on and images will be operated during this function is "On," projector is completed, the power switches off and lamp cooling starts. Note ; Remote control This projector has eight different remote control codes; For example operating projector in ONSCREEN MENU is displayed. To change the remote control code of Projector; To change the code of the Remote Control Unit, set the time (1 minute to Code 8).
Instruction Manual, PLC-XP56
Page 41
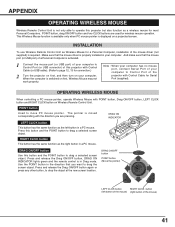
... 1 ZOOM COMPUTER 2 VIDEO FOCUS LENS 41 VOLUME- Use the POINT button in a PC mouse. Press and release the Drag ON/OFF button again or press any other button, to drag a selected screen object. Note : When your computer has no mouse port, connect Serial Port of your computer. MENU KEYSTONE DRAG ON/OFF button Use this button and the POINT button to Control Port (or USB connector) of the mouse driver (not supplied) is displayed on Wireless Remote Control...
... 1 ZOOM COMPUTER 2 VIDEO FOCUS LENS 41 VOLUME- Use the POINT button in a PC mouse. Press and release the Drag ON/OFF button again or press any other button, to drag a selected screen object. Note : When your computer has no mouse port, connect Serial Port of your computer. MENU KEYSTONE DRAG ON/OFF button Use this button and the POINT button to Control Port (or USB connector) of the mouse driver (not supplied) is displayed on Wireless Remote Control...
Instruction Manual, PLC-XP56
Page 44
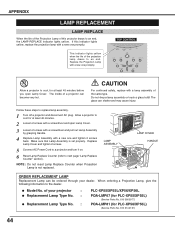
... open Lamp Cover. 3 Loosen 2 screws with a screwdriver and pull out Lamp Assembly by grasping Handle. 4 Replace Lamp Assembly with a new one promptly. of your dealer. APPENDIX LAMP REPLACEMENT LAMP REPLACE When the life of the Projection Lamp of this indicator lights yellow, replace the projection lamp with a lamp assembly of a projector can become very hot. TOP CONTROL This indicator lights yellow when the life of the projection lamp draws to an end, the LAMP REPLACE indicator lights yellow. Follow these steps to cool for PLC-XP56/XP56L) (Service Parts...
... open Lamp Cover. 3 Loosen 2 screws with a screwdriver and pull out Lamp Assembly by grasping Handle. 4 Replace Lamp Assembly with a new one promptly. of your dealer. APPENDIX LAMP REPLACEMENT LAMP REPLACE When the life of the Projection Lamp of this indicator lights yellow, replace the projection lamp with a lamp assembly of a projector can become very hot. TOP CONTROL This indicator lights yellow when the life of the projection lamp draws to an end, the LAMP REPLACE indicator lights yellow. Follow these steps to cool for PLC-XP56/XP56L) (Service Parts...
Instruction Manual, PLC-XP56
Page 45
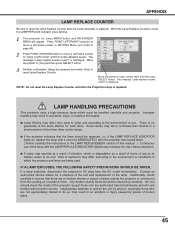
... of hours of lamp explosion. No one IMMEDIATELY after the projector has cooled down. ( Follow carefully the instructions in which must be cleaned up , replace the lamp with a new one should be handled carefully and properly. When the Lamp Replace Counter is reset, the LAMP REPLACE Indicator stops lighting. 1 Turn projector on, press MENU button and ON-SCREEN MENU will appear. LAMP HANDLING PRECAUTIONS This projector uses a high-pressure lamp which the projector and lamp are being used. IF A LAMP EXPLODES...
... of hours of lamp explosion. No one IMMEDIATELY after the projector has cooled down. ( Follow carefully the instructions in which must be cleaned up , replace the lamp with a new one should be handled carefully and properly. When the Lamp Replace Counter is reset, the LAMP REPLACE Indicator stops lighting. 1 Turn projector on, press MENU button and ON-SCREEN MENU will appear. LAMP HANDLING PRECAUTIONS This projector uses a high-pressure lamp which the projector and lamp are being used. IF A LAMP EXPLODES...
Instruction Manual, PLC-XP56
Page 46
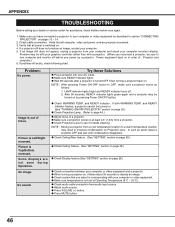
... indicator lights green again and a projector may result in order of focus. Picture is Top/Bottom reversed. No image. G Check WARNING TEMP. and READY indicator flashes, a projector cannot be turned on Projection Lens. G Make sure a projection screen is not out of a projector. G Check Projection Lens to see if it takes about 30 seconds to a warm temperature location may be turned on. (See "TURNING ON/OFF PROJECTOR" section on page 38.) G Check connection between your computer monitor's display. NOTE : Moving a projector from...
... indicator lights green again and a projector may result in order of focus. Picture is Top/Bottom reversed. No image. G Check WARNING TEMP. and READY indicator flashes, a projector cannot be turned on Projection Lens. G Make sure a projection screen is not out of a projector. G Check Projection Lens to see if it takes about 30 seconds to a warm temperature location may be turned on. (See "TURNING ON/OFF PROJECTOR" section on page 38.) G Check connection between your computer monitor's display. NOTE : Moving a projector from...

Instruction Manual, PLC-XP56
Page 48
...nor- The Warning Temp. indicator keeps flashing.) Check and clean the Air Filter. Check and clean the Air Filter. ✽ The projector is in the Power management mode. • • • on with a new one promptly. Reset the Lamp Replace Counter after replacement of the lamp. 48 APPENDIX INDICATORS AND PROJECTOR CONDITION Check the Indicators for service and checkup. yellow red READY green LAMP red Projector Condition The projector is OFF. (The AC Power Cord is unplugged.) ✽ The projector is operating normally. It cannot be turned on until the...
...nor- The Warning Temp. indicator keeps flashing.) Check and clean the Air Filter. Check and clean the Air Filter. ✽ The projector is in the Power management mode. • • • on with a new one promptly. Reset the Lamp Replace Counter after replacement of the lamp. 48 APPENDIX INDICATORS AND PROJECTOR CONDITION Check the Indicators for service and checkup. yellow red READY green LAMP red Projector Condition The projector is OFF. (The AC Power Cord is unplugged.) ✽ The projector is operating normally. It cannot be turned on until the...
Instruction Manual, PLC-XP56
Page 51
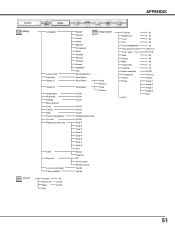
... 51 System Setting Sound Language Lamp mode Keystone Aspect V Aspect H Anamorphic Blue back Display Menu position Logo Ceiling Rear Power management On start Remote control code USB Key lock Lamp counter reset Factory default Volume Built-in SP. Mute Quit 0 - 63 On/Off On/Off APPENDIX English German French Italian Spanish Portuguese Dutch Swedish Russian Chinese Korean Japanese Quit Normal/Auto/Eco Store/Reset Store/Reset Store/Reset On/Off On/Off On/Off Image adjust Scale...
... 51 System Setting Sound Language Lamp mode Keystone Aspect V Aspect H Anamorphic Blue back Display Menu position Logo Ceiling Rear Power management On start Remote control code USB Key lock Lamp counter reset Factory default Volume Built-in SP. Mute Quit 0 - 63 On/Off On/Off APPENDIX English German French Italian Spanish Portuguese Dutch Swedish Russian Chinese Korean Japanese Quit Normal/Auto/Eco Store/Reset Store/Reset Store/Reset On/Off On/Off On/Off Image adjust Scale...
Instruction Manual, PLC-XP56
Page 52
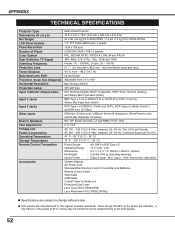
... / Wave length : 650±20nm) Owner's Manual AC Power Cord Wireless/Wired Remote Control Transmitter and Batteries Remote Control Cable VGA Cable USB Cable Control Cable for Serial port Protective Dust Cover Lens Cover (PLC-XP55/XP56) Lens Attachment (PLC-XP55L/XP56L) G Specifications are manufactured to change without notice. Ampere), 50 / 60 Hz (Continental Europe and The U.K.) 41 ˚F ~ 95 ˚F (5 ˚C ~ 35 ˚C) 14 ˚F ~ 140 ˚F (-10 ˚C ~ 60 ˚C) Power Source Operating Range Dimensions Net Weight Laser...
... / Wave length : 650±20nm) Owner's Manual AC Power Cord Wireless/Wired Remote Control Transmitter and Batteries Remote Control Cable VGA Cable USB Cable Control Cable for Serial port Protective Dust Cover Lens Cover (PLC-XP55/XP56) Lens Attachment (PLC-XP55L/XP56L) G Specifications are manufactured to change without notice. Ampere), 50 / 60 Hz (Continental Europe and The U.K.) 41 ˚F ~ 95 ˚F (5 ˚C ~ 35 ˚C) 14 ˚F ~ 140 ˚F (-10 ˚C ~ 60 ˚C) Power Source Operating Range Dimensions Net Weight Laser...
Instruction Manual, PLC-XP56
Page 54
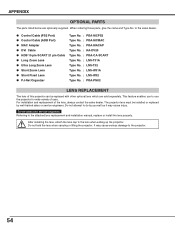
... optionally supplied. After installing the lens, attach the lens cap to use the projector for wide variety of uses. This feature enables you to the lens when setting up the projector. Do not attempt to the projector. 54 Do not hold the lens when carrying or lifting the projector. G Control Cable (PS2 Port) G Control Cable (ADB Port) G MAC Adapter G DVI Cable G HDB 15 pin-SCART 21 pin Cable G Long Zoom Lens G Ultra Long Zoom Lens G Short Zoom Lens G Short Fixed Lens...
... optionally supplied. After installing the lens, attach the lens cap to use the projector for wide variety of uses. This feature enables you to the lens when setting up the projector. Do not attempt to the projector. 54 Do not hold the lens when carrying or lifting the projector. G Control Cable (PS2 Port) G Control Cable (ADB Port) G MAC Adapter G DVI Cable G HDB 15 pin-SCART 21 pin Cable G Long Zoom Lens G Ultra Long Zoom Lens G Short Zoom Lens G Short Fixed Lens...


