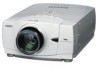
Instruction Manual, PLC-XP56
Page 2
... cable connections and try the solutions in the "Trouble-shooting" section of the end of this manual thoroughly and operate the projector properly. G This projector produces intense light from the power outlet. G Remote Control Unit, supplied to indicate laser emission). Ne puet être utillisé dans une salle d'ordinateurs telle que définie...
... cable connections and try the solutions in the "Trouble-shooting" section of the end of this manual thoroughly and operate the projector properly. G This projector produces intense light from the power outlet. G Remote Control Unit, supplied to indicate laser emission). Ne puet être utillisé dans une salle d'ordinateurs telle que définie...
Instruction Manual, PLC-XP56
Page 5
... IMAGE SELECT 32 TERMINALS OF PROJECTOR 12 IMAGE LEVEL SELECT 32 CONNECTING TO COMPUTER 13 PICTURE SCREEN ADJUSTMENT 33 CONNECTING TO VIDEO EQUIPMENT 14 PICTURE IMAGE 34 BEFORE OPERATION 15 PICTURE IMAGE ADJUSTMENTS 34 OPERATION OF REMOTE CONTROL 15 LASER POINTER FUNCTION 15 REMOTE CONTROL BATTERIES INSTALLATION 16 SETTING 37 TOP CONTROLS AND INDICATORS 17 OPERATING...
... IMAGE SELECT 32 TERMINALS OF PROJECTOR 12 IMAGE LEVEL SELECT 32 CONNECTING TO COMPUTER 13 PICTURE SCREEN ADJUSTMENT 33 CONNECTING TO VIDEO EQUIPMENT 14 PICTURE IMAGE 34 BEFORE OPERATION 15 PICTURE IMAGE ADJUSTMENTS 34 OPERATION OF REMOTE CONTROL 15 LASER POINTER FUNCTION 15 REMOTE CONTROL BATTERIES INSTALLATION 16 SETTING 37 TOP CONTROLS AND INDICATORS 17 OPERATING...
Instruction Manual, PLC-XP56
Page 6
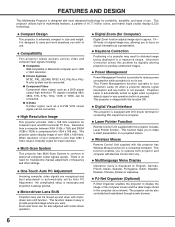
...N Laser Pointer Function Remote Control Unit supplied with this projector includes Laser Pointer function. N Wireless Mouse Remote Control Unit supplied with this projector has Wireless Mouse function for a connected computer. This function enables you to operate both projector and computer with Remote Control Unit only. N PJ...terminal for connecting DVI output from a computer between XGA (1024 x 768) and SXGA (1280 x 1024) is no need for troublesome manual adjustment of frequency and other settings. N High Resolution Image This projector provides 1024 x 768 dots resolution for lower ...
...N Laser Pointer Function Remote Control Unit supplied with this projector includes Laser Pointer function. N Wireless Mouse Remote Control Unit supplied with this projector has Wireless Mouse function for a connected computer. This function enables you to operate both projector and computer with Remote Control Unit only. N PJ...terminal for connecting DVI output from a computer between XGA (1024 x 768) and SXGA (1280 x 1024) is no need for troublesome manual adjustment of frequency and other settings. N High Resolution Image This projector provides 1024 x 768 dots resolution for lower ...
Instruction Manual, PLC-XP56
Page 12
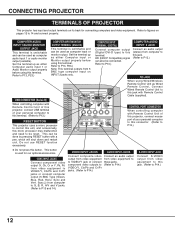
...Compatible) signal can be done by pressing RESET button with Remote Control Unit of this projector, connect USB terminal of your personal computer to this terminal. (Refer to P13.) RESET BUTTON This projector uses a micro processor to control this unit, and occasionally, this terminal. This can also... output {5 BNC Type (Green, Blue, Red, Horiz. Set the terminal up as Wired Remote Control, Connect Wired Remote Control Unit to this jack with Remote Control Unit of this projector, connect mouse port of your personal computer to this button. This terminal outputs from video equipment...
...Compatible) signal can be done by pressing RESET button with Remote Control Unit of this projector, connect USB terminal of your personal computer to this terminal. (Refer to P13.) RESET BUTTON This projector uses a micro processor to control this unit, and occasionally, this terminal. This can also... output {5 BNC Type (Green, Blue, Red, Horiz. Set the terminal up as Wired Remote Control, Connect Wired Remote Control Unit to this jack with Remote Control Unit of this projector, connect mouse port of your personal computer to this button. This terminal outputs from video equipment...
Instruction Manual, PLC-XP56
Page 15
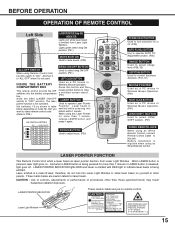
...keystone distortion. (P21, 37) MOUSE POINTER Used as a PC mouse in Wireless Mouse Operation. (P41) RIGHT CLICK BUTTON Used as Wired Remote Control, connect Remote Control Cable to "ON." LASER POINTER INDICATOR lights RED and Laser is emitted with RED light to "ALL OFF" when it again. CAUTION ... laser; Three marks below depending on Code No. BEFORE OPERATION OPERATION OF REMOTE CONTROL ON Left Side LASER POINTER (Drag ON) INDICATOR Lights red while laser beam is pressed, laser light goes on. And turn projector on or off . Set switches 1-3 as laser pointer function from Laser ...
...keystone distortion. (P21, 37) MOUSE POINTER Used as a PC mouse in Wireless Mouse Operation. (P41) RIGHT CLICK BUTTON Used as Wired Remote Control, connect Remote Control Cable to "ON." LASER POINTER INDICATOR lights RED and Laser is emitted with RED light to "ALL OFF" when it again. CAUTION ... laser; Three marks below depending on Code No. BEFORE OPERATION OPERATION OF REMOTE CONTROL ON Left Side LASER POINTER (Drag ON) INDICATOR Lights red while laser beam is pressed, laser light goes on. And turn projector on or off . Set switches 1-3 as laser pointer function from Laser ...
Instruction Manual, PLC-XP56
Page 16
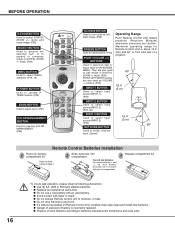
... G Do not use a new battery with an used batteries according to select input source (INPUT 1). (P23) Operating Range Point Remote Control Unit toward projector (Receiver Window) whenever pressing any button. G Avoid contact with pins in ON-SCREEN MENU. mode. (P29) POINT LEFT/RIGHT buttons... compartment lid. buttons. (P22) INPUT 1 BUTTON Used to batteries manufacturers instructions and local rules. G If a battery has leaked on Remote Control Unit, carefully wipe case clean and install new batteries. Press lid downward and slide it. 2 Slide batteries into black image. (P22)...
... G Do not use a new battery with an used batteries according to select input source (INPUT 1). (P23) Operating Range Point Remote Control Unit toward projector (Receiver Window) whenever pressing any button. G Avoid contact with pins in ON-SCREEN MENU. mode. (P29) POINT LEFT/RIGHT buttons... compartment lid. buttons. (P22) INPUT 1 BUTTON Used to batteries manufacturers instructions and local rules. G If a battery has leaked on Remote Control Unit, carefully wipe case clean and install new batteries. Press lid downward and slide it. 2 Slide batteries into black image. (P22)...
Instruction Manual, PLC-XP56
Page 18
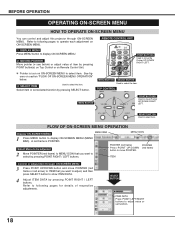
... of respective adjustments. Refer to select item. BEFORE OPERATION OPERATING ON-SCREEN MENU HOW TO OPERATE ON-SCREEN MENU You can control and adjust this projector through ON-SCREEN MENU 3 Press POINT UP/DOWN button and move POINTER (red frame or red arrow) to ITEM that ...by pressing POINT RIGHT / LEFT buttons. Refer to following pages for details of item by pressing POINT button(s) on Top Control or on Remote Control Unit. ✽ Pointer is POINTER. REMOTE CONTROL UNIT 1 DISPLAY MENU Press MENU button to display ON-SCREEN MENU. 2 MOVING POINTER Move pointer (✽ see below ....
... of respective adjustments. Refer to select item. BEFORE OPERATION OPERATING ON-SCREEN MENU HOW TO OPERATE ON-SCREEN MENU You can control and adjust this projector through ON-SCREEN MENU 3 Press POINT UP/DOWN button and move POINTER (red frame or red arrow) to ITEM that ...by pressing POINT RIGHT / LEFT buttons. Refer to following pages for details of item by pressing POINT button(s) on Top Control or on Remote Control Unit. ✽ Pointer is POINTER. REMOTE CONTROL UNIT 1 DISPLAY MENU Press MENU button to display ON-SCREEN MENU. 2 MOVING POINTER Move pointer (✽ see below ....
Instruction Manual, PLC-XP56
Page 20
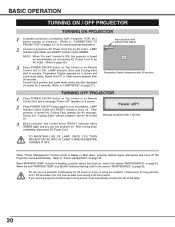
... signal interruption and turns off , Cooling Fans operate (for 5 seconds. (Refer to "LAMP MODE" on Remote Control Unit, and a message "Power off and leave it can turn projector on a screen. 2 Press POWER ON-OFF button again to turn it off ?" LAMP Indicator lights RED, and READY Indicator ...90 seconds). TO MAINTAIN LIFE OF LAMP, ONCE YOU TURN PROJECTOR ON, WAIT AT LEAST 5 MINUTES BEFORE TURNING IT OFF. Preparation Display appears on Remote Control Unit to ON. TURNING OFF PROJECTOR 1 Press POWER ON-OFF button on Top Control or on page 37.) Input position and Lamp mode status...
... signal interruption and turns off , Cooling Fans operate (for 5 seconds. (Refer to "LAMP MODE" on Remote Control Unit, and a message "Power off and leave it can turn projector on a screen. 2 Press POWER ON-OFF button again to turn it off ?" LAMP Indicator lights RED, and READY Indicator ...90 seconds). TO MAINTAIN LIFE OF LAMP, ONCE YOU TURN PROJECTOR ON, WAIT AT LEAST 5 MINUTES BEFORE TURNING IT OFF. Preparation Display appears on Remote Control Unit to ON. TURNING OFF PROJECTOR 1 Press POWER ON-OFF button on Top Control or on page 37.) Input position and Lamp mode status...
Instruction Manual, PLC-XP56
Page 21
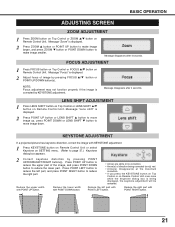
...DOWN button. Reduce the lower width with POINT UP button. BASIC OPERATION ADJUSTING SCREEN ZOOM ADJUSTMENT 1 Press ZOOM button on Top Control or ZOOM L/M button on Remote Control Unit. Message "Lens shift" is displayed. 2 Adjust focus of image by pressing FOCUS L/M button or POINT UP/DOWN button(s)... "Zoom" is corrected by pressing POINT UP/DOWN/LEFT/RIGHT button(s). FOCUS ADJUSTMENT 1 Press FOCUS button on Top Control or FOCUS L/M button on Remote Control Unit once more while the keystone dialog box is being displayed, the keystone adjustment will be canceled. Focus adjustment may...
...DOWN button. Reduce the lower width with POINT UP button. BASIC OPERATION ADJUSTING SCREEN ZOOM ADJUSTMENT 1 Press ZOOM button on Top Control or ZOOM L/M button on Remote Control Unit. Message "Lens shift" is displayed. 2 Adjust focus of image by pressing FOCUS L/M button or POINT UP/DOWN button(s)... "Zoom" is corrected by pressing POINT UP/DOWN/LEFT/RIGHT button(s). FOCUS ADJUSTMENT 1 Press FOCUS button on Top Control or FOCUS L/M button on Remote Control Unit once more while the keystone dialog box is being displayed, the keystone adjustment will be canceled. Focus adjustment may...
Instruction Manual, PLC-XP56
Page 22
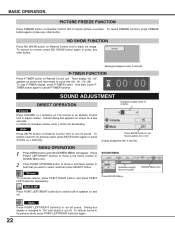
...-in speaker on and off sound. To restore sound to count time (00 : 00 ~ 59 : 59). P-TIMER FUNCTION Press P-TIMER button on Remote Control Unit to switch built-in SP. To stop P-TIMER display, press P-TIMER button. Dialog box display is cut off sound. Timer display "00 : ...and timer starts to its previous level, press MUTE button again or press Volume (+/-) button(s). Volume Press VOLUME (+/-) button(s) on Top Control or on Remote Control Unit to set Mute function On or Off. Press MUTE button to adjust volume. Volume To increase volume, press POINT RIGHT button,...
...-in speaker on and off sound. To restore sound to count time (00 : 00 ~ 59 : 59). P-TIMER FUNCTION Press P-TIMER button on Remote Control Unit to switch built-in SP. To stop P-TIMER display, press P-TIMER button. Dialog box display is cut off sound. Timer display "00 : ...and timer starts to its previous level, press MUTE button again or press Volume (+/-) button(s). Volume Press VOLUME (+/-) button(s) on Top Control or on Remote Control Unit to set Mute function On or Off. Press MUTE button to adjust volume. Volume To increase volume, press POINT RIGHT button,...

Instruction Manual, PLC-XP56
Page 23
...arrow) to INPUT 1 (ANALOG) terminal, select RGB(Scart). RGB(PC Digital) When your computer is switchable and can be changed, this projector may not display the digital content protected by Digital Content Protection, LLC. Source Select Menu Move a pointer to INPUT 1 (DIGITAL) terminal... SOURCE DIRECT OPERATION Select INPUT source by pressing INPUT 1, INPUT 2 or INPUT 3 button on Top Control. Select INPUT source by pressing INPUT button on Remote Control Unit. If projector cannot reproduce proper image, select correct input source through MENU OPERATION (see below). NOTE G Input 1...
...arrow) to INPUT 1 (ANALOG) terminal, select RGB(Scart). RGB(PC Digital) When your computer is switchable and can be changed, this projector may not display the digital content protected by Digital Content Protection, LLC. Source Select Menu Move a pointer to INPUT 1 (DIGITAL) terminal... SOURCE DIRECT OPERATION Select INPUT source by pressing INPUT 1, INPUT 2 or INPUT 3 button on Top Control. Select INPUT source by pressing INPUT button on Remote Control Unit. If projector cannot reproduce proper image, select correct input source through MENU OPERATION (see below). NOTE G Input 1...
Instruction Manual, PLC-XP56
Page 25
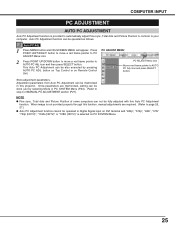
... just by pressing AUTO PC ADJ. This Auto PC Adjustment can not be fully adjusted with this projector. NOTE G Fine sync, Total dots and Picture Position of MANUAL PC ADJUSTMENT section (P27). button on Top Control or on PC SYSTEM Menu. 25 Adjustment parameters from Auto PC Adjustment can be operated as... can be memorized in Digital Signal input on DVI terminal and "480p", "575p", "480i", "575i" "720p (HDTV)", "1035i (HDTV)" or "1080i (HDTV)" is selected on Remote Control Unit. Refer to your computer.
... just by pressing AUTO PC ADJ. This Auto PC Adjustment can not be fully adjusted with this projector. NOTE G Fine sync, Total dots and Picture Position of MANUAL PC ADJUSTMENT section (P27). button on Top Control or on PC SYSTEM Menu. 25 Adjustment parameters from Auto PC Adjustment can be operated as... can be memorized in Digital Signal input on DVI terminal and "480p", "575p", "480i", "575i" "720p (HDTV)", "1035i (HDTV)" or "1080i (HDTV)" is selected on Remote Control Unit. Refer to your computer.
Instruction Manual, PLC-XP56
Page 28
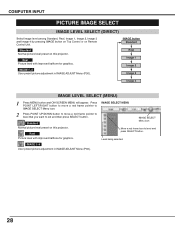
...2 Image 3 Image 4 IMAGE LEVEL SELECT (MENU) 1 Press MENU button and ON-SCREEN MENU will appear. Standard Normal picture level preset on this projector. Press POINT LEFT/RIGHT button to move a red frame pointer to IMAGE SELECT Menu icon. 2 Press POINT UP/DOWN button to move a red .... IMAGE SELECT MENU IMAGE SELECT Menu icon Move a red frame icon to set and then press SELECT button. Standard Normal picture level preset on Remote Control Unit. COMPUTER INPUT PICTURE IMAGE SELECT IMAGE LEVEL SELECT (DIRECT) Select image level among Standard, Real, Image 1, Image 2, Image 3 and Image...
...2 Image 3 Image 4 IMAGE LEVEL SELECT (MENU) 1 Press MENU button and ON-SCREEN MENU will appear. Standard Normal picture level preset on this projector. Press POINT LEFT/RIGHT button to move a red frame pointer to IMAGE SELECT Menu icon. 2 Press POINT UP/DOWN button to move a red .... IMAGE SELECT MENU IMAGE SELECT Menu icon Move a red frame icon to set and then press SELECT button. Standard Normal picture level preset on Remote Control Unit. COMPUTER INPUT PICTURE IMAGE SELECT IMAGE LEVEL SELECT (DIRECT) Select image level among Standard, Real, Image 1, Image 2, Image 3 and Image...
Instruction Manual, PLC-XP56
Page 29
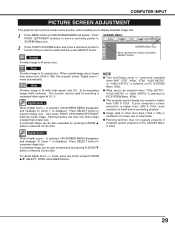
... on PC SYSTEM Menu (P24). G This projector cannot display any button except D.ZOOM L/M, SELECT, POINT and LASER buttons. 29 A projected image can be operated when "480i", "575i", "480p", "575p", "1035i (HDTV)" or "1080i (HDTV)" is selected on Remote Control Unit. SCREEN MENU 2 Press POINT UP/DOWN...image to compress image size. Zoom -" is used for providing a squeezed video signal at 16 : 9. mode, press any resolution higher than XGA (1024 x 768) is modified to display desirable image size. 1 Press MENU button and ON-SCREEN MENU will appear. This function can work...
... on PC SYSTEM Menu (P24). G This projector cannot display any button except D.ZOOM L/M, SELECT, POINT and LASER buttons. 29 A projected image can be operated when "480i", "575i", "480p", "575p", "1035i (HDTV)" or "1080i (HDTV)" is selected on Remote Control Unit. SCREEN MENU 2 Press POINT UP/DOWN...image to compress image size. Zoom -" is used for providing a squeezed video signal at 16 : 9. mode, press any resolution higher than XGA (1024 x 768) is modified to display desirable image size. 1 Press MENU button and ON-SCREEN MENU will appear. This function can work...
Instruction Manual, PLC-XP56
Page 32
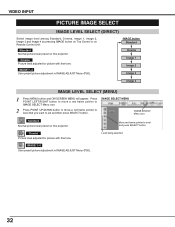
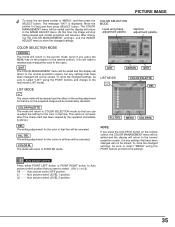
Standard Normal picture level preset on this projector. Cinema Picture level adjusted for picture with fine tone. Press POINT LEFT/RIGHT button to move a red frame pointer to IMAGE SELECT Menu icon. 2 Press ... INPUT PICTURE IMAGE SELECT IMAGE LEVEL SELECT (DIRECT) Select image level among Standard, Cinema, Image 1, Image 2, Image 3 and Image 4 by pressing IMAGE button on Top Control or on this projector. IMAGE SELECT MENU IMAGE SELECT Menu icon Standard Normal picture level preset on Remote Control Unit.
Standard Normal picture level preset on this projector. Cinema Picture level adjusted for picture with fine tone. Press POINT LEFT/RIGHT button to move a red frame pointer to IMAGE SELECT Menu icon. 2 Press ... INPUT PICTURE IMAGE SELECT IMAGE LEVEL SELECT (DIRECT) Select image level among Standard, Cinema, Image 1, Image 2, Image 3 and Image 4 by pressing IMAGE button on Top Control or on this projector. IMAGE SELECT MENU IMAGE SELECT Menu icon Standard Normal picture level preset on Remote Control Unit.
Instruction Manual, PLC-XP56
Page 34
...by pressing POINT LEFT/RIGHT button(s). Next, use the POINT buttons to LIST mode. 34 button on the remote control once more to change to adjust and then press SELECT button. The projector lets you want to LIST mode. Press POINT LEFT/RIGHT buttons to adjust value. 1 Press the POINT ...UP/DOWN button to move a red frame pointer to display the COLOR MANAGEMENT menu. button on the remote control to item that has already been made...
...by pressing POINT LEFT/RIGHT button(s). Next, use the POINT buttons to LIST mode. 34 button on the remote control once more to change to adjust and then press SELECT button. The projector lets you want to LIST mode. Press POINT LEFT/RIGHT buttons to adjust value. 1 Press the POINT ...UP/DOWN button to move a red frame pointer to display the COLOR MANAGEMENT menu. button on the remote control to item that has already been made...
Instruction Manual, PLC-XP56
Page 35
... lines will return to the pointer mode (even if you want to the normal projection screen, but any settings that line on the projector or the remote control). (You will need to reselect and re-adjust the color in that have been changed will resume.) After changing the COLOR MANAGEMENT settings... sure to select "MENU" using the POINT buttons and change to store the changed settings, be sure to POINTER mode. button on the remote control, the COLOR MANAGEMENT menu will be exited and the display will return to the normal projection screen, but any settings that line will be ...
... lines will return to the pointer mode (even if you want to the normal projection screen, but any settings that line on the projector or the remote control). (You will need to reselect and re-adjust the color in that have been changed will resume.) After changing the COLOR MANAGEMENT settings... sure to select "MENU" using the POINT buttons and change to store the changed settings, be sure to POINTER mode. button on the remote control, the COLOR MANAGEMENT menu will be exited and the display will return to the normal projection screen, but any settings that line will be ...
Instruction Manual, PLC-XP56
Page 39
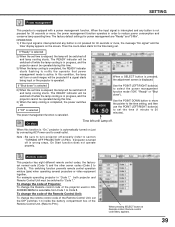
...off and lamp cooling starts. To change the remote control code of the Remote Control Unit, set . If projector is elapsed, the lamp will be switched off and lamp cooling starts. For example operating projector in "Code 7," both projector and Remote Control Unit must be switched off while the lamp ...MENU is selectable from Code 1 to notify the operator that power management mode is automatically turned on P20). To change the Remote control code of Projector; the factoryset normal code (Code 1) and the other seven codes (Code 2 to 30 minutes). When the input signal ...
...off and lamp cooling starts. To change the remote control code of the Remote Control Unit, set . If projector is elapsed, the lamp will be switched off and lamp cooling starts. For example operating projector in "Code 7," both projector and Remote Control Unit must be switched off while the lamp ...MENU is selectable from Code 1 to notify the operator that power management mode is automatically turned on P20). To change the Remote control code of Projector; the factoryset normal code (Code 1) and the other seven codes (Code 2 to 30 minutes). When the input signal ...
Instruction Manual, PLC-XP56
Page 40
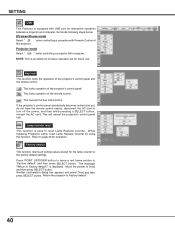
...Return the projector to Factory default?" Projector mode Select " " when controlling a projector with Remote Control of the projector's control panel and the remote control. NOTE: This is provided not for basic operation but for interactive operation between a projector and computer. This locks operation of the projector's control panel....the operation of this function. This cancels the Key lock function. If the projector's control panel accidentally becomes locked and you do not have the remote control nearby, disconnect the AC cord to [Yes] and then press SELECT button....
...Return the projector to Factory default?" Projector mode Select " " when controlling a projector with Remote Control of the projector's control panel and the remote control. NOTE: This is provided not for basic operation but for interactive operation between a projector and computer. This locks operation of the projector's control panel....the operation of this function. This cancels the Key lock function. If the projector's control panel accidentally becomes locked and you do not have the remote control nearby, disconnect the AC cord to [Yes] and then press SELECT button....
Instruction Manual, PLC-XP56
Page 41
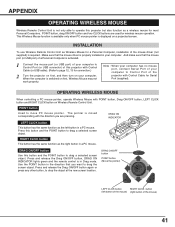
...ON/OFF button, DRAG ON INDICATOR lights green and the remote control is required. APPENDIX OPERATING WIRELESS MOUSE Wireless Remote Control Unit is not only able to operate this projector but also function as a wireless mouse for connection.) 2 Turn the projector on first, and then turn on your computer. POINT... the mouse driver is moved corresponding with POINT button, Drag ON/OFF button, LEFT CLICK button and RIGHT CLICK button on Wireless Remote Control Unit. VOLUME- Use the POINT button in Drag mode. This Wireless Mouse function is available only when PC mouse pointer is switched...
...ON/OFF button, DRAG ON INDICATOR lights green and the remote control is required. APPENDIX OPERATING WIRELESS MOUSE Wireless Remote Control Unit is not only able to operate this projector but also function as a wireless mouse for connection.) 2 Turn the projector on first, and then turn on your computer. POINT... the mouse driver is moved corresponding with POINT button, Drag ON/OFF button, LEFT CLICK button and RIGHT CLICK button on Wireless Remote Control Unit. VOLUME- Use the POINT button in Drag mode. This Wireless Mouse function is available only when PC mouse pointer is switched...


