Instruction Manual, PLC-XP56
Page 2
...LASER POINTER INDICATOR lights red to indicate laser emission). If the projector is to operate improperly, read this manual thoroughly and operate the projector properly. Heat build-up can reduce the service life of your projector seems to be maintained. Do not look into a compartment or...INDICATES THAT THERE ARE IMPORTANT OPERATING AND MAINTENANCE INSTRUCTIONS IN THE OWNER'S MANUAL WITH THIS UNIT. 2 REFER SERVICING TO QUALIFIED SERVICE PERSONNEL. TO THE OWNER Before operating this projector, read this manual again, check operations and cable connections and try the solutions in the...
...LASER POINTER INDICATOR lights red to indicate laser emission). If the projector is to operate improperly, read this manual thoroughly and operate the projector properly. Heat build-up can reduce the service life of your projector seems to be maintained. Do not look into a compartment or...INDICATES THAT THERE ARE IMPORTANT OPERATING AND MAINTENANCE INSTRUCTIONS IN THE OWNER'S MANUAL WITH THIS UNIT. 2 REFER SERVICING TO QUALIFIED SERVICE PERSONNEL. TO THE OWNER Before operating this projector, read this manual again, check operations and cable connections and try the solutions in the...
Instruction Manual, PLC-XP56
Page 5
...21 CLEANING PROJECTION LENS 43 21 LAMP REPLACEMENT 44 21 LAMP REPLACE COUNTER 45 21 TROUBLESHOOTING 46 21 INDICATORS AND PROJECTOR CONDITION 48 22 22 COMPATIBLE COMPUTER SPECIFICATION 49 22 MENU TREE 50 22 TECHNICAL SPECIFICATIONS 52 CONFIGURATIONS OF TERMINALS ... 7 SELECTING COMPUTER SYSTEM PC ADJUSTMENT 23 25 AUTO PC ADJUSTMENT 25 NAME OF EACH PART OF PROJECTOR 7 MANUAL PC ADJUSTMENT 26 SETTING-UP PROJECTOR CONNECTING AC POWER CORD POSITIONING PROJECTOR ADJUSTABLE FEET 8 PICTURE IMAGE SELECT 28 8 IMAGE LEVEL SELECT 28 9 PICTURE SCREEN ADJUSTMENT 29 ...
...21 CLEANING PROJECTION LENS 43 21 LAMP REPLACEMENT 44 21 LAMP REPLACE COUNTER 45 21 TROUBLESHOOTING 46 21 INDICATORS AND PROJECTOR CONDITION 48 22 22 COMPATIBLE COMPUTER SPECIFICATION 49 22 MENU TREE 50 22 TECHNICAL SPECIFICATIONS 52 CONFIGURATIONS OF TERMINALS ... 7 SELECTING COMPUTER SYSTEM PC ADJUSTMENT 23 25 AUTO PC ADJUSTMENT 25 NAME OF EACH PART OF PROJECTOR 7 MANUAL PC ADJUSTMENT 26 SETTING-UP PROJECTOR CONNECTING AC POWER CORD POSITIONING PROJECTOR ADJUSTABLE FEET 8 PICTURE IMAGE SELECT 28 8 IMAGE LEVEL SELECT 28 9 PICTURE SCREEN ADJUSTMENT 29 ...
Instruction Manual, PLC-XP56
Page 6
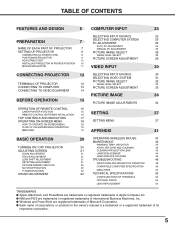
...and matrix liquid crystal display (LCD) technology. G Component Video Component video signal, such as a S-VHS VCR output signal, can be connected. N High Resolution Image This projector provides 1024 x 768 dots resolution for troublesome manual adjustment of frequency and other... settings. Keystone Correction solves this projector has Wireless Mouse function for connecting DVI output from a computer between XGA (1024 x 768) and SXGA (1280...
...and matrix liquid crystal display (LCD) technology. G Component Video Component video signal, such as a S-VHS VCR output signal, can be connected. N High Resolution Image This projector provides 1024 x 768 dots resolution for troublesome manual adjustment of frequency and other... settings. Keystone Correction solves this projector has Wireless Mouse function for connecting DVI output from a computer between XGA (1024 x 768) and SXGA (1280...
Instruction Manual, PLC-XP56
Page 7
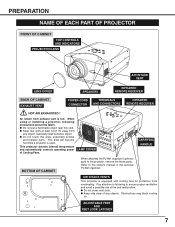
.... LAMP COVER CARRYING HANDLE BOTTOM OF CABINET When attached the PJ-Net organizer (optional part) to the owner's manual in the optional PJ-Net organizer. G Do not cover vent slots. When using or installing a projector, following to following precautions should be taken. G Do not put a flammable object near this area, especially screws...
.... LAMP COVER CARRYING HANDLE BOTTOM OF CABINET When attached the PJ-Net organizer (optional part) to the owner's manual in the optional PJ-Net organizer. G Do not cover vent slots. When using or installing a projector, following to following precautions should be taken. G Do not put a flammable object near this area, especially screws...
Instruction Manual, PLC-XP56
Page 24
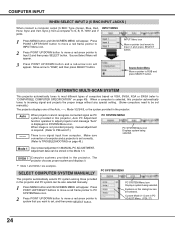
... 2 Press POINT UP/DOWN button to move a red arrow pointer to system that you want to set manually.) The projector displays one of computers based on VGA, SVGA, XGA or SXGA (refer to most different types of the Auto, -----, Mode 1/2/3/4/5, or the system provided in this...ADJUST Menu. (P26, 27) 24 SVGA 1 Computer systems provided in MANUAL PC ADJUSTMENT. The projector chooses proper system and displays it. ✽ Mode 1 and SVGA 1 are examples. AUTOMATIC MULTI-SCAN SYSTEM This projector automatically tunes to "COMPATIBLE COMPUTER SPECIFICATION" on page 46.) PC SYSTEM MENU...
... 2 Press POINT UP/DOWN button to move a red arrow pointer to system that you want to set manually.) The projector displays one of computers based on VGA, SVGA, XGA or SXGA (refer to most different types of the Auto, -----, Mode 1/2/3/4/5, or the system provided in this...ADJUST Menu. (P26, 27) 24 SVGA 1 Computer systems provided in MANUAL PC ADJUSTMENT. The projector chooses proper system and displays it. ✽ Mode 1 and SVGA 1 are examples. AUTOMATIC MULTI-SCAN SYSTEM This projector automatically tunes to "COMPATIBLE COMPUTER SPECIFICATION" on page 46.) PC SYSTEM MENU...
Instruction Manual, PLC-XP56
Page 25
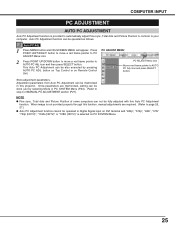
...PC Adj. Auto PC Adj. 1 Press MENU button and ON-SCREEN MENU will appear. NOTE G Fine sync, Total dots and Picture Position of MANUAL PC ADJUSTMENT section (P27). icon and then press SELECT button. button on Top Control or on PC SYSTEM Menu. 25 Auto PC Adjustment function ...can not be operated as follows. Adjustment parameters from Auto PC Adjustment can be memorized in this projector. Once parameters are required. (Refer to page 26, 27.) G Auto PC Adjustment function cannot be also executed by selecting Mode in Digital ...
...PC Adj. Auto PC Adj. 1 Press MENU button and ON-SCREEN MENU will appear. NOTE G Fine sync, Total dots and Picture Position of MANUAL PC ADJUSTMENT section (P27). icon and then press SELECT button. button on Top Control or on PC SYSTEM Menu. 25 Auto PC Adjustment function ...can not be operated as follows. Adjustment parameters from Auto PC Adjustment can be memorized in this projector. Once parameters are required. (Refer to page 26, 27.) G Auto PC Adjustment function cannot be also executed by selecting Mode in Digital ...
Instruction Manual, PLC-XP56
Page 26
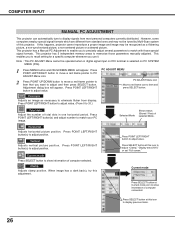
...press SELECT button. Current mode Press SELECT button at Current mode icon to show information of computer selected. This projector has a Manual PC Adjustment to show information of this projector. Fine sync Adjusts an image as a flickering picture, a non-synchronized picture, a non-centered picture or ...to display signals from standard ones and may be tuned by Multi-Scan system of computer connected. COMPUTER INPUT MANUAL PC ADJUSTMENT This projector can automatically tune to adjust and then press SELECT button. If this adjustment. Press POINT LEFT/RIGHT button to...
...press SELECT button. Current mode Press SELECT button at Current mode icon to show information of computer selected. This projector has a Manual PC Adjustment to show information of this projector. Fine sync Adjusts an image as a flickering picture, a non-synchronized picture, a non-centered picture or ...to display signals from standard ones and may be tuned by Multi-Scan system of computer connected. COMPUTER INPUT MANUAL PC ADJUSTMENT This projector can automatically tune to adjust and then press SELECT button. If this adjustment. Press POINT LEFT/RIGHT button to...
Instruction Manual, PLC-XP56
Page 31
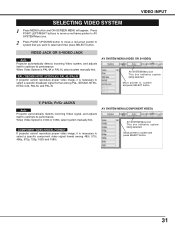
...Video system, and adjusts itself to optimize its performance. When Video System is 1035i or 1080i, select system manually first. Y, Pb/Cb, Pr/Cr JACKS Auto Projector automatically detects incoming Video signal, and adjusts itself to optimize its performance. Move pointer to select a specific broadcast... format among 480i, 575i, 480p, 575p, 720p, 1035i and 1080i. PAL / SECAM / NTSC / NTSC4.43 / PAL-M / PAL-N If projector cannot reproduce proper video image, it is necessary to system and press SELECT button. AV SYSTEM MENU (COMPONENT VIDEO) AV SYSTEM Menu icon This box...
...Video system, and adjusts itself to optimize its performance. When Video System is 1035i or 1080i, select system manually first. Y, Pb/Cb, Pr/Cr JACKS Auto Projector automatically detects incoming Video signal, and adjusts itself to optimize its performance. Move pointer to select a specific broadcast... format among 480i, 575i, 480p, 575p, 720p, 1035i and 1080i. PAL / SECAM / NTSC / NTSC4.43 / PAL-M / PAL-N If projector cannot reproduce proper video image, it is necessary to system and press SELECT button. AV SYSTEM MENU (COMPONENT VIDEO) AV SYSTEM Menu icon This box...
Instruction Manual, PLC-XP56
Page 36
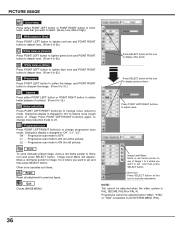
... to off. PICTURE IMAGE Color temp. Progressive scan Press POINT LEFT/RIGHT button(s) to change noise reduction mode to any of image. Store To store manually preset image, move a red frame pointer to "Off", "L1", "L2". NOTE : Tint cannot be operated when "480p", "575p" or "720p" is changed to Store icon...
... to off. PICTURE IMAGE Color temp. Progressive scan Press POINT LEFT/RIGHT button(s) to change noise reduction mode to any of image. Store To store manually preset image, move a red frame pointer to "Off", "L1", "L2". NOTE : Tint cannot be operated when "480p", "575p" or "720p" is changed to Store icon...
Instruction Manual, PLC-XP56
Page 45
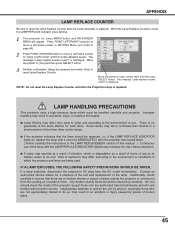
.... Move the pointer to ensure that the lamp should check the inside of the projector except those who are not appropriately trained to the environment or conditions in the LAMP REPLACEMENT section of this manual. ) Continuous use of time than other similar lamps. Contact an authorized service station for each lamp. APPENDIX...
.... Move the pointer to ensure that the lamp should check the inside of the projector except those who are not appropriately trained to the environment or conditions in the LAMP REPLACEMENT section of this manual. ) Continuous use of time than other similar lamps. Contact an authorized service station for each lamp. APPENDIX...
Instruction Manual, PLC-XP56
Page 52
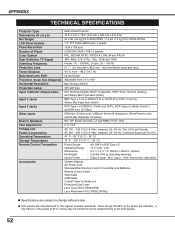
... (including batteries) : Class II Laser (Max. Output : 1mW / Wave length : 650±20nm) Owner's Manual AC Power Cord Wireless/Wired Remote Control Transmitter and Batteries Remote Control Cable VGA Cable USB Cable Control Cable for Serial port...PLC-XP55/XP56) Lens Attachment (PLC-XP55L/XP56L) G Specifications are subject to 10.5˚ AC 100 ~ 120 V (5.0 A Max. G LCD panels are effective, a tiny fraction of the pixels (0.01% or less) may be ineffective by the characteristics of the LCD panels. 52 APPENDIX TECHNICAL SPECIFICATIONS Projector Type Dimensions (W x H x D) Net Weight LCD...
... (including batteries) : Class II Laser (Max. Output : 1mW / Wave length : 650±20nm) Owner's Manual AC Power Cord Wireless/Wired Remote Control Transmitter and Batteries Remote Control Cable VGA Cable USB Cable Control Cable for Serial port...PLC-XP55/XP56) Lens Attachment (PLC-XP55L/XP56L) G Specifications are subject to 10.5˚ AC 100 ~ 120 V (5.0 A Max. G LCD panels are effective, a tiny fraction of the pixels (0.01% or less) may be ineffective by the characteristics of the LCD panels. 52 APPENDIX TECHNICAL SPECIFICATIONS Projector Type Dimensions (W x H x D) Net Weight LCD...
Instruction Manual, PLC-XP56
Page 54
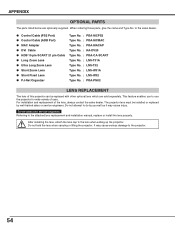
...other optional lens which are optionally supplied. Referring to the lens when setting up the projector. After installing the lens, attach the lens cap to the attached lens replacement and installation manual, replace or install the lens properly. For installation and replacement of uses. It may... cause injury. Do not hold the lens when carrying or lifting the projector. APPENDIX OPTIONAL PARTS The parts listed below are sold...
...other optional lens which are optionally supplied. Referring to the lens when setting up the projector. After installing the lens, attach the lens cap to the attached lens replacement and installation manual, replace or install the lens properly. For installation and replacement of uses. It may... cause injury. Do not hold the lens when carrying or lifting the projector. APPENDIX OPTIONAL PARTS The parts listed below are sold...


