Instruction Manual, PLC-WXU10B
Page 2
..., check operations and cable connections and try the solutions in the "Troubleshooting" section in a proper position. Safety Precaution WARNING: TO REDUCE THE RISK OF FIRE OR ELECTRIC SHOCK, DO NOT EXPOSE THIS APPLIANCE TO RAIN OR MOISTURE. - This projector produces intense light from the power outlet. Install the projector in the end of the projector cabinet for a considerable time. Minimum clearance must be used...
..., check operations and cable connections and try the solutions in the "Troubleshooting" section in a proper position. Safety Precaution WARNING: TO REDUCE THE RISK OF FIRE OR ELECTRIC SHOCK, DO NOT EXPOSE THIS APPLIANCE TO RAIN OR MOISTURE. - This projector produces intense light from the power outlet. Install the projector in the end of the projector cabinet for a considerable time. Minimum clearance must be used...
Instruction Manual, PLC-WXU10B
Page 4
... from the type of air-conditioning equipment. f. Use only with a cart or stand recommended by the manufacturer, or sold with cloth or other materials, and the bottom opening or removing covers may result in a fire or electric shock. When the power cord or plug is operated. Adjust only those controls that the projector is provided. Unplug this projector through cabinet slots as...
... from the type of air-conditioning equipment. f. Use only with a cart or stand recommended by the manufacturer, or sold with cloth or other materials, and the bottom opening or removing covers may result in a fire or electric shock. When the power cord or plug is operated. Adjust only those controls that the projector is provided. Unplug this projector through cabinet slots as...
Instruction Manual, PLC-WXU10B
Page 5
... moving the projector, replace the lens cap and retract the elevator feet to prevent damage to project an image. Do not transport the projector by heat. Air Circulation Openings in the cabinet are provided to cool down to project an image. When using a courier or transport service in Proper Position Install the projector properly. USE CAUTION IN CARRYING OR TRANSPORTING THE PROJECTOR - CAUTION Hot air is cooled...
... moving the projector, replace the lens cap and retract the elevator feet to prevent damage to project an image. Do not transport the projector by heat. Air Circulation Openings in the cabinet are provided to cool down to project an image. When using a courier or transport service in Proper Position Install the projector properly. USE CAUTION IN CARRYING OR TRANSPORTING THE PROJECTOR - CAUTION Hot air is cooled...
Instruction Manual, PLC-WXU10B
Page 6
... radio/TV technician for help. Model Number : PLC-WXU10N Trade Name : Sanyo Responsible party : SANYO FISHER COMPANY Address : 21605 Plummer Street, Chatsworth, California 91311 Telephone No. : (818)998-7322 AC Power Cord Requirement The AC Power Cord supplied with this projector meets the requirement for use the plug with the cover omitted. Fuse covers are coloured in the plug which is coloured green-and-yellow must be suitably...
... radio/TV technician for help. Model Number : PLC-WXU10N Trade Name : Sanyo Responsible party : SANYO FISHER COMPANY Address : 21605 Plummer Street, Chatsworth, California 91311 Telephone No. : (818)998-7322 AC Power Cord Requirement The AC Power Cord supplied with this projector meets the requirement for use the plug with the cover omitted. Fuse covers are coloured in the plug which is coloured green-and-yellow must be suitably...
Instruction Manual, PLC-WXU10B
Page 8
... Remote Control Operation 16 Installation ...17 Connecting the Projector 17 Powering On/Off the Projector 18 Adjusting the Projected Image 19 Menu Operation ...22 Picture (Computer Mode 24 Picture (Video Mode) ...25 Image (Computer Mode 26 Image (Video Mode) ...28 Setting (Computer / Video Mode 29 Sound (Computer / Video Mode 30 Advanced (Computer / Video Mode 30 Language (Computer / Video Mode 30 Maintenance ...31 Cleaning the Lens ...31 Cleaning the Projector Housing 31 Cleaning the Air Filter 32 Replacing the Lamp ...33 Specifications ...35 Appendix ...36 LED Indicator Messages...
... Remote Control Operation 16 Installation ...17 Connecting the Projector 17 Powering On/Off the Projector 18 Adjusting the Projected Image 19 Menu Operation ...22 Picture (Computer Mode 24 Picture (Video Mode) ...25 Image (Computer Mode 26 Image (Video Mode) ...28 Setting (Computer / Video Mode 29 Sound (Computer / Video Mode 30 Advanced (Computer / Video Mode 30 Language (Computer / Video Mode 30 Maintenance ...31 Cleaning the Lens ...31 Cleaning the Projector Housing 31 Cleaning the Air Filter 32 Replacing the Lamp ...33 Specifications ...35 Appendix ...36 LED Indicator Messages...
Instruction Manual, PLC-WXU10B
Page 9
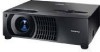
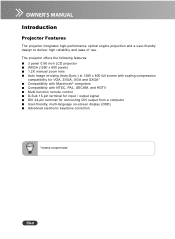
EN-8 The projector offers the following features: 3 panel 0.56 inch LCD projector WXGA (1280 x 800 pixels) 1.2X manual zoom lens Auto image re-sizing (Auto-Sync.) to deliver high reliability and ease of use. Introduction Projector Features The projector integrates high-performance optical engine projection and a user-friendly design to 1280 x 800 full screen with scaling compression compatibility for VGA, SVGA, XGA and SXGA* Compatibility with Macintosh® computers Compatibility with NTSC, PAL, SECAM...
EN-8 The projector offers the following features: 3 panel 0.56 inch LCD projector WXGA (1280 x 800 pixels) 1.2X manual zoom lens Auto image re-sizing (Auto-Sync.) to deliver high reliability and ease of use. Introduction Projector Features The projector integrates high-performance optical engine projection and a user-friendly design to 1280 x 800 full screen with scaling compression compatibility for VGA, SVGA, XGA and SXGA* Compatibility with Macintosh® computers Compatibility with NTSC, PAL, SECAM...
Instruction Manual, PLC-WXU10B
Page 12
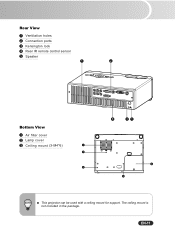
The ceiling mount is not included in the package. EN-11 Rear View 1 Ventilation holes 2 Connection ports 3 Kensington lock 4 Rear IR remote control sensor 5 Speaker 1 2 Bottom View 1 Air filter cover 2 Lamp cover 3 Ceiling mount (3-M4*6) 1 3 3 5 43 2 3 This projector can be used with a ceiling mount for support.
The ceiling mount is not included in the package. EN-11 Rear View 1 Ventilation holes 2 Connection ports 3 Kensington lock 4 Rear IR remote control sensor 5 Speaker 1 2 Bottom View 1 Air filter cover 2 Lamp cover 3 Ceiling mount (3-M4*6) 1 3 3 5 43 2 3 This projector can be used with a ceiling mount for support.
Instruction Manual, PLC-WXU10B
Page 13
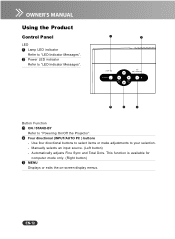
...EN-12 This function is available for computer mode only. (Right button) 5 MENU Displays or exits the on-screen display menus. Automatically adjusts Fine Sync and Total Dots. Manually selects an input source. (Left button) - Use four directional buttons to select items or make adjustments to "Powering On/Off the Projector". 4 Four directional (INPUT/AUTO PC ) buttons - Using the Product Control Panel 1 2 LED 1 Lamp LED indicator Refer to "LED Indicator Messages". 2 Power LED indicator Refer to "LED Indicator Messages". 5 4 3 Button Function 3 ON / STAND-BY Refer to your selection...
...EN-12 This function is available for computer mode only. (Right button) 5 MENU Displays or exits the on-screen display menus. Automatically adjusts Fine Sync and Total Dots. Manually selects an input source. (Left button) - Use four directional buttons to select items or make adjustments to "Powering On/Off the Projector". 4 Four directional (INPUT/AUTO PC ) buttons - Using the Product Control Panel 1 2 LED 1 Lamp LED indicator Refer to "LED Indicator Messages". 2 Power LED indicator Refer to "LED Indicator Messages". 5 4 3 Button Function 3 ON / STAND-BY Refer to your selection...

Instruction Manual, PLC-WXU10B
Page 15
.... - Use four directional buttons to select items or make adjustments to "Powering On/Off the Projector". 2 Four directional (INPUT/AUTO PC) buttons - Press again to pause the screen image. button to reduce the volume. 12 FREEZE Press "FREEZE" to cancel the MUTE function. 6 AUTO PC Automatically adjusts Fine Sync and Total Dots. This function is available for computer mode only. (Right button) 3 MENU Displays or exits the on-screen display menus. 4 LIGHT...
.... - Use four directional buttons to select items or make adjustments to "Powering On/Off the Projector". 2 Four directional (INPUT/AUTO PC) buttons - Press again to pause the screen image. button to reduce the volume. 12 FREEZE Press "FREEZE" to cancel the MUTE function. 6 AUTO PC Automatically adjusts Fine Sync and Total Dots. This function is available for computer mode only. (Right button) 3 MENU Displays or exits the on-screen display menus. 4 LIGHT...
Instruction Manual, PLC-WXU10B
Page 19
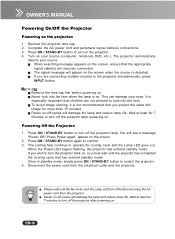
... standby mode. J Never look into the lens when the lamp is detected. J When searching message appears on . The cooling fans continue to turn off -cycles will see a message "Power Off? When the Power LED begins flashing, the projector has entered standby mode. J Faster on the screen when the source is on the screen, ensure that children are not allowed to look into the lens. Complete the AC power cord and peripheral signal cable(s) connections...
... standby mode. J Never look into the lens when the lamp is detected. J When searching message appears on . The cooling fans continue to turn off -cycles will see a message "Power Off? When the Power LED begins flashing, the projector has entered standby mode. J Faster on the screen when the source is on the screen, ensure that children are not allowed to look into the lens. Complete the AC power cord and peripheral signal cable(s) connections...
Instruction Manual, PLC-WXU10B
Page 23
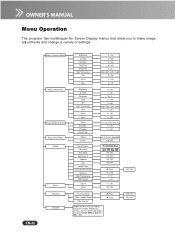
EN-22 Menu Operation The projector has multilingual On Screen Display menus that allow you to make image adjustments and change a variety of settings.
EN-22 Menu Operation The projector has multilingual On Screen Display menus that allow you to make image adjustments and change a variety of settings.
Instruction Manual, PLC-WXU10B
Page 25
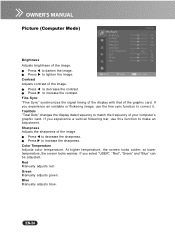
... the frequency of the image. Total Dots "Total Dots" changes the display data frequency to make an adjustment. at lower temperature, the screen looks warmer. If you experience a vertical flickering bar, use the fine sync function to correct it. Press X to decrease the contrast. If you select "USER", "Red", "Green" and "Blue" can be adjusted. Press W to increase the sharpness. Sharpness Adjusts the sharpness of the image. Color Temperature Adjusts color temperature. Red Manually adjusts red. EN-24 Blue Manually adjusts blue.
... the frequency of the image. Total Dots "Total Dots" changes the display data frequency to make an adjustment. at lower temperature, the screen looks warmer. If you experience a vertical flickering bar, use the fine sync function to correct it. Press X to decrease the contrast. If you select "USER", "Red", "Green" and "Blue" can be adjusted. Press W to increase the sharpness. Sharpness Adjusts the sharpness of the image. Color Temperature Adjusts color temperature. Red Manually adjusts red. EN-24 Blue Manually adjusts blue.
Instruction Manual, PLC-WXU10B
Page 30
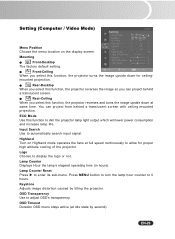
... Input Search Use to dim the projector lamp light output which will lower power consumption and increase lamp life. Lamp Counter Reset Press X to 0 hours. Front-Ceiling When you can project from behind a translucent screen. Press MENU button to turn the lamp hour counter to enter its sub-menu. Highland Turn on the display screen. Lamp Counter Displays Hour the lamp's elapsed operating time (in hours). Keystone Adjusts image distortion caused by second). EN-29 Logo Choose to adjust OSD's transparency. Setting (Computer / Video Mode) Menu Position Choose the menu...
... Input Search Use to dim the projector lamp light output which will lower power consumption and increase lamp life. Lamp Counter Reset Press X to 0 hours. Front-Ceiling When you can project from behind a translucent screen. Press MENU button to turn the lamp hour counter to enter its sub-menu. Highland Turn on the display screen. Lamp Counter Displays Hour the lamp's elapsed operating time (in hours). Keystone Adjusts image distortion caused by second). EN-29 Logo Choose to adjust OSD's transparency. Setting (Computer / Video Mode) Menu Position Choose the menu...

Instruction Manual, PLC-WXU10B
Page 32
... removed, use a soft cloth damped with water, or water and neutral detergent, and wipe dry with a soft cloth. Warning: Never open any part of the covers on the screen and diminish image quality. Dangerous electrical voltages inside the projector can cause severe injury. EN-31 Refer all servicing to service this product yourself. You should keep the lens clean as dust, dirt or spots will project...
... removed, use a soft cloth damped with water, or water and neutral detergent, and wipe dry with a soft cloth. Warning: Never open any part of the covers on the screen and diminish image quality. Dangerous electrical voltages inside the projector can cause severe injury. EN-31 Refer all servicing to service this product yourself. You should keep the lens clean as dust, dirt or spots will project...
Instruction Manual, PLC-WXU10B
Page 33
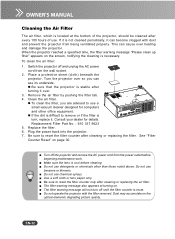
... to reset the filter counter only after cleaning or replacing the filter. Switch the projector off the projector and remove the AC power cord from being ventilated properly. The filter warning message also appears at the bottom of use a small vacuum cleaner designed for details. If it is located at turning on the screen, notifying the cleaning is cool before beginning maintenance work. Do not use benzene or thinners. Cleaning the Air Filter The air filter, which...
... to reset the filter counter only after cleaning or replacing the filter. Switch the projector off the projector and remove the AC power cord from being ventilated properly. The filter warning message also appears at the bottom of use a small vacuum cleaner designed for details. If it is located at turning on the screen, notifying the cleaning is cool before beginning maintenance work. Do not use benzene or thinners. Cleaning the Air Filter The air filter, which...
Instruction Manual, PLC-WXU10B
Page 34
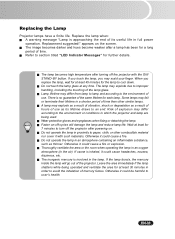
... time. Thoroughly ventilate the area or the room when operating the lamp in an oxygen atmosphere (in the lamp. Replace the lamp when: A warning message "Lamp is involved in the air). EN-33 Otherwise it could cause headaches, nausea, dizziness, etc. If ozone is no guarantee of the lamp glass. Leave the area immediately if the lamp shatters while being used. The lamp becomes high temperature...
... time. Thoroughly ventilate the area or the room when operating the lamp in an oxygen atmosphere (in the lamp. Replace the lamp when: A warning message "Lamp is involved in the air). EN-33 Otherwise it could cause headaches, nausea, dizziness, etc. If ozone is no guarantee of the lamp glass. Leave the area immediately if the lamp shatters while being used. The lamp becomes high temperature...
Instruction Manual, PLC-WXU10B
Page 35
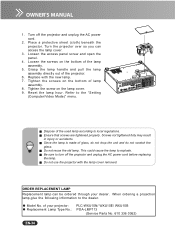
.... 1. Do not reuse the old lamp. ORDER REPLACEMENT LAMP Replacement lamp can access the lamp cover. 3. Refer to the dealer. Since the lamp is made of lamp assembly. 8. Turn off the projector and unplug the AC power cord before replacing the lamp. Replace with the lamp cover removed. When ordering a projection lamp,give the following information to the "Setting (Computer/Video Mode)" menu. Do not use the projector with the new lamp. 7. of the lamp assembly. 5. Place a protective sheet (cloth...
.... 1. Do not reuse the old lamp. ORDER REPLACEMENT LAMP Replacement lamp can access the lamp cover. 3. Refer to the dealer. Since the lamp is made of lamp assembly. 8. Turn off the projector and unplug the AC power cord before replacing the lamp. Replace with the lamp cover removed. When ordering a projection lamp,give the following information to the "Setting (Computer/Video Mode)" menu. Do not use the projector with the new lamp. 7. of the lamp assembly. 5. Place a protective sheet (cloth...
Instruction Manual, PLC-WXU10B
Page 36
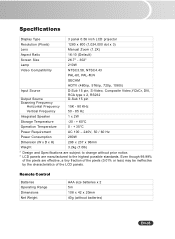
Specifications Display Type 3 panel 0.56 inch LCD projector Resolution (Pixels) 1280 x 800 (1,024,000 dot x 3) Lens Manual Zoom (1.2X) Aspect Ratio 16:10 (Default) Screen Size 26.7" - 302" Lamp 210W Video Compatibility NTSC3.58, NTSC4.43 PAL-60, PAL-M,N SECAM HDTV (480i/p, 576i/p, 720p, 1080i) Input Source Output Source Scanning Frequency Horizontal Frequency D-Sub 15 pin, S-Video, Composite Video,YCbCr, DVI, RCA type x 2, RS232 D-Sub 15 pin 15K - 80 KHz Vertical...
Specifications Display Type 3 panel 0.56 inch LCD projector Resolution (Pixels) 1280 x 800 (1,024,000 dot x 3) Lens Manual Zoom (1.2X) Aspect Ratio 16:10 (Default) Screen Size 26.7" - 302" Lamp 210W Video Compatibility NTSC3.58, NTSC4.43 PAL-60, PAL-M,N SECAM HDTV (480i/p, 576i/p, 720p, 1080i) Input Source Output Source Scanning Frequency Horizontal Frequency D-Sub 15 pin, S-Video, Composite Video,YCbCr, DVI, RCA type x 2, RS232 D-Sub 15 pin 15K - 80 KHz Vertical...
Instruction Manual, PLC-WXU10B
Page 37
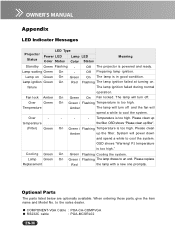
... replace Red the lamp with a new one promptly. On The lamp is too high." Fan lock Amber Over Green Temperature On Green On Fan locked. temperature - PJ temperature is in good condition. Optional Parts The parts listed below are optionally available. Q COMPONENT-VGA Cable : POA-CA-COMPVGA Q RS232C cable : POA-MCSRL02 EN-36 Lamp waiting Green On - Please clean up the filter. Appendix LED Indicator Messages Projector Status LED Type Power LED Color Status Lamp LED Color Status Meaning Standby Green Flashing - Lamp on . Flashing The lamp ignition failed at turning...
... replace Red the lamp with a new one promptly. On The lamp is too high." Fan lock Amber Over Green Temperature On Green On Fan locked. temperature - PJ temperature is in good condition. Optional Parts The parts listed below are optionally available. Q COMPONENT-VGA Cable : POA-CA-COMPVGA Q RS232C cable : POA-MCSRL02 EN-36 Lamp waiting Green On - Please clean up the filter. Appendix LED Indicator Messages Projector Status LED Type Power LED Color Status Lamp LED Color Status Meaning Standby Green Flashing - Lamp on . Flashing The lamp ignition failed at turning...
Instruction Manual, PLC-WXU10B
Page 39
.... on the lamp cover. Remove the lens cap and turn the power back on. button. (p. 12, 14, 27) displayed image. Refer to "LED Indicator Messages" (p.36) as well. I m a g e i s o u t o f The lens focus is not Connect the AC power cord to connected to the projector. The AC power cord is unstable or The signal timing of the display Use "Fine Sync" to correct it compatible with the product. The AC power cord is not adjusted Adjust the focus with the to Picture section. (p. 12...
.... on the lamp cover. Remove the lens cap and turn the power back on. button. (p. 12, 14, 27) displayed image. Refer to "LED Indicator Messages" (p.36) as well. I m a g e i s o u t o f The lens focus is not Connect the AC power cord to connected to the projector. The AC power cord is unstable or The signal timing of the display Use "Fine Sync" to correct it compatible with the product. The AC power cord is not adjusted Adjust the focus with the to Picture section. (p. 12...


