
VPC-PD2 Instruction Manual
Page 1
Make sure to safely operate the VPC-PD1EX, VPC-PD2, VPC-PD1GX, VPC-PD1PX and VPC-PD1TA. INSTRUCTION MANUAL Dual Camera VPC-PD1EX VPC-PD2 VPC-PD1GX VPC-PD1PX VPC-PD1TA Important note This manual explains how to read these products will be labeled as such. Keep this manual in a safe place for later reference. Any information regarding only one of these instructions carefully before using the camera. Please read and understand the separate booklet "SAFETY MANUAL".
Make sure to safely operate the VPC-PD1EX, VPC-PD2, VPC-PD1GX, VPC-PD1PX and VPC-PD1TA. INSTRUCTION MANUAL Dual Camera VPC-PD1EX VPC-PD2 VPC-PD1GX VPC-PD1PX VPC-PD1TA Important note This manual explains how to read these products will be labeled as such. Keep this manual in a safe place for later reference. Any information regarding only one of these instructions carefully before using the camera. Please read and understand the separate booklet "SAFETY MANUAL".

VPC-PD2 Instruction Manual
Page 5
i The camera has an internal memory, which means that you can record and save the recorded data even if no card is not an included accessory. English iv Please purchase a commercially sold card. SHOOT, PLAY BACK AND SAVE PREPARE THE BATTERY PACK AND CARD Installing the battery pack and card Install the card and the supplied battery pack. i The card is installed.
i The camera has an internal memory, which means that you can record and save the recorded data even if no card is not an included accessory. English iv Please purchase a commercially sold card. SHOOT, PLAY BACK AND SAVE PREPARE THE BATTERY PACK AND CARD Installing the battery pack and card Install the card and the supplied battery pack. i The card is installed.

VPC-PD2 Instruction Manual
Page 6
...-indicator is approx. 180 minutes. h The charging time is lit red. h When charging is on. 2 Use the dedicated USB interface cable (supplied) to connect the camera to a computer. 3 Turn on the computer Computer power switch • ON v English 2 Pull out 1 Press 2 Pull out 1 Push in Charging the battery pack 1 Press the... ON/OFF button to turn off . h Charging begins. h It is not possible to charge the battery pack while the camera is completed, the indicator turns off the...
...-indicator is approx. 180 minutes. h The charging time is lit red. h When charging is on. 2 Use the dedicated USB interface cable (supplied) to connect the camera to a computer. 3 Turn on the computer Computer power switch • ON v English 2 Pull out 1 Press 2 Pull out 1 Push in Charging the battery pack 1 Press the... ON/OFF button to turn off . h Charging begins. h It is not possible to charge the battery pack while the camera is completed, the indicator turns off the...

VPC-PD2 Instruction Manual
Page 7
... computer is turned off . i If excessive force is charging. It is not possible to connect a cable, it may permanently damage the terminal or the camera. Insert and pull out the cable and USB plug carefully i When connecting the cables, make sure that the plugs are correctly oriented and that they...sockets on . If undue force is on the devices. English vi CAUTION During charging... It is not possible to charge the battery pack while the camera is used to charge the battery pack even when the computer is off . i With certain computers, it may be possible to pull the USB ...
... computer is turned off . i If excessive force is charging. It is not possible to connect a cable, it may permanently damage the terminal or the camera. Insert and pull out the cable and USB plug carefully i When connecting the cables, make sure that the plugs are correctly oriented and that they...sockets on . If undue force is on the devices. English vi CAUTION During charging... It is not possible to charge the battery pack while the camera is used to charge the battery pack even when the computer is off . i With certain computers, it may be possible to pull the USB ...

VPC-PD2 Instruction Manual
Page 8
... [ ] button. For how to set the date and time appears, press the [?] button to begin recording a video clip. h Press the [ ] button again to turn the camera on. h A still image is captured. [ ] button (Photo shooting button) Recording time 2M REC 00:09 5 Available recording time remaining vii English Shooting 1 Press the ON...
... [ ] button. For how to set the date and time appears, press the [?] button to begin recording a video clip. h Press the [ ] button again to turn the camera on. h A still image is captured. [ ] button (Photo shooting button) Recording time 2M REC 00:09 5 Available recording time remaining vii English Shooting 1 Press the ON...

VPC-PD2 Instruction Manual
Page 10
Deleting files 1 On the screen in step 2, move the orange frame to the file you wish to turn the camera off. Press the ON/OFF button for at least 1 second to delete, and press the [?] button. 2 Select "DELETE SINGLE", and press the SET button. h If you press [G] or [H], the screen to delete a different file will appear. 3 When you are finished deleting files, press the [?] button. ix English When you are finished using the camera...
Deleting files 1 On the screen in step 2, move the orange frame to the file you wish to turn the camera off. Press the ON/OFF button for at least 1 second to delete, and press the [?] button. 2 Select "DELETE SINGLE", and press the SET button. h If you press [G] or [H], the screen to delete a different file will appear. 3 When you are finished deleting files, press the [?] button. ix English When you are finished using the camera...

VPC-PD2 Instruction Manual
Page 11
Push the plugs in straight when connecting them. If undue force is used to connect a cable, it may permanently damage the terminal or the camera. Camera on/off switch • OFF Push To USB terminal Supplied dedicated USB interface cable To USB connector on the computer Computer power switch • ... oriented and that they match the shapes of the terminal sockets on the computer, and use the supplied dedicated USB interface cable to connect your camera to the computer. i If excessive force is used to pull the USB plug, it may damage the cable and/or connector. h Connect the...
Push the plugs in straight when connecting them. If undue force is used to connect a cable, it may permanently damage the terminal or the camera. Camera on/off switch • OFF Push To USB terminal Supplied dedicated USB interface cable To USB connector on the computer Computer power switch • ... oriented and that they match the shapes of the terminal sockets on the computer, and use the supplied dedicated USB interface cable to connect your camera to the computer. i If excessive force is used to pull the USB plug, it may damage the cable and/or connector. h Connect the...
VPC-PD2 Instruction Manual
Page 12
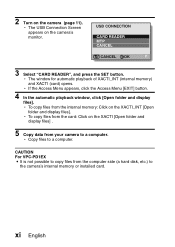
.... h The window for automatic playback of XACTI_INT (internal memory) and XACTI (card) opens. h To copy files from your camera to copy files from the internal memory: Click on the camera (page 11). h The USB Connection Screen appears on the XACTI [Open folder and display files] . 5 Copy data from ...the card: Click on the camera's monitor. 2 Turn on the XACTI_INT [Open folder and display files]. xi English USB CONNECTION CARD READER MTP CANCEL CANCEL OK 3 Select "CARD ...
.... h The window for automatic playback of XACTI_INT (internal memory) and XACTI (card) opens. h To copy files from your camera to copy files from the internal memory: Click on the camera (page 11). h The USB Connection Screen appears on the XACTI [Open folder and display files] . 5 Copy data from ...the card: Click on the camera's monitor. 2 Turn on the XACTI_INT [Open folder and display files]. xi English USB CONNECTION CARD READER MTP CANCEL CANCEL OK 3 Select "CARD ...
VPC-PD2 Instruction Manual
Page 13
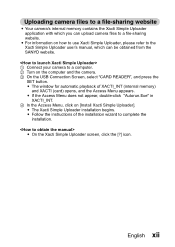
...Connection Screen, select "CARD READER", and press the SET button. Uploading camera files to a file-sharing website i Your camera's internal memory contains the Xacti Simple Uploader application with which can upload camera files to complete the installation. i On the Xacti Simple Uploader screen, ...click the [?] icon. i For information on how to use Xacti Simple Uploader, please refer to the Xacti Simple Uploader user's manual, which you can be obtained from the SANYO website. 1 Connect your camera...
...Connection Screen, select "CARD READER", and press the SET button. Uploading camera files to a file-sharing website i Your camera's internal memory contains the Xacti Simple Uploader application with which can upload camera files to complete the installation. i On the Xacti Simple Uploader screen, ...click the [?] icon. i For information on how to use Xacti Simple Uploader, please refer to the Xacti Simple Uploader user's manual, which you can be obtained from the SANYO website. 1 Connect your camera...

VPC-PD2 Instruction Manual
Page 15
h A list appears showing the devices connected to the computer's USB connector. 2 Left-click on the icon for safely removing hardware in your camera. 1 Left-click on the camera drive. h The camera can now be sure to follow the procedure below. English xiv Dismounting the camera CAUTION i To disconnect your camera, be disconnected. Failure to follow this procedure may cause faulty operation of your computer or corrupt the files in the task tray.
h A list appears showing the devices connected to the computer's USB connector. 2 Left-click on the icon for safely removing hardware in your camera. 1 Left-click on the camera drive. h The camera can now be sure to follow the procedure below. English xiv Dismounting the camera CAUTION i To disconnect your camera, be disconnected. Failure to follow this procedure may cause faulty operation of your computer or corrupt the files in the task tray.

VPC-PD2 Instruction Manual
Page 16
... TO READ THIS MANUAL iii CHECKING THE INCLUDED ACCESSORIES 3 How to use the accessories 4 ABOUT THE CARD 5 Media cards that can be used with this camera 5 What "card" means in this manual 5 „ SETUP PARTS NAMES 6 ABOUT THE BATTERY AND THE CARD 8 About recharging 8 About the temperature alert ...icon 9 To format a card 10 Shooting without a card installed 10 TURNING THE CAMERA ON AND OFF 11 Turning on the camera 11 Turning off the camera 11 Turning on the camera when the power save (sleep) mode is active 12 DATE AND TIME SETTING 14 ACCESSING THE SETUP ...
... TO READ THIS MANUAL iii CHECKING THE INCLUDED ACCESSORIES 3 How to use the accessories 4 ABOUT THE CARD 5 Media cards that can be used with this camera 5 What "card" means in this manual 5 „ SETUP PARTS NAMES 6 ABOUT THE BATTERY AND THE CARD 8 About recharging 8 About the temperature alert ...icon 9 To format a card 10 Shooting without a card installed 10 TURNING THE CAMERA ON AND OFF 11 Turning on the camera 11 Turning off the camera 11 Turning on the camera when the power save (sleep) mode is active 12 DATE AND TIME SETTING 14 ACCESSING THE SETUP ...

VPC-PD2 Instruction Manual
Page 17
„ APPENDICES FREQUENTLY ASKED QUESTIONS 34 OVERVIEW OF THE SETUP MENU SCREEN 39 SPECIFICATIONS 41 Camera 41 Camera connectors 44 Battery life 44 Possible No. of Images/Possible Shooting Time/ Possible Recording Time 45 Concerning the multi-indicator 46 Supplied Li-ion battery pack 46 Others 47 Before capturing those important shots, be sure to first take a test shot to confirm that your camera is set up and ready to go 48 About the MPEG-4 Standard license 48 English 2
„ APPENDICES FREQUENTLY ASKED QUESTIONS 34 OVERVIEW OF THE SETUP MENU SCREEN 39 SPECIFICATIONS 41 Camera 41 Camera connectors 44 Battery life 44 Possible No. of Images/Possible Shooting Time/ Possible Recording Time 45 Concerning the multi-indicator 46 Supplied Li-ion battery pack 46 Others 47 Before capturing those important shots, be sure to first take a test shot to confirm that your camera is set up and ready to go 48 About the MPEG-4 Standard license 48 English 2

VPC-PD2 Instruction Manual
Page 18
CHECKING THE INCLUDED ACCESSORIES i Li-ion battery pack: 1 i Dedicated USB interface cable (page v, x): 1 i SAFETY MANUAL (safety precautions booklet) Please read this booklet carefully before using the camera. i QUICK GUIDE i Obtaining the PDF instruction manual and cautions 3 English
CHECKING THE INCLUDED ACCESSORIES i Li-ion battery pack: 1 i Dedicated USB interface cable (page v, x): 1 i SAFETY MANUAL (safety precautions booklet) Please read this booklet carefully before using the camera. i QUICK GUIDE i Obtaining the PDF instruction manual and cautions 3 English

VPC-PD2 Instruction Manual
Page 19
English 4 How to use the accessories k Handstrap (Please purchase a commercially available handstrap.) i To avoid dropping the camera, it is recommended that you attach a handstrap.
English 4 How to use the accessories k Handstrap (Please purchase a commercially available handstrap.) i To avoid dropping the camera, it is recommended that you attach a handstrap.

VPC-PD2 Instruction Manual
Page 20
ABOUT THE CARD Media cards that can be used with this camera The type of card that can be inserted into and used with this camera is: i SD Memory Card i SDHC Memory Card i SDXC Memory Card What "card" means in this manual i In this manual, SD Memory Cards, SDHC Memory Cards and SDXC Memory Cards that can be used in this camera are referred to as "card". 5 English
ABOUT THE CARD Media cards that can be used with this camera The type of card that can be inserted into and used with this camera is: i SD Memory Card i SDHC Memory Card i SDXC Memory Card What "card" means in this manual i In this manual, SD Memory Cards, SDHC Memory Cards and SDXC Memory Cards that can be used in this camera are referred to as "card". 5 English

VPC-PD2 Instruction Manual
Page 23
.... SETUP ABOUT THE BATTERY AND THE CARD About recharging Recharging takes place only when the camera is removed for a long period, the time and date settings may be cleared. If you attempt to charge... the battery pack in the camera continuously for a long time. Note that when the battery pack is turned off , and it with...battery pack is difficult to insert because it . Recharging does not take place when the camera is used even if the camera is turned off , or when the power save function or the sleep function has been...
.... SETUP ABOUT THE BATTERY AND THE CARD About recharging Recharging takes place only when the camera is removed for a long period, the time and date settings may be cleared. If you attempt to charge... the battery pack in the camera continuously for a long time. Note that when the battery pack is turned off , and it with...battery pack is difficult to insert because it . Recharging does not take place when the camera is used even if the camera is turned off , or when the power save function or the sleep function has been...

VPC-PD2 Instruction Manual
Page 24
...will appear as described below. h If the temperature rises further, the \ icon will start to a computer. h If the camera is connected to flash, and the camera will turn the camera off. i Note, however, that the time it is advised that is, while the \ icon is lit; k When ... 9 English i Connect the dedicated USB interface cable to the USB hub. h During video recording, a countdown indicator will differ depending on the camera's operating condition. Do not connect it cannot be turned on again until the temperature has dropped (or as long as the \ icon remains flashing)....
...will appear as described below. h If the temperature rises further, the \ icon will start to a computer. h If the camera is connected to flash, and the camera will turn the camera off. i Note, however, that the time it is advised that is, while the \ icon is lit; k When ... 9 English i Connect the dedicated USB interface cable to the USB hub. h During video recording, a countdown indicator will differ depending on the camera's operating condition. Do not connect it cannot be turned on again until the temperature has dropped (or as long as the \ icon remains flashing)....

VPC-PD2 Instruction Manual
Page 25
When no card installed, the internal memory icon is turned on the screen to the camera's internal memory. When the camera is shown on the monitor to let you know that the images you capture will be saved to format the card. Shooting without a card installed i ... appears. Follow the instructions on with no card is installed, images are recorded to and played back from the camera's internal memory. English 10 SETUP To format a card 1 Insert the card in the camera, and press the ON/OFF button (pages iv and 11). 2 Press and hold the [?] button for at least...
When no card installed, the internal memory icon is turned on the screen to the camera's internal memory. When the camera is shown on the monitor to let you know that the images you capture will be saved to format the card. Shooting without a card installed i ... appears. Follow the instructions on with no card is installed, images are recorded to and played back from the camera's internal memory. English 10 SETUP To format a card 1 Insert the card in the camera, and press the ON/OFF button (pages iv and 11). 2 Press and hold the [?] button for at least...

VPC-PD2 Instruction Manual
Page 26
HINT To adjust the operation sounds i If you turn on the camera 1 Press the ON/OFF button for at least 1 second. TURNING THE CAMERA ON AND OFF Turning on the camera by pressing the ON/OFF button while holding down the [I] arrow key, the screen to change the operation sounds will appear. 11 English ON/OFF button Turning off . h The camera turns off the camera 1 Press the ON/OFF button for at least 1 second.
HINT To adjust the operation sounds i If you turn on the camera 1 Press the ON/OFF button for at least 1 second. TURNING THE CAMERA ON AND OFF Turning on the camera by pressing the ON/OFF button while holding down the [I] arrow key, the screen to change the operation sounds will appear. 11 English ON/OFF button Turning off . h The camera turns off the camera 1 Press the ON/OFF button for at least 1 second.
VPC-PD2 Instruction Manual
Page 27
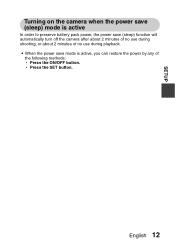
i When the power save mode is active In order to preserve battery pack power, the power save (sleep) mode is active, you can restore the power by any of no use during shooting, or about 2 minutes of no use during playback. h Press the SET button. English 12 SETUP Turning on the camera when the power save (sleep) function will automatically turn off the camera after about 2 minutes of the following methods: h Press the ON/OFF button.
i When the power save mode is active In order to preserve battery pack power, the power save (sleep) mode is active, you can restore the power by any of no use during shooting, or about 2 minutes of no use during playback. h Press the SET button. English 12 SETUP Turning on the camera when the power save (sleep) function will automatically turn off the camera after about 2 minutes of the following methods: h Press the ON/OFF button.


