
VPC-CS1 Owners Manual English
Page 8
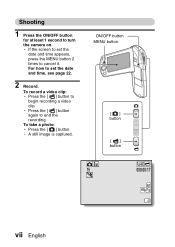
For how to set the date and time appears, press the MENU button 2 times to cancel it. h If the screen to turn the camera on. h A still image is captured. ON/OFF button MENU button [] button [] button 8M 15 Ful -HD 000:00:17 vii English To record a video clip: h Press the [ ] button to end the recording. h Press the [ ] button again to begin recording a video clip. To take a photo: h Press the [ ] button. Shooting 1 Press the ON/OFF button for at least 1 second to set the date and time, see page 22. 2 Record.
For how to set the date and time appears, press the MENU button 2 times to cancel it. h If the screen to turn the camera on. h A still image is captured. ON/OFF button MENU button [] button [] button 8M 15 Ful -HD 000:00:17 vii English To record a video clip: h Press the [ ] button to end the recording. h Press the [ ] button again to begin recording a video clip. To take a photo: h Press the [ ] button. Shooting 1 Press the ON/OFF button for at least 1 second to set the date and time, see page 22. 2 Record.
VPC-CS1 Owners Manual English
Page 9
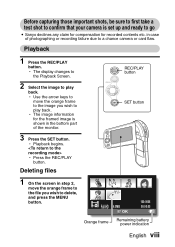
...Before capturing those important shots, be sure to first take a test shot to confirm that your camera is set up and ready to go i Sanyo declines any claim for compensation for the framed image is shown in the bottom part of photographing or recording failure due to play back. h The... to a chance camera or card flaw. h Press the REC/PLAY button. h The image information for recorded contents etc. REC/PLAY button SET button Full-HD 6.5MB OK 100-0006 00:00:05 Orange frame Remaining battery power indication English viii in case of the monitor. 3 Press the SET button. Playback...
...Before capturing those important shots, be sure to first take a test shot to confirm that your camera is set up and ready to go i Sanyo declines any claim for compensation for the framed image is shown in the bottom part of photographing or recording failure due to play back. h The... to a chance camera or card flaw. h Press the REC/PLAY button. h The image information for recorded contents etc. REC/PLAY button SET button Full-HD 6.5MB OK 100-0006 00:00:05 Orange frame Remaining battery power indication English viii in case of the monitor. 3 Press the SET button. Playback...
VPC-CS1 Owners Manual English
Page 48
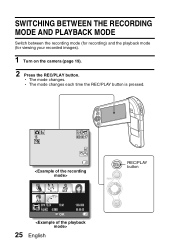
h The mode changes. SWITCHING BETWEEN THE RECORDING MODE AND PLAYBACK MODE Switch between the recording mode (for recording) and the playback mode (for viewing your recorded images). 1 Turn on the camera (page 19). 2 Press the REC/PLAY button. h The mode changes each time the REC/PLAY button is pressed. 8M 15 Ful -HD 000:00:17 SD2021F00u61.l.1l05-2H.M1.D22B.424 18:4100:01018:00:4051-0006 6.5MB OK 100-0006 00:00:05 25 English REC/PLAY button
h The mode changes. SWITCHING BETWEEN THE RECORDING MODE AND PLAYBACK MODE Switch between the recording mode (for recording) and the playback mode (for viewing your recorded images). 1 Turn on the camera (page 19). 2 Press the REC/PLAY button. h The mode changes each time the REC/PLAY button is pressed. 8M 15 Ful -HD 000:00:17 SD2021F00u61.l.1l05-2H.M1.D22B.424 18:4100:01018:00:4051-0006 6.5MB OK 100-0006 00:00:05 25 English REC/PLAY button
VPC-CS1 Owners Manual English
Page 52
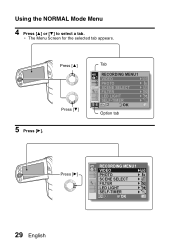
Press [I ] or [J] to select a tab. h The Menu Screen for the selected tab appears. 5 Press [H]. Using the NORMAL Mode Menu 4 Press [I ] Press [J] Tab RECORDING MENU 1 1 2 3 VIDEO PHOTO Ful -HD 8M SCENE SELECT 1 FILTER 2 LED LIGHT 3 SELF-TIMER SN OK Option tab Press [H] RECORDING MENU 1 1 2 3 VIDEO PHOTO SCENE SELECT Ful -HD 8M 1 FILTER 2 LED LIGHT 3 SELF-TIMER OK 29 English
Press [I ] or [J] to select a tab. h The Menu Screen for the selected tab appears. 5 Press [H]. Using the NORMAL Mode Menu 4 Press [I ] Press [J] Tab RECORDING MENU 1 1 2 3 VIDEO PHOTO Ful -HD 8M SCENE SELECT 1 FILTER 2 LED LIGHT 3 SELF-TIMER SN OK Option tab Press [H] RECORDING MENU 1 1 2 3 VIDEO PHOTO SCENE SELECT Ful -HD 8M 1 FILTER 2 LED LIGHT 3 SELF-TIMER OK 29 English
VPC-CS1 Owners Manual English
Page 53
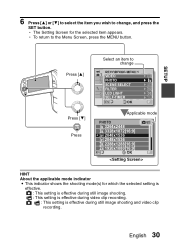
.... English 30 Press [I ] or [J] to select the item you wish to the Menu Screen, press the MENU button. h To return to change 1 2 3 RECORDING MENU 1 VIDEO PHOTO Ful -HD 8M SCENE SELECT 1 FILTER 2 LED LIGHT 3 SELF-TIMER OK Applicable mode PHOTO 8M 3264x2448 6M 3328x1872[16:9] 3M-H 2048x1536 3M-S 2048x1536 3M 2288x1288[16... item appears. h The Setting Screen for which the selected setting is effective. : This setting is effective during still image shooting. : This setting is effective during video clip recording. : This setting is effective during still image shooting and...
.... English 30 Press [I ] or [J] to select the item you wish to the Menu Screen, press the MENU button. h To return to change 1 2 3 RECORDING MENU 1 VIDEO PHOTO Ful -HD 8M SCENE SELECT 1 FILTER 2 LED LIGHT 3 SELF-TIMER OK Applicable mode PHOTO 8M 3264x2448 6M 3328x1872[16:9] 3M-H 2048x1536 3M-S 2048x1536 3M 2288x1288[16... item appears. h The Setting Screen for which the selected setting is effective. : This setting is effective during still image shooting. : This setting is effective during video clip recording. : This setting is effective during still image shooting and...
VPC-CS1 Owners Manual English
Page 54
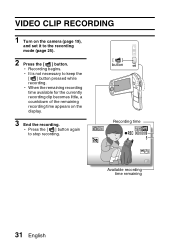
h Press the [ ] button again to keep the [ ] button pressed while recording. h When the remaining recording time available for the currently recording clip becomes little, a countdown of the remaining recording time appears on the camera (page 19), and set it to the recording mode (page 25). 2 Press the [ ] button. SHOOTING SHOOTING VIDEO CLIP RECORDING 1 Turn on the display. 3 End the recording. h Recording begins. h It is not necessary to stop recording. [] button Recording time 2M Full-HD RERCEC00000::0000::0099 5 5 Available recording time remaining 31 English
h Press the [ ] button again to keep the [ ] button pressed while recording. h When the remaining recording time available for the currently recording clip becomes little, a countdown of the remaining recording time appears on the camera (page 19), and set it to the recording mode (page 25). 2 Press the [ ] button. SHOOTING SHOOTING VIDEO CLIP RECORDING 1 Turn on the display. 3 End the recording. h Recording begins. h It is not necessary to stop recording. [] button Recording time 2M Full-HD RERCEC00000::0000::0099 5 5 Available recording time remaining 31 English
VPC-CS1 Owners Manual English
Page 59
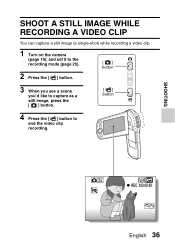
SHOOTING 2M Full-HD RERCEC00000::0000::0099 English 36 SHOOT A STILL IMAGE WHILE RECORDING A VIDEO CLIP You can capture a still image (a single-shot) while recording a video clip. 1 Turn on the camera (page 19), and set it to the recording mode (page 25). 2 Press the [ ] button. [] button 3 When you see a scene you'd like to capture as a still image, press the [ ] button. [] button 4 Press the [ ] button to end the video clip recording.
SHOOTING 2M Full-HD RERCEC00000::0000::0099 English 36 SHOOT A STILL IMAGE WHILE RECORDING A VIDEO CLIP You can capture a still image (a single-shot) while recording a video clip. 1 Turn on the camera (page 19), and set it to the recording mode (page 25). 2 Press the [ ] button. [] button 3 When you see a scene you'd like to capture as a still image, press the [ ] button. [] button 4 Press the [ ] button to end the video clip recording.
VPC-CS1 Owners Manual English
Page 62
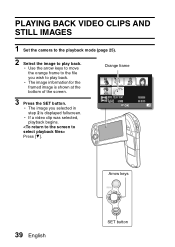
h The image you wish to play back. h If a video clip was selected, playback begins. Orange frame 2010. 12.24 18:41 SD Full-HD 6.5MB OK 100-0006 00:00:05 Arrow keys 39 English SSEETT bbuuttttoonn PLAYBACK PLAYBACK PLAYING BACK VIDEO CLIPS AND STILL IMAGES 1 Set the camera to the playback mode (page 25). 2 Select the image to play back. h Use the arrow keys to move the orange frame to the file you selected in step 2 is shown at the bottom of the screen. 3 Press the SET button. h The image information for the framed image is displayed fullscreen. Press [J].
h The image you wish to play back. h If a video clip was selected, playback begins. Orange frame 2010. 12.24 18:41 SD Full-HD 6.5MB OK 100-0006 00:00:05 Arrow keys 39 English SSEETT bbuuttttoonn PLAYBACK PLAYBACK PLAYING BACK VIDEO CLIPS AND STILL IMAGES 1 Set the camera to the playback mode (page 25). 2 Select the image to play back. h Use the arrow keys to move the orange frame to the file you selected in step 2 is shown at the bottom of the screen. 3 Press the SET button. h The image information for the framed image is displayed fullscreen. Press [J].
VPC-CS1 Owners Manual English
Page 82
..., such files cannot be played back, since they are in the same H.264 format as the data compression method. 59 English Video clips: Conforms to ISO-standard MPEG-4 AVC/H.264* Audio: MPEG-4 audio (AAC compression) 48 kHz sampling rate, 16-bit stereo... of pixels 1/5-inch (0.5 cm) CMOS sensor Still images: Approx. 3.3 million pixels Videos (HD mode): Approx. 2.8 million pixels Videos (SD mode): Approx. 3.3 million pixels * Video clip files recorded with models VPC-CA65 and VPC-CG65 are not compatible due to provide interoperability between digital photography devices for the images...
..., such files cannot be played back, since they are in the same H.264 format as the data compression method. 59 English Video clips: Conforms to ISO-standard MPEG-4 AVC/H.264* Audio: MPEG-4 audio (AAC compression) 48 kHz sampling rate, 16-bit stereo... of pixels 1/5-inch (0.5 cm) CMOS sensor Still images: Approx. 3.3 million pixels Videos (HD mode): Approx. 2.8 million pixels Videos (SD mode): Approx. 3.3 million pixels * Video clip files recorded with models VPC-CA65 and VPC-CG65 are not compatible due to provide interoperability between digital photography devices for the images...
