
VPC-CS1 Owners Manual English
Page 6
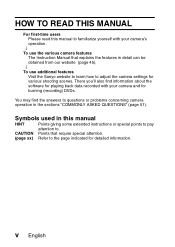
...-time users Please read this manual HINT Points giving some extended instructions or special points to pay attention to. v English You may find information about the software for playing back data recorded with your camera and for burning (recording) DVDs. CAUTION Points that explains the features in detail can be obtained from our website (page 45). ↓ To use additional features Visit the Sanyo...
...-time users Please read this manual HINT Points giving some extended instructions or special points to pay attention to. v English You may find information about the software for playing back data recorded with your camera and for burning (recording) DVDs. CAUTION Points that explains the features in detail can be obtained from our website (page 45). ↓ To use additional features Visit the Sanyo...
VPC-CS1 Owners Manual English
Page 8
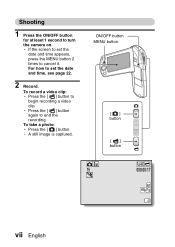
h If the screen to set the date and time, see page 22. 2 Record. To record a video clip: h Press the [ ] button to cancel it. h A still image is captured. ON/OFF button MENU button [] button [] button 8M 15 Ful -HD 000:00:17 vii English Shooting 1 Press the ON/OFF button for at least 1 second to end the recording. h Press the [ ] button again to turn the camera on. For how to set the date and time appears, press the MENU button 2 times to begin recording a video clip. To take a photo: h Press the [ ] button.
h If the screen to set the date and time, see page 22. 2 Record. To record a video clip: h Press the [ ] button to cancel it. h A still image is captured. ON/OFF button MENU button [] button [] button 8M 15 Ful -HD 000:00:17 vii English Shooting 1 Press the ON/OFF button for at least 1 second to end the recording. h Press the [ ] button again to turn the camera on. For how to set the date and time appears, press the MENU button 2 times to begin recording a video clip. To take a photo: h Press the [ ] button.
VPC-CS1 Owners Manual English
Page 9
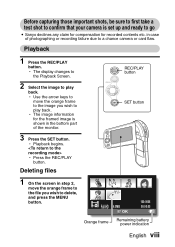
... image to delete, and press the MENU button. Deleting files 1 On the screen in step 2, move the orange frame to the image you wish to play back. h Playback begins. in the bottom part of photographing or recording failure due to go i Sanyo declines any claim for compensation for recorded contents etc. h The image information for the framed image is set up and ready to a chance camera or card flaw. REC/PLAY button SET button Full-HD...
... image to delete, and press the MENU button. Deleting files 1 On the screen in step 2, move the orange frame to the image you wish to play back. h Playback begins. in the bottom part of photographing or recording failure due to go i Sanyo declines any claim for compensation for recorded contents etc. h The image information for the framed image is set up and ready to a chance camera or card flaw. REC/PLAY button SET button Full-HD...
VPC-CS1 Owners Manual English
Page 13
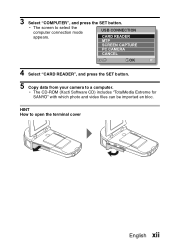
h The CD-ROM (Xacti Software CD) includes "TotalMedia Extreme for SANYO" with which photo and video files can be imported en bloc. HINT How to a computer. 3 Select "COMPUTER", and press the SET button. CARD READER MTP SCREEN CAPTURE PC CAMERA CANCEL OK 4 Select "CARD READER", and press the SET button. 5 Copy data from your camera to open the terminal cover ˛ English xii h The screen to select the computer connection mode USB CONNECTION appears.
h The CD-ROM (Xacti Software CD) includes "TotalMedia Extreme for SANYO" with which photo and video files can be imported en bloc. HINT How to a computer. 3 Select "COMPUTER", and press the SET button. CARD READER MTP SCREEN CAPTURE PC CAMERA CANCEL OK 4 Select "CARD READER", and press the SET button. 5 Copy data from your camera to open the terminal cover ˛ English xii h The screen to select the computer connection mode USB CONNECTION appears.
VPC-CS1 Owners Manual English
Page 14
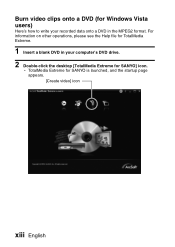
h TotalMedia Extreme for SANYO is launched, and the startup page appears. [Create video] icon xiii English For information on other operations, please see the Help file for TotalMedia Extreme. 1 Insert a blank DVD in the MPEG2 format. Burn video clips onto a DVD (for Windows Vista users) Here's how to write your recorded data onto a DVD in your computer's DVD drive. 2 Double-click the desktop [TotalMedia Extreme for SANYO] icon.
h TotalMedia Extreme for SANYO is launched, and the startup page appears. [Create video] icon xiii English For information on other operations, please see the Help file for TotalMedia Extreme. 1 Insert a blank DVD in the MPEG2 format. Burn video clips onto a DVD (for Windows Vista users) Here's how to write your recorded data onto a DVD in your computer's DVD drive. 2 Double-click the desktop [TotalMedia Extreme for SANYO] icon.
VPC-CS1 Owners Manual English
Page 24
... 19 Turning on the camera 19 Turning off the camera 19 Turning on the camera when the power save (sleep) mode is active 20 DATE AND TIME SETTING 22 SWITCHING BETWEEN THE RECORDING MODE AND PLAYBACK MODE 25 SWITCHING THE OPERATING MODE 26 Switching between the SIMPLE and NORMAL modes 26 Accessing/exiting the SIMPLE/NORMAL Mode Menu Screen ..... 27 „ SHOOTING VIDEO CLIP RECORDING 31 SHOOTING SINGLE SHOTS 32 Using the LED light 34 SHOOT A STILL IMAGE WHILE RECORDING A VIDEO CLIP .......... 36 MACRO-PHOTOGRAPHY (ZOOM 38 1 English
... 19 Turning on the camera 19 Turning off the camera 19 Turning on the camera when the power save (sleep) mode is active 20 DATE AND TIME SETTING 22 SWITCHING BETWEEN THE RECORDING MODE AND PLAYBACK MODE 25 SWITCHING THE OPERATING MODE 26 Switching between the SIMPLE and NORMAL modes 26 Accessing/exiting the SIMPLE/NORMAL Mode Menu Screen ..... 27 „ SHOOTING VIDEO CLIP RECORDING 31 SHOOTING SINGLE SHOTS 32 Using the LED light 34 SHOOT A STILL IMAGE WHILE RECORDING A VIDEO CLIP .......... 36 MACRO-PHOTOGRAPHY (ZOOM 38 1 English
VPC-CS1 Owners Manual English
Page 25
...; PLAYBACK PLAYING BACK VIDEO CLIPS AND STILL IMAGES 39 How to save one frame from a video clip as a still image 41 „ CONNECTING TO A TV CONNECTING TO A TV 42 Connecting to a video input terminal 43 Connecting to the HDMI terminal 43 PLAYING BACK ON A TV 44 „ OBTAINING THE INSTRUCTION MANUAL OBTAINING THE INSTRUCTION MANUAL 45 Contents of Images/Possible Shooting Time/ Possible Recording Time 64 Concerning the multi-indicator 65 Supplied battery pack charger...
...; PLAYBACK PLAYING BACK VIDEO CLIPS AND STILL IMAGES 39 How to save one frame from a video clip as a still image 41 „ CONNECTING TO A TV CONNECTING TO A TV 42 Connecting to a video input terminal 43 Connecting to the HDMI terminal 43 PLAYING BACK ON A TV 44 „ OBTAINING THE INSTRUCTION MANUAL OBTAINING THE INSTRUCTION MANUAL 45 Contents of Images/Possible Shooting Time/ Possible Recording Time 64 Concerning the multi-indicator 65 Supplied battery pack charger...
VPC-CS1 Owners Manual English
Page 37
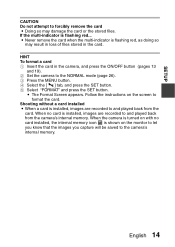
... the MENU button. 4 Select the [E] tab, and press the SET button. 5 Select "FORMAT" and press the SET button. Follow the instructions on the monitor to let you know that the images you capture will be saved to the camera's internal memory. i The Format Screen appears. When the camera is turned on with no card is installed, images are recorded to format the card. HINT To format a card 1 Insert the card in the card. When no card installed, the internal memory icon is flashing red...
... the MENU button. 4 Select the [E] tab, and press the SET button. 5 Select "FORMAT" and press the SET button. Follow the instructions on the monitor to let you know that the images you capture will be saved to the camera's internal memory. i The Format Screen appears. When the camera is turned on with no card is installed, images are recorded to format the card. HINT To format a card 1 Insert the card in the card. When no card installed, the internal memory icon is flashing red...
VPC-CS1 Owners Manual English
Page 45
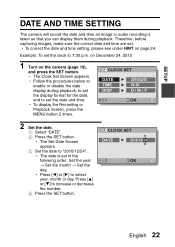
... camera will record the date and time an image or audio recording is set the clock to 7:30 p.m. Example: To set in the following order: Set the year → Set the month → Set the day. h To display the Recording or Playback Screen, press the MENU button 2 times. h The Set Date Screen appears. 3 Set the date to increase or decrease the number. 4 Press the SET button. h The date is taken so that you can display them during playback, to set the display format...
... camera will record the date and time an image or audio recording is set the clock to 7:30 p.m. Example: To set in the following order: Set the year → Set the month → Set the day. h To display the Recording or Playback Screen, press the MENU button 2 times. h The Set Date Screen appears. 3 Set the date to increase or decrease the number. 4 Press the SET button. h The date is taken so that you can display them during playback, to set the display format...
VPC-CS1 Owners Manual English
Page 54
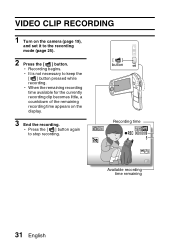
h Press the [ ] button again to the recording mode (page 25). 2 Press the [ ] button. SHOOTING SHOOTING VIDEO CLIP RECORDING 1 Turn on the display. 3 End the recording. h It is not necessary to keep the [ ] button pressed while recording. h Recording begins. h When the remaining recording time available for the currently recording clip becomes little, a countdown of the remaining recording time appears on the camera (page 19), and set it to stop recording. [] button Recording time 2M Full-HD RERCEC00000::0000::0099 5 5 Available recording time remaining 31 English
h Press the [ ] button again to the recording mode (page 25). 2 Press the [ ] button. SHOOTING SHOOTING VIDEO CLIP RECORDING 1 Turn on the display. 3 End the recording. h It is not necessary to keep the [ ] button pressed while recording. h Recording begins. h When the remaining recording time available for the currently recording clip becomes little, a countdown of the remaining recording time appears on the camera (page 19), and set it to stop recording. [] button Recording time 2M Full-HD RERCEC00000::0000::0099 5 5 Available recording time remaining 31 English
VPC-CS1 Owners Manual English
Page 56
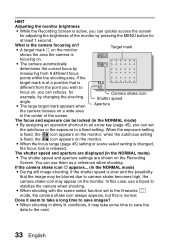
... NORMAL mode) i The shutter speed and aperture settings are displayed (in dimly lit conditions, it seem to take some time to save images? i When shooting with the scene select function set the autofocus or the exposure to stabilize the camera when shooting. If the target mark is at least 1 second. i When the focus range (page 45) setting or scene select setting is changed, the focus lock is the camera focusing...
... NORMAL mode) i The shutter speed and aperture settings are displayed (in dimly lit conditions, it seem to take some time to save images? i When shooting with the scene select function set the autofocus or the exposure to stabilize the camera when shooting. If the target mark is at least 1 second. i When the focus range (page 45) setting or scene select setting is changed, the focus lock is the camera focusing...
VPC-CS1 Owners Manual English
Page 60
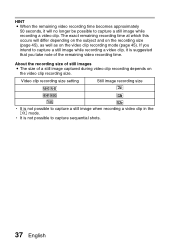
... the video clip recording size. Video clip recording size setting Still image recording size !Y + "& , ) [ h It is not possible to capture a still image when recording a video clip in the x mode. h It is not possible to capture sequential shots. 37 English The exact remaining recording time at which this occurs will no longer be possible to capture a still image while recording a video clip. If you take note of a still image captured during video clip recording depends on the video clip recording mode...
... the video clip recording size. Video clip recording size setting Still image recording size !Y + "& , ) [ h It is not possible to capture a still image when recording a video clip in the x mode. h It is not possible to capture sequential shots. 37 English The exact remaining recording time at which this occurs will no longer be possible to capture a still image while recording a video clip. If you take note of a still image captured during video clip recording depends on the video clip recording mode...
VPC-CS1 Owners Manual English
Page 64
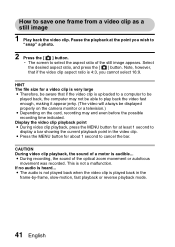
... 16:9. How to display a bar showing the current playback point in the frame-by-frame, slow-motion, fast playback or reverse playback mode. 41 English CAUTION During video clip playback, the sound of a motor is not a malfunction. This is audible... Pause the playback at least 1 second to save one frame from a video clip as a still image 1 Play back the video clip. i Press the MENU button for a video clip is very large...
... 16:9. How to display a bar showing the current playback point in the frame-by-frame, slow-motion, fast playback or reverse playback mode. 41 English CAUTION During video clip playback, the sound of a motor is not a malfunction. This is audible... Pause the playback at least 1 second to save one frame from a video clip as a still image 1 Play back the video clip. i Press the MENU button for a video clip is very large...
VPC-CS1 Owners Manual English
Page 68
... camera Turning off the camera Turning on our website. Please be used with "Full High Definition*" Includes SIMPLE mode for quick-and-easy operation Image stabilizer for the functions indicated below can be found on the camera when the power save (sleep) mode is required to use the Instruction Manual. i "Adobe Reader" is active DATE AND TIME SETTING 45 English HOW TO READ THIS MANUAL QUICK SEARCH BY OPERATION CHECKING THE INCLUDED ACCESSORIES How to view the Instruction Manual...
... camera Turning off the camera Turning on our website. Please be used with "Full High Definition*" Includes SIMPLE mode for quick-and-easy operation Image stabilizer for the functions indicated below can be found on the camera when the power save (sleep) mode is required to use the Instruction Manual. i "Adobe Reader" is active DATE AND TIME SETTING 45 English HOW TO READ THIS MANUAL QUICK SEARCH BY OPERATION CHECKING THE INCLUDED ACCESSORIES How to view the Instruction Manual...
VPC-CS1 Owners Manual English
Page 69
...Using the LED light SHOOT A STILL IMAGE WHILE RECORDING A VIDEO CLIP MACRO-PHOTOGRAPHY (ZOOM) OBTAINING THE INSTRUCTION MANUAL PLAYBACK PLAYING BACK VIDEO CLIPS AND STILL IMAGES How to save one frame from a video clip as a still image SLIDESHOW PLAYBACK PLAYBACK VOLUME DELETING FILES Delete single/delete all/delete folder Delete selected PLAYBACK MODES 21-image display playback Selecting the playback folder Magnifying (zooming in) the image „ NORMAL SHOOTING RECORDING MENU 1 Video setting Still image setting Scene select setting Filter setting Self-timer setting RECORDING MENU 2 Motion...
...Using the LED light SHOOT A STILL IMAGE WHILE RECORDING A VIDEO CLIP MACRO-PHOTOGRAPHY (ZOOM) OBTAINING THE INSTRUCTION MANUAL PLAYBACK PLAYING BACK VIDEO CLIPS AND STILL IMAGES How to save one frame from a video clip as a still image SLIDESHOW PLAYBACK PLAYBACK VOLUME DELETING FILES Delete single/delete all/delete folder Delete selected PLAYBACK MODES 21-image display playback Selecting the playback folder Magnifying (zooming in) the image „ NORMAL SHOOTING RECORDING MENU 1 Video setting Still image setting Scene select setting Filter setting Self-timer setting RECORDING MENU 2 Motion...
VPC-CS1 Owners Manual English
Page 70
... (initializing) CHECKING THE REMAINING CARD MEMORY Checking the remaining number of images and video recording time For audio recordings CHECKING THE REMAINING BATTERY PACK CHARGE „ OTHER DEVICES AND CONNECTIONS CONNECTING TO A TV CONNECTING TO A TV Connecting to a video input terminal Connecting to the HDMI terminal PLAYING BACK ON A TV CONNECTING TO A PRINTER PRINTING 47 English Focus mode setting Light-measuring mode setting ISO sensitivity setting RECORDING MENU 3 White balance setting Exposure setting Subject chaser settings High sensitivity mode setting Digital zoom setting Exposure...
... (initializing) CHECKING THE REMAINING CARD MEMORY Checking the remaining number of images and video recording time For audio recordings CHECKING THE REMAINING BATTERY PACK CHARGE „ OTHER DEVICES AND CONNECTIONS CONNECTING TO A TV CONNECTING TO A TV Connecting to a video input terminal Connecting to the HDMI terminal PLAYING BACK ON A TV CONNECTING TO A PRINTER PRINTING 47 English Focus mode setting Light-measuring mode setting ISO sensitivity setting RECORDING MENU 3 White balance setting Exposure setting Subject chaser settings High sensitivity mode setting Digital zoom setting Exposure...
VPC-CS1 Owners Manual English
Page 72
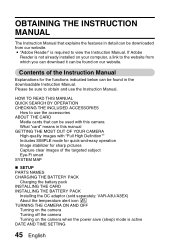
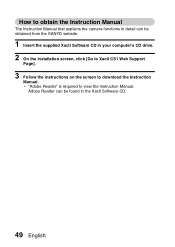
How to obtain the Instruction Manual The Instruction Manual that explains the camera functions in detail can be obtained from the SANYO website. 1 Insert the supplied Xacti Software CD in the Xacti Software CD. 49 English Adobe Reader can be found in your computer's CD drive. 2 On the installation screen, click [Go to Xacti CS1 Web Support Page]. 3 Follow the instructions on the screen to view the Instruction Manual. h "Adobe Reader" is required to download the Instruction Manual.
How to obtain the Instruction Manual The Instruction Manual that explains the camera functions in detail can be obtained from the SANYO website. 1 Insert the supplied Xacti Software CD in the Xacti Software CD. 49 English Adobe Reader can be found in your computer's CD drive. 2 On the installation screen, click [Go to Xacti CS1 Web Support Page]. 3 Follow the instructions on the screen to view the Instruction Manual. h "Adobe Reader" is required to download the Instruction Manual.
VPC-CS1 Owners Manual English
Page 73
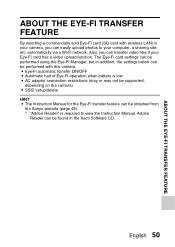
... i Automatic halt of Eye-Fi operation when battery is low i AC adaptor connection restrictions (may or may not be supported, depending on the camera) i SSID setup/delete HINT i The Instruction Manual for the Eye-Fi transfer feature can be found in your Eye-Fi card has a video upload function. Also, you can transfer video files if your camera, you can easily upload photos to view the Instruction Manual. English 50 automatically via a Wi-Fi...
... i Automatic halt of Eye-Fi operation when battery is low i AC adaptor connection restrictions (may or may not be supported, depending on the camera) i SSID setup/delete HINT i The Instruction Manual for the Eye-Fi transfer feature can be found in your Eye-Fi card has a video upload function. Also, you can transfer video files if your camera, you can easily upload photos to view the Instruction Manual. English 50 automatically via a Wi-Fi...
VPC-CS1 Owners Manual English
Page 80
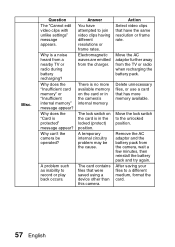
... minutes, then reinstall the battery pack and try again. There is in the camera's internal memory. Move the AC adaptor further away from the charger. Misc. Question The "Cannot edit video clips with unlike settings" message appears. A temporary internal circuitry problem may be operated? The card contains files that were saved using a device other than this camera. Move the lock switch to join video clips having different resolutions or...
... minutes, then reinstall the battery pack and try again. There is in the camera's internal memory. Move the AC adaptor further away from the charger. Misc. Question The "Cannot edit video clips with unlike settings" message appears. A temporary internal circuitry problem may be operated? The card contains files that were saved using a device other than this camera. Move the lock switch to join video clips having different resolutions or...
VPC-CS1 Owners Manual English
Page 82
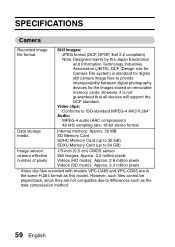
... compatible due to 64 GB) Image sensor/ camera effective number of pixels 1/5-inch (0.5 cm) CMOS sensor Still images: Approx. 3.3 million pixels Videos (HD mode): Approx. 2.8 million pixels Videos (SD mode): Approx. 3.3 million pixels * Video clip files recorded with models VPC-CA65 and VPC-CG65 are in the same H.264 format as the data compression method. 59 English However, it is standard for digital still camera image files to provide interoperability between digital photography devices for Camera File...
... compatible due to 64 GB) Image sensor/ camera effective number of pixels 1/5-inch (0.5 cm) CMOS sensor Still images: Approx. 3.3 million pixels Videos (HD mode): Approx. 2.8 million pixels Videos (SD mode): Approx. 3.3 million pixels * Video clip files recorded with models VPC-CA65 and VPC-CG65 are in the same H.264 format as the data compression method. 59 English However, it is standard for digital still camera image files to provide interoperability between digital photography devices for Camera File...


