

VPC-CG102 Owners Manual English
Page 4
For how to begin recording a video clip. To take a photo: h Press the [ ] button. ON/OFF button [ ] button [ ] button 14M-S 10 MENU button Ful -HD 000:00:14 iii English To record a video clip: h Press the [ ] button to set the date and time appears, press the MENU button 2 times to cancel it. h Press the [ ] button again to turn the camera on. h A still image is captured. Shooting 1 Press the ON/OFF button for at least 1 second to end the recording. h If the screen to set the date and time, see page 20. 2 Record.
For how to begin recording a video clip. To take a photo: h Press the [ ] button. ON/OFF button [ ] button [ ] button 14M-S 10 MENU button Ful -HD 000:00:14 iii English To record a video clip: h Press the [ ] button to set the date and time appears, press the MENU button 2 times to cancel it. h Press the [ ] button again to turn the camera on. h A still image is captured. Shooting 1 Press the ON/OFF button for at least 1 second to end the recording. h If the screen to set the date and time, see page 20. 2 Record.
VPC-CG102 Owners Manual English
Page 17
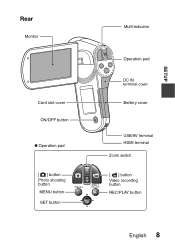
Rear Monitor Card slot cover ON/OFF button „ Operation pad [ ] button Photo shooting button MENU button SET button Multi-indicator Operation pad DC IN terminal cover Battery cover USB/AV terminal HDMI terminal Zoom switch [ ] button Video recording button REC/PLAY button English 8 SETUP
Rear Monitor Card slot cover ON/OFF button „ Operation pad [ ] button Photo shooting button MENU button SET button Multi-indicator Operation pad DC IN terminal cover Battery cover USB/AV terminal HDMI terminal Zoom switch [ ] button Video recording button REC/PLAY button English 8 SETUP
VPC-CG102 Owners Manual English
Page 35
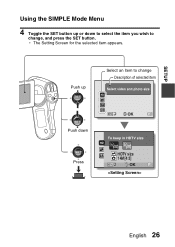
SETUP Using the SIMPLE Mode Menu 4 Toggle the SET button up Select an item to change Description of selected item Select video and photo size SN SET OK Push down Press To keep in HDTV size 14M 2M HDTV size 14M [4:3] SESTET OK English 26 h The Setting Screen for the selected item appears. Push up or down to select the item you wish to change , and press the SET button.
SETUP Using the SIMPLE Mode Menu 4 Toggle the SET button up Select an item to change Description of selected item Select video and photo size SN SET OK Push down Press To keep in HDTV size 14M 2M HDTV size 14M [4:3] SESTET OK English 26 h The Setting Screen for the selected item appears. Push up or down to select the item you wish to change , and press the SET button.
VPC-CG102 Owners Manual English
Page 36
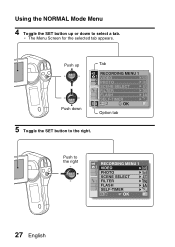
Using the NORMAL Mode Menu 4 Toggle the SET button up Push down to select a tab. h The Menu Screen for the selected tab appears. Push up or down Tab RECORDING MENU 1 1 2 3 VIDEO PHOTO Ful -HD 14M-S SCENE SELECT 1 FILTER 2 FLASH 3 SELF-TIMER SN SET OK Option tab 5 Toggle the SET button to the right RECORDING MENU 1 1 2 3 VIDEO PHOTO SCENE SELECT Ful -HD 14M-S 1 FILTER 2 FLASH 3 SELF-TIMER SET OK 27 English Push to the right.
Using the NORMAL Mode Menu 4 Toggle the SET button up Push down to select a tab. h The Menu Screen for the selected tab appears. Push up or down Tab RECORDING MENU 1 1 2 3 VIDEO PHOTO Ful -HD 14M-S SCENE SELECT 1 FILTER 2 FLASH 3 SELF-TIMER SN SET OK Option tab 5 Toggle the SET button to the right RECORDING MENU 1 1 2 3 VIDEO PHOTO SCENE SELECT Ful -HD 14M-S 1 FILTER 2 FLASH 3 SELF-TIMER SET OK 27 English Push to the right.
VPC-CG102 Owners Manual English
Page 37
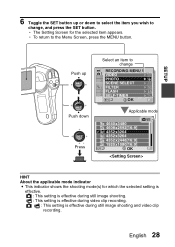
... English 28 SETUP 6 Toggle the SET button up Push down to select the item you wish to change RECORDING MENU 1 1 2 3 VIDEO PHOTO SCENE SELECT Ful -HD 14M-S 1 FILTER 2 FLASH 3 SELF-TIMER SET OK Applicable mode 16M 4640x3480 12M 4608x2592[16:9] 14M-H 4352x3264 14M-S 4352x3264 10M 4352x2448[16... is effective. : This setting is effective during still image shooting. : This setting is effective during video clip recording. : This setting is effective during still image shooting and video clip recording. Push up or down Press Select an item to the Menu Screen, press the MENU ...
... English 28 SETUP 6 Toggle the SET button up Push down to select the item you wish to change RECORDING MENU 1 1 2 3 VIDEO PHOTO SCENE SELECT Ful -HD 14M-S 1 FILTER 2 FLASH 3 SELF-TIMER SET OK Applicable mode 16M 4640x3480 12M 4608x2592[16:9] 14M-H 4352x3264 14M-S 4352x3264 10M 4352x2448[16... is effective. : This setting is effective during still image shooting. : This setting is effective during video clip recording. : This setting is effective during still image shooting and video clip recording. Push up or down Press Select an item to the Menu Screen, press the MENU ...
VPC-CG102 Owners Manual English
Page 47
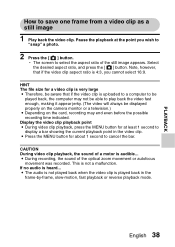
...the desired aspect ratio, and press the [ ] button. i During recording, the sound of the still image appears. h The screen to "snap" a photo. 2 Press the [ ] button. This is 4:3, you wish to select the aspect ratio of the optical zoom movement or autofocus movement was recorded. i ... bar showing the current playback point in the frame-by-frame, slow-motion, fast playback or reverse playback mode. HINT The file size for a video clip is very large i Therefore, be displayed properly on the camera monitor or a television.) i Depending on the card, recording may end even before...
...the desired aspect ratio, and press the [ ] button. i During recording, the sound of the still image appears. h The screen to "snap" a photo. 2 Press the [ ] button. This is 4:3, you wish to select the aspect ratio of the optical zoom movement or autofocus movement was recorded. i ... bar showing the current playback point in the frame-by-frame, slow-motion, fast playback or reverse playback mode. HINT The file size for a video clip is very large i Therefore, be displayed properly on the camera monitor or a television.) i Depending on the card, recording may end even before...
VPC-CG102 Owners Manual English
Page 57
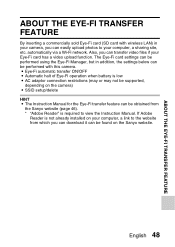
...Automatic halt of Eye-Fi operation when battery is required to your Eye-Fi card has a video upload function. If Adobe Reader is not already installed on your computer, a link to the website from the Sanyo website (page 46). * "Adobe Reader" is low i AC adaptor connection restrictions (may ... Instruction Manual for the Eye-Fi transfer feature can be performed with wireless LAN) in your camera, you can easily upload photos to view the Instruction Manual. English 48 Also, you can transfer video files if your computer, a sharing site, etc. automatically via a Wi-Fi network.
...Automatic halt of Eye-Fi operation when battery is required to your Eye-Fi card has a video upload function. If Adobe Reader is not already installed on your computer, a link to the website from the Sanyo website (page 46). * "Adobe Reader" is low i AC adaptor connection restrictions (may ... Instruction Manual for the Eye-Fi transfer feature can be performed with wireless LAN) in your camera, you can easily upload photos to view the Instruction Manual. English 48 Also, you can transfer video files if your computer, a sharing site, etc. automatically via a Wi-Fi network.
VPC-CG102 Owners Manual English
Page 59
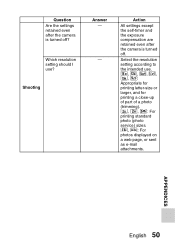
... off . Which resolution setting should I use . 4, 5, 6, 7, 8, :: Appropriate for printing letter-size or larger, and for printing a close-up of part of a photo (trimming). +, G, t: For printing standard photo (photo service) sizes. ,, [: For photos displayed on a web page, or sent as e-mail attachments. Shooting Answer - - Action All settings except the self-timer and the exposure compensation...
... off . Which resolution setting should I use . 4, 5, 6, 7, 8, :: Appropriate for printing letter-size or larger, and for printing a close-up of part of a photo (trimming). +, G, t: For printing standard photo (photo service) sizes. ,, [: For photos displayed on a web page, or sent as e-mail attachments. Shooting Answer - - Action All settings except the self-timer and the exposure compensation...


