
Owners Manual
Page 11
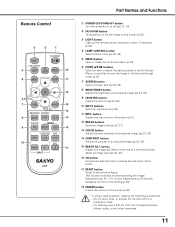
...Menu, or use a soft dry cloth. S-VIDEO PC !1 INPUT CXVT Part Names and Functions q POWER ON/STAND-BY button Turn the projector on or off the image on the screen (p.22). button Display the Image adj. Menu items one at a time and directly adjust ... to the previous figure. Do not apply benzene, thinner, splay, or any other chemicals. 11 Remote Control e w q ON/STAND-BY LIGHT LAMP CONTROL r LAMP NO SHOW FREEZE !8 t MENU RESET !7 OK !6 y u SCREEN IMAGE !5 IMAGE ADJ. !4 BRIGHTNESS CONTRAST i BRIGHT CONT. e LIGHT button Light up the remote control buttons for...
...Menu, or use a soft dry cloth. S-VIDEO PC !1 INPUT CXVT Part Names and Functions q POWER ON/STAND-BY button Turn the projector on or off the image on the screen (p.22). button Display the Image adj. Menu items one at a time and directly adjust ... to the previous figure. Do not apply benzene, thinner, splay, or any other chemicals. 11 Remote Control e w q ON/STAND-BY LIGHT LAMP CONTROL r LAMP NO SHOW FREEZE !8 t MENU RESET !7 OK !6 y u SCREEN IMAGE !5 IMAGE ADJ. !4 BRIGHTNESS CONTRAST i BRIGHT CONT. e LIGHT button Light up the remote control buttons for...
Owners Manual
Page 20
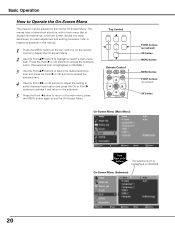
... access the submenu items. (The selected item is highlighted in ORANGE. Top Control Remote Control LAMP NO SHOW FREEZE MENU RESET OK SCREEN IMAGE IMAGE ADJ. press the MENU button again to Operate the On-Screen Menu The projector can be adjusted or set via the On-Screen Menu. POINT buttons (arrowhead) OK...
... access the submenu items. (The selected item is highlighted in ORANGE. Top Control Remote Control LAMP NO SHOW FREEZE MENU RESET OK SCREEN IMAGE IMAGE ADJ. press the MENU button again to Operate the On-Screen Menu The projector can be adjusted or set via the On-Screen Menu. POINT buttons (arrowhead) OK...
Owners Manual
Page 21
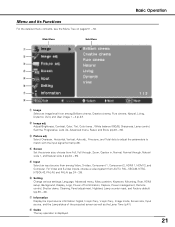
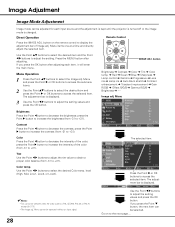
...Menu position, Keystone, Mounting, Rear, HDMI setup, Background, Display, Logo, Power off confirmation, Capture, Power management, Remote control, Shutter demo, Cleaning, Panel adjustment, Highland, Lamp counter reset, and Factory default (pp.36 - 40). Main Menu Sub-Menu q w e r t y u i q Image Select an image level from among Brilliant cinema, Creative ... parameters to match with the input signal format (p.33). Adjust Brightness, Contrast, Color, Tint, Color temp., White balance (R/G/B), Sharpness, Lamp control, Gamma, Progressive, Lens iris, Advanced menu, Reset, and Store (pp.28 - 32).
...Menu position, Keystone, Mounting, Rear, HDMI setup, Background, Display, Logo, Power off confirmation, Capture, Power management, Remote control, Shutter demo, Cleaning, Panel adjustment, Highland, Lamp counter reset, and Factory default (pp.36 - 40). Main Menu Sub-Menu q w e r t y u i q Image Select an image level from among Brilliant cinema, Creative ... parameters to match with the input signal format (p.33). Adjust Brightness, Contrast, Color, Tint, Color temp., White balance (R/G/B), Sharpness, Lamp control, Gamma, Progressive, Lens iris, Advanced menu, Reset, and Store (pp.28 - 32).
Owners Manual
Page 22
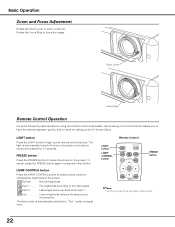
... FREEZE button to "Eco" under no buttons on the screen. Normal brightness. Eco Lower brightness reduces the lamp power consumption. Remote Control LIGHT button LAMP CONTROL button ON/STAND-BY LIGHT LAMP CONTROL LAMP NO SHOW FREEZE MENU RESET FREEZE button OK SCREEN IMAGE IMAGE ADJ. ✔Note: • See the next page for 10...
... FREEZE button to "Eco" under no buttons on the screen. Normal brightness. Eco Lower brightness reduces the lamp power consumption. Remote Control LIGHT button LAMP CONTROL button ON/STAND-BY LIGHT LAMP CONTROL LAMP NO SHOW FREEZE MENU RESET FREEZE button OK SCREEN IMAGE IMAGE ADJ. ✔Note: • See the next page for 10...
Owners Manual
Page 23
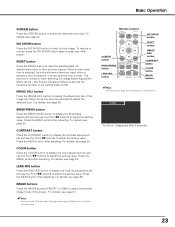
... Press the MENU button after adjusting. For details, see page 28. COLOR LENS IRIS IMAGE IRIS PRESET USER COMPONENT HDMI NO SHOW button RESET button IMAGE ADJ. Basic Operation SCREEN button Press the SCREEN button to black out the image. NO SHOW button Press the NO SHOW button...details, see page 29. IMAGE buttons Press the IMAGE buttons (PRESET or USER) to display the adjustment bar of the screen. Remote Control LAMP CONTROL LAMP NO SHOW FREEZE MENU RESET OK SCREEN button BRIGHTNESS button LENS IRIS button SCREEN IMAGE IMAGE ADJ. BRIGHTNESS CONTRAST BRIGHT CONT.
... Press the MENU button after adjusting. For details, see page 28. COLOR LENS IRIS IMAGE IRIS PRESET USER COMPONENT HDMI NO SHOW button RESET button IMAGE ADJ. Basic Operation SCREEN button Press the SCREEN button to black out the image. NO SHOW button Press the NO SHOW button...details, see page 29. IMAGE buttons Press the IMAGE buttons (PRESET or USER) to display the adjustment bar of the screen. Remote Control LAMP CONTROL LAMP NO SHOW FREEZE MENU RESET OK SCREEN button BRIGHTNESS button LENS IRIS button SCREEN IMAGE IMAGE ADJ. BRIGHTNESS CONTRAST BRIGHT CONT.
Owners Manual
Page 28
...button after adjusting each input source and the adjustment is kept until the projector is turned off or the image mode is changed. press the Point ...Low1, Low2, or Low3). Go on the remote control to access the selected item. MENU RESET OK SCREEN IMAGE IMAGE ADJ. button Brightness ➜ Contrast ➜ Color ➜ Tint.... ➜ Red ➜ Green ➜ Blue ➜ Sharpness ➜ Lamp control ➜ Gamma ➜ Progressive ➜ Lens iris ➜ Lamp iris ➜ Auto black stretch➜ Contrast enhancement ➜ Transient improvement ➜...
...button after adjusting each input source and the adjustment is kept until the projector is turned off or the image mode is changed. press the Point ...Low1, Low2, or Low3). Go on the remote control to access the selected item. MENU RESET OK SCREEN IMAGE IMAGE ADJ. button Brightness ➜ Contrast ➜ Color ➜ Tint.... ➜ Red ➜ Green ➜ Blue ➜ Sharpness ➜ Lamp control ➜ Gamma ➜ Progressive ➜ Lens iris ➜ Lamp iris ➜ Auto black stretch➜ Contrast enhancement ➜ Transient improvement ➜...
Owners Manual
Page 38
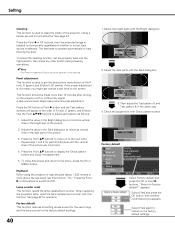
...Yes] to switch On/Off. Press the Point 8 or OK buttons to project the image as early as possible even when the lamp is automatically reset and the projector captures an image without capturing an image. Show the Image you want to switch between each option. The confirmation box appears and select...• When capturing the image that has been adjusted in this function when you captured. The factory default setting is turned on the projector. Show the factory-set to project images after the lamp becomes bright enough. Menu will be operated with "Power off?"
...Yes] to switch On/Off. Press the Point 8 or OK buttons to project the image as early as possible even when the lamp is automatically reset and the projector captures an image without capturing an image. Show the Image you want to switch between each option. The confirmation box appears and select...• When capturing the image that has been adjusted in this function when you captured. The factory default setting is turned on the projector. Show the factory-set to project images after the lamp becomes bright enough. Menu will be operated with "Power off?"
Owners Manual
Page 40
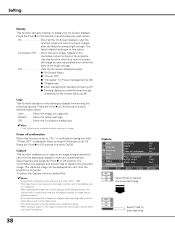
...lamp replacement counter. appears. Select [Yes] and press the OK button, then another confirmation box appears. Using a blower as follows: 1. This function should be operated during cleaning operations. ✔Note: • The Power management function cannot be made , you might get the best picture reproduction of the R (red), G (green), and B (blue) LCD... environment helps make more effective. When replacing the projection lamp, reset the lamp replacement counter with the Dark dialog box. 3. Highland When using the projector in the same way. 4. If the proper adjustment ...
...lamp replacement counter. appears. Select [Yes] and press the OK button, then another confirmation box appears. Using a blower as follows: 1. This function should be operated during cleaning operations. ✔Note: • The Power management function cannot be made , you might get the best picture reproduction of the R (red), G (green), and B (blue) LCD... environment helps make more effective. When replacing the projection lamp, reset the lamp replacement counter with the Dark dialog box. 3. Highland When using the projector in the same way. 4. If the proper adjustment ...
Owners Manual
Page 47
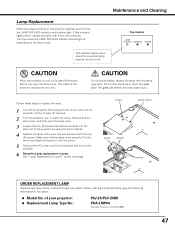
... the lamp. See "Lamp Replacement Counter" on the lamp mode. The glass can become very hot. Screw Lamp Cover Lamp Handle Screws ORDER REPLACEMENT LAMP Replacement lamp can be ordered through your projector: ● Replacement Lamp Type No.: PLV-Z5/PLV-Z5BK POA-LMP94 (Service Parts No. 610 323 5998) 47 CAUTION Allow the projector to the projector and turn on the projector. 6 Reset the Lamp replacement...
... the lamp. See "Lamp Replacement Counter" on the lamp mode. The glass can become very hot. Screw Lamp Cover Lamp Handle Screws ORDER REPLACEMENT LAMP Replacement lamp can be ordered through your projector: ● Replacement Lamp Type No.: PLV-Z5/PLV-Z5BK POA-LMP94 (Service Parts No. 610 323 5998) 47 CAUTION Allow the projector to the projector and turn on the projector. 6 Reset the Lamp replacement...
Owners Manual
Page 48
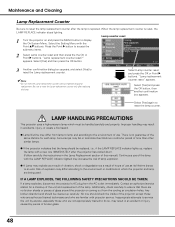
... the lamp. Maintenance and Cleaning Lamp Replacement Counter Be sure to reset the lamp replacement counter after replacing the lamp. "Lamp replacement counter reset?" Additionally, check carefully to an end. Contact an authorized service station for each lamp. Lamp counter reset 1 Turn the projector on and press the MENU button to reset the Lamp replacement counter. ✔Note: • Do not reset the Lamp replacement...
... the lamp. Maintenance and Cleaning Lamp Replacement Counter Be sure to reset the lamp replacement counter after replacing the lamp. "Lamp replacement counter reset?" Additionally, check carefully to an end. Contact an authorized service station for each lamp. Lamp counter reset 1 Turn the projector on and press the MENU button to reset the Lamp replacement counter. ✔Note: • Do not reset the Lamp replacement...

Owners Manual
Page 50
... off again, unplug the AC power cord and contact the dealer or service center for projector's condition. Reset the Lamp replacement counter after replacing the lamp. Indicators POWER LAMP red/green/ WARNING REPLACE orange red yellow Projector Condition The Main On/Off switch is being cooled down enough and the ✽ temperature returns to be turned...
... off again, unplug the AC power cord and contact the dealer or service center for projector's condition. Reset the Lamp replacement counter after replacing the lamp. Indicators POWER LAMP red/green/ WARNING REPLACE orange red yellow Projector Condition The Main On/Off switch is being cooled down enough and the ✽ temperature returns to be turned...

Owners Manual
Page 52
...through Natural wide 1 Natural wide 2 Signal H-sync freq. Lamp Time Image Screen Input Lamp status PAL SECAM NTSC NTSC4.43 PAL-M PAL-N 480i 480p 575i 575p 720p 1080i D-VGA D-480i D-480p D-575i D-575p D-720p D-1080i D-1080p Resolution for PC input - - - ...Unknown Language Advanced menu Menu Position Keystone Mounting Rear HDMI setup Background Display Logo Power off confirmation Capture Power management Remote control Shutter demo Cleaning Panel adjustment Highland Lamp counter reset...
...through Natural wide 1 Natural wide 2 Signal H-sync freq. Lamp Time Image Screen Input Lamp status PAL SECAM NTSC NTSC4.43 PAL-M PAL-N 480i 480p 575i 575p 720p 1080i D-VGA D-480i D-480p D-575i D-575p D-720p D-1080i D-1080p Resolution for PC input - - - ...Unknown Language Advanced menu Menu Position Keystone Mounting Rear HDMI setup Background Display Logo Power off confirmation Capture Power management Remote control Shutter demo Cleaning Panel adjustment Highland Lamp counter reset...


