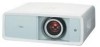
Owners Manual
Page 3
...Terminal 9 Top Control 10 Remote Control 11 Remote Control Operating Range 12 Remote Control Battery Installation 12 Installation 13 Positioning the Projector 13 Adjustable Feet 13 Moving the Lens 14 Connecting to Video Equipment (Video, S-Video) 15 Connecting to Video Equipment (...45 Cleaning the Air Filter 47 Resetting the Filter Counter 48 Cleaning the Projection Lens 48 Cleaning the Projector Cabinet 48 Lamp Replacement 49 Resetting the Lamp Replacement Counter 50 Appendix 51 Troubleshooting 51 Indicators and Projector Condition 53 Menu Tree 54 ...
...Terminal 9 Top Control 10 Remote Control 11 Remote Control Operating Range 12 Remote Control Battery Installation 12 Installation 13 Positioning the Projector 13 Adjustable Feet 13 Moving the Lens 14 Connecting to Video Equipment (Video, S-Video) 15 Connecting to Video Equipment (...45 Cleaning the Air Filter 47 Resetting the Filter Counter 48 Cleaning the Projection Lens 48 Cleaning the Projector Cabinet 48 Lamp Replacement 49 Resetting the Lamp Replacement Counter 50 Appendix 51 Troubleshooting 51 Indicators and Projector Condition 53 Menu Tree 54 ...
Owners Manual
Page 11
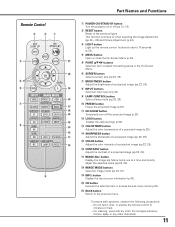
... y u i o Part Names and Functions q POWER ON/STAND-BY button Turn the projector on or off the projected image (p.23). !2 LOGO button !4 Display the captured logo (p.23). !3 !3 COLOR TEMP. w RESET button Reset to the previous menu. button Adjust the color temperature of a projected image (p.28). !2...@0 y SCREEN button Select a screen size (pp.22, 35). To ensure safe operation, observe the following precautions: - o LAMP CONTROL button !8 Select a lamp mode (pp.23, 29). !0 FREEZE button !7 Freeze the projected image (p.23). !6 !1 NO SHOW button !5 Temporarily turn...
... y u i o Part Names and Functions q POWER ON/STAND-BY button Turn the projector on or off the projected image (p.23). !2 LOGO button !4 Display the captured logo (p.23). !3 !3 COLOR TEMP. w RESET button Reset to the previous menu. button Adjust the color temperature of a projected image (p.28). !2...@0 y SCREEN button Select a screen size (pp.22, 35). To ensure safe operation, observe the following precautions: - o LAMP CONTROL button !8 Select a lamp mode (pp.23, 29). !0 FREEZE button !7 Freeze the projected image (p.23). !6 !1 NO SHOW button !5 Temporarily turn...
Owners Manual
Page 21
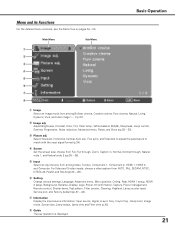
..., HDMI 1 setup, HDMI 2 setup, Background, Rename, Display, Logo, Power off confirmation, Capture, Power management, Remote control, Shutter demo, Test pattern, Filter counter, Cleaning, Highland, Lamp counter reset, Service port, and Factory default (pp.37 - 42). Basic Operation Menu and its Functions For the detailed menu contents, see the Menu Tree on pages...
..., HDMI 1 setup, HDMI 2 setup, Background, Rename, Display, Logo, Power off confirmation, Capture, Power management, Remote control, Shutter demo, Test pattern, Filter counter, Cleaning, Highland, Lamp counter reset, Service port, and Factory default (pp.37 - 42). Basic Operation Menu and its Functions For the detailed menu contents, see the Menu Tree on pages...
Owners Manual
Page 42
... Test pattern A test pattern for zoom and focus adjustment is available for operation. When replacing the projection lamp, reset the lamp replacement counter with this function "On." Highland When using the projector in high altitudes (about resetting the timer, refer to the factory default settings. See page 50 for use ONLY. Using a blower at a set...
... Test pattern A test pattern for zoom and focus adjustment is available for operation. When replacing the projection lamp, reset the lamp replacement counter with this function "On." Highland When using the projector in high altitudes (about resetting the timer, refer to the factory default settings. See page 50 for use ONLY. Using a blower at a set...
Owners Manual
Page 48
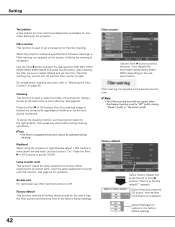
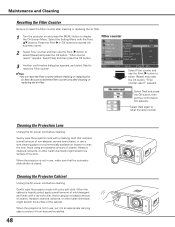
... put it from dust and scratches. 48 appears. Gently wipe the projector body with a dry soft cloth. Filter counter 3 Another confirmation dialog box appears, and select [Yes] to reset the lamp counter. When the projector is not in use , make sure that contains a small amount ...of the lens. "Filter counter reset?" Abrasive cleaners, solvents, or other harsh chemicals might scratch the surface of...
... put it from dust and scratches. 48 appears. Gently wipe the projector body with a dry soft cloth. Filter counter 3 Another confirmation dialog box appears, and select [Yes] to reset the lamp counter. When the projector is not in use , make sure that contains a small amount ...of the lens. "Filter counter reset?" Abrasive cleaners, solvents, or other harsh chemicals might scratch the surface of...

Owners Manual
Page 49
... two (2) screws that the lamp is depending on the projector. 6 Reset the Lamp replacement counter (p.50). Follow these steps to the dealer. ● Model No. of your dealer. Make sure that secure the lamp. Screw Lamp Cover Handle Screws Lamp ORDER REPLACEMENT LAMP Replacement lamp can be ordered through your projector: ● Replacement Lamp Type No.: PLV-Z2000 POA-LMP114 (Service Parts No...
... two (2) screws that the lamp is depending on the projector. 6 Reset the Lamp replacement counter (p.50). Follow these steps to the dealer. ● Model No. of your dealer. Make sure that secure the lamp. Screw Lamp Cover Handle Screws Lamp ORDER REPLACEMENT LAMP Replacement lamp can be ordered through your projector: ● Replacement Lamp Type No.: PLV-Z2000 POA-LMP114 (Service Parts No...
Owners Manual
Page 50
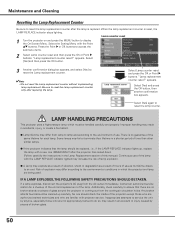
...use . Be sure to access the submenu items. 2 Select Lamp counter reset and then press the OK or Point 8 buttons. LAMP HANDLING PRECAUTIONS This projector uses a high-pressure lamp which the projector and lamp are not appropriately trained to do so, may differ according ... by pieces of the lamp. Maintenance and Cleaning Resetting the Lamp Replacement Counter Be sure to reset the lamp replacement counter after the lamp is reset, the LAMP REPLACE indicator stops lighting. Lamp counter reset 1 Turn the projector on and press the MENU button to reset the lamp counter. Select [Yes]...
...use . Be sure to access the submenu items. 2 Select Lamp counter reset and then press the OK or Point 8 buttons. LAMP HANDLING PRECAUTIONS This projector uses a high-pressure lamp which the projector and lamp are not appropriately trained to do so, may differ according ... by pieces of the lamp. Maintenance and Cleaning Resetting the Lamp Replacement Counter Be sure to reset the lamp replacement counter after the lamp is reset, the LAMP REPLACE indicator stops lighting. Lamp counter reset 1 Turn the projector on and press the MENU button to reset the lamp counter. Select [Yes]...
Owners Manual
Page 53
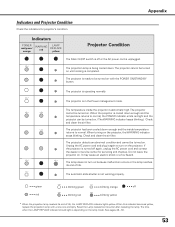
... to normal, the POWER indicator emits red light and the projector can be turned ✽ on . Reset the Lamp replacement counter after replacing the lamp. The projector detects an abnormal condition and cannot be turned on the lamp mode. When this indicator becomes yellow, replace the projection lamp with the POWER ON/STAND-BY button. ✽ The...
... to normal, the POWER indicator emits red light and the projector can be turned ✽ on . Reset the Lamp replacement counter after replacing the lamp. The projector detects an abnormal condition and cannot be turned on the lamp mode. When this indicator becomes yellow, replace the projection lamp with the POWER ON/STAND-BY button. ✽ The...

Owners Manual
Page 54
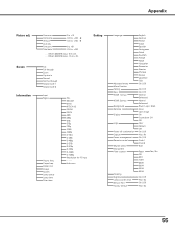
Red Green Blue Sharpness Lamp Control Gamma Progressive Noise reduction Advanced menu Reset Store ✽ Value changes depending on the selected image mode. -31 to +31 -31 to +31 -31 to +31 -31 to +31 High 2 High 1 Default ...
Red Green Blue Sharpness Lamp Control Gamma Progressive Noise reduction Advanced menu Reset Store ✽ Value changes depending on the selected image mode. -31 to +31 -31 to +31 -31 to +31 -31 to +31 High 2 High 1 Default ...
Owners Manual
Page 55
...When 480i/575i input, -8 to +15. Deep color Image Screen Lamp status Lamp time Filter time PAL SECAM NTSC NTSC4.43 PAL-M PAL-N 480i 480p 575i 575p 720p 1080i 1080p D-VGA D-480i D-480p D-575i D-575p D-720p D-1080i D-1080p Resolution for PC input - - - - When 480i/575i input... Rename Display Logo Power off confirmation Capture Power management Remote control Shutter demo Test pattern Filter counter Cleaning Highland Lamp counter reset Service Port Factory default English German French Italian Spanish Portuguese Dutch Swedish Finnish Polish Hungarian Romanian Russian Chinese Korean ...
...When 480i/575i input, -8 to +15. Deep color Image Screen Lamp status Lamp time Filter time PAL SECAM NTSC NTSC4.43 PAL-M PAL-N 480i 480p 575i 575p 720p 1080i 1080p D-VGA D-480i D-480p D-575i D-575p D-720p D-1080i D-1080p Resolution for PC input - - - - When 480i/575i input... Rename Display Logo Power off confirmation Capture Power management Remote control Shutter demo Test pattern Filter counter Cleaning Highland Lamp counter reset Service Port Factory default English German French Italian Spanish Portuguese Dutch Swedish Finnish Polish Hungarian Romanian Russian Chinese Korean ...


