
User Manual
Page 2
... the Setting menu. (See page 42.) ◆ Compatibility The projector widely accepts various video and computer input signals including; Features and Design This Multimedia Projector is designed with the most advanced technology for portability, durability, and ease of use . ◆ Selectable Lamp Mode Brightness of the projection lamp can be used for Computer) The digital zoom function expands (to approx. 16 times of screen size) or compress the image size, allowing...
... the Setting menu. (See page 42.) ◆ Compatibility The projector widely accepts various video and computer input signals including; Features and Design This Multimedia Projector is designed with the most advanced technology for portability, durability, and ease of use . ◆ Selectable Lamp Mode Brightness of the projection lamp can be used for Computer) The digital zoom function expands (to approx. 16 times of screen size) or compress the image size, allowing...
User Manual
Page 3
... 32 Input Source Selection (Video, S-Video) 32 Input Source Selection (Component, RGB Scart 21-Pin) 33 Video System Selection 34 Image Level Selection 35 Image Level Adjustment 36 Screen Size Adjustment 38 Setting 39 Setting 39 Maintenance and Cleaning 45 Warning Indicator 45 Cleaning the Air Filters 46 Attaching the Lens Cover 46 Cleaning the Projection Lens 47 Cleaning the Projector Cabinet 47 Lamp Replacement 48 Lamp Replace Counter 49 Appendix 50 Troubleshooting 50 Indicators and Projector Condition 52 Menu Tree 53 Compatible Computer Specifications...
... 32 Input Source Selection (Video, S-Video) 32 Input Source Selection (Component, RGB Scart 21-Pin) 33 Video System Selection 34 Image Level Selection 35 Image Level Adjustment 36 Screen Size Adjustment 38 Setting 39 Setting 39 Maintenance and Cleaning 45 Warning Indicator 45 Cleaning the Air Filters 46 Attaching the Lens Cover 46 Cleaning the Projection Lens 47 Cleaning the Projector Cabinet 47 Lamp Replacement 48 Lamp Replace Counter 49 Appendix 50 Troubleshooting 50 Indicators and Projector Condition 52 Menu Tree 53 Compatible Computer Specifications...
User Manual
Page 4
... NOT REMOVE COVER (OR BACK). Please help us to manage those features and maintains it may result in a proper position. To the Owner Before operating this projector, read this manual again, check operations and cable connections and try the solutions in the "Troubleshooting" section in the end of this booklet. If the projector is exhausted from the projection lens. READ AND KEEP THIS OWNER'S MANUAL FOR LATER USE. Operating the projector...
... NOT REMOVE COVER (OR BACK). Please help us to manage those features and maintains it may result in a proper position. To the Owner Before operating this projector, read this manual again, check operations and cable connections and try the solutions in the "Troubleshooting" section in the end of this booklet. If the projector is exhausted from the projection lens. READ AND KEEP THIS OWNER'S MANUAL FOR LATER USE. Operating the projector...

User Manual
Page 6
... cause fire hazard by using or installing the projector, the following precautions should be blocked or covered. This projector monitors internal temperature and control the running speed of the exhaust vent, especially screws and metallic part. Improper Installation may result. - Air Intake Vent Moving the Projector When moving the projector, replace the Lens Cover and retract Adjustable Feet to prevent damage to project an image. Do not put on...
... cause fire hazard by using or installing the projector, the following precautions should be blocked or covered. This projector monitors internal temperature and control the running speed of the exhaust vent, especially screws and metallic part. Improper Installation may result. - Air Intake Vent Moving the Projector When moving the projector, replace the Lens Cover and retract Adjustable Feet to prevent damage to project an image. Do not put on...

User Manual
Page 7
... interference to which is coloured blue must be connected to the terminal in your socket outlet, it is of the plug (i.e. GROUND AC Power Cord for your User Instructions. ASA If the fuse cover is already fitted with the letter N or coloured black. Model Numbers Trade Name Responsible party Address Telephone No. : PLC-XU41 / PLC-XU47 / PLC-XU48 : Sanyo : SANYO FISHER COMPANY : 21605 Plummer Street...
... interference to which is coloured blue must be connected to the terminal in your socket outlet, it is of the plug (i.e. GROUND AC Power Cord for your User Instructions. ASA If the fuse cover is already fitted with the letter N or coloured black. Model Numbers Trade Name Responsible party Address Telephone No. : PLC-XU41 / PLC-XU47 / PLC-XU48 : Sanyo : SANYO FISHER COMPANY : 21605 Plummer Street...
User Manual
Page 10
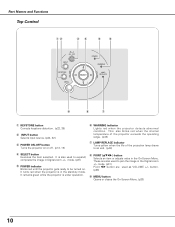
... +/- button. (p23) o MENU button Opens or closes the On-Screen Menu. (p20) 10 OFF INPUT POWER WARNING VOLUME - It turns red when the projector is under operation. VOLUME + KEYSTONE MENU SELECT LAMP REPLACE o i u q KEYSTONE button Corrects keystone distortion. (p22, 39) w INPUT button Selects input source. (p24, 32 ) e POWER ON-OFF button Turns the projector on . These are used to expand/ compress the image in the Digital zoom +/- Part Names and Functions Top Control qw er t y ON - It is also used to pan the image in Digital zoom +/- i POINT...
... +/- button. (p23) o MENU button Opens or closes the On-Screen Menu. (p20) 10 OFF INPUT POWER WARNING VOLUME - It turns red when the projector is under operation. VOLUME + KEYSTONE MENU SELECT LAMP REPLACE o i u q KEYSTONE button Corrects keystone distortion. (p22, 39) w INPUT button Selects input source. (p24, 32 ) e POWER ON-OFF button Turns the projector on . These are used to expand/ compress the image in the Digital zoom +/- Part Names and Functions Top Control qw er t y ON - It is also used to pan the image in Digital zoom +/- i POINT...
User Manual
Page 15
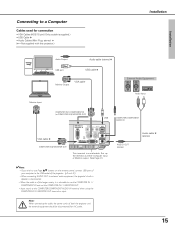
Set up the terminal as input. Note: When connecting the cable, the power cords of the longer variety, it is of both the projector and the external equipment should be disconnected from AC outlet. COMPUTER/ COMPONENT AUDIO IN AUDIO OUT (stereo) Audio cable ✽ (stereo) 15 I AUDIO IN R L (MONO) VIDEO USB SERVICE PORT S-VIDEO COMPUTER / / CCOOMMPPOONNEENNTT RESET COMCOPMUPTUETRERIINN 22/ / MCMOONOMNIPTIOTOONRRENOOTUUITNT / AUDIO IN AUDIO OUT (AVRARIAIALBEL)E) This terminal is supplied.) • USB Cable ✽ •...
Set up the terminal as input. Note: When connecting the cable, the power cords of the longer variety, it is of both the projector and the external equipment should be disconnected from AC outlet. COMPUTER/ COMPONENT AUDIO IN AUDIO OUT (stereo) Audio cable ✽ (stereo) 15 I AUDIO IN R L (MONO) VIDEO USB SERVICE PORT S-VIDEO COMPUTER / / CCOOMMPPOONNEENNTT RESET COMCOPMUPTUETRERIINN 22/ / MCMOONOMNIPTIOTOONRRENOOTUUITNT / AUDIO IN AUDIO OUT (AVRARIAIALBEL)E) This terminal is supplied.) • USB Cable ✽ •...
User Manual
Page 18
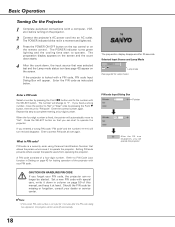
... Operation Turning On the Projector 1 Complete peripheral connections (with a computer, VCR, etc.) before turning on the screen. The preparation display appears on the screen and the count down starts. 4 After the count-down, the input source that allows the person who knows it down in column on page 59 of this step to operate. The number will turn red and disappear. The POWER indicator blinks red in Setting on the remote control...
... Operation Turning On the Projector 1 Complete peripheral connections (with a computer, VCR, etc.) before turning on the screen. The preparation display appears on the screen and the count down starts. 4 After the count-down, the input source that allows the person who knows it down in column on page 59 of this step to operate. The number will turn red and disappear. The POWER indicator blinks red in Setting on the remote control...

User Manual
Page 19
... screen. 2 Press the POWER ON-OFF button again to turn it a rest about an hour in shortening the lamp life. TO MAINTAIN THE LIFE OF LAMP, ONCE YOU TURN PROJECTOR ON, WAIT AT LEAST 5 MINUTES BEFORE TURNING IT OFF. Continuous use may result in every 24 hours. • This projector monitors internal temperature and automatically controls the running speed of the cooling fans. • If the WARNING indicator blinks or lights red, see "Warning Indicator...
... screen. 2 Press the POWER ON-OFF button again to turn it a rest about an hour in shortening the lamp life. TO MAINTAIN THE LIFE OF LAMP, ONCE YOU TURN PROJECTOR ON, WAIT AT LEAST 5 MINUTES BEFORE TURNING IT OFF. Continuous use may result in every 24 hours. • This projector monitors internal temperature and automatically controls the running speed of the cooling fans. • If the WARNING indicator blinks or lights red, see "Warning Indicator...

User Manual
Page 21
...(Green), and Image 1 ~ 4. (p29) Screen Menu Used to adjust size of image. [Normal / True / Wide / Digital zoom +/-] (p31) Setting Menu Used to change settings of the projector or reset lamp replace counter. (p39-44) Basic Operation Input Menu Used to select input source either Computer or Video. (p24) PC Adjust Menu Used to adjust parameters to match with input signal format. (p26-28) Image Adjust Menu Used to adjust computer image. [Contrast / Brightness / Color temp. / White balance (R/G/B) / Sharpness / Gamma] (p30) Sound Menu Used to adjust volume or mute sound. (p23) For video...
...(Green), and Image 1 ~ 4. (p29) Screen Menu Used to adjust size of image. [Normal / True / Wide / Digital zoom +/-] (p31) Setting Menu Used to change settings of the projector or reset lamp replace counter. (p39-44) Basic Operation Input Menu Used to select input source either Computer or Video. (p24) PC Adjust Menu Used to adjust parameters to match with input signal format. (p26-28) Image Adjust Menu Used to adjust computer image. [Contrast / Brightness / Color temp. / White balance (R/G/B) / Sharpness / Gamma] (p30) Sound Menu Used to adjust volume or mute sound. (p23) For video...

User Manual
Page 31
.... Digital zoom - mode, press any resolution higher than the screen size. Wide Provides image to fit wide video aspect ratio (16 : 9) by pressing the D.ZOOM ▲ button on the remote control. ✔Note: • This Screen Menu cannot be operated when "720p(HDTV)", "1035i (HDTV)", or "1080i (HDTV)" is displayed. This function can be limited depending on the remote control. A projected image can be also compressed by pressing the D.ZOOM ▼ button...
.... Digital zoom - mode, press any resolution higher than the screen size. Wide Provides image to fit wide video aspect ratio (16 : 9) by pressing the D.ZOOM ▲ button on the remote control. ✔Note: • This Screen Menu cannot be operated when "720p(HDTV)", "1035i (HDTV)", or "1080i (HDTV)" is displayed. This function can be limited depending on the remote control. A projected image can be also compressed by pressing the D.ZOOM ▼ button...

User Manual
Page 40
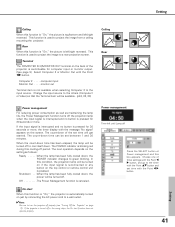
... except for a starting-up display or interval of the PIN Code Lock function on PIN code setting, refer to capture the image being projected and use it at hand. Press the SELECT button so that has been adjusted by the Keystone function, the adjustment data is automatically reset and the projector captures an image without keystone adjustment. • When the Logo PIN code lock function is fixed, the pointer will turn red and disappear...
... except for a starting-up display or interval of the PIN Code Lock function on PIN code setting, refer to capture the image being projected and use it at hand. Press the SELECT button so that has been adjusted by the Keystone function, the adjustment data is automatically reset and the projector captures an image without keystone adjustment. • When the Logo PIN code lock function is fixed, the pointer will turn red and disappear...
User Manual
Page 41
...-down time has been elapsed, the lamp will get started. On start function does not operate properly. Computer 2 . . . . .computer input Monitor Out . . . . .monitor out Terminal item is canceled. Change the input source to green blinking. Choose one of the projector is switcheable for computer input or monitor output. (See page 9) Select Computer 2 or Monitor Out with the message "No signal" appears on the top control or remote control...
...-down time has been elapsed, the lamp will get started. On start function does not operate properly. Computer 2 . . . . .computer input Monitor Out . . . . .monitor out Terminal item is canceled. Change the input source to green blinking. Choose one of the projector is switcheable for computer input or monitor output. (See page 9) Select Computer 2 or Monitor Out with the message "No signal" appears on the top control or remote control...

User Manual
Page 44
... the user logo, PIN code lock, logo PIN code lock and the lamp counter to the factory default settings. Select [Yes] , and the next box appears. L1 normal operation L2 . . . . . .slower operation than in the normal mode. When replacing the projection lamp, reset the lamp replace counter by using this box appears. Setting Fan Fan This function provides you the following alternatives in the cooling fans operation after turning off the projector. In this mode, cooling time after turning off the projector...
... the user logo, PIN code lock, logo PIN code lock and the lamp counter to the factory default settings. Select [Yes] , and the next box appears. L1 normal operation L2 . . . . . .slower operation than in the normal mode. When replacing the projection lamp, reset the lamp replace counter by using this box appears. Setting Fan Fan This function provides you the following alternatives in the cooling fans operation after turning off the projector. In this mode, cooling time after turning off the projector...
User Manual
Page 48
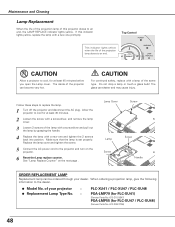
... PLC-XU41) (Service Parts No. 610 315 5647) POA-LMP55 (for PLC-XU47 / PLC-XU48) (Service Parts No. 610 309 2706) 48 Allow the projector to an end. If this projector draws to the projector and turn on the next page . Do not drop a lamp or touch a glass bulb! Maintenance and Cleaning Lamp Replacement When the life of the projection lamp of this indicator lights yellow, replace the lamp with a new one and tighten the 2 screws...
... PLC-XU41) (Service Parts No. 610 315 5647) POA-LMP55 (for PLC-XU47 / PLC-XU48) (Service Parts No. 610 309 2706) 48 Allow the projector to an end. If this projector draws to the projector and turn on the next page . Do not drop a lamp or touch a glass bulb! Maintenance and Cleaning Lamp Replacement When the life of the projection lamp of this indicator lights yellow, replace the lamp with a new one and tighten the 2 screws...

User Manual
Page 49
... use. The message "Lamp replace counter Reset?" Be sure to Lamp counter reset and then press the SELECT button. LAMP HANDLING PRECAUTIONS This projector uses a high-pressure lamp which the projector and lamp are familiar with projector service. No one IMMEDIATELY after the lamp is reset, the LAMP REPLACE indicator stops lighting. 1 Turn the projector on, press the MENU button and the OnScreen Menu will appear. When the lamp replace counter is replaced. Improper handling may result in a shorter period of time than other similar lamps...
... use. The message "Lamp replace counter Reset?" Be sure to Lamp counter reset and then press the SELECT button. LAMP HANDLING PRECAUTIONS This projector uses a high-pressure lamp which the projector and lamp are familiar with projector service. No one IMMEDIATELY after the lamp is reset, the LAMP REPLACE indicator stops lighting. 1 Turn the projector on, press the MENU button and the OnScreen Menu will appear. When the lamp replace counter is replaced. Improper handling may result in a shorter period of time than other similar lamps...
User Manual
Page 50
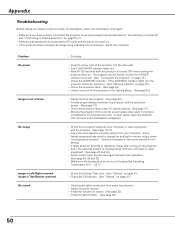
... POWER indicator lights red. - Wait 90-120 seconds after the projector is correctly output from audio input source. - The projector can be turned on. (See "Warning Indicator" on page 19.) - Check the WARNING indicator. If the WARNING indicator lights red, the projector cannot be turned on after turning on page15-17. - Provide proper distance between your computer. Check the projection lens to display an image after the POWER indicator turns red. (See "Turning Off the Projector" on page 45.) - Check the connection between the projector and the projection screen...
... POWER indicator lights red. - Wait 90-120 seconds after the projector is correctly output from audio input source. - The projector can be turned on. (See "Warning Indicator" on page 19.) - Check the WARNING indicator. If the WARNING indicator lights red, the projector cannot be turned on after turning on page15-17. - Provide proper distance between your computer. Check the projection lens to display an image after the POWER indicator turns red. (See "Turning Off the Projector" on page 45.) - Check the connection between the projector and the projection screen...

User Manual
Page 52
... projector on the projector, the WARNING indicator stops blinking. See page 48 and 49. 52 Appendix Indicators and Projector Condition Check the indicators to turn on the projector. Reset the Lamp replace counter after replacement of the projection lamp draws to normal, the POWER indicator lights red and the projector can be turned on . If the ✽ projector is turned off ✽ When the life of the lamp. The projector cannot be turned on with a new one promptly. Check and clean the air filters. The projector...
... projector on the projector, the WARNING indicator stops blinking. See page 48 and 49. 52 Appendix Indicators and Projector Condition Check the indicators to turn on the projector. Reset the Lamp replace counter after replacement of the projection lamp draws to normal, the POWER indicator lights red and the projector can be turned on . If the ✽ projector is turned off ✽ When the life of the lamp. The projector cannot be turned on with a new one promptly. Check and clean the air filters. The projector...

User Manual
Page 54
...Standard Cinema Blackboard(Green) Image 1 Image 2 Image 3 Image 4 Setting Setting Image Adjust Contrast Brightness Color Tint Color Temp Screen Red Green Blue Sharpness Gamma Progressive Film Reset Store Quit Normal Wide 0 - 63 0 - 63 0 - 63 0 - 63 High Mid Low XLow 0 - 63 0 - 63 0 - 63 0 - 15 0 - 15 Off L1 L2 On/ Off Yes / No Image 1 Image 2 Image 3 Image 4 Quit Language Keystone Blue back Display Logo PIN code lock Logo Capture Ceiling Rear Terminal Power management On start Lamp mode Remote control USB Key lock PIN code lock Fan Lamp counter reset Factory default Quit English German...
...Standard Cinema Blackboard(Green) Image 1 Image 2 Image 3 Image 4 Setting Setting Image Adjust Contrast Brightness Color Tint Color Temp Screen Red Green Blue Sharpness Gamma Progressive Film Reset Store Quit Normal Wide 0 - 63 0 - 63 0 - 63 0 - 63 High Mid Low XLow 0 - 63 0 - 63 0 - 63 0 - 15 0 - 15 Off L1 L2 On/ Off Yes / No Image 1 Image 2 Image 3 Image 4 Quit Language Keystone Blue back Display Logo PIN code lock Logo Capture Ceiling Rear Terminal Power management On start Lamp mode Remote control USB Key lock PIN code lock Fan Lamp counter reset Factory default Quit English German...
Brochure
Page 2
... Auto mode. Blackboard (Green color) Mode This mode lets you make images look similar to those projection to ensure high contrast for more natural image displays. Other Features • Freeze function • User logo function • No show function • Presentation timer • Multilanguage menu display (12 languages) Specifications Model name Panels No. SML058 Auto mode adjusts lamp brightness in temperature. of pixels Projection lamp Brightness (typical) Contrast Uniformity Projection lens Screen size Zoom / Focus HDTV signals Color systems Video signal Video...
... Auto mode. Blackboard (Green color) Mode This mode lets you make images look similar to those projection to ensure high contrast for more natural image displays. Other Features • Freeze function • User logo function • No show function • Presentation timer • Multilanguage menu display (12 languages) Specifications Model name Panels No. SML058 Auto mode adjusts lamp brightness in temperature. of pixels Projection lamp Brightness (typical) Contrast Uniformity Projection lens Screen size Zoom / Focus HDTV signals Color systems Video signal Video...


