
Owners Manual
Page 2
...Functions for Presentations - Up to UXGA resolution can capture an image for the screen logo and use of the projector (pp.21, 52-53). ◆ Helpful Maintenance Functions Lamp and filter maintenance functions provide for the starting-up and Operation." ◆ Memory Viewer Function (Optional Function)... or other equipment for portability, durability, and ease of 16.77 million colors, and matrix liquid crystal display (LCD) technology. ◆ Compact Design This projector is loaded with optionally supplied USB memory. ✔Notes: •The On-Screen Menu and figures in this ...
...Functions for Presentations - Up to UXGA resolution can capture an image for the screen logo and use of the projector (pp.21, 52-53). ◆ Helpful Maintenance Functions Lamp and filter maintenance functions provide for the starting-up and Operation." ◆ Memory Viewer Function (Optional Function)... or other equipment for portability, durability, and ease of 16.77 million colors, and matrix liquid crystal display (LCD) technology. ◆ Compact Design This projector is loaded with optionally supplied USB memory. ✔Notes: •The On-Screen Menu and figures in this ...
Owners Manual
Page 3
... Control Code 14 Remote Control Battery Installation 15 Remote Control Operating Range 15 Adjustable Feet 15 Installation 16 Positioning the Projector 16 Connecting to a Computer 17 Connecting to Video Equipment 18 Connecting to Component Video Equipment 19 Connecting the AC ... the Filter 57 Resetting the Filter Counter 57 Lamp Replacement 58 Resetting the Lamp Counter 59 Attaching the Lens Cover 60 Cleaning the Projection Lens 60 Cleaning the Projector Cabinet 60 Appendix 61 Indicators and Projector Condition 61 Troubleshooting 62 Menu Tree 64 Compatible...
... Control Code 14 Remote Control Battery Installation 15 Remote Control Operating Range 15 Adjustable Feet 15 Installation 16 Positioning the Projector 16 Connecting to a Computer 17 Connecting to Video Equipment 18 Connecting to Component Video Equipment 19 Connecting the AC ... the Filter 57 Resetting the Filter Counter 57 Lamp Replacement 58 Resetting the Lamp Counter 59 Attaching the Lens Cover 60 Cleaning the Projection Lens 60 Cleaning the Projector Cabinet 60 Appendix 61 Indicators and Projector Condition 61 Troubleshooting 62 Menu Tree 64 Compatible...

Owners Manual
Page 4
... and electronic products. To the Owner Before installing and operating this projector, read this equipment at their end-oflife, should be recycled and reused. NO USER-SERVICEABLE PARTS INSIDE EXCEPT LAMP REPLACEMENT. THIS SYMBOL INDICATES THAT THERE ARE IMPORTANT OPERATING AND MAINTENANCE INSTRUCTIONS...to operate improperly, read this booklet. Be especially careful that electrical and electronic equipment, at your household waste. Your SANYO product is unused for Protection of this manual thoroughly. READ AND KEEP THIS OWNER'S MANUAL FOR LATER USE. 4 Safety...
... and electronic products. To the Owner Before installing and operating this projector, read this equipment at their end-oflife, should be recycled and reused. NO USER-SERVICEABLE PARTS INSIDE EXCEPT LAMP REPLACEMENT. THIS SYMBOL INDICATES THAT THERE ARE IMPORTANT OPERATING AND MAINTENANCE INSTRUCTIONS...to operate improperly, read this booklet. Be especially careful that electrical and electronic equipment, at your household waste. Your SANYO product is unused for Protection of this manual thoroughly. READ AND KEEP THIS OWNER'S MANUAL FOR LATER USE. 4 Safety...
Owners Manual
Page 7
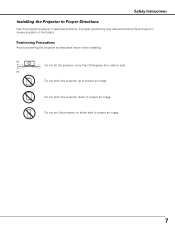
Do not put the projector on either side to project an image. Safety Instructions Installing the Projector in Proper Directions Use the projector properly in severe accident or fire hazard. Positioning Precautions Avoid positioning the projector as described below when installing. 20˚ Do not tilt the projector more than 20 degrees from side to side. 20˚ Do not point the projector up to project an image. 7 Improper positioning may reduce the lamp life and result in specified positions. Do not point the projector down to project an image.
Do not put the projector on either side to project an image. Safety Instructions Installing the Projector in Proper Directions Use the projector properly in severe accident or fire hazard. Positioning Precautions Avoid positioning the projector as described below when installing. 20˚ Do not tilt the projector more than 20 degrees from side to side. 20˚ Do not point the projector up to project an image. 7 Improper positioning may reduce the lamp life and result in specified positions. Do not point the projector down to project an image.

Owners Manual
Page 9
... Ring y Lens Cover (See page 60 for attaching.) u Infrared Remote Receiver i Top Controls and Indicators o Speaker !0 Air Intake Vent !1 Power Cord Connector !2 Terminals and Connectors !3 Lamp Cover !4 Air Intake Vents (back and bottom) !5 Filters !6 Adjustable Feet !7 Exhaust Vent CAUTION Hot air is a registered trademark of the...
... Ring y Lens Cover (See page 60 for attaching.) u Infrared Remote Receiver i Top Controls and Indicators o Speaker !0 Air Intake Vent !1 Power Cord Connector !2 Terminals and Connectors !3 Lamp Cover !4 Air Intake Vents (back and bottom) !5 Filters !6 Adjustable Feet !7 Exhaust Vent CAUTION Hot air is a registered trademark of the...
Owners Manual
Page 11
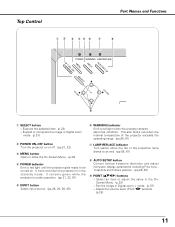
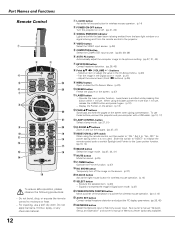
...39) y WARNING indicator Emit a red light when the projector detects abnormal condition. OFF POWER MENU WARNING INPUT LAMP REPLACE AUTO SET UP SELECT - It remains green while the projector is in Digital zoom mode. (p.37) w POWER ON-OFF button Turn the projector on or off. (pp.21, 22) e MENU ...Point 7 8 buttons) (p.25) 11 This also blinks red when the internal temperature of the projector exceeds the operating range. (pp.56, 61) u LAMP REPLACE indicator Turn yellow when the life of the projection lamp draws to be turned on. Pan the image in the OnScreen Menu. (p.23) - Select ...
...39) y WARNING indicator Emit a red light when the projector detects abnormal condition. OFF POWER MENU WARNING INPUT LAMP REPLACE AUTO SET UP SELECT - It remains green while the projector is in Digital zoom mode. (p.37) w POWER ON-OFF button Turn the projector on or off. (pp.21, 22) e MENU ...Point 7 8 buttons) (p.25) 11 This also blinks red when the internal temperature of the projector exceeds the operating range. (pp.56, 61) u LAMP REPLACE indicator Turn yellow when the life of the projection lamp draws to be turned on. Pan the image in the OnScreen Menu. (p.23) - Select ...
Owners Manual
Page 12
.... (p.14) @1 SELECT button - See owner's manual "Network Set-up and Operation" and owner's manual of the projector or a pointer for more than 1 minute, release the LASER button and press it is being emitted from the remote ...@0 !0 !9 !1 !8 !2 !7 !3 !6 !4 !5 To ensure safe operation, please observe the following precautions: - For cleaning, use these buttons, connect the projector and your computer with a USB cable. (pp.10, 17) !3 LAMP CONTROL button Select a lamp mode. (pp.27, 51) !4 D.ZOOM ed buttons Zoom in the Digital zoom + mode. (p.37) - To use a soft dry cloth.
.... (p.14) @1 SELECT button - See owner's manual "Network Set-up and Operation" and owner's manual of the projector or a pointer for more than 1 minute, release the LASER button and press it is being emitted from the remote ...@0 !0 !9 !1 !8 !2 !7 !3 !6 !4 !5 To ensure safe operation, please observe the following precautions: - For cleaning, use these buttons, connect the projector and your computer with a USB cable. (pp.10, 17) !3 LAMP CONTROL button Select a lamp mode. (pp.27, 51) !4 D.ZOOM ed buttons Zoom in the Digital zoom + mode. (p.37) - To use a soft dry cloth.
Owners Manual
Page 21
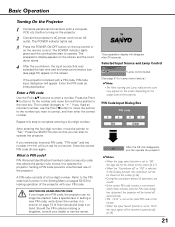
...the usage state of the projector. The POWER indicator lights green and the cooling fans start to operate. If you fixed an incorrect number, use of a four-digit number. Press the SELECT button so that was selected the last time and the lamp control status icon (see ...control. Should the PIN code be started. Selected Input Source and Lamp Control Lamp control status (See page 51 for Lamp control status.) ✔Note: •The Filter warning and Lamp replacement icons may appear on the screen depending on the projector. 2 Connect the projector's AC power cord into an AC outlet.
...the usage state of the projector. The POWER indicator lights green and the cooling fans start to operate. If you fixed an incorrect number, use of a four-digit number. Press the SELECT button so that was selected the last time and the lamp control status icon (see ...control. Should the PIN code be started. Selected Input Source and Lamp Control Lamp control status (See page 51 for Lamp control status.) ✔Note: •The Filter warning and Lamp replacement icons may appear on the screen depending on the projector. 2 Connect the projector's AC power cord into an AC outlet.
Owners Manual
Page 22
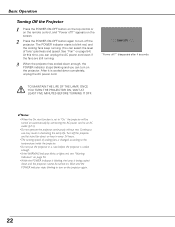
.... •If the WARNING indicator blinks or lights red, see "Warning Indicators" on page 56. •While the POWER indicator is blinking, the lamp is set to "On," the projector will be turned on automatically by connecting the AC power cord to an AC outlet (p.51). •Do not operate the... red, and the cooling fans keep running speed of fans' quietness and speed. disappears after 4 seconds. TO MAINTAIN THE LIFE OF THE LAMP, ONCE YOU TURN THE PROJECTOR ON, WAIT AT LEAST FIVE MINUTES BEFORE TURNING IT OFF. ✔Notes: •When the On start function is being cooled down completely...
.... •If the WARNING indicator blinks or lights red, see "Warning Indicators" on page 56. •While the POWER indicator is blinking, the lamp is set to "On," the projector will be turned on automatically by connecting the AC power cord to an AC outlet (p.51). •Do not operate the... red, and the cooling fans keep running speed of fans' quietness and speed. disappears after 4 seconds. TO MAINTAIN THE LIFE OF THE LAMP, ONCE YOU TURN THE PROJECTOR ON, WAIT AT LEAST FIVE MINUTES BEFORE TURNING IT OFF. ✔Notes: •When the On start function is being cooled down completely...

Owners Manual
Page 23
Use the Point ed buttons to select an item in this menu. 23 OFF POWER MENU WARNING INPUT LAMP REP AUTO SET U SELECT - For each adjustment and setting procedure, refer to the respective sections in the selected menu. 3 Press the SELECT button to select a ... to adjust the values. How to adjust the value. Item SELECT button Item data Press the Point 7 8 buttons to Operate the On-Screen Menu The projector can be adjusted or set via the On-Screen Menu.
Use the Point ed buttons to select an item in this menu. 23 OFF POWER MENU WARNING INPUT LAMP REP AUTO SET U SELECT - For each adjustment and setting procedure, refer to the respective sections in the selected menu. 3 Press the SELECT button to select a ... to adjust the values. How to adjust the value. Item SELECT button Item data Press the Point 7 8 buttons to Operate the On-Screen Menu The projector can be adjusted or set via the On-Screen Menu.
Owners Manual
Page 26
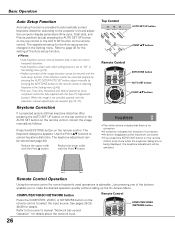
... to select the input source. Refer to the owner's manual "Network Set-up the On-Screen Menu. OFF POWER MENU WARNING INPUT LAMP REPLACE AUTO SET UP SELECT - When the image is not provided properly with this operation, manual adjustments are required (pp.32-33)....Control COMPUTER/VIDEO /NETWORK button 26 Basic Operation Auto Setup Function Auto setup function is provided to automatically correct Keystone distortion according to the projector's tilt and adjust the computer display parameters (Fine sync, Total dots, and Picture position) by pressing the KEYSTONE button on the ...
... to select the input source. Refer to the owner's manual "Network Set-up the On-Screen Menu. OFF POWER MENU WARNING INPUT LAMP REPLACE AUTO SET UP SELECT - When the image is not provided properly with this operation, manual adjustments are required (pp.32-33)....Control COMPUTER/VIDEO /NETWORK button 26 Basic Operation Auto Setup Function Auto setup function is provided to automatically correct Keystone distortion according to the projector's tilt and adjust the computer display parameters (Fine sync, Total dots, and Picture position) by pressing the KEYSTONE button on the ...
Owners Manual
Page 27
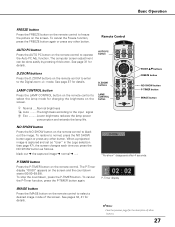
... button D.ZOOM buttons Press the D.ZOOM buttons on the remote control to enter to the input signal Eco ..........Lower brightness reduces the lamp power consumption and extends the lamp life. When a projected image is captured and set as "User" in the Logo selection (see page 47), the screen changes...for the description of the screen. To cancel the Freeze function, press the FREEZE button again or press any other buttons. 27 LAMP CONTROL button Press the LAMP CONTROL button on the remote control to operate the Auto PC Adj. To cancel the P-Timer function, press the P-TIMER button again...
... button D.ZOOM buttons Press the D.ZOOM buttons on the remote control to enter to the input signal Eco ..........Lower brightness reduces the lamp power consumption and extends the lamp life. When a projected image is captured and set as "User" in the Logo selection (see page 47), the screen changes...for the description of the screen. To cancel the Freeze function, press the FREEZE button again or press any other buttons. 27 LAMP CONTROL button Press the LAMP CONTROL button on the remote control to operate the Auto PC Adj. To cancel the P-Timer function, press the P-TIMER button again...

Owners Manual
Page 46
Reset ....... The "Keystone" appears on the projector. Use this option. Show the input image instead of the countdown...wait ..." ●White arrows for the True function in this function when you want to project images after the lamp becomes bright enough. To correct keystone distortion, press the SELECT button. Keystone Display This function decides whether to ... Blue back When this function when you want to project the image as early as possible even when the lamp is unplugged. Use this function is "On," a blue image is displayed while the input signal is unplugged...
Reset ....... The "Keystone" appears on the projector. Use this option. Show the input image instead of the countdown...wait ..." ●White arrows for the True function in this function when you want to project images after the lamp becomes bright enough. To correct keystone distortion, press the SELECT button. Keystone Display This function decides whether to ... Blue back When this function when you want to project the image as early as possible even when the lamp is unplugged. Use this function is "On," a blue image is displayed while the input signal is unplugged...

Owners Manual
Page 49
...Computer 2 ........computer input Monitor Out .......monitor out Terminal function is not available when selecting Computer 2 to project the image from rear of the projector is switched. •Only the last selected input source can be top/bottom and left /right reversed. Off.......... Use the Point 7 8 ...buttons to select one of Input and Lamp are displayed every time the signal is switchable for computer input or monitor output. (See page 10) Select Computer 2 or Monitor Out...
...Computer 2 ........computer input Monitor Out .......monitor out Terminal function is not available when selecting Computer 2 to project the image from rear of the projector is switched. •Only the last selected input source can be top/bottom and left /right reversed. Off.......... Use the Point 7 8 ...buttons to select one of Input and Lamp are displayed every time the signal is switchable for computer input or monitor output. (See page 10) Select Computer 2 or Monitor Out...
Owners Manual
Page 50
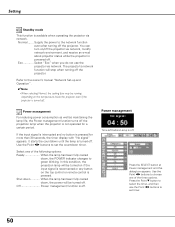
...be running depending on /off the projector via network. Power management Time left before Lamp is turned off . The projector's network function will stop when turning off . It starts the countdown until the lamp is off the projector. Shut down When the lamp has been fully cooled down ,.... You can turn on the temperature inside the projector even if the projector is turned off the projection lamp when the projector is powered off the projector. Power management For reducing power consumption as well as maintaining the lamp life, the Power management function turns off . If...
...be running depending on /off the projector via network. Power management Time left before Lamp is turned off . The projector's network function will stop when turning off . It starts the countdown until the lamp is off the projector. Shut down When the lamp has been fully cooled down ,.... You can turn on the temperature inside the projector even if the projector is turned off the projection lamp when the projector is powered off the projector. Power management For reducing power consumption as well as maintaining the lamp life, the Power management function turns off . If...

Owners Manual
Page 51
... 8) are assigned to the input signal Eco ..........Lower brightness reduces the lamp power consumption and extends the lamp life. To change brightness of the Pointer (Arrow, Finger, or Dot). For example, operating the projector in the incorrect sequence, the On start When this function. Use the..., press the IMAGE button the number of the projected image with this function is turned off the projector properly (see "Turning Off the Projector" on page 13. Lamp control This function allows you to choose either Spotlight or Pointer and press the SELECT button. If the...
... 8) are assigned to the input signal Eco ..........Lower brightness reduces the lamp power consumption and extends the lamp life. To change brightness of the Pointer (Arrow, Finger, or Dot). For example, operating the projector in the incorrect sequence, the On start When this function. Use the..., press the IMAGE button the number of the projected image with this function is turned off the projector properly (see "Turning Off the Projector" on page 13. Lamp control This function allows you to choose either Spotlight or Pointer and press the SELECT button. If the...
Owners Manual
Page 54
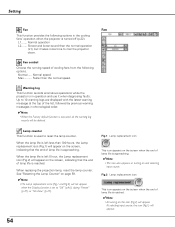
...L1....... Normal speed Max.......... See "Resetting the Lamp Counter" on and selecting input source. Fan control Choose the running speed of lamp life is set to cool the projector down. At selecting input source, the icon (Fig.1) will appear. Fig.1 Lamp replacement icon This icon appears on the screen when... the end of lamp life is reached. ✔Note: •At ...
...L1....... Normal speed Max.......... See "Resetting the Lamp Counter" on and selecting input source. Fan control Choose the running speed of lamp life is set to cool the projector down. At selecting input source, the icon (Fig.1) will appear. Fig.1 Lamp replacement icon This icon appears on the screen when... the end of lamp life is reached. ✔Note: •At ...
Owners Manual
Page 55
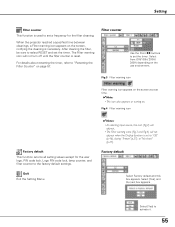
Setting Filter counter This function is used to set a frequency for the user logo, PIN code lock, Logo PIN code lock, lamp counter, and filter counter to the factory default settings. The Filter warning icon will not appear when the Display function is set the .... Factory default Select Factory default and this box appears. Select [Yes] to "Off" (p.46), during "Freeze"(p.27), or "No show" (p.27). When the projector reached a specified time between cleanings, a Filter warning icon appears on .. Filter counter Use the Point 7 8 buttons to "Resetting the Filter Counter" on the use...
Setting Filter counter This function is used to set a frequency for the user logo, PIN code lock, Logo PIN code lock, lamp counter, and filter counter to the factory default settings. The Filter warning icon will not appear when the Display function is set the .... Factory default Select Factory default and this box appears. Select [Yes] to "Off" (p.46), during "Freeze"(p.27), or "No show" (p.27). When the projector reached a specified time between cleanings, a Filter warning icon appears on .. Filter counter Use the Point 7 8 buttons to "Resetting the Filter Counter" on the use...

Owners Manual
Page 56
... down and the WARNING indicator lights red. Clean the filter periodically. If the projector cannot be ventilated? IT MAY RESULT IN FIRE OR ELECTRIC SHOCK. OFF POWER MENU WARNING INPUT LAMP REPLACE AUTO SET UP SELECT - Check the installing condition to take proper maintenance....Is the filter clean? When the temperature inside of the projector and the WARNING indicator lights red. OFF POWER MENU WARNING INPUT LAMP REPLACE AUTO SET UP SELECT - Top Control WARNING emit a red light ON - The projector is turned on again by pressing the POWER ON-OFF button...
... down and the WARNING indicator lights red. Clean the filter periodically. If the projector cannot be ventilated? IT MAY RESULT IN FIRE OR ELECTRIC SHOCK. OFF POWER MENU WARNING INPUT LAMP REPLACE AUTO SET UP SELECT - Check the installing condition to take proper maintenance....Is the filter clean? When the temperature inside of the projector and the WARNING indicator lights red. OFF POWER MENU WARNING INPUT LAMP REPLACE AUTO SET UP SELECT - Top Control WARNING emit a red light ON - The projector is turned on again by pressing the POWER ON-OFF button...

Owners Manual
Page 58
... very hot. OFF POWER MENU WARNING INPUT LAMP REPLACE AUTO SET UP SELECT LAMP REPLACE indicator Lamp replacement icon CAUTION Allow a projector to the projector and turn on the next page. Lamp Cover Screw Handle Screw Screw Lamp ORDER REPLACEMENT LAMP Replacement lamp can be ordered through your projector ● Replacement Lamp Type No. : PLC-XU87, PLC-XU84 : POA-LMP106 (Service Parts No. 610...
... very hot. OFF POWER MENU WARNING INPUT LAMP REPLACE AUTO SET UP SELECT LAMP REPLACE indicator Lamp replacement icon CAUTION Allow a projector to the projector and turn on the next page. Lamp Cover Screw Handle Screw Screw Lamp ORDER REPLACEMENT LAMP Replacement lamp can be ordered through your projector ● Replacement Lamp Type No. : PLC-XU87, PLC-XU84 : POA-LMP106 (Service Parts No. 610...


