Owners Manual
Page 3
... Rear Terminal 9 Top Control 10 Remote Control 11 Remote Control Battery Installation 12 Operating Range 12 Installation 13 Positioning the Projector 13 Adjustable Feet 13 Connecting the AC Power Cord 14 Connecting to a Computer 15 Connecting to Video Equipment 16 Connecting...Replacement 52 Lamp Replacement Counter 53 Appendix 54 Troubleshooting 54 Menu Tree 56 Indicators and Projector Condition 58 Compatible Computer Specifications 59 Technical Specifications 60 Optional Parts 61 Configurations of Terminals 62 PIN Code Number Memo 63 Trademarks Each ...
... Rear Terminal 9 Top Control 10 Remote Control 11 Remote Control Battery Installation 12 Operating Range 12 Installation 13 Positioning the Projector 13 Adjustable Feet 13 Connecting the AC Power Cord 14 Connecting to a Computer 15 Connecting to Video Equipment 16 Connecting...Replacement 52 Lamp Replacement Counter 53 Appendix 54 Troubleshooting 54 Menu Tree 56 Indicators and Projector Condition 58 Compatible Computer Specifications 59 Technical Specifications 60 Optional Parts 61 Configurations of Terminals 62 PIN Code Number Memo 63 Trademarks Each ...
Owners Manual
Page 18
... operations are invalid. • If the correct PIN code number is PIN code? Setting PIN code prevents others except the specific users from operating the projector. A PIN code consists of the projector with a PIN code, PIN code Input Dialog Box will disappear after the PIN code dialog box appeared, the... start. 4 After the countdown, the input source that you entered an incorrect PIN code, "PIN code" and the number will appear on the projector. 2 Connect the projector's AC power cord into an AC outlet. If you can start to "PIN code". Set a new PIN code with a computer, VCR, etc...
... operations are invalid. • If the correct PIN code number is PIN code? Setting PIN code prevents others except the specific users from operating the projector. A PIN code consists of the projector with a PIN code, PIN code Input Dialog Box will disappear after the PIN code dialog box appeared, the... start. 4 After the countdown, the input source that you entered an incorrect PIN code, "PIN code" and the number will appear on the projector. 2 Connect the projector's AC power cord into an AC outlet. If you can start to "PIN code". Set a new PIN code with a computer, VCR, etc...
Owners Manual
Page 28
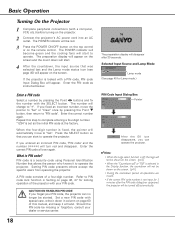
It allows you to recall the setting for a specific computer. 1 Press the MENU button to display the adjustment ... mode Press the SELECT button to show H-sync freq. When the image has dark bars, try this projector. Press the SELECT button at this item to adjust other items. Press the SELECT button at the Current... the SELECT button. Press the Point 7 8 buttons to adjust the horizontal picture position. and V-sync freq. The projector has 5 independent memory areas to match those parameters manually adjusted. Fine sync Eliminate flicker from the image displayed. Horizontal...
It allows you to recall the setting for a specific computer. 1 Press the MENU button to display the adjustment ... mode Press the SELECT button to show H-sync freq. When the image has dark bars, try this projector. Press the SELECT button at this item to adjust other items. Press the SELECT button at the Current... the SELECT button. Press the Point 7 8 buttons to adjust the horizontal picture position. and V-sync freq. The projector has 5 independent memory areas to match those parameters manually adjusted. Fine sync Eliminate flicker from the image displayed. Horizontal...

Owners Manual
Page 36
... and then press the SELECT button. When Video System is displayed. COMPONENT VIDEO SIGNAL FORMAT If the projector cannot reproduce proper video image, it is necessary to select a specific broadcast signal format among 480i, 575i, 480p, 575p, 720p, 1035i, and 1080i. Move the pointer... to display the On-Screen Menu. PAL / SECAM / NTSC / NTSC4.43 / PAL-M / PAL-N If the projector cannot reproduce proper video image, it is necessary to select a specific component video signal format among PAL, SECAM, NTSC, NTSC 4.43, PAL-M, and PALN. Video Input Video System Selection ...
... and then press the SELECT button. When Video System is displayed. COMPONENT VIDEO SIGNAL FORMAT If the projector cannot reproduce proper video image, it is necessary to select a specific broadcast signal format among 480i, 575i, 480p, 575p, 720p, 1035i, and 1080i. Move the pointer... to display the On-Screen Menu. PAL / SECAM / NTSC / NTSC4.43 / PAL-M / PAL-N If the projector cannot reproduce proper video image, it is necessary to select a specific component video signal format among PAL, SECAM, NTSC, NTSC 4.43, PAL-M, and PALN. Video Input Video System Selection ...
Owners Manual
Page 59
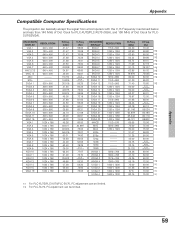
... SVGA 4 SVGA 5 SVGA 6 SVGA 7 SVGA 8 SVGA 9 SVGA 10 SVGA 11 MAC 16 XGA 1 XGA 2 XGA 3 XGA 4 XGA 5 XGA 6 XGA 7 XGA 8 XGA 9 XGA 10 XGA 11 XGA 12 XGA 13 XGA 14 XGA 15 MAC 19 RESOLUTION 640 x 480 720 x 400 640 x 400 640 x 480 640 x ...PLC-XU73/PLC-XU70/PLC-SU70, PC adjustment can be limited. ✳2 For PLC-SU70, PC adjustment can basically accept the signal from all computers with the V, H-Frequency mentioned below and less than 140 MHz of Dot Clock for PLC-XU73/PLC-XU70 (XGA), and 100 MHz of Dot Clock for PLCSU70(SVGA). Appendix 59 Appendix Compatible Computer Specifications The projector...
... SVGA 4 SVGA 5 SVGA 6 SVGA 7 SVGA 8 SVGA 9 SVGA 10 SVGA 11 MAC 16 XGA 1 XGA 2 XGA 3 XGA 4 XGA 5 XGA 6 XGA 7 XGA 8 XGA 9 XGA 10 XGA 11 XGA 12 XGA 13 XGA 14 XGA 15 MAC 19 RESOLUTION 640 x 480 720 x 400 640 x 400 640 x 480 640 x ...PLC-XU73/PLC-XU70/PLC-SU70, PC adjustment can be limited. ✳2 For PLC-SU70, PC adjustment can basically accept the signal from all computers with the V, H-Frequency mentioned below and less than 140 MHz of Dot Clock for PLC-XU73/PLC-XU70 (XGA), and 100 MHz of Dot Clock for PLCSU70(SVGA). Appendix 59 Appendix Compatible Computer Specifications The projector...
Owners Manual
Page 60
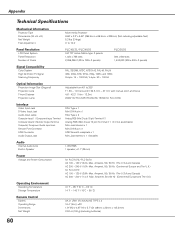
... oz (100 g) (including batteries) 60 Appendix Technical Specifications Mechanical Information Projector Type Dimensions (W x H x D) Net Weight Feet Adjustment Multi-media Projector 9.66" x 2.3" x 6.82" (294.5mm x 69.5mm x 208mm) (Not including adjustable feet) 5.3 lbs (2.4kgs) 0˚ to 10.0˚ Panel Resolution LCD Panel System Panel Resolution Number of Pixels PLC-XU73 / PLC-XU70 0.6" TFT Active Matrix type, 3 panels 1,024...
... oz (100 g) (including batteries) 60 Appendix Technical Specifications Mechanical Information Projector Type Dimensions (W x H x D) Net Weight Feet Adjustment Multi-media Projector 9.66" x 2.3" x 6.82" (294.5mm x 69.5mm x 208mm) (Not including adjustable feet) 5.3 lbs (2.4kgs) 0˚ to 10.0˚ Panel Resolution LCD Panel System Panel Resolution Number of Pixels PLC-XU73 / PLC-XU70 0.6" TFT Active Matrix type, 3 panels 1,024...
Owners Manual
Page 61
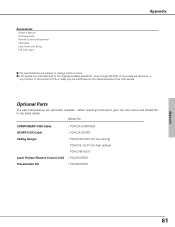
... Manual AC Power Cord Remote Control and Batteries VGA Cable Lens Cover with String PIN Code Label Appendix ● The specifications are subject to change without notice. ● LCD panels are manufactured to the sales dealer. Optional Parts The parts listed below are effective, a tiny fraction of the ...pixels (0.01% or less) may be ineffective by the characteristics of the LCD panels. Model No. COMPONENT-VGA Cable : POA-CA-COMPVGA SCART-VGA Cable : POA-CA-SCART Ceiling Hanger : POA-CHS-US01 (for low ...
... Manual AC Power Cord Remote Control and Batteries VGA Cable Lens Cover with String PIN Code Label Appendix ● The specifications are subject to change without notice. ● LCD panels are manufactured to the sales dealer. Optional Parts The parts listed below are effective, a tiny fraction of the ...pixels (0.01% or less) may be ineffective by the characteristics of the LCD panels. Model No. COMPONENT-VGA Cable : POA-CA-COMPVGA SCART-VGA Cable : POA-CA-SCART Ceiling Hanger : POA-CHS-US01 (for low ...