Owners Manual
Page 10
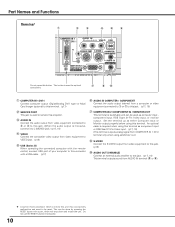
...18) (This terminal outputs analog signal from COMPUTER IN 1 DVI-I AUDIO IN R L (MONO) VIDEO USB * SERVICE PORT S-VIDEO COMPUTER / COMPONENT RESET MCI COMPUTER IN 2 / COMPONENT IN / MONITOR OUT AUDIO IN AUDIO OUT (VARIABLE) Do not press this button. An optional cable is used for ... this connector with a pen, which controls this unit may occasionally malfunction and need to service this terminal. I terminal only when using this projector. This button is switchable and can be used as Monitor out.) i S-VIDEO Connect the S-VIDEO output from video equipment to this jack....
...18) (This terminal outputs analog signal from COMPUTER IN 1 DVI-I AUDIO IN R L (MONO) VIDEO USB * SERVICE PORT S-VIDEO COMPUTER / COMPONENT RESET MCI COMPUTER IN 2 / COMPONENT IN / MONITOR OUT AUDIO IN AUDIO OUT (VARIABLE) Do not press this button. An optional cable is used for ... this connector with a pen, which controls this unit may occasionally malfunction and need to service this terminal. I terminal only when using this projector. This button is switchable and can be used as Monitor out.) i S-VIDEO Connect the S-VIDEO output from video equipment to this jack....

Owners Manual
Page 12
... button Operates P-Timer function. (p21) !7 MUTE button Mutes sound. (p21) !8 R-CLICK button Acts as right click for an image from the remote control to the projector. Part Names and Functions Remote Control q w e r !4 t !5 y !6 u !7 i o !0 !8 !1 !9 !2 @0 !3 @1 12 q L-CLICK button Acts as left click ... COMPUTER button Selects input source (COMPUTER 1 or COMPUTER 2). (p24) @0 VIDEO button Selects input source (VIDEO). (p32) @1 RESET/ON/ALL-OFF switch When using the remote control, set this laser pointer for energy saving when it again. Slide this button within ...
... button Operates P-Timer function. (p21) !7 MUTE button Mutes sound. (p21) !8 R-CLICK button Acts as right click for an image from the remote control to the projector. Part Names and Functions Remote Control q w e r !4 t !5 y !6 u !7 i o !0 !8 !1 !9 !2 @0 !3 @1 12 q L-CLICK button Acts as left click ... COMPUTER button Selects input source (COMPUTER 1 or COMPUTER 2). (p24) @0 VIDEO button Selects input source (VIDEO). (p32) @1 RESET/ON/ALL-OFF switch When using the remote control, set this laser pointer for energy saving when it again. Slide this button within ...

Owners Manual
Page 14
.... (See page 17 for connection.) When the Pointer function is used as a wireless mouse for the remote control, slide the RESET/ON/ALL-OFF switch to the RESET, and then to each remote control code number. Each time you press the IMAGE button, the code is not available. Remote ...code (Code 1) and the other seven codes (Code 2 to the remote control code for the remote control. R-CLICK button Acts as left click while the projector and a computer are connected with a USB cable. The initial code is Code 1. PRESENTATION POINTER button Move the pointer on page 40.) 1 While pressing ...
.... (See page 17 for connection.) When the Pointer function is used as a wireless mouse for the remote control, slide the RESET/ON/ALL-OFF switch to the RESET, and then to each remote control code number. Each time you press the IMAGE button, the code is not available. Remote ...code (Code 1) and the other seven codes (Code 2 to the remote control code for the remote control. R-CLICK button Acts as left click while the projector and a computer are connected with a USB cable. The initial code is Code 1. PRESENTATION POINTER button Move the pointer on page 40.) 1 While pressing ...
Owners Manual
Page 17
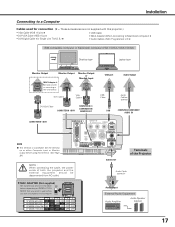
...) ✽ • Audio Cables ( Mini Plug (stereo) x 2) ✽ IBM-compatible computer or Macintosh computer (VGA / SVGA / XGA / SXGA) Desktop type Laptop type Monitor Output Monitor Output MAC Adapter ✽ Set slide switches according to the chart below depending on RESOLUTION MODE...39.) SERVICE PORT S-VIDEO COMPUTER / COMPONENT RESET MCI COMPUTER IN 2 / COMPONENT IN / MONITOR OUT AUDIO IN AUDIO OUT (VARIABLE) AUDIO OUT Terminals of the Projector NOTE : When connecting the cable, the power cords of both the projector and the external equipment should be disconnected ...
...) ✽ • Audio Cables ( Mini Plug (stereo) x 2) ✽ IBM-compatible computer or Macintosh computer (VGA / SVGA / XGA / SXGA) Desktop type Laptop type Monitor Output Monitor Output MAC Adapter ✽ Set slide switches according to the chart below depending on RESOLUTION MODE...39.) SERVICE PORT S-VIDEO COMPUTER / COMPONENT RESET MCI COMPUTER IN 2 / COMPONENT IN / MONITOR OUT AUDIO IN AUDIO OUT (VARIABLE) AUDIO OUT Terminals of the Projector NOTE : When connecting the cable, the power cords of both the projector and the external equipment should be disconnected ...
Owners Manual
Page 18
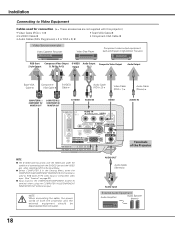
.... NOTE : When connecting the cable, the power cords of connecting both the projector and the external equipment should be disconnected from AC outlet. I AUDIO IN R L (MONO) VIDEO USB SERVICE PORT S-VIDEO COMPUTER / COMPONENT RESET MCI COMPUTER IN 2 / COMPONENT IN / MONITOR OUT AUDIO IN AUDIO OUT... (VARIABLE) AUDIO IN Terminals of the Projector NOTE G The S-VIDEO jack has priority over the VIDEO jack under the condition of both...
.... NOTE : When connecting the cable, the power cords of connecting both the projector and the external equipment should be disconnected from AC outlet. I AUDIO IN R L (MONO) VIDEO USB SERVICE PORT S-VIDEO COMPUTER / COMPONENT RESET MCI COMPUTER IN 2 / COMPONENT IN / MONITOR OUT AUDIO IN AUDIO OUT... (VARIABLE) AUDIO IN Terminals of the Projector NOTE G The S-VIDEO jack has priority over the VIDEO jack under the condition of both...

Owners Manual
Page 23
... Image 1 ~ 4. (p29) Screen Menu Used to adjust size of image. [Normal / True / Wide / Digital zoom +/-] (p31) Setting Menu Used to change settings of the projector or reset lamp replace counter. (p38-40) Input Menu Used to select input source either Computer or Video. (p24) PC Adjust Menu Used to adjust parameters to...
... Image 1 ~ 4. (p29) Screen Menu Used to adjust size of image. [Normal / True / Wide / Digital zoom +/-] (p31) Setting Menu Used to change settings of the projector or reset lamp replace counter. (p38-40) Input Menu Used to select input source either Computer or Video. (p24) PC Adjust Menu Used to adjust parameters to...

Owners Manual
Page 28
... area Display area V Adjusts the vertical area displayed by this function off. It is displayed at 4 : 3 aspect ratio. Reset Resets all adjustment to the Mode free icon and then press the SELECT button. Mode free To clear adjustment data previously set, move ...(H/V), and Full screen cannot be selected when "480i", "575i", "480p", "575p", "720p", "1035i", or "1080i" is fully displayed at 5 : 4 aspect ratio with this projector. Press the SELECT button at the Display area dialog box. Display area H Adjusts the horizontal area displayed by this dialog box. Computer Input Display area...
... area Display area V Adjusts the vertical area displayed by this function off. It is displayed at 4 : 3 aspect ratio. Reset Resets all adjustment to the Mode free icon and then press the SELECT button. Mode free To clear adjustment data previously set, move ...(H/V), and Full screen cannot be selected when "480i", "575i", "480p", "575p", "720p", "1035i", or "1080i" is fully displayed at 5 : 4 aspect ratio with this projector. Press the SELECT button at the Display area dialog box. Display area H Adjusts the horizontal area displayed by this dialog box. Computer Input Display area...

Owners Manual
Page 30
... Right button to adjust image brighter. (From 0 to adjust value. Image Level Menu Move the red frame pointer to any of contrast. (From 0 to 15.) Reset Resets all adjustment to adjust, and then press the SELECT button. Press the Point Left/Right button to move the red frame pointer to the Image...
... Right button to adjust image brighter. (From 0 to adjust value. Image Level Menu Move the red frame pointer to any of contrast. (From 0 to 15.) Reset Resets all adjustment to adjust, and then press the SELECT button. Press the Point Left/Right button to move the red frame pointer to the Image...

Owners Manual
Page 31
...+" is higher than 1280 X 1024, reset the resolution to the lower before connecting to fit the screen size in the PC System Menu (p25). NOTE G This Screen Menu cannot be operated when "720p (HDTV)", "1035i (HDTV)", or "1080i (HDTV)" is modified to the projector. If your computer's screen resolution is...A projected image can be selected when "480i", "575i", "480p", or "575p" is selected in the PC Adjust Menu is larger than XGA (1024 x 768 for PLC-XU55/PLC-XU50) or SVGA (800 x 600 for PLCSU50) is selected in initial mode. cannot be used . mode, press any resolution higher than the ...
...+" is higher than 1280 X 1024, reset the resolution to the lower before connecting to fit the screen size in the PC System Menu (p25). NOTE G This Screen Menu cannot be operated when "720p (HDTV)", "1035i (HDTV)", or "1080i (HDTV)" is modified to the projector. If your computer's screen resolution is...A projected image can be selected when "480i", "575i", "480p", or "575p" is selected in the PC Adjust Menu is larger than XGA (1024 x 768 for PLC-XU55/PLC-XU50) or SVGA (800 x 600 for PLCSU50) is selected in initial mode. cannot be used . mode, press any resolution higher than the ...

Owners Manual
Page 37
Video Input Reset Resets all adjustment to display the desirable image size. 1 Press the MENU button and the On-Screen Menu will appear. Store icon Screen Size Adjustment This projector has a picture screen resize function, which enables you want to a function and press the SELECT button. Press the Point Left/Right button to move...
Video Input Reset Resets all adjustment to display the desirable image size. 1 Press the MENU button and the On-Screen Menu will appear. Store icon Screen Size Adjustment This projector has a picture screen resize function, which enables you want to a function and press the SELECT button. Press the Point Left/Right button to move...

Owners Manual
Page 38
..., and 1080i. The keystone dialog box appears. Blue back When this function is "On," the projector produces a blue image while input signal is automatically reset and the projector captures an image without keystone adjustment. G On-Screen Menu G "Power off?" message Logo This ...function decides what to XGA(1024 x 768). Capture This function is disconnected. Press the Point Left/Right...
..., and 1080i. The keystone dialog box appears. Blue back When this function is "On," the projector produces a blue image while input signal is automatically reset and the projector captures an image without keystone adjustment. G On-Screen Menu G "Power off?" message Logo This ...function decides what to XGA(1024 x 768). Capture This function is disconnected. Press the Point Left/Right...

Owners Manual
Page 40
... ···· lowers brightness and reduces the lamp power consumption. This switching function prevents remote control interference when operating several projectors or video equipment at Remote control, the remote control code menu appears. To change the code for the remote control; Select a ...of the top control and remote control. It is used to reset the lamp replace counter. This will cancel the top control lock. Factory default Factory default This function returns all setting values except for the projector; Key lock Select Key lock and this function. Setting Lamp ...
... ···· lowers brightness and reduces the lamp power consumption. This switching function prevents remote control interference when operating several projectors or video equipment at Remote control, the remote control code menu appears. To change the code for the remote control; Select a ...of the top control and remote control. It is used to reset the lamp replace counter. This will cancel the top control lock. Factory default Factory default This function returns all setting values except for the projector; Key lock Select Key lock and this function. Setting Lamp ...

Owners Manual
Page 43
... Lamp Screw Screw Screw Handle ORDER REPLACEMENT LAMP Replacement lamp can be ordered through your projector : G Replacement Lamp Type No. : PLC-XU55/PLC-XU50/PLC-SU50 POA-LMP55 (for PLC-XU55/PLC-XU50) (Service Parts No. 610 309 2706) POA-LMP65 (for PLC-SU50) (Service Parts No. 610 307 7925) 43 SELECT WARNING LAMP REPLACE VOLUME... the AC power cord to an end. G Model No. The glass can become very hot. See "Lamp Replace Counter" on the projector. 6 Reset the Lamp replace counter. Top Control POWER This indicator lights yellow when the life of the projection lamp draws to the...
... Lamp Screw Screw Screw Handle ORDER REPLACEMENT LAMP Replacement lamp can be ordered through your projector : G Replacement Lamp Type No. : PLC-XU55/PLC-XU50/PLC-SU50 POA-LMP55 (for PLC-XU55/PLC-XU50) (Service Parts No. 610 309 2706) POA-LMP65 (for PLC-SU50) (Service Parts No. 610 307 7925) 43 SELECT WARNING LAMP REPLACE VOLUME... the AC power cord to an end. G Model No. The glass can become very hot. See "Lamp Replace Counter" on the projector. 6 Reset the Lamp replace counter. Top Control POWER This indicator lights yellow when the life of the projection lamp draws to the...

Owners Manual
Page 44
...button to move the red frame pointer to reset the Lamp replace counter. The message "Lamp replace counter Reset?" NOTE G Do not reset the Lamp replace counter without implementation of use . is reset, the LAMP REPLACE indicator stops lighting. 1 Turn the projector on, press the MENU button and the OnScreen... dialog box appears and select [Yes] to the Lamp counter reset item and then press the SELECT button. Be sure to reset the Lamp replace counter only after the lamp is replaced. If a lamp explodes, disconnect the projector's AC plug from lamp to lamp and according to the environment...
...button to move the red frame pointer to reset the Lamp replace counter. The message "Lamp replace counter Reset?" NOTE G Do not reset the Lamp replace counter without implementation of use . is reset, the LAMP REPLACE indicator stops lighting. 1 Turn the projector on, press the MENU button and the OnScreen... dialog box appears and select [Yes] to the Lamp counter reset item and then press the SELECT button. Be sure to reset the Lamp replace counter only after the lamp is replaced. If a lamp explodes, disconnect the projector's AC plug from lamp to lamp and according to the environment...

Owners Manual
Page 47
...for service and checkup. Indicators LAMP POWER WARNING REPLACE red/green red yellow Projector Condition The projector is OFF. (The AC power cord is unplugged.) Appendix ✽ The projector is preparing for stand-by or the projection lamp is cooled down enough and...replace the projection lamp with the POWER ON-OFF button. ✽ The projector is operating normally. ✽ The projector is abnormally high. jector on the projector, the WARNING indicator stops flashing. Reset the Lamp replace counter after replacement of the projection lamp draws to normal...
...for service and checkup. Indicators LAMP POWER WARNING REPLACE red/green red yellow Projector Condition The projector is OFF. (The AC power cord is unplugged.) Appendix ✽ The projector is preparing for stand-by or the projection lamp is cooled down enough and...replace the projection lamp with the POWER ON-OFF button. ✽ The projector is operating normally. ✽ The projector is abnormally high. jector on the projector, the WARNING indicator stops flashing. Reset the Lamp replace counter after replacement of the projection lamp draws to normal...

Owners Manual
Page 48
Total dots Horizontal Vertical Current mode Clamp Display area Display area - V Full screen Reset Mode free Store Quit RGB( Analog ) RGB( PC Digital ) RGB( AV HDCP ) RGB Component RGB( Scart ) Auto Video S-Video Go to System (1) N/A N/A Go to System (1) ... / Off Yes / No Mode 1 Mode 2 Mode 3 Mode 4 Mode 5 Quit Screen Standard Real Image 1 Image 2 Image 3 Image 4 Contrast Brightness Color Temp Red Green Blue Sharpness Gamma Reset Store Quit Normal True Wide Digital zoom + Digital zoom - 0 - 63 0 - 63 High Mid Low XLow 0 - 63 0 - 63 0 - 63 0 - 15 0 - 15 Yes / No Image 1 Image 2 Image...
Total dots Horizontal Vertical Current mode Clamp Display area Display area - V Full screen Reset Mode free Store Quit RGB( Analog ) RGB( PC Digital ) RGB( AV HDCP ) RGB Component RGB( Scart ) Auto Video S-Video Go to System (1) N/A N/A Go to System (1) ... / Off Yes / No Mode 1 Mode 2 Mode 3 Mode 4 Mode 5 Quit Screen Standard Real Image 1 Image 2 Image 3 Image 4 Contrast Brightness Color Temp Red Green Blue Sharpness Gamma Reset Store Quit Normal True Wide Digital zoom + Digital zoom - 0 - 63 0 - 63 High Mid Low XLow 0 - 63 0 - 63 0 - 63 0 - 15 0 - 15 Yes / No Image 1 Image 2 Image...

Owners Manual
Page 49
...43 PAL-M PAL-N Standard Cinema Image 1 Image 2 Image 3 Image 4 Contrast Brightness Color Tint Color Temp Screen Red Green Blue Sharpness Gamma Progressive Reset Store Quit Normal Wide Setting Sound Setting 0 - 63 0 - 63 0 - 63 0 - 63 High Mid Low XLow 0 - 63 0 ...Lamp mode Pointer Remote control Key lock Lamp counter reset Factory default 0 - 63 On / Off English German French Italian Spanish Portuguese Dutch Swedish Russian ...Chinese Korean Japanese Quit Store / Reset On / Off On / Off Off User Default Yes/No On / Off On /...
...43 PAL-M PAL-N Standard Cinema Image 1 Image 2 Image 3 Image 4 Contrast Brightness Color Tint Color Temp Screen Red Green Blue Sharpness Gamma Progressive Reset Store Quit Normal Wide Setting Sound Setting 0 - 63 0 - 63 0 - 63 0 - 63 High Mid Low XLow 0 - 63 0 ...Lamp mode Pointer Remote control Key lock Lamp counter reset Factory default 0 - 63 On / Off English German French Italian Spanish Portuguese Dutch Swedish Russian ...Chinese Korean Japanese Quit Store / Reset On / Off On / Off Off User Default Yes/No On / Off On /...


