Owners Manual
Page 9
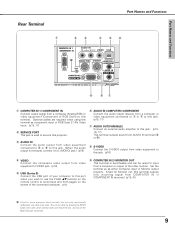
.... (p15, 16, 17) This terminal outputs sound from a computer (Analog RGB) or video equipment (Component or RGB Scart) to this projector. i S-VIDEO Connect the S-VIDEO output from video equipment to this jack. (p16) r VIDEO Connect the composite video output from a computer... and Functions q w e r t y COMPUTER IN 1 / COMPONENT IN AUDIO IN R L (MONO) VIDEO USB ✽ SERVICE PORT S-VIDEO COMPUTER / COMPONENT RESET COMPUTER IN 2 / MONITOR OUT AUDIO IN AUDIO OUT (VARIABLE) o iu q COMPUTER IN 1/ COMPONENT IN Connect output signal from AUDIO IN terminal (e or y). Optional...
.... (p15, 16, 17) This terminal outputs sound from a computer (Analog RGB) or video equipment (Component or RGB Scart) to this projector. i S-VIDEO Connect the S-VIDEO output from video equipment to this jack. (p16) r VIDEO Connect the composite video output from a computer... and Functions q w e r t y COMPUTER IN 1 / COMPONENT IN AUDIO IN R L (MONO) VIDEO USB ✽ SERVICE PORT S-VIDEO COMPUTER / COMPONENT RESET COMPUTER IN 2 / MONITOR OUT AUDIO IN AUDIO OUT (VARIABLE) o iu q COMPUTER IN 1/ COMPONENT IN Connect output signal from AUDIO IN terminal (e or y). Optional...
Owners Manual
Page 15
... is switcheable. I AUDIO IN R L (MONO) VIDEO USB SERVICE PORT S-VIDEO COMPUTER / / CCOOMMPPOONNEENNTT RESET COMCOPMUPTUETRERIINN 22/ / MCMOONOMNIPTIOTOONRRENOOTUUITNT / AUDIO IN AUDIO OUT (AVRARIAIALBEL)E) This terminal is supplied.) • USB Cable ✽ • Audio Cables (Mini Plug: stereo Not supplied with this projector.) Installation Audio Output Audio cable (stereo) ✽ USB port USB cable ✽...
... is switcheable. I AUDIO IN R L (MONO) VIDEO USB SERVICE PORT S-VIDEO COMPUTER / / CCOOMMPPOONNEENNTT RESET COMCOPMUPTUETRERIINN 22/ / MCMOONOMNIPTIOTOONRRENOOTUUITNT / AUDIO IN AUDIO OUT (AVRARIAIALBEL)E) This terminal is supplied.) • USB Cable ✽ • Audio Cables (Mini Plug: stereo Not supplied with this projector.) Installation Audio Output Audio cable (stereo) ✽ USB port USB cable ✽...
Owners Manual
Page 16
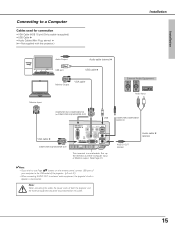
I AUDIO IN R L (MONO) VIDEO USB SERVICE PORT S-VIDEO COMPUTER / / CCOOMMPPOONNEENNTT RESET COMCOPMUPTUETRERIINN 22/ / MCMOONOMNIPTIOTOONRRENOOTUUITNT / AUDIO IN AUDIO OUT ((VVAARRIAIBALBE)LE) AUDIO OUT (stereo) Audio cable ✽ (stereo) ✔Note: &#...• Video and Audio Cable (RCA x 3) ✽ • S-VIDEO Cable ✽ • Audio Cables (Mini Plug: stereo Not supplied with this projector.) S-Video Output Composite Video and Audio Output (R) (L) (Video) S-Video cable ✽ Video and audio cable✽ External Audio Equipment Audio Input S-VIDEO (R) (L)...
I AUDIO IN R L (MONO) VIDEO USB SERVICE PORT S-VIDEO COMPUTER / / CCOOMMPPOONNEENNTT RESET COMCOPMUPTUETRERIINN 22/ / MCMOONOMNIPTIOTOONRRENOOTUUITNT / AUDIO IN AUDIO OUT ((VVAARRIAIBALBE)LE) AUDIO OUT (stereo) Audio cable ✽ (stereo) ✔Note: &#...• Video and Audio Cable (RCA x 3) ✽ • S-VIDEO Cable ✽ • Audio Cables (Mini Plug: stereo Not supplied with this projector.) S-Video Output Composite Video and Audio Output (R) (L) (Video) S-Video cable ✽ Video and audio cable✽ External Audio Equipment Audio Input S-VIDEO (R) (L)...

Owners Manual
Page 17
... from AC outlet. 17 Installation Connecting to external audio equipment, the projector's built-in speaker is disconnected. I AUDIO IN R L (MONO) VIDEO USB SERVICE PORT S-VIDEO COMPUTER / / CCOOMMPPOONNEENNTT RESET COMCOPMUPTUETRERIINN 22/ / MCMOONOMNIPTIOTOONRRENOOTUUITNT / AUDIO IN AUDIO OUT ((VVAARRIAIBALBE)LE)...RCA x 2) ✽ • Scart-VGA Cable ✽ • Component-VGA Cable ✽ (✽ = Not supplied with this projector.) Installation RGB Scart 21-pin Output Component Video Output (Y, Pb/Cb, Pr/Cr) Audio Output Scart-VGA cable ✽ Component-VGA cable...
... from AC outlet. 17 Installation Connecting to external audio equipment, the projector's built-in speaker is disconnected. I AUDIO IN R L (MONO) VIDEO USB SERVICE PORT S-VIDEO COMPUTER / / CCOOMMPPOONNEENNTT RESET COMCOPMUPTUETRERIINN 22/ / MCMOONOMNIPTIOTOONRRENOOTUUITNT / AUDIO IN AUDIO OUT ((VVAARRIAIBALBE)LE)...RCA x 2) ✽ • Scart-VGA Cable ✽ • Component-VGA Cable ✽ (✽ = Not supplied with this projector.) Installation RGB Scart 21-pin Output Component Video Output (Y, Pb/Cb, Pr/Cr) Audio Output Scart-VGA cable ✽ Component-VGA cable...
Owners Manual
Page 21
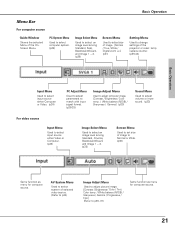
... Image 1 ~ 4. (p29) Screen Menu Used to adjust size of image. [Normal / True / Wide / Digital zoom +/-] (p31) Setting Menu Used to change settings of the projector or reset lamp replace counter. (p39-44) Basic Operation Input Menu Used to select input source either Computer or Video. (p24) PC Adjust Menu Used to adjust...
... Image 1 ~ 4. (p29) Screen Menu Used to adjust size of image. [Normal / True / Wide / Digital zoom +/-] (p31) Setting Menu Used to change settings of the projector or reset lamp replace counter. (p39-44) Basic Operation Input Menu Used to select input source either Computer or Video. (p24) PC Adjust Menu Used to adjust...

Owners Manual
Page 28
Display area H Adjusts the horizontal area displayed by this projector. Press the Point 7 8 button to their previous levels. Reset Resets all adjustment to decrease/increase value and then press the SELECT button. Move the red arrow pointer to the Mode that you want to clear ... the red arrow pointer to 5 in the PC System Menu (p25). 28 closes this dialog box. Display area V Adjusts the vertical area displayed by this projector. Mode free To clear adjustment data previously set, move the red frame pointer to the Mode free icon and then press the SELECT button. Press...
Display area H Adjusts the horizontal area displayed by this projector. Press the Point 7 8 button to their previous levels. Reset Resets all adjustment to decrease/increase value and then press the SELECT button. Move the red arrow pointer to the Mode that you want to clear ... the red arrow pointer to 5 in the PC System Menu (p25). 28 closes this dialog box. Display area V Adjusts the vertical area displayed by this projector. Mode free To clear adjustment data previously set, move the red frame pointer to the Mode free icon and then press the SELECT button. Press...

Owners Manual
Page 30
... and the Point 8 button to sharpen the image. (From 0 to 15.) Gamma Press the Point 7 8 button to obtain better balance of contrast. (From 0 to 15.) Reset Resets all adjustment to adjust, and then press the SELECT button. Adjust each item is displayed. Move the red frame pointer to the Image 1 to 4 where...
... and the Point 8 button to sharpen the image. (From 0 to 15.) Gamma Press the Point 7 8 button to obtain better balance of contrast. (From 0 to 15.) Reset Resets all adjustment to adjust, and then press the SELECT button. Adjust each item is displayed. Move the red frame pointer to the Image 1 to 4 where...

Owners Manual
Page 31
...when the image is selected in other than the screen size. If your computer's screen resolution is higher than 1280 X 1024, reset the resolution to the lower before connecting to the projector. • The image data in the PC System Menu (p25). • The True and Digital zoom +/- Digital zoom ... button to compress the image size. The Panning function can be operated when "720p(HDTV)", "1035i (HDTV)", or "1080i (HDTV)" is larger than XGA (1024 x 768) is modified to the normal screen, press the KEYSTONE button twice, press the D.ZOOM ▲▼ button or select Normal from ...
...when the image is selected in other than the screen size. If your computer's screen resolution is higher than 1280 X 1024, reset the resolution to the lower before connecting to the projector. • The image data in the PC System Menu (p25). • The True and Digital zoom +/- Digital zoom ... button to compress the image size. The Panning function can be operated when "720p(HDTV)", "1035i (HDTV)", or "1080i (HDTV)" is larger than XGA (1024 x 768) is modified to the normal screen, press the KEYSTONE button twice, press the D.ZOOM ▲▼ button or select Normal from ...

Owners Manual
Page 37
... fps film needs to get the best film-like images. Store To store the adjustment data, move the red frame pointer to their previous figure. Reset Resets all adjustment to the Store icon and press the SELECT button. Move the red frame pointer to the Image Level 1 to the original film quality...; 3:2 Pulldown or Telecine transfer is effective on 3:2 pulldown video source. Off . . . .Not activated. L2 . . . . .Select "L2" for an active picture. With this function On, the projector reproduces pictures faithful to 4 and then press the SELECT button.
... fps film needs to get the best film-like images. Store To store the adjustment data, move the red frame pointer to their previous figure. Reset Resets all adjustment to the Store icon and press the SELECT button. Move the red frame pointer to the Image Level 1 to the original film quality...; 3:2 Pulldown or Telecine transfer is effective on 3:2 pulldown video source. Off . . . .Not activated. L2 . . . . .Select "L2" for an active picture. With this function On, the projector reproduces pictures faithful to 4 and then press the SELECT button.
Owners Manual
Page 39
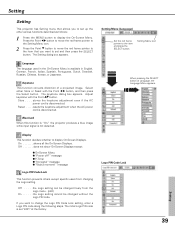
...Display This function decides whether to change the Logo PIN Code Lock setting, enter a Logo PIN code along the following steps. Setting Setting This projector has Setting menu that you to set up the other various functions described as follows; 1 Press the MENU button to display the On-Screen... Menu. Language The language used in the On-Screen Menu is not detected. Reset . . . . .resets the keystone adjustment when the AC power cord is disconnected. Off does not show On-Screen Displays except; ● On-Screen Menu ● ...
...Display This function decides whether to change the Logo PIN Code Lock setting, enter a Logo PIN code along the following steps. Setting Setting This projector has Setting menu that you to set up the other various functions described as follows; 1 Press the MENU button to display the On-Screen... Menu. Language The language used in the On-Screen Menu is not detected. Reset . . . . .resets the keystone adjustment when the AC power cord is disconnected. Off does not show On-Screen Displays except; ● On-Screen Menu ● ...
Owners Manual
Page 40
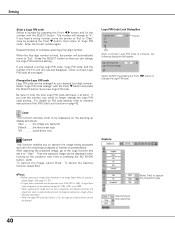
...capture the projected image. Press the SELECT button so that has been adjusted by the Keystone function, the adjustment data is automatically reset and the projector captures an image without keystone adjustment. • When the Logo PIN code lock function is entered, the following dialog box will... 720p, 1035i, and 1080i. • When capturing the image that you entered a wrong Logo PIN code, "Logo PIN code" and the number will change to XGA(1024 x 768). A signal from a computer can be captured up display as follows: User . . . . . .the image you captured Default . . . .the ...
...capture the projected image. Press the SELECT button so that has been adjusted by the Keystone function, the adjustment data is automatically reset and the projector captures an image without keystone adjustment. • When the Logo PIN code lock function is entered, the following dialog box will... 720p, 1035i, and 1080i. • When capturing the image that you entered a wrong Logo PIN code, "Logo PIN code" and the number will change to XGA(1024 x 768). A signal from a computer can be captured up display as follows: User . . . . . .the image you captured Default . . . .the ...
Owners Manual
Page 44
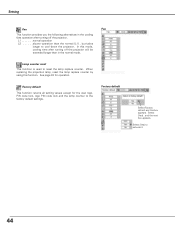
...following alternatives in the cooling fans operation after turning off the projector. L1 normal operation L2 . . . . . .slower operation than in the normal mode. Lamp counter reset This function is used to cool down the projector. Factory default This function returns all setting values except for ... default settings. In this mode, cooling time after turning off the projector will be extended longer than the normal (L1) , but takes longer to reset the lamp replace counter. When replacing the projection lamp, reset the lamp replace counter by using this box appears.
...following alternatives in the cooling fans operation after turning off the projector. L1 normal operation L2 . . . . . .slower operation than in the normal mode. Lamp counter reset This function is used to cool down the projector. Factory default This function returns all setting values except for ... default settings. In this mode, cooling time after turning off the projector will be extended longer than the normal (L1) , but takes longer to reset the lamp replace counter. When replacing the projection lamp, reset the lamp replace counter by using this box appears.
Owners Manual
Page 48
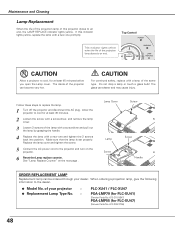
...safety, replace with a new one and tighten the 2 screws back into position. The glass can be ordered through your projector : ● Replacement Lamp Type No. : PLC-XU41 / PLC-XU47 POA-LMP79 (for PLC-XU41) (Service Parts No. 610 315 5647) POA-LMP55 (for at least 45 minutes. 2 Loosen the screw with... cool for at least 45 minutes before you open the Lamp cover. See "Lamp Replace Counter" on the projector. 6 Reset the Lamp replace counter. of the projector can become very hot. Lamp Cover Screw Lamp Screw Screw Handle ORDER REPLACEMENT LAMP Replacement lamp can shatter and ...
...safety, replace with a new one and tighten the 2 screws back into position. The glass can be ordered through your projector : ● Replacement Lamp Type No. : PLC-XU41 / PLC-XU47 POA-LMP79 (for PLC-XU41) (Service Parts No. 610 315 5647) POA-LMP55 (for at least 45 minutes. 2 Loosen the screw with... cool for at least 45 minutes before you open the Lamp cover. See "Lamp Replace Counter" on the projector. 6 Reset the Lamp replace counter. of the projector can become very hot. Lamp Cover Screw Lamp Screw Screw Handle ORDER REPLACEMENT LAMP Replacement lamp can shatter and ...
Owners Manual
Page 49
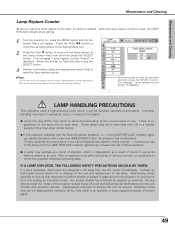
... lamps. ● If the projector indicates that there are no guarantee of the projector except those who are not appropriately trained to Lamp counter reset and then press the SELECT button. is reset, the LAMP REPLACE indicator stops lighting. 1 Turn the projector on, press the MENU button ...and the OnScreen Menu will appear. No one IMMEDIATELY after the projector has cooled down. ( Follow carefully...
... lamps. ● If the projector indicates that there are no guarantee of the projector except those who are not appropriately trained to Lamp counter reset and then press the SELECT button. is reset, the LAMP REPLACE indicator stops lighting. 1 Turn the projector on, press the MENU button ...and the OnScreen Menu will appear. No one IMMEDIATELY after the projector has cooled down. ( Follow carefully...
Owners Manual
Page 52
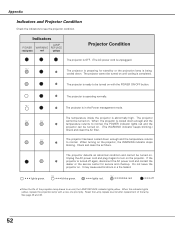
... POWER ON-OFF button. ✽ The projector is operating normally. ✽ The projector is cooled down enough and the ✽ temperature returns to normal, the POWER indicator lights red and the projector can be turned on the projector. Reset the Lamp replace counter after replacement of the... projection lamp draws to turn on . (The WARNING indicator keeps blinking.) Check and clean the Air filter. The projector cannot be turned on until cooling ...
... POWER ON-OFF button. ✽ The projector is operating normally. ✽ The projector is cooled down enough and the ✽ temperature returns to normal, the POWER indicator lights red and the projector can be turned on the projector. Reset the Lamp replace counter after replacement of the... projection lamp draws to turn on . (The WARNING indicator keeps blinking.) Check and clean the Air filter. The projector cannot be turned on until cooling ...

Owners Manual
Page 53
PC Adjust Auto PC Adj. V Full screen Reset Mode free Store Quit Appendix RGB Component RGB( Scart ) RGB Auto Video S-Video 0 - 63 On / Off Go to System (1) Go to System (2) N/A Go to System (1) ... 3 Mode 4 Mode 5 Quit Image Select Standard Real Blackboard(Green) Image 1 Image 2 Image 3 Image 4 Image Adjust Screen Contrast Brightness Color Temp Red Green Blue Sharpness Gamma Reset Store Quit 0 - 63 0 - 63 High Mid Low XLow 0 - 63 0 - 63 0 - 63 0 - 15 0 - 15 Yes / No Image 1 Image 2 Image 3 Image 4 Quit Normal True Wide Digital zoom...
PC Adjust Auto PC Adj. V Full screen Reset Mode free Store Quit Appendix RGB Component RGB( Scart ) RGB Auto Video S-Video 0 - 63 On / Off Go to System (1) Go to System (2) N/A Go to System (1) ... 3 Mode 4 Mode 5 Quit Image Select Standard Real Blackboard(Green) Image 1 Image 2 Image 3 Image 4 Image Adjust Screen Contrast Brightness Color Temp Red Green Blue Sharpness Gamma Reset Store Quit 0 - 63 0 - 63 High Mid Low XLow 0 - 63 0 - 63 0 - 63 0 - 15 0 - 15 Yes / No Image 1 Image 2 Image 3 Image 4 Quit Normal True Wide Digital zoom...
Owners Manual
Page 54
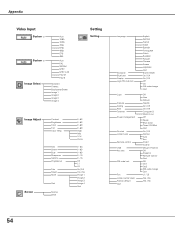
... Cinema Blackboard(Green) Image 1 Image 2 Image 3 Image 4 Setting Setting Image Adjust Contrast Brightness Color Tint Color Temp Screen Red Green Blue Sharpness Gamma Progressive Film Reset Store Quit Normal Wide 0 - 63 0 - 63 0 - 63 0 - 63 High Mid Low XLow 0 - 63 0 - 63 0 - 63 0 - 15 0 - 15 Off L1 L2 On/ Off ...Korean Japanese Quit Store / Reset On / Off On / Off Off On PIN code change Quit Off User Default Yes/No On / Off On / Off Computer 2 Monitor out Off Ready Shut down Timer(1-30 Min) Quit On / Off Normal Auto Eco Code 1 Code 2 Mouse / Projector Off Projector Remote Control Quit Off ...
... Cinema Blackboard(Green) Image 1 Image 2 Image 3 Image 4 Setting Setting Image Adjust Contrast Brightness Color Tint Color Temp Screen Red Green Blue Sharpness Gamma Progressive Film Reset Store Quit Normal Wide 0 - 63 0 - 63 0 - 63 0 - 63 High Mid Low XLow 0 - 63 0 - 63 0 - 63 0 - 15 0 - 15 Off L1 L2 On/ Off ...Korean Japanese Quit Store / Reset On / Off On / Off Off On PIN code change Quit Off User Default Yes/No On / Off On / Off Computer 2 Monitor out Off Ready Shut down Timer(1-30 Min) Quit On / Off Normal Auto Eco Code 1 Code 2 Mouse / Projector Off Projector Remote Control Quit Off ...


