Owners Manual
Page 3
...Rear Terminal 9 Top Control 10 Remote Control 11 Operating Range 11 Remote Control Battery Installation 12 Installation 13 Positioning the Projector 13 Adjustable Feet 13 Connecting the AC Power Cord 14 Connecting to a Computer 15 Connecting to Video Equipment 16 ... Attaching the Lens Cover 46 Cleaning the Projection Lens 47 Cleaning the Projector Cabinet 47 Lamp Replacement 48 Lamp Replace Counter 49 Appendix 50 Troubleshooting 50 Indicators and Projector Condition 52 Menu Tree 53 Compatible Computer Specifications 55 Technical Specifications 56 ...
...Rear Terminal 9 Top Control 10 Remote Control 11 Operating Range 11 Remote Control Battery Installation 12 Installation 13 Positioning the Projector 13 Adjustable Feet 13 Connecting the AC Power Cord 14 Connecting to a Computer 15 Connecting to Video Equipment 16 ... Attaching the Lens Cover 46 Cleaning the Projection Lens 47 Cleaning the Projector Cabinet 47 Lamp Replacement 48 Lamp Replace Counter 49 Appendix 50 Troubleshooting 50 Indicators and Projector Condition 52 Menu Tree 53 Compatible Computer Specifications 55 Technical Specifications 56 ...
Owners Manual
Page 4
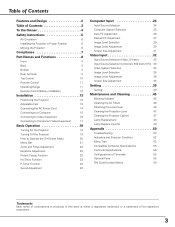
...clearance must be maintained. If the projector is to manage those features and maintains it may result in better condition for Protection of Electronic Computer/Data Processing Equipment 4 Heat build- NO USER-SERVICEABLE PARTS INSIDE EXCEPT LAMP REPLACEMENT. Do not stare directly into ...the beam. - If the projector is exhausted from the ventilation holes. - CAUTION RISK OF ELECTRIC SHOCK DO NOT OPEN CAUTION ...
...clearance must be maintained. If the projector is to manage those features and maintains it may result in better condition for Protection of Electronic Computer/Data Processing Equipment 4 Heat build- NO USER-SERVICEABLE PARTS INSIDE EXCEPT LAMP REPLACEMENT. Do not stare directly into ...the beam. - If the projector is exhausted from the ventilation holes. - CAUTION RISK OF ELECTRIC SHOCK DO NOT OPEN CAUTION ...
Owners Manual
Page 6
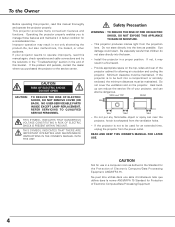
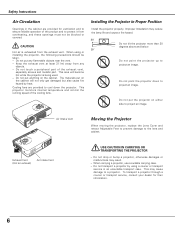
... may result. - Air Intake Vent Moving the Projector When moving the projector, replace the Lens Cover and retract Adjustable Feet to prevent damage to a projector. The materials put any objects. - Do not point the projector down the projector. Do not drop or bump a projector, otherwise damages or malfunctions may reduce the lamp life and cause a fire hazard. 20...
... may result. - Air Intake Vent Moving the Projector When moving the projector, replace the Lens Cover and retract Adjustable Feet to prevent damage to a projector. The materials put any objects. - Do not point the projector down the projector. Do not drop or bump a projector, otherwise damages or malfunctions may reduce the lamp life and cause a fire hazard. 20...

Owners Manual
Page 10
... or closes the On-Screen Menu. (p20) 10 This also blinks red when the internal temperature of the projector exceeds the operating range. (p45) u LAMP REPLACE indicator Turns yellow when the life of the projection lamp draws to expand/ compress the image in the stand-by mode. mode. (p31) Point 7 8 button are also used...
... or closes the On-Screen Menu. (p20) 10 This also blinks red when the internal temperature of the projector exceeds the operating range. (p45) u LAMP REPLACE indicator Turns yellow when the life of the projection lamp draws to expand/ compress the image in the stand-by mode. mode. (p31) Point 7 8 button are also used...
Owners Manual
Page 20
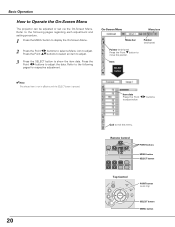
... the MENU button to display the On-Screen Menu. 2 Press the Point 7 8 buttons to select a Menu icon to move the pointer. VOLUME + KEYSTONE MENU SELECT LAMP REPLACE POINT buttons MENU button SELECT button POINT button (outer ring) SELECT button MENU button On-Screen Menu Menu icon Menu bar Pointer (red frame) Pointer...- Item data Press the Point 7 8 buttons to adjust value. 20 Quit to adjust the data. Basic Operation How to Operate the On-Screen Menu The projector can be adjusted or set via the On-Screen Menu.
... the MENU button to display the On-Screen Menu. 2 Press the Point 7 8 buttons to select a Menu icon to move the pointer. VOLUME + KEYSTONE MENU SELECT LAMP REPLACE POINT buttons MENU button SELECT button POINT button (outer ring) SELECT button MENU button On-Screen Menu Menu icon Menu bar Pointer (red frame) Pointer...- Item data Press the Point 7 8 buttons to adjust value. 20 Quit to adjust the data. Basic Operation How to Operate the On-Screen Menu The projector can be adjusted or set via the On-Screen Menu.
Owners Manual
Page 21
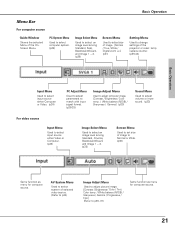
... Image 1 ~ 4. (p29) Screen Menu Used to adjust size of image. [Normal / True / Wide / Digital zoom +/-] (p31) Setting Menu Used to change settings of the projector or reset lamp replace counter. (p39-44) Basic Operation Input Menu Used to select input source either Computer or Video. (p24) PC Adjust Menu Used to adjust parameters...
... Image 1 ~ 4. (p29) Screen Menu Used to adjust size of image. [Normal / True / Wide / Digital zoom +/-] (p31) Setting Menu Used to change settings of the projector or reset lamp replace counter. (p39-44) Basic Operation Input Menu Used to select input source either Computer or Video. (p24) PC Adjust Menu Used to adjust parameters...
Owners Manual
Page 44
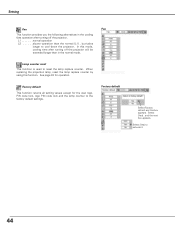
.... Select [Yes] , and the next box appears. Lamp counter reset This function is used to activate it. 44 Factory default Select Factory default and this function. In this mode, cooling time after turning off the projector will be extended longer than the normal (L1) , ...PIN code lock, logo PIN code lock and the lamp counter to cool down the projector. L1 normal operation L2 . . . . . .slower operation than in the cooling fans operation after turning off the projector. Select [Yes] to reset the lamp replace counter. Setting Fan Fan This function provides you the...
.... Select [Yes] , and the next box appears. Lamp counter reset This function is used to activate it. 44 Factory default Select Factory default and this function. In this mode, cooling time after turning off the projector will be extended longer than the normal (L1) , ...PIN code lock, logo PIN code lock and the lamp counter to cool down the projector. L1 normal operation L2 . . . . . .slower operation than in the cooling fans operation after turning off the projector. Select [Yes] to reset the lamp replace counter. Setting Fan Fan This function provides you the...
Owners Manual
Page 45
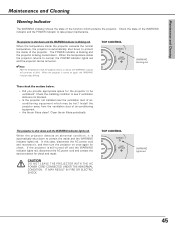
... are not blocked. - Clean the air filters periodically. When the projector detects an abnormal condition, it , and then turn the projector on . ✔Note: After the temperature inside the projector exceeds the normal temperature, the projector is blinking red. TOP CONTROL WARNING LECT LAMP REPLACE WARNING blinking red Then check the matters below: - TOP CONTROL WARNING...
... are not blocked. - Clean the air filters periodically. When the projector detects an abnormal condition, it , and then turn the projector on . ✔Note: After the temperature inside the projector exceeds the normal temperature, the projector is blinking red. TOP CONTROL WARNING LECT LAMP REPLACE WARNING blinking red Then check the matters below: - TOP CONTROL WARNING...
Owners Manual
Page 48
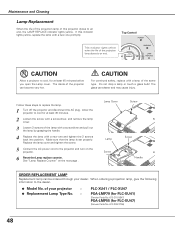
... through your projector : ● Replacement Lamp Type No. : PLC-XU41 / PLC-XU47 POA-LMP79 (for PLC-XU41) (Service Parts No. 610 315 5647) POA-LMP55 (for at least 45 minutes before you open the Lamp cover. Lamp Cover Screw Lamp Screw Screw Handle ORDER REPLACEMENT LAMP Replacement lamp can shatter and may cause injury. SELECT WARNING LAMP REPLACE VOLUME + CAUTION Allow a projector to an end, the LAMP REPLACE indicator...
... through your projector : ● Replacement Lamp Type No. : PLC-XU41 / PLC-XU47 POA-LMP79 (for PLC-XU41) (Service Parts No. 610 315 5647) POA-LMP55 (for at least 45 minutes before you open the Lamp cover. Lamp Cover Screw Lamp Screw Screw Handle ORDER REPLACEMENT LAMP Replacement lamp can shatter and may cause injury. SELECT WARNING LAMP REPLACE VOLUME + CAUTION Allow a projector to an end, the LAMP REPLACE indicator...
Owners Manual
Page 49
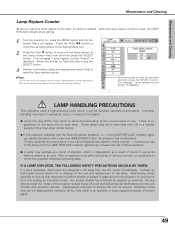
... Cleaning Lamp Replace Counter Be sure to reset the lamp replace counter after the lamp is displayed. is replaced. Improper handling may differ from lamp to lamp and according to ensure that the lamp should be replaced, i.e., if the LAMP REPLACE indicator lights up carefully. IF A LAMP EXPLODES, THE FOLLOWING SAFETY PRECAUTIONS SHOULD BE TAKEN. is reset, the LAMP REPLACE indicator stops lighting. 1 Turn the projector...
... Cleaning Lamp Replace Counter Be sure to reset the lamp replace counter after the lamp is displayed. is replaced. Improper handling may differ from lamp to lamp and according to ensure that the lamp should be replaced, i.e., if the LAMP REPLACE indicator lights up carefully. IF A LAMP EXPLODES, THE FOLLOWING SAFETY PRECAUTIONS SHOULD BE TAKEN. is reset, the LAMP REPLACE indicator stops lighting. 1 Turn the projector...
Owners Manual
Page 52
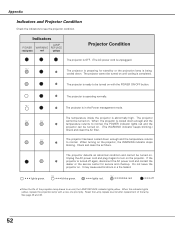
... to normal. Check and clean the air filters. Do not leave the projector on the projector, the WARNING indicator stops blinking. Reset the Lamp replace counter after replacement of the projection lamp draws to see the projector condition. Indicators LAMP POWER WARNING REPLACE red/green red yellow Projector Condition The projector is OFF. (The AC power cord is unplugged.) ✽ The...
... to normal. Check and clean the air filters. Do not leave the projector on the projector, the WARNING indicator stops blinking. Reset the Lamp replace counter after replacement of the projection lamp draws to see the projector condition. Indicators LAMP POWER WARNING REPLACE red/green red yellow Projector Condition The projector is OFF. (The AC power cord is unplugged.) ✽ The...


