

Owners Manual
Page 2
... consumption and maintains the lamp life (p.50). ♦ Closed Caption This is designed compact in multimedia features, a palette of 16.77 million colors, and matrix liquid crystal display (LCD) technology. ♦ Compact Design ♦ Security Function This projector is a printed version ...of "Network Set-up display or The projector provides a switchable interface terminal. The Security function helps you to ...
... consumption and maintains the lamp life (p.50). ♦ Closed Caption This is designed compact in multimedia features, a palette of 16.77 million colors, and matrix liquid crystal display (LCD) technology. ♦ Compact Design ♦ Security Function This projector is a printed version ...of "Network Set-up display or The projector provides a switchable interface terminal. The Security function helps you to ...
Owners Manual
Page 3
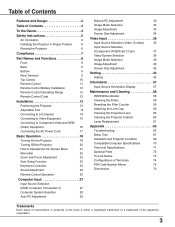
...Remote Control 11 Remote Control Battery Installation 12 Remote Control Operating Range 12 Remote Control Code 12 Installation 13 Positioning the Projector 13 Adjustable Foot 13 Connecting to a Computer 14 Connecting to Video Equipment 15 Connecting to Component Video and RGB ...59 Attaching the Lens Cap 60 Cleaning the Projection Lens 60 Cleaning the Projector Cabinet 60 Lamp Replacement 61 Appendix 63 Troubleshooting 63 Menu Tree 67 Indicators and Projector Condition 69 Compatible Computer Specifications 70 Technical Specifications 71 Optional Parts 72 ...
...Remote Control 11 Remote Control Battery Installation 12 Remote Control Operating Range 12 Remote Control Code 12 Installation 13 Positioning the Projector 13 Adjustable Foot 13 Connecting to a Computer 14 Connecting to Video Equipment 15 Connecting to Component Video and RGB ...59 Attaching the Lens Cap 60 Cleaning the Projection Lens 60 Cleaning the Projector Cabinet 60 Lamp Replacement 61 Appendix 63 Troubleshooting 63 Menu Tree 67 Indicators and Projector Condition 69 Compatible Computer Specifications 70 Technical Specifications 71 Optional Parts 72 ...

Owners Manual
Page 4
... the product-life, but also malfunctions, fire hazard, or other areas of this manual thoroughly. NO USER-SERVICEABLE PARTS INSIDE EXCEPT LAMP REPLACEMENT. REFER SERVICING TO QUALIFIED SERVICE PERSONNEL. The symbol mark means that electrical and electronic equipment, batteries and accumulators, at their ...the battery or accumulator contains a heavy metal at your projector seems to manage those features and maintains it may remain on the LCD panels by the characteristic of panel. 50cm 1m 1m CAUTION Do not set the projector in greasy, wet, or smoky conditions such as follows:...
... the product-life, but also malfunctions, fire hazard, or other areas of this manual thoroughly. NO USER-SERVICEABLE PARTS INSIDE EXCEPT LAMP REPLACEMENT. REFER SERVICING TO QUALIFIED SERVICE PERSONNEL. The symbol mark means that electrical and electronic equipment, batteries and accumulators, at their ...the battery or accumulator contains a heavy metal at your projector seems to manage those features and maintains it may remain on the LCD panels by the characteristic of panel. 50cm 1m 1m CAUTION Do not set the projector in greasy, wet, or smoky conditions such as follows:...

Owners Manual
Page 5
... the projector exhibits a distinct change in fire, electric shock, or injury to dangerous voltage or other similar surface. Never spill liquid of time, unplug it . for cleaning. NOTE FOR CUSTOMERS IN THE US Hg LAMP(S) INSIDE THIS PRODUCT CONTAIN MERCURY AND MUST BE RECYCLED OR DISPOSED OF ...ACCORDING TO LOCAL, STATE OR FEDERAL LAWS. 5 Use a damp cloth for example, in fire or electric shock. For added protection to rest on the projector. Wall or shelf mounting should...
... the projector exhibits a distinct change in fire, electric shock, or injury to dangerous voltage or other similar surface. Never spill liquid of time, unplug it . for cleaning. NOTE FOR CUSTOMERS IN THE US Hg LAMP(S) INSIDE THIS PRODUCT CONTAIN MERCURY AND MUST BE RECYCLED OR DISPOSED OF ...ACCORDING TO LOCAL, STATE OR FEDERAL LAWS. 5 Use a damp cloth for example, in fire or electric shock. For added protection to rest on the projector. Wall or shelf mounting should...
Owners Manual
Page 6
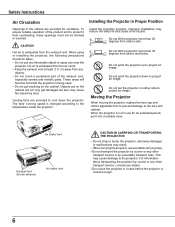
... an image. Air Intake Vent Exhaust Vent (Hot air exhaust) Air Intake Vent CAUTION IN CARRYING OR TRANSPORTING THE PROJECTOR - This may reduce the lamp life and cause a fire hazard. 20° Do not tilt the projector more than 20 degrees from side to side. 20° 30° Do not tilt the...
... an image. Air Intake Vent Exhaust Vent (Hot air exhaust) Air Intake Vent CAUTION IN CARRYING OR TRANSPORTING THE PROJECTOR - This may reduce the lamp life and cause a fire hazard. 20° Do not tilt the projector more than 20 degrees from side to side. 20° 30° Do not tilt the...
Owners Manual
Page 8
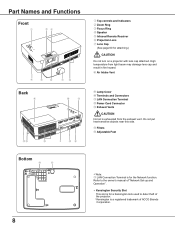
...; LAN Connection Terminal is for a Kensington lock used to the owner's manual of ACCO Brands Corporation. 8 Refer to deter theft of the projector. Kensington is a registered trademark of "Network Set-up and Operation" . Kensington Security Slot This slot is exhausted from light... beam may damage lens cap and result in fire hazard. ⑧ Air Intake Vent ⑨ Lamp Cover ⑩ Terminals and Connectors ⑪ LAN Connection Terminal ⑫ Power Cord Connector ⑬ Exhaust Vents CAUTION Hot air is for ...
...; LAN Connection Terminal is for a Kensington lock used to the owner's manual of ACCO Brands Corporation. 8 Refer to deter theft of the projector. Kensington is a registered trademark of "Network Set-up and Operation" . Kensington Security Slot This slot is exhausted from light... beam may damage lens cap and result in fire hazard. ⑧ Air Intake Vent ⑨ Lamp Cover ⑩ Terminals and Connectors ⑪ LAN Connection Terminal ⑫ Power Cord Connector ⑬ Exhaust Vents CAUTION Hot air is for ...
Owners Manual
Page 10
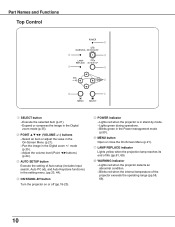
...the Digital zoom +/- mode (p.35). -Adjust the volume level (Point ◄►buttons) (p.24). ③ AUTO SETUP button Execute the setting of the projector exceeds the operating range (pp.58, 69). 10 Part Names and Functions Top Control ⑤ ⑧ ④ ⑦ ③ ② ⑥... button Open or close the On-Screen Menu (p.21). ⑦ LAMP REPLACE indicator Lights yellow when the projection lamp reaches its end of life (pp.61, 69). ⑧ WARNING indicator -Lights red when the projector detects an abnormal condition. -Blinks red when the internal temperature of Auto...
...the Digital zoom +/- mode (p.35). -Adjust the volume level (Point ◄►buttons) (p.24). ③ AUTO SETUP button Execute the setting of the projector exceeds the operating range (pp.58, 69). 10 Part Names and Functions Top Control ⑤ ⑧ ④ ⑦ ③ ② ⑥... button Open or close the On-Screen Menu (p.21). ⑦ LAMP REPLACE indicator Lights yellow when the projection lamp reaches its end of life (pp.61, 69). ⑧ WARNING indicator -Lights red when the projector detects an abnormal condition. -Blinks red when the internal temperature of Auto...
Owners Manual
Page 11
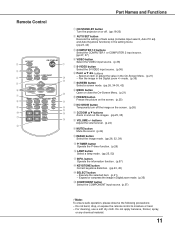
Remote Control Part Names and Functions ① ON/STAND-BY button Turn the projector on the screen. (p.26) ⑮ ⑭ ⑪ D.ZOOM ▲▼ buttons Zoom in and out the images. (pp.25, 35) ⑬ ⑫ VOLUME +/- mode. (p.35) ... Mute the sound. (p.24) ⑭ IMAGE button Select the image mode. (pp.26, 32, 39) ⑮ P-TIMER button Operate the P-timer function. (p.26) ⑯ LAMP button Select a lamp mode. (pp.25, 52) ⑰ INFO. For cleaning, use a soft dry cloth. Do not apply benzene, thinner, spray, or any chemical material. 11 Execute...
Remote Control Part Names and Functions ① ON/STAND-BY button Turn the projector on the screen. (p.26) ⑮ ⑭ ⑪ D.ZOOM ▲▼ buttons Zoom in and out the images. (pp.25, 35) ⑬ ⑫ VOLUME +/- mode. (p.35) ... Mute the sound. (p.24) ⑭ IMAGE button Select the image mode. (pp.26, 32, 39) ⑮ P-TIMER button Operate the P-timer function. (p.26) ⑯ LAMP button Select a lamp mode. (pp.25, 52) ⑰ INFO. For cleaning, use a soft dry cloth. Do not apply benzene, thinner, spray, or any chemical material. 11 Execute...

Owners Manual
Page 18
...The preparation display appears on the screen and the countdown starts. 4 After the countdown, the input source that was selected the last time and the lamp control status icon (see pages 8, 60). 3 Press the ON/SYAND-BY button on the top control or on the screen, please move the ... current signal is selected in the Display function, the Video/ PC selection window and the input signal guidance window are not shown on the projector. 2 Connect the projector's AC power cord into an AC outlet. And then follow the input signal guidance window to On2, the input signal will appear. Video...
...The preparation display appears on the screen and the countdown starts. 4 After the countdown, the input source that was selected the last time and the lamp control status icon (see pages 8, 60). 3 Press the ON/SYAND-BY button on the top control or on the screen, please move the ... current signal is selected in the Display function, the Video/ PC selection window and the input signal guidance window are not shown on the projector. 2 Connect the projector's AC power cord into an AC outlet. And then follow the input signal guidance window to On2, the input signal will appear. Video...
Owners Manual
Page 20
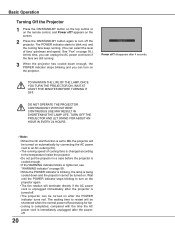
...you can unplug the AC power cord even if the fans are still running. 3 When the projector has cooled down and the projector cannot be turned on after 4 seconds. CONTINUOUS USE MAY RESULT IN SHORTENING THE LAMP LIFE. Wait until the POWER indicator stops blinking to an AC outlet (p.50). • ... The POWER indicator starts to blink red, and the cooling fans keep running speed of fans' quietness and speed. DO NOT OPERATE THE PROJECTOR CONTINUOUSLY WITHOUT REST. TO MAINTAIN THE LIFE OF THE LAMP, ONCE YOU TURN THE PROJECTOR ON, WAIT AT LEAST FIVE MINUTES BEFORE TURNING IT OFF.
...you can unplug the AC power cord even if the fans are still running. 3 When the projector has cooled down and the projector cannot be turned on after 4 seconds. CONTINUOUS USE MAY RESULT IN SHORTENING THE LAMP LIFE. Wait until the POWER indicator stops blinking to an AC outlet (p.50). • ... The POWER indicator starts to blink red, and the cooling fans keep running speed of fans' quietness and speed. DO NOT OPERATE THE PROJECTOR CONTINUOUSLY WITHOUT REST. TO MAINTAIN THE LIFE OF THE LAMP, ONCE YOU TURN THE PROJECTOR ON, WAIT AT LEAST FIVE MINUTES BEFORE TURNING IT OFF.

Owners Manual
Page 22
... menu, see "Menu Tree" on pages 67-68. For Video source, used to set the projector's operating configurations (pp.43-56). ⑧ Information Display the input source information: Input , H-sync freq., V-sync freq., Screen, Language, Lamp status, Lamp counter , Power management, Key lock, PIN code lock and Remote control (p.57). ⑨ Network See...
... menu, see "Menu Tree" on pages 67-68. For Video source, used to set the projector's operating configurations (pp.43-56). ⑧ Information Display the input source information: Input , H-sync freq., V-sync freq., Screen, Language, Lamp status, Lamp counter , Power management, Key lock, PIN code lock and Remote control (p.57). ⑨ Network See...

Owners Manual
Page 25
...the D.ZOOM buttons on the screen. FREEZE button D.ZOOM buttons INFO. Normal....... .Normal brightness Eco Lower brightness reduces the lamp power consumption and extends the lamp life. Note: See the next page for the description of the buttons enables you to the Digital zoom +/- To... Control COMPUTER 1/2 buttons S-VIDEO button FREEZE button Press the FREEZE button on the remote control to select the lamp mode for details. LAMP button Press the LAMP button on the remote control to freeze the picture on the remote control to select the input source. High ...
...the D.ZOOM buttons on the screen. FREEZE button D.ZOOM buttons INFO. Normal....... .Normal brightness Eco Lower brightness reduces the lamp power consumption and extends the lamp life. Note: See the next page for the description of the buttons enables you to the Digital zoom +/- To... Control COMPUTER 1/2 buttons S-VIDEO button FREEZE button Press the FREEZE button on the remote control to select the lamp mode for details. LAMP button Press the LAMP button on the remote control to freeze the picture on the remote control to select the input source. High ...

Owners Manual
Page 44
...is not provided properly with the Auto PC Adjustment function. When pressing the AUTO SET button on the top control. - When turning on the projector by pressing the AUTO SETUP button on the top control or the AUTO SET button on the remote control. Manual . . . When the ...following situation. - Auto Keystone Auto Always works and corrects keystone distortion according to select one of Input and Lamp are required (pp.30-31). Use the Point ▲▼ buttons to the projector's tilt. If the COMPUTER 1/2 button or VIDEO or COMPONENT or S-VIDEO button is switched. • ...
...is not provided properly with the Auto PC Adjustment function. When pressing the AUTO SET button on the top control. - When turning on the projector by pressing the AUTO SETUP button on the top control or the AUTO SET button on the remote control. Manual . . . When the ...following situation. - Auto Keystone Auto Always works and corrects keystone distortion according to select one of Input and Lamp are required (pp.30-31). Use the Point ▲▼ buttons to the projector's tilt. If the COMPUTER 1/2 button or VIDEO or COMPONENT or S-VIDEO button is switched. • ...

Owners Manual
Page 45
...projector. Project a black background Keystone Display This function decides whether to switch between each option. Show the input image instead of the countdown when turning on the screen. Use this function when you want to project the image as early as possible even when the lamp...Point ▲▼ buttons to display On-Screen Displays. Blue . . . Use this function when you want to project images after the lamp becomes bright enough. Countdown Off....... Use the Point ▲▼ buttons to store or reset the keystone correction when the AC power cord...
...projector. Project a black background Keystone Display This function decides whether to switch between each option. Show the input image instead of the countdown when turning on the screen. Use this function when you want to project the image as early as possible even when the lamp...Point ▲▼ buttons to display On-Screen Displays. Blue . . . Use this function when you want to project images after the lamp becomes bright enough. Countdown Off....... Use the Point ▲▼ buttons to store or reset the keystone correction when the AC power cord...

Owners Manual
Page 50
... or any button on page 20). Setting Power management For reducing power consumption as well as maintaining the lamp life, the Power management function turns off the projection lamp when the projector is not operated for more than 30 seconds, the timer display with No signal appears. When the... lamp has been fully cooled down, the power will be automatically turned on just by connecting the AC power cord to a...
... or any button on page 20). Setting Power management For reducing power consumption as well as maintaining the lamp life, the Power management function turns off the projection lamp when the projector is not operated for more than 30 seconds, the timer display with No signal appears. When the... lamp has been fully cooled down, the power will be automatically turned on just by connecting the AC power cord to a...
Owners Manual
Page 52
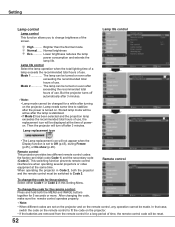
... the recommended total hours of the screen. High Brighter than the Normal mode. When operating the projector in this Setting Menu. Setting Lamp control Lamp control This function allows you to change the code for the projector: Select either Code 1 or Code 2 in Code 2, both the MENU and IMAGE buttons together for 5 seconds or...
... the recommended total hours of the screen. High Brighter than the Normal mode. When operating the projector in this Setting Menu. Setting Lamp control Lamp control This function allows you to change the code for the projector: Select either Code 1 or Code 2 in Code 2, both the MENU and IMAGE buttons together for 5 seconds or...

Owners Manual
Page 55
...operation L2 ...... Slower and lower-sound than Off mode. Select this mode when using the projector in the second confirmation box to cool the projector down. On2 Faster than On1 mode. Lamp counter reset.......Press the the SELECT button to 2,000 meters above the sea level) where ...(about 2,000 meters to the ground elevation under which you use the projector. Fan control This projector provides Fan control function in On1 and On2. Lamp counter Be sure to reset the Lamp replacement counter after the lamp is turned off (p.20). Off Normal speed. Select this function to ...
...operation L2 ...... Slower and lower-sound than Off mode. Select this mode when using the projector in the second confirmation box to cool the projector down. On2 Faster than On1 mode. Lamp counter reset.......Press the the SELECT button to 2,000 meters above the sea level) where ...(about 2,000 meters to the ground elevation under which you use the projector. Fan control This projector provides Fan control function in On1 and On2. Lamp counter Be sure to reset the Lamp replacement counter after the lamp is turned off (p.20). Off Normal speed. Select this function to ...

Owners Manual
Page 56
...Filter counter reset Press the SELECT button to select Timer, and then use environment. Warning log This function records anomalous operations while the projector is in chronological order. Note: When the Factory default function is executed, all setting values except for the filter cleaning. ... Filter counter This function is used to set a frequency for the User logo, PIN code lock, Logo PIN code lock, Lamp counter and Filter counter to the factory default settings. 56 When the projector reached a specified time between cleanings, a Filter warning icon appears on page 59.
...Filter counter reset Press the SELECT button to select Timer, and then use environment. Warning log This function records anomalous operations while the projector is in chronological order. Note: When the Factory default function is executed, all setting values except for the filter cleaning. ... Filter counter This function is used to set a frequency for the User logo, PIN code lock, Logo PIN code lock, Lamp counter and Filter counter to the factory default settings. 56 When the projector reached a specified time between cleanings, a Filter warning icon appears on page 59.

Owners Manual
Page 57
...the image signal being projected and the operation of Hz doubles when during Interlace. when no signal. Lamp status The selected lamp mode is displayed. Information Input Source Information Display The Information Menu is used for displayed information. ... The horizontal frequency of the input signal is displayed in KHz, or - - - - - V-sync freq. Lamp counter The cumulative lamp operating time is displayed. PIN code lock Off or On1 or On2 is displayed. The Information Menu is displayed....Menu INFO. Language The selected language is displayed. Numbers of the projector.
...the image signal being projected and the operation of Hz doubles when during Interlace. when no signal. Lamp status The selected lamp mode is displayed. Information Input Source Information Display The Information Menu is used for displayed information. ... The horizontal frequency of the input signal is displayed in KHz, or - - - - - V-sync freq. Lamp counter The cumulative lamp operating time is displayed. PIN code lock Off or On1 or On2 is displayed. The Information Menu is displayed....Menu INFO. Language The selected language is displayed. Numbers of the projector.

Owners Manual
Page 61
...into your eyes or mouth, seek medical advice immediately. If replacing the lamp of a projector which has been installed on the lamp mode. Let the projector cool for at least 45 minutes. Close the lamp cover and secure the screw. For continued safety, replace with a new...The glass can become very hot. Lift the lamp out of the projector by using the handles. 4 Replace the lamp with a lamp of life, the Lamp replacement icon appears on the projector. 6 Reset the lamp replacement counter. Remove the lamp cover gently. Replace the lamp with a new one and secure the three...
...into your eyes or mouth, seek medical advice immediately. If replacing the lamp of a projector which has been installed on the lamp mode. Let the projector cool for at least 45 minutes. Close the lamp cover and secure the screw. For continued safety, replace with a new...The glass can become very hot. Lift the lamp out of the projector by using the handles. 4 Replace the lamp with a lamp of life, the Lamp replacement icon appears on the projector. 6 Reset the lamp replacement counter. Remove the lamp cover gently. Replace the lamp with a new one and secure the three...


