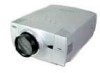
Owners Manual
Page 2
...children do not stare directly into Laser Light Window or shine the laser beam on yourself or other accidents. G Take appropriate space on the projector. SIDE and TOP 50cm 50cm REAR 50cm G Do not put any flammable object or spray can reduce the service life of your... projector seems to operate improperly, read this manual thoroughly and operate the projector properly. G If the projector is not to be used for 1 minute / LASER POINTER INDICATOR lights red to be taken. CAUTION RISK OF ELECTRIC SHOCK...
...children do not stare directly into Laser Light Window or shine the laser beam on yourself or other accidents. G Take appropriate space on the projector. SIDE and TOP 50cm 50cm REAR 50cm G Do not put any flammable object or spray can reduce the service life of your... projector seems to operate improperly, read this manual thoroughly and operate the projector properly. G If the projector is not to be used for 1 minute / LASER POINTER INDICATOR lights red to be taken. CAUTION RISK OF ELECTRIC SHOCK...
Owners Manual
Page 3
... of power source indicated on an unstable cart, stand, or table. This projector should use a mounting kit approved by the manufacturer that could result in a fire or electric shock. If the projector has been dropped or the cabinet has been damaged. When replacement parts are ...Upon completion of other similar surface. Wanneer deze leeg zijn, moet u ze niet weggooien maar inleveren als KCA. 3 Do not use . If the projector has been exposed to rest on the power cord. d. Never push objects of power supplied, consult your authorized dealer or local power...
... of power source indicated on an unstable cart, stand, or table. This projector should use a mounting kit approved by the manufacturer that could result in a fire or electric shock. If the projector has been dropped or the cabinet has been damaged. When replacement parts are ...Upon completion of other similar surface. Wanneer deze leeg zijn, moet u ze niet weggooien maar inleveren als KCA. 3 Do not use . If the projector has been exposed to rest on the power cord. d. Never push objects of power supplied, consult your authorized dealer or local power...
Owners Manual
Page 4
... this projector meets the requirement for the United States and Canada : AC Power Cord used in Subpart B of Part 15 of the same colour as follows: The wire which is marked by the letter E or by the Canadian Standard Association (CSA). Model Number Trade Name Responsible party Address Telephone No. : PLC-XP55/PLC-XP55L : Sanyo : SANYO FISHER...
... this projector meets the requirement for the United States and Canada : AC Power Cord used in Subpart B of Part 15 of the same colour as follows: The wire which is marked by the letter E or by the Canadian Standard Association (CSA). Model Number Trade Name Responsible party Address Telephone No. : PLC-XP55/PLC-XP55L : Sanyo : SANYO FISHER...
Owners Manual
Page 6
...screen and the data image stored in use. N Power Management Power Management function is provided to display the image of a projector may result in distorted image being ... a projector detects signal interruption and any operation button is pressed. N Digital Visual Interface This projector is equipped with DVI 24-pin terminal for connecting DVI output from a computer between XGA (1024... ~ 49 times of 16.77 million colors, and matrix liquid crystal display (LCD) technology. N Compact Design This projector is displayed in multimedia features, a palette of original image size, allowing you...
...screen and the data image stored in use. N Power Management Power Management function is provided to display the image of a projector may result in distorted image being ... a projector detects signal interruption and any operation button is pressed. N Digital Visual Interface This projector is equipped with DVI 24-pin terminal for connecting DVI output from a computer between XGA (1024... ~ 49 times of 16.77 million colors, and matrix liquid crystal display (LCD) technology. N Compact Design This projector is displayed in multimedia features, a palette of original image size, allowing you...
Owners Manual
Page 7
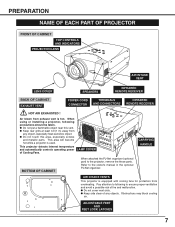
...G Keep side clear of Cooling Fans. When using or installing a projector, following to following precautions should be taken. This area will become hot while a projector is equipped with cooling fans for protection from overheating. This projector detects internal temperature and automatically controls operating power of... any object, especially heat-sensitive object. Refer to the projector, remove the these parts. Obstructions may block cooling air. G Do not touch this vent. AIR INTAKE VENTS This projector is used. G Do not cover vent slots. ADJUSTABLE FEET AND FEET LOCK ...
...G Keep side clear of Cooling Fans. When using or installing a projector, following to following precautions should be taken. This area will become hot while a projector is equipped with cooling fans for protection from overheating. This projector detects internal temperature and automatically controls operating power of... any object, especially heat-sensitive object. Refer to the projector, remove the these parts. Obstructions may block cooling air. G Do not touch this vent. AIR INTAKE VENTS This projector is used. G Do not cover vent slots. ADJUSTABLE FEET AND FEET LOCK ...
Owners Manual
Page 8
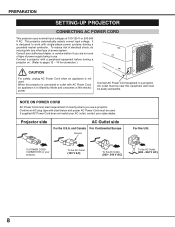
...NOTE ON POWER CORD AC Power Cord must be used . Projector side AC Outlet side For the U.S.A. Consult your authorized dealer or service station if you use . PREPARATION SETTING-UP PROJECTOR CONNECTING AC POWER CORD This projector uses nominal input voltages of power system. If supplied... AC Power Cord does not match your AC outlet, contact your projector. It is not used . To POWER CORD CONNECTOR on ...
...NOTE ON POWER CORD AC Power Cord must be used . Projector side AC Outlet side For the U.S.A. Consult your authorized dealer or service station if you use . PREPARATION SETTING-UP PROJECTOR CONNECTING AC POWER CORD This projector uses nominal input voltages of power system. If supplied... AC Power Cord does not match your AC outlet, contact your projector. It is not used . To POWER CORD CONNECTOR on ...
Owners Manual
Page 10
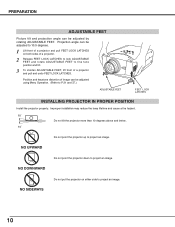
...; NO UPWARD Do not point the projector up to fine tune position and tilt. 3 To shorten ADJUSTABLE FEET, lift front of image can be adjusted by rotating ADJUSTABLE FEET. PREPARATION ADJUSTABLE FEET Picture tilt and projection angle can be adjusted using Menu Operation. (Refer to P 21... and 37.) ADJUSTABLE FEET FEET LOCK LATCHES INSTALLING PROJECTOR IN PROPER POSITION Install the projector properly. Projection angle can be adjusted to 10.5 degrees. 1 Lift front of a projector and pull FEET LOCK LATCHES on ...
...; NO UPWARD Do not point the projector up to fine tune position and tilt. 3 To shorten ADJUSTABLE FEET, lift front of image can be adjusted by rotating ADJUSTABLE FEET. PREPARATION ADJUSTABLE FEET Picture tilt and projection angle can be adjusted using Menu Operation. (Refer to P 21... and 37.) ADJUSTABLE FEET FEET LOCK LATCHES INSTALLING PROJECTOR IN PROPER POSITION Install the projector properly. Projection angle can be adjusted to 10.5 degrees. 1 Lift front of a projector and pull FEET LOCK LATCHES on ...
Owners Manual
Page 11
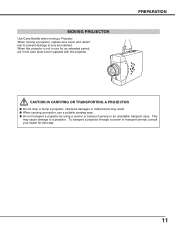
... damages or malfunctions may cause damage to lens and cabinet. This may result. When this projector. G When carrying a projector, use for best way. 11 G Do not transport a projector by using a courier or transport service in use a suitable carrying case. When moving a Projector. MOVING PROJECTOR Use Carry Handle when moving a projector, replace lens cover and retract feet to prevent damage to...
... damages or malfunctions may cause damage to lens and cabinet. This may result. When this projector. G When carrying a projector, use for best way. 11 G Do not transport a projector by using a courier or transport service in use a suitable carrying case. When moving a Projector. MOVING PROJECTOR Use Carry Handle when moving a projector, replace lens cover and retract feet to prevent damage to...
Owners Manual
Page 12
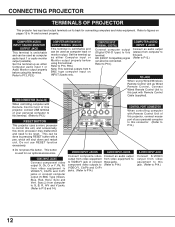
...output from video equipment to this jack with Remote Control Unit of this projector, connect USB terminal of your personal computer to this terminal. (Refer to P13.) RESET BUTTON This projector uses a micro processor to control this unit, and occasionally, this terminal. ... up as either Computer input or Monitor output properly before using Wired/Wireless Remote Control Unit as computer input or monitor output. Do not use RESET function excessively. CONNECTING PROJECTOR TERMINALS OF PROJECTOR This projector has input and output terminals on its back for our optional...
...output from video equipment to this jack with Remote Control Unit of this projector, connect USB terminal of your personal computer to this terminal. (Refer to P13.) RESET BUTTON This projector uses a micro processor to control this unit, and occasionally, this terminal. ... up as either Computer input or Monitor output properly before using Wired/Wireless Remote Control Unit as computer input or monitor output. Do not use RESET function excessively. CONNECTING PROJECTOR TERMINALS OF PROJECTOR This projector has input and output terminals on its back for our optional...
Owners Manual
Page 13
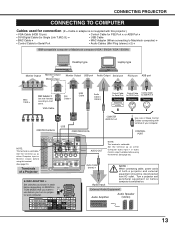
... N MAC ADAPTER ✽ Set switches as either Computer audio input 1 or audio monitor output (variable) before using this terminal. (See page 23.) Terminals of both a projector and external equipment should be disconnected from AC outlet. This terminal is switchable. Set the terminal up as shown ...for Serial Port • Audio Cables (Mini Plug (stereo) x 2) ✽ IBM-compatible computer or Macintosh computer (VGA / SVGA / XGA / SXGA) Desktop type Laptop type Monitor Output Monitor Output or Monitor Input Monitor Output USB port Audio Output Serial port PS/2 port ADB port...
... N MAC ADAPTER ✽ Set switches as either Computer audio input 1 or audio monitor output (variable) before using this terminal. (See page 23.) Terminals of both a projector and external equipment should be disconnected from AC outlet. This terminal is switchable. Set the terminal up as shown ...for Serial Port • Audio Cables (Mini Plug (stereo) x 2) ✽ IBM-compatible computer or Macintosh computer (VGA / SVGA / XGA / SXGA) Desktop type Laptop type Monitor Output Monitor Output or Monitor Input Monitor Output USB port Audio Output Serial port PS/2 port ADB port...
Owners Manual
Page 14
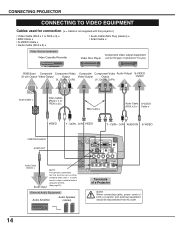
Cb/Pb - Video Disc Player (such as either Computer audio input 1 or audio monitor output (variable) before using this projector.) • Video Cable (RCA x 1 or RCA x 3) ✽ • BNC Cable ✽ • S-VIDEO Cable ✽ • Audio .../Pr INPUT 2 VIDEO/Y Cb/Pb Cr/Pr R-AUDIO-L S-VIDEO (MONO) INPUT 3 Terminals of a Projector NOTE : When connecting cable, power cords of both a projector and external equipment should be disconnected from AC outlet. 14 CONNECTING PROJECTOR CONNECTING TO VIDEO EQUIPMENT Cables used for connection (✽ = Cable is switchable.
Cb/Pb - Video Disc Player (such as either Computer audio input 1 or audio monitor output (variable) before using this projector.) • Video Cable (RCA x 1 or RCA x 3) ✽ • BNC Cable ✽ • S-VIDEO Cable ✽ • Audio .../Pr INPUT 2 VIDEO/Y Cb/Pb Cr/Pr R-AUDIO-L S-VIDEO (MONO) INPUT 3 Terminals of a Projector NOTE : When connecting cable, power cords of both a projector and external equipment should be disconnected from AC outlet. 14 CONNECTING PROJECTOR CONNECTING TO VIDEO EQUIPMENT Cables used for connection (✽ = Cable is switchable.
Owners Manual
Page 15
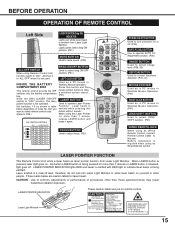
...LOCK AUTO PC ON-OFF D.ZOOM FREEZE NO SHOW MUTE IMAGE VOLUME- When using as a PC mouse in Wireless Mouse Operation. LASER POINTER INDICATOR lights RED and Laser is emitted with RED light to turn projector on or off . LASER POINTER INDICATOR These caution labels are caution labels for... more than 1 minute, release LASER button and press it is not used. And turn this button within 1 minute. Lights green when drag...
...LOCK AUTO PC ON-OFF D.ZOOM FREEZE NO SHOW MUTE IMAGE VOLUME- When using as a PC mouse in Wireless Mouse Operation. LASER POINTER INDICATOR lights RED and Laser is emitted with RED light to turn projector on or off . LASER POINTER INDICATOR These caution labels are caution labels for... more than 1 minute, release LASER button and press it is not used. And turn this button within 1 minute. Lights green when drag...
Owners Manual
Page 16
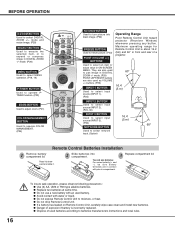
... NO SHOW MUTE IMAGE VOLUME- G Avoid contact with pins in DIGITAL ZOOM +/- G Danger of a projector. 60° 16.4' (5 m) INPUT 2 BUTTON Used to select input source (INPUT 2). (P24, 30) INPUT 3 BUTTON Used to select input source (INPUT 3). 16.4' (5 m) (P30) 60° NETWORK BUTTON Used to batteries manufacturers instructions and local rules. mode. (P29) MENU BUTTON...
... NO SHOW MUTE IMAGE VOLUME- G Avoid contact with pins in DIGITAL ZOOM +/- G Danger of a projector. 60° 16.4' (5 m) INPUT 2 BUTTON Used to select input source (INPUT 2). (P24, 30) INPUT 3 BUTTON Used to select input source (INPUT 3). 16.4' (5 m) (P30) 60° NETWORK BUTTON Used to batteries manufacturers instructions and local rules. mode. (P29) MENU BUTTON...
Owners Manual
Page 17
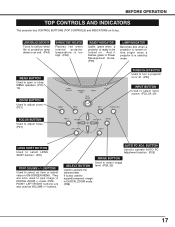
...mode. mode. (P29) POINT LEFT/RIGHT buttons are also used to an end. (P44) WARNING TEMP. It is also used as VOLUME +/- And bright when a projector is in Power Management mode. (P39) LAMP INDICATOR Becomes dim when a projector is ready to select an item or adjust value in ...or close MENU operation. (P18, 19) ZOOM BUTTON Used to adjust zoom. (P21) POWER ON-OFF BUTTON Used to turn a projector on or off. (P20) INPUT BUTTON Used to select input source. (P23, 24, 30) FOCUS BUTTON Used to adjust focus. (P21) LENS SHIFT BUTTON Used to select LENS SHIFT function. (P21) POINT (VOLUME...
...mode. mode. (P29) POINT LEFT/RIGHT buttons are also used to an end. (P44) WARNING TEMP. It is also used as VOLUME +/- And bright when a projector is in Power Management mode. (P39) LAMP INDICATOR Becomes dim when a projector is ready to select an item or adjust value in ...or close MENU operation. (P18, 19) ZOOM BUTTON Used to adjust zoom. (P21) POWER ON-OFF BUTTON Used to turn a projector on or off. (P20) INPUT BUTTON Used to select input source. (P23, 24, 30) FOCUS BUTTON Used to adjust focus. (P21) LENS SHIFT BUTTON Used to select LENS SHIFT function. (P21) POINT (VOLUME...
Owners Manual
Page 18
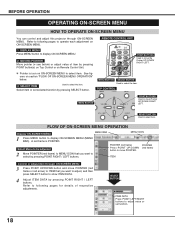
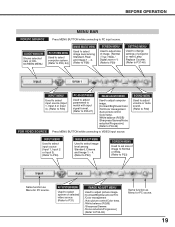
...MENU HOW TO OPERATE ON-SCREEN MENU You can control and adjust this projector through ON-SCREEN MENU 3 Press POINT UP/DOWN button and move POINTER...for details of item by pressing POINT RIGHT / LEFT buttons. TOP CONTROL MENU BUTTON LASER POINT BUTTONS Used to operate each adjustment on Remote Control Unit. ✽ Pointer is POINTER. POINTER (red frame) POINTER...button. A red frame is icon on section "FLOW OF ON-SCREEN MENU OPERATION" below. 3 SELECT ITEM Used to display ON-SCREEN MENU. 2 MOVING POINTER Move pointer (✽ see below) or adjust value of ...
...MENU HOW TO OPERATE ON-SCREEN MENU You can control and adjust this projector through ON-SCREEN MENU 3 Press POINT UP/DOWN button and move POINTER...for details of item by pressing POINT RIGHT / LEFT buttons. TOP CONTROL MENU BUTTON LASER POINT BUTTONS Used to operate each adjustment on Remote Control Unit. ✽ Pointer is POINTER. POINTER (red frame) POINTER...button. A red frame is icon on section "FLOW OF ON-SCREEN MENU OPERATION" below. 3 SELECT ITEM Used to display ON-SCREEN MENU. 2 MOVING POINTER Move pointer (✽ see below) or adjust value of ...
Owners Manual
Page 19
AV SYSTEM MENU Used to select system of image to Normal or Wide. (Refer to P33) Same function as Menu for PC source. GUIDE WINDOW Shows selected item of projector or reset Lamp Replace Counter. (Refer to P37-40) INPUT MENU Used to select input source (Input 1, Input 2 or Input 3). (Refer to... P23) PC ADJUST MENU Used to adjust parameters to match with input signal format. (Refer to ...
AV SYSTEM MENU Used to select system of image to Normal or Wide. (Refer to P33) Same function as Menu for PC source. GUIDE WINDOW Shows selected item of projector or reset Lamp Replace Counter. (Refer to P37-40) INPUT MENU Used to select input source (Input 1, Input 2 or Input 3). (Refer to... P23) PC ADJUST MENU Used to adjust parameters to match with input signal format. (Refer to ...
Owners Manual
Page 20
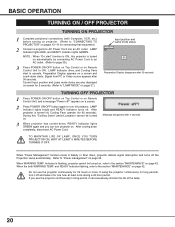
...on page 39. Refer to "Power management" on a screen and count-down , READY Indicator lights GREEN again and you use the projector continuously for 90 seconds). When the both WARNING TEMP. and READY Indicator flashing, refer to the section "MAINTENANCE" on pages ... off . LAMP Indicator dims, and Cooling Fans start " function is turned off the Projection Lamp automatically. If using the projector continuously for connecting that equipment.) 2 Connect a projector's AC Power Cord into an AC outlet. LAMP Indicator lights RED, and READY Indicator lights GREEN.
...on page 39. Refer to "Power management" on a screen and count-down , READY Indicator lights GREEN again and you use the projector continuously for 90 seconds). When the both WARNING TEMP. and READY Indicator flashing, refer to the section "MAINTENANCE" on pages ... off . LAMP Indicator dims, and Cooling Fans start " function is turned off the Projection Lamp automatically. If using the projector continuously for connecting that equipment.) 2 Connect a projector's AC Power Cord into an AC outlet. LAMP Indicator lights RED, and READY Indicator lights GREEN.
Owners Manual
Page 23
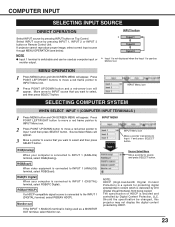
...will appear. Source Select Menu Move a pointer to the INPUT 1 (DIGITAL) terminal, select RGB(AV HDCP). Should the specification be used as Monitor out. COMPUTER INPUT SELECTING INPUT SOURCE DIRECT OPERATION Select INPUT source by HDCP. 23 RGB(AV HDCP) If a HDCP-compatible... Input 1 and then press SELECT button. Monitor out If the INPUT 1 ANALOG terminal is delivered by Digital Content Protection, LLC. If projector cannot reproduce proper image, select correct input source through MENU OPERATION (see below). HDCP (High-bandwidth Digital Content Protection) is a system ...
...will appear. Source Select Menu Move a pointer to the INPUT 1 (DIGITAL) terminal, select RGB(AV HDCP). Should the specification be used as Monitor out. COMPUTER INPUT SELECTING INPUT SOURCE DIRECT OPERATION Select INPUT source by HDCP. 23 RGB(AV HDCP) If a HDCP-compatible... Input 1 and then press SELECT button. Monitor out If the INPUT 1 ANALOG terminal is delivered by Digital Content Protection, LLC. If projector cannot reproduce proper image, select correct input source through MENU OPERATION (see below). HDCP (High-bandwidth Digital Content Protection) is a system ...
Owners Manual
Page 26
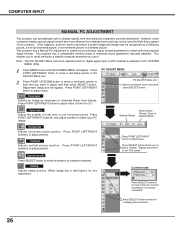
...move a red frame pointer to PC ADJUST Menu icon. 2 Press POINT UP/DOWN button to move a red frame pointer to item that you use it. Vertical Adjusts vertical picture position. When image has a dark bar(s), try this icon to adjust "Clamp," "Display area (H/V)" or set "...Full screen." Selected Mode Shows status (Stored / Free) of computer connected. Current mode Press SELECT button at this projector. This projector has 5 independent memory areas to adjust position. Note : This PC ADJUST Menu cannot be operated when in one horizontal period. Press POINT LEFT...
...move a red frame pointer to PC ADJUST Menu icon. 2 Press POINT UP/DOWN button to move a red frame pointer to item that you use it. Vertical Adjusts vertical picture position. When image has a dark bar(s), try this icon to adjust "Clamp," "Display area (H/V)" or set "...Full screen." Selected Mode Shows status (Stored / Free) of computer connected. Current mode Press SELECT button at this projector. This projector has 5 independent memory areas to adjust position. Note : This PC ADJUST Menu cannot be operated when in one horizontal period. Press POINT LEFT...

Owners Manual
Page 29
... X 1024. G Panning function may not operate properly if computer system prepared on Remote Control Unit. mode, press any resolution higher than XGA (1024 x 768) is selected on PC SYSTEM Menu (P24). Digital zoom + When Digital zoom + is displayed. A projected image ...9) by pressing D.ZOOM L button on PC SYSTEM Menu (P24). Panning function can be also expanded by expanding image width uniformly. cannot be used . G This projector cannot display any button except D.ZOOM L/M, SELECT, POINT and LASER buttons. 29 Digital Zoom - When Digital zoom - is displayed. Zoom ...
... X 1024. G Panning function may not operate properly if computer system prepared on Remote Control Unit. mode, press any resolution higher than XGA (1024 x 768) is selected on PC SYSTEM Menu (P24). Digital zoom + When Digital zoom + is displayed. A projected image ...9) by pressing D.ZOOM L button on PC SYSTEM Menu (P24). Panning function can be also expanded by expanding image width uniformly. cannot be used . G This projector cannot display any button except D.ZOOM L/M, SELECT, POINT and LASER buttons. 29 Digital Zoom - When Digital zoom - is displayed. Zoom ...

