Owners Manual
Page 2
...SHOCK, DO NOT REMOVE COVER (OR BACK). NO USERSERVICEABLE PARTS INSIDE EXCEPT LAMP REPLACEMENT. THIS SYMBOL INDICATES THAT THERE ARE IMPORTANT OPERATING AND MAINTENANCE INSTRUCTIONS IN THE OWNER'S MANUAL WITH THIS UNIT. 2 If your projector, and can also be taken. If not, it in better condition ... the minimum distances must be used for a considerable time. Do not cover the ventilation slot on the top, sides and rear of the projector cabinet for 1 minute / LASER POINTER INDICATOR lights red to manage those features and maintains it may result. Eye damage may result in a ...
...SHOCK, DO NOT REMOVE COVER (OR BACK). NO USERSERVICEABLE PARTS INSIDE EXCEPT LAMP REPLACEMENT. THIS SYMBOL INDICATES THAT THERE ARE IMPORTANT OPERATING AND MAINTENANCE INSTRUCTIONS IN THE OWNER'S MANUAL WITH THIS UNIT. 2 If your projector, and can also be taken. If not, it in better condition ... the minimum distances must be used for a considerable time. Do not cover the ventilation slot on the top, sides and rear of the projector cabinet for 1 minute / LASER POINTER INDICATOR lights red to manage those features and maintains it may result. Eye damage may result in a ...
Owners Manual
Page 5
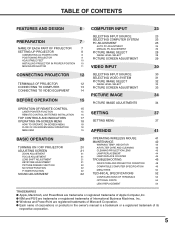
...-SCREEN MENU 18 FLOW OF ON-SCREEN MENU OPERATION 18 MENU BAR 19 APPENDIX 41 BASIC OPERATION TURNING ON / OFF PROJECTOR ADJUSTING SCREEN ZOOM ADJUSTMENT FOCUS ADJUSTMENT LENS SHIFT ADJUSTMENT KEYSTONE ADJUSTMENT PICTURE FREEZE FUNCTION NO SHOW FUNCTION P-TIMER FUNCTION SOUND ADJUSTMENT...INDICATOR 42 20 AIR FILTER CARE AND CLEANING 43 21 CLEANING PROJECTION LENS 43 21 LAMP REPLACEMENT 44 21 LAMP REPLACE COUNTER 45 21 TROUBLESHOOTING 46 21 INDICATORS AND PROJECTOR CONDITION 48 22 22 COMPATIBLE COMPUTER SPECIFICATION 49 22 MENU TREE 50 22 TECHNICAL SPECIFICATIONS ...
...-SCREEN MENU 18 FLOW OF ON-SCREEN MENU OPERATION 18 MENU BAR 19 APPENDIX 41 BASIC OPERATION TURNING ON / OFF PROJECTOR ADJUSTING SCREEN ZOOM ADJUSTMENT FOCUS ADJUSTMENT LENS SHIFT ADJUSTMENT KEYSTONE ADJUSTMENT PICTURE FREEZE FUNCTION NO SHOW FUNCTION P-TIMER FUNCTION SOUND ADJUSTMENT...INDICATOR 42 20 AIR FILTER CARE AND CLEANING 43 21 CLEANING PROJECTION LENS 43 21 LAMP REPLACEMENT 44 21 LAMP REPLACE COUNTER 45 21 TROUBLESHOOTING 46 21 INDICATORS AND PROJECTOR CONDITION 48 22 22 COMPATIBLE COMPUTER SPECIFICATION 49 22 MENU TREE 50 22 TECHNICAL SPECIFICATIONS ...
Owners Manual
Page 6
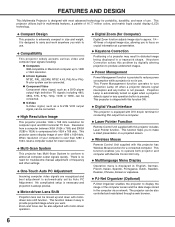
... signal, can be connected. This projector cannot display image of 16.77 million colors, and matrix liquid crystal display (LCD) technology. N Multi-Scan System This projector has Multi-Scan System to conform to turn Projection Lamp off when a projector detects signal interruption and any operation ...projection is not in a trapezoid shape. N Digital Visual Interface This projector is pressed. Zoom and focus can be also adjusted with this projector has Wireless Mouse function for connecting DVI output from a computer between XGA (1024 x 768) and SXGA (1280 x 1024) is not...
... signal, can be connected. This projector cannot display image of 16.77 million colors, and matrix liquid crystal display (LCD) technology. N Multi-Scan System This projector has Multi-Scan System to conform to turn Projection Lamp off when a projector detects signal interruption and any operation ...projection is not in a trapezoid shape. N Digital Visual Interface This projector is pressed. Zoom and focus can be also adjusted with this projector has Wireless Mouse function for connecting DVI output from a computer between XGA (1024 x 768) and SXGA (1280 x 1024) is not...

Owners Manual
Page 7
... for protection from any objects. G Keep side clear of any object, especially heat-sensitive object. When using or installing a projector, following to following precautions should be taken. G Do not touch this vent. LAMP COVER CARRYING HANDLE BOTTOM OF CABINET When attached the PJ-Net organizer (optional part) to the owner's manual in...
... for protection from any objects. G Keep side clear of any object, especially heat-sensitive object. When using or installing a projector, following to following precautions should be taken. G Do not touch this vent. LAMP COVER CARRYING HANDLE BOTTOM OF CABINET When attached the PJ-Net organizer (optional part) to the owner's manual in...

Owners Manual
Page 10
... tune position and tilt. 3 To shorten ADJUSTABLE FEET, lift front of a projector and pull and undo FEET LOCK LATCHES. Improper installation may reduce the lamp lifetime and cause a fire hazard. 10˚ Do not tilt the projector more than 10 degrees above and below. 10˚ NO UPWARD Do not ...point the projector up to project an image. Projection angle can be adjusted ...
... tune position and tilt. 3 To shorten ADJUSTABLE FEET, lift front of a projector and pull and undo FEET LOCK LATCHES. Improper installation may reduce the lamp lifetime and cause a fire hazard. 10˚ Do not tilt the projector more than 10 degrees above and below. 10˚ NO UPWARD Do not ...point the projector up to project an image. Projection angle can be adjusted ...
Owners Manual
Page 17
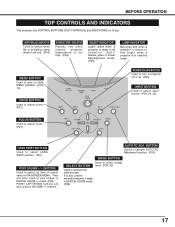
... select LENS SHIFT function. (P21) POINT (VOLUME + / - ) BUTTONS Used to execute the selected item. INDICATOR Flashes red when internal projector temperature is too high. (P42) READY INDICATOR Lights green when a projector is also used to expand/compress image in Power Management mode. (P39) LAMP INDICATOR Becomes dim when a projector is in DIGITAL ZOOM +/- buttons.
... select LENS SHIFT function. (P21) POINT (VOLUME + / - ) BUTTONS Used to execute the selected item. INDICATOR Flashes red when internal projector temperature is too high. (P42) READY INDICATOR Lights green when a projector is also used to expand/compress image in Power Management mode. (P39) LAMP INDICATOR Becomes dim when a projector is in DIGITAL ZOOM +/- buttons.
Owners Manual
Page 19
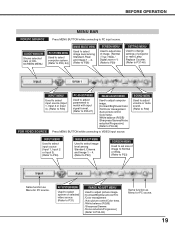
... image. [Normal / True / Wide / Digital zoom +/-] (Refer to P29) SETTING MENU Used to change settings of ONSCREEN MENU. GUIDE WINDOW Shows selected item of projector or reset Lamp Replace Counter. (Refer to P37-40) INPUT MENU Used to select input source (Input 1, Input 2 or Input 3). (Refer to P23) PC ADJUST MENU Used...
... image. [Normal / True / Wide / Digital zoom +/-] (Refer to P29) SETTING MENU Used to change settings of ONSCREEN MENU. GUIDE WINDOW Shows selected item of projector or reset Lamp Replace Counter. (Refer to P37-40) INPUT MENU Used to select input source (Input 1, Input 2 or Input 3). (Refer to P23) PC ADJUST MENU Used...
Owners Manual
Page 20
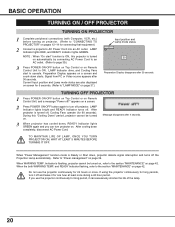
... button on Top Control or on Remote Control Unit, and a message "Power off . TO MAINTAIN LIFE OF LAMP, ONCE YOU TURN PROJECTOR ON, WAIT AT LEAST 5 MINUTES BEFORE TURNING IT OFF. Indicator is turned on automatically by connecting AC Power ...on a screen and count-down , projector detects signal interruption and turns off the Projection Lamp automatically. BASIC OPERATION TURNING ON / OFF PROJECTOR TURNING ON PROJECTOR 1 Complete peripheral connections (with Computer, VCR, etc.) before turning on projector. (Refer to turn off projector. LAMP Indicator lights RED, and READY Indicator...
... button on Top Control or on Remote Control Unit, and a message "Power off . TO MAINTAIN LIFE OF LAMP, ONCE YOU TURN PROJECTOR ON, WAIT AT LEAST 5 MINUTES BEFORE TURNING IT OFF. Indicator is turned on automatically by connecting AC Power ...on a screen and count-down , projector detects signal interruption and turns off the Projection Lamp automatically. BASIC OPERATION TURNING ON / OFF PROJECTOR TURNING ON PROJECTOR 1 Complete peripheral connections (with Computer, VCR, etc.) before turning on projector. (Refer to turn off projector. LAMP Indicator lights RED, and READY Indicator...
Owners Manual
Page 37
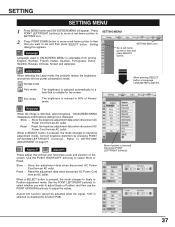
... selecting the Lamp mode, the projector reduce the brightness and set and then press SELECT button. When pressing SELECT button at Language, Language Menu appears. Use the POINT RIGHT/LEFT button(s) ...
... selecting the Lamp mode, the projector reduce the brightness and set and then press SELECT button. When pressing SELECT button at Language, Language Menu appears. Use the POINT RIGHT/LEFT button(s) ...

Owners Manual
Page 39
...("Off", "Ready" or "Shut down " is selected 2) When the set time is elapsed, the lamp will be operated during this condition, the lamp will turn projector off while the lamp cooling is automatically turned on and images will be switched off properly (refer to Code 8. The READY ...Unit. (Refer to Code 8). The READY indicator will be switched off while the lamp cooling is in progress, and the projector cannot be operated during this function is "On," projector is in progress, and the projector cannot be projected if a signal starts being set. When a SELECT button is...
...("Off", "Ready" or "Shut down " is selected 2) When the set time is elapsed, the lamp will be operated during this condition, the lamp will turn projector off while the lamp cooling is automatically turned on and images will be switched off properly (refer to Code 8. The READY ...Unit. (Refer to Code 8). The READY indicator will be switched off while the lamp cooling is in progress, and the projector cannot be operated during this function is "On," projector is in progress, and the projector cannot be projected if a signal starts being set. When a SELECT button is...
Owners Manual
Page 40
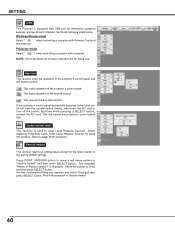
...with USB port for the lamp counter to the factory default settings. Projector mode Select " " when controlling a projector with Remote Control of the projector's control panel. This cancels the Key lock function. When replacing Projection Lamp, reset Lamp Replace Counter by using this projector. Press POINT UP/DOWN...button, reinsert the AC cord, This will cancel the projector's control panel lock. NOTE: This is provided not for basic operation but for operation. Refer to [Yes] and then press SELECT button. Lamp counter reset This function is displayed. Move the pointer to...
...with USB port for the lamp counter to the factory default settings. Projector mode Select " " when controlling a projector with Remote Control of the projector's control panel. This cancels the Key lock function. When replacing Projection Lamp, reset Lamp Replace Counter by using this projector. Press POINT UP/DOWN...button, reinsert the AC cord, This will cancel the projector's control panel lock. NOTE: This is provided not for basic operation but for operation. Refer to [Yes] and then press SELECT button. Lamp counter reset This function is displayed. Move the pointer to...
Owners Manual
Page 44
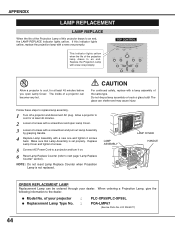
... steps to the dealer. NOTE : Do not reset Lamp Replace Counter when Projection Lamp is set properly. LAMP ASSEMBLY LAMP COVER HANDLE ORDER REPLACEMENT LAMP Replacement Lamp can be ordered through your projector : G Replacement Lamp Type No. : PLC-XP55/PLC-XP55L POA-LMP67 (Service Parts No. 610 306 5977) 44 Do not drop a lamp assembly or touch a glass bulb! The glass can...
... steps to the dealer. NOTE : Do not reset Lamp Replace Counter when Projection Lamp is set properly. LAMP ASSEMBLY LAMP COVER HANDLE ORDER REPLACEMENT LAMP Replacement Lamp can be ordered through your projector : G Replacement Lamp Type No. : PLC-XP55/PLC-XP55L POA-LMP67 (Service Parts No. 610 306 5977) 44 Do not drop a lamp assembly or touch a glass bulb! The glass can...
Owners Manual
Page 45
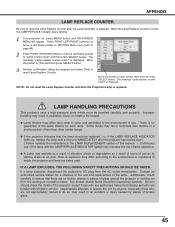
... and select [Yes] to ensure that the lamp should be replaced, i.e., if the LAMP REPLACE INDICATOR lights up carefully. There is displayed. G A Lamp may differ from the AC outlet immediately. When the Lamp Replace Counter is replaced. LAMP HANDLING PRECAUTIONS This projector uses a high-pressure lamp which the projector and lamp are not appropriately trained to do so, may...
... and select [Yes] to ensure that the lamp should be replaced, i.e., if the LAMP REPLACE INDICATOR lights up carefully. There is displayed. G A Lamp may differ from the AC outlet immediately. When the Lamp Replace Counter is replaced. LAMP HANDLING PRECAUTIONS This projector uses a high-pressure lamp which the projector and lamp are not appropriately trained to do so, may...
Owners Manual
Page 46
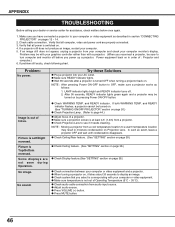
...not out of focus. G Make sure temperature is out of Operating Temperature (5°C ~ 35°C). LAMP indicator lights bright and READY indicator turns off before you reconnect a projector, be turned on page 38.) G Check connection between your computer. 5. After 90 seconds, READY ... an image. and READY indicator flashes, a projector cannot be turned on. (See "TURNING ON/OFF PROJECTOR" section on page 20.) G Check Projection Lamp. (Refer to turn computer and monitor off . 2. In such an event, leave a projector OFF and wait until condensation disappears. G Check...
...not out of focus. G Make sure temperature is out of Operating Temperature (5°C ~ 35°C). LAMP indicator lights bright and READY indicator turns off before you reconnect a projector, be turned on page 38.) G Check connection between your computer. 5. After 90 seconds, READY ... an image. and READY indicator flashes, a projector cannot be turned on. (See "TURNING ON/OFF PROJECTOR" section on page 20.) G Check Projection Lamp. (Refer to turn computer and monitor off . 2. In such an event, leave a projector OFF and wait until condensation disappears. G Check...
Owners Manual
Page 48
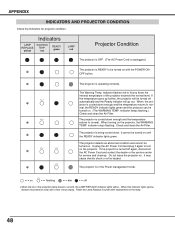
... • • • dim • • • off ✽ When the life of the projection lamp draws to turn ✽ on . The projector is turned off ✽ automatically and the Ready indicator will be turned on the projector. The Warning Temp. When turning on . (The WARNING TEMP. If the temperature goes up further...
... • • • dim • • • off ✽ When the life of the projection lamp draws to turn ✽ on . The projector is turned off ✽ automatically and the Ready indicator will be turned on the projector. The Warning Temp. When turning on . (The WARNING TEMP. If the temperature goes up further...

Owners Manual
Page 51
... reduction On/Off Progressive Off/L1/L2 Reset Yes/No Store Image 1 Image 2 Image 3 Image 4 Quit Quit 51 System Setting Sound Language Lamp mode Keystone Aspect V Aspect H Anamorphic Blue back Display Menu position Logo Ceiling Rear Power management On start Remote control code USB Key lock...Scale Position On/Off On/Off On/Off Off/Ready/Shut down On/Off Code 1 Code 2 Code 3 Code 4 Code 5 Code 6 Code 7 Code 8 Quit Mouse Projector Off Control panel Remote control Yes/No Yes/No Contrast 0 - 63 Brightness 0 - 63 Color 0 - 63 Tint 0 - 63 Color management 0 - 63 Auto picture...
... reduction On/Off Progressive Off/L1/L2 Reset Yes/No Store Image 1 Image 2 Image 3 Image 4 Quit Quit 51 System Setting Sound Language Lamp mode Keystone Aspect V Aspect H Anamorphic Blue back Display Menu position Logo Ceiling Rear Power management On start Remote control code USB Key lock...Scale Position On/Off On/Off On/Off Off/Ready/Shut down On/Off Code 1 Code 2 Code 3 Code 4 Code 5 Code 6 Code 7 Code 8 Quit Mouse Projector Off Control panel Remote control Yes/No Yes/No Contrast 0 - 63 Brightness 0 - 63 Color 0 - 63 Tint 0 - 63 Color management 0 - 63 Auto picture...

Owners Manual
Page 52
... 4-pin (S-Video) DIN 8-pin (Control port), USB port (Series B receptacle), Wired Remote Jack and PJ-Net Organizer Connector INT. G LCD panels are manufactured to 10.5˚ AC 100 ~ 120 V (5.0 A Max. Ampere), 50 / 60 Hz (Continental Europe and The U.K.)...Lamp Input 1/Monitor Output Jacks Input 2 Jacks Input 3 Jacks Other Jacks Built-in Speakers Feet Adjustment Voltage and Power Consumption Operating Temperature Storage Temperature Remote Control Transmitter Accessories Multi-media Projector 12.6" x 6.6" x 18.5" (319 mm x 168 mm x 470 mm) 20.3 lbs (9.2 kg) PLC-XP55, 17.4 lbs (7.9 kg) PLC...
... 4-pin (S-Video) DIN 8-pin (Control port), USB port (Series B receptacle), Wired Remote Jack and PJ-Net Organizer Connector INT. G LCD panels are manufactured to 10.5˚ AC 100 ~ 120 V (5.0 A Max. Ampere), 50 / 60 Hz (Continental Europe and The U.K.)...Lamp Input 1/Monitor Output Jacks Input 2 Jacks Input 3 Jacks Other Jacks Built-in Speakers Feet Adjustment Voltage and Power Consumption Operating Temperature Storage Temperature Remote Control Transmitter Accessories Multi-media Projector 12.6" x 6.6" x 18.5" (319 mm x 168 mm x 470 mm) 20.3 lbs (9.2 kg) PLC-XP55, 17.4 lbs (7.9 kg) PLC...


