Owners Manual
Page 3
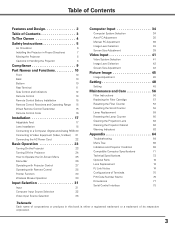
...2 Table of Contents 3 To The Owner 4 Safety Instructions 5 Air Circulation 6 Installing the Projector in Proper Directions 7 Moving the Projector 8 Cautions in Handling the Projector 8 Compliance 9 Part Names and Functions 10 Front 10 Back 10 Bottom 10 Rear Terminal 11 ...Resetting the Lamp Counter 60 Cleaning the Projection Lens 62 Cleaning the Projector Cabinet 62 Warning Indicators 63 Appendix 64 Troubleshooting 64 Menu Tree 66 Indicators and Projector Condition 69 Compatible Computer Specifications 71 Technical Specifications 73 Optional Parts ...
...2 Table of Contents 3 To The Owner 4 Safety Instructions 5 Air Circulation 6 Installing the Projector in Proper Directions 7 Moving the Projector 8 Cautions in Handling the Projector 8 Compliance 9 Part Names and Functions 10 Front 10 Back 10 Bottom 10 Rear Terminal 11 ...Resetting the Lamp Counter 60 Cleaning the Projection Lens 62 Cleaning the Projector Cabinet 62 Warning Indicators 63 Appendix 64 Troubleshooting 64 Menu Tree 66 Indicators and Projector Condition 69 Compatible Computer Specifications 71 Technical Specifications 73 Optional Parts ...
Owners Manual
Page 4
...REMOVE COVER (OR BACK). Your SANYO product is critical for proper air circulation and cooling of the unit. Otherwise it in good condition for an extended time, unplug the projector from your projector, and can be clogged with a vacuum cleaner. If the projector is to be built into a ...oil or chemicals, it may become deteriorated. To The Owner Before installing and operating the projector, read this manual again, check operations and cable connections and try the solutions in the "Troubleshooting" section in the back of this booklet. If the problem still persists, contact the...
...REMOVE COVER (OR BACK). Your SANYO product is critical for proper air circulation and cooling of the unit. Otherwise it in good condition for an extended time, unplug the projector from your projector, and can be clogged with a vacuum cleaner. If the projector is to be built into a ...oil or chemicals, it may become deteriorated. To The Owner Before installing and operating the projector, read this manual again, check operations and cable connections and try the solutions in the "Troubleshooting" section in the back of this booklet. If the problem still persists, contact the...
Owners Manual
Page 34
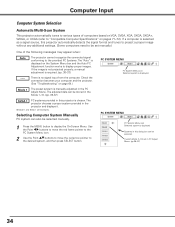
... the On-Screen Menu. Selecting Computer System Manually PC system can be selected. Check the connection between your computer and the projector. (See "Troubleshooting" on pages 71-72). If the image is not projected properly, a manual adjustment is manually adjustted in this... function works to display proper images. If a computer is selected as a signal source, this projector is no signal input from the computer. Custom Mode (1-10) set manually.) One of computers based on VGA, SVGA, XGA, SXGA, SXGA+, WXGA, or UXGA (refer to "Compatible Computer Specifications" on page 64.) ...
... the On-Screen Menu. Selecting Computer System Manually PC system can be selected. Check the connection between your computer and the projector. (See "Troubleshooting" on pages 71-72). If the image is not projected properly, a manual adjustment is manually adjustted in this... function works to display proper images. If a computer is selected as a signal source, this projector is no signal input from the computer. Custom Mode (1-10) set manually.) One of computers based on VGA, SVGA, XGA, SXGA, SXGA+, WXGA, or UXGA (refer to "Compatible Computer Specifications" on page 64.) ...
Owners Manual
Page 64
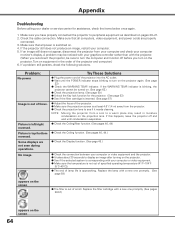
... 30 seconds to peripheral equipment as described on the projector. Image is corresponding with the projector. (When you have properly connected the projector to display an image after turning on the projection lens. Appendix Troubleshooting Before calling your computer. 5. Problem: No power.... Some displays are properly connected. 3. Try These Solutions ● Plug the power cord of the projector and computer.) 6. If the WARNING TEMP....
... 30 seconds to peripheral equipment as described on the projector. Image is corresponding with the projector. (When you have properly connected the projector to display an image after turning on the projection lens. Appendix Troubleshooting Before calling your computer. 5. Problem: No power.... Some displays are properly connected. 3. Try These Solutions ● Plug the power cord of the projector and computer.) 6. If the WARNING TEMP....