Owners Manual
Page 5
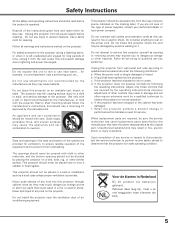
... de klanten in fire, electric shock, or injury to qualified service personnel under the following the operating instructions. Do not expose this projector yourself as the original part. Slots and openings in a fire or electric shock. The openings should never be covered with cloth or...required, be placed in a built-in a wet basement, near water... Do not use a mounting kit approved by the manufacturer that are provided for example, in installation such as this projector from AC power supply before the product is provided. for ventilation, to ensure reliable operation of ...
... de klanten in fire, electric shock, or injury to qualified service personnel under the following the operating instructions. Do not expose this projector yourself as the original part. Slots and openings in a fire or electric shock. The openings should never be covered with cloth or...required, be placed in a built-in a wet basement, near water... Do not use a mounting kit approved by the manufacturer that are provided for example, in installation such as this projector from AC power supply before the product is provided. for ventilation, to ensure reliable operation of ...
Owners Manual
Page 7
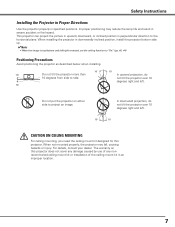
...730; 10˚ In upward projection, do not tilt the projector over 10 degrees right and left . 10˚ 10˚ CAUTION ON CEILING MOUNTING For ceiling mounting, you need the ceiling mount kit designed for this projector does not cover any damage caused by use of any nonrecommened ...ceiling mount kit or installation of the ceiling mount kit in specified positions. The warranty on either side...
...730; 10˚ In upward projection, do not tilt the projector over 10 degrees right and left . 10˚ 10˚ CAUTION ON CEILING MOUNTING For ceiling mounting, you need the ceiling mount kit designed for this projector does not cover any damage caused by use of any nonrecommened ...ceiling mount kit or installation of the ceiling mount kit in specified positions. The warranty on either side...
Owners Manual
Page 19
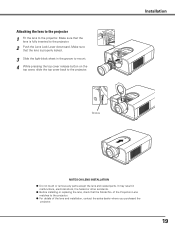
... shock, fire hazard or other accidents. ● Before installing or replacing the lens, check that the lens is fully inserted to the projector. It may result in the groove to mount. 4 While pressing the top cover release button on the top cover, slide the top cover back to the... projector. 2 Push the Lens Lock Lever downward. of the lens and installation, contact the sales dealer where you purchased the projector. 19 Groove Installation NOTES ON...
... shock, fire hazard or other accidents. ● Before installing or replacing the lens, check that the lens is fully inserted to the projector. It may result in the groove to mount. 4 While pressing the top cover release button on the top cover, slide the top cover back to the... projector. 2 Push the Lens Lock Lever downward. of the lens and installation, contact the sales dealer where you purchased the projector. 19 Groove Installation NOTES ON...
Owners Manual
Page 40
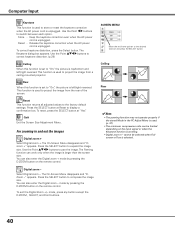
... cord is unplugged. Use the Point ed7 8 buttons to correct keystone distortion. (p.29) Ceiling When this function is used to project the image from a ceiling-mounted projector. zoom +" appears. Reset This function returns all adjusted values to the desired function and press the SELECT button. This function is used to store or...
... cord is unplugged. Use the Point ed7 8 buttons to correct keystone distortion. (p.29) Ceiling When this function is used to project the image from a ceiling-mounted projector. zoom +" appears. Reset This function returns all adjusted values to the desired function and press the SELECT button. This function is used to store or...
Owners Manual
Page 44
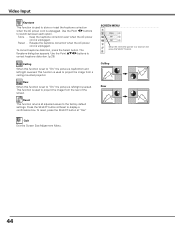
... function is set to "On," the picture is left /right reversed. To reset, press the SELECT button at Reset to project the image from a ceiling-mounted projector. Keep the keystone correction even when the AC power cord is unplugged. Reset . . . Rear When this function is set to "On," the picture is top...
... function is set to "On," the picture is left /right reversed. To reset, press the SELECT button at Reset to project the image from a ceiling-mounted projector. Keep the keystone correction even when the AC power cord is unplugged. Reset . . . Rear When this function is set to "On," the picture is top...
Owners Manual
Page 77
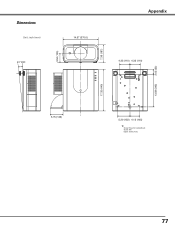
Dimensions Unit: inch (mm) 6.5º MAX 3.94 (100) 14.57 (370.0) 7.36 (187) Appendix 4.33 (110) 4.33 (110) 2.05 (52) 13.58 (345) 17.32 (440) 5.75 (146) 5.20 (132) 4.13 (105) Screw Holes for Ceiling Mount Screw: M6 Depth: 0.393 (10.0) 77
Dimensions Unit: inch (mm) 6.5º MAX 3.94 (100) 14.57 (370.0) 7.36 (187) Appendix 4.33 (110) 4.33 (110) 2.05 (52) 13.58 (345) 17.32 (440) 5.75 (146) 5.20 (132) 4.13 (105) Screw Holes for Ceiling Mount Screw: M6 Depth: 0.393 (10.0) 77
