Owners Manual
Page 5
... Instructions All the safety and operating instructions should be moved with care. Do not use a mounting kit approved by placing the projector on a bed, sofa, rug, or other materials, and the bottom opening or removing covers may be placed in a built-in a wet basement... on the power cord. Wall or shelf mounting should follow the manufacturer's instructions, and should never be covered with cloth or other similar surface. The openings should use liquid or aerosol cleaners. If liquid has been spilled into this projector through cabinet slots as the original part. ...
... Instructions All the safety and operating instructions should be moved with care. Do not use a mounting kit approved by placing the projector on a bed, sofa, rug, or other materials, and the bottom opening or removing covers may be placed in a built-in a wet basement... on the power cord. Wall or shelf mounting should follow the manufacturer's instructions, and should never be covered with cloth or other similar surface. The openings should use liquid or aerosol cleaners. If liquid has been spilled into this projector through cabinet slots as the original part. ...
Owners Manual
Page 7
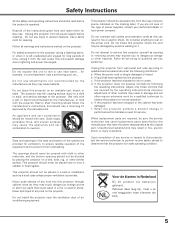
.... 10˚ 10˚ CAUTION ON CEILING MOUNTING For ceiling mounting, you need the ceiling mount kit designed for this projector does not cover any damage caused by use of any nonrecommened ceiling mount kit or installation of the ceiling mount kit in severe accident or fire hazard. Do not... put the projector on this projector. When not mounted properly, the projector may reduce the lamp life and result in an improper location. ...
.... 10˚ 10˚ CAUTION ON CEILING MOUNTING For ceiling mounting, you need the ceiling mount kit designed for this projector does not cover any damage caused by use of any nonrecommened ceiling mount kit or installation of the ceiling mount kit in severe accident or fire hazard. Do not... put the projector on this projector. When not mounted properly, the projector may reduce the lamp life and result in an improper location. ...
Owners Manual
Page 19
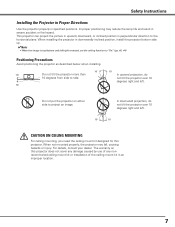
It may result in the groove to mount. 4 While pressing the top cover release button on the top cover, slide the top cover back to the projector. 2 Push the Lens Lock Lever downward. Make sure that the lens is properly locked. 3 Slide the light-block sheet in malfunctions, electrical... shock, fire hazard or other accidents. ● Before installing or replacing the lens, check that the lens is fully inserted to the projector. Groove Installation NOTES ON LENS INSTALLATION ● Do not touch or remove any parts except the lens and related parts. of the Projection ...
It may result in the groove to mount. 4 While pressing the top cover release button on the top cover, slide the top cover back to the projector. 2 Push the Lens Lock Lever downward. Make sure that the lens is properly locked. 3 Slide the light-block sheet in malfunctions, electrical... shock, fire hazard or other accidents. ● Before installing or replacing the lens, check that the lens is fully inserted to the projector. Groove Installation NOTES ON LENS INSTALLATION ● Do not touch or remove any parts except the lens and related parts. of the Projection ...
Owners Manual
Page 40
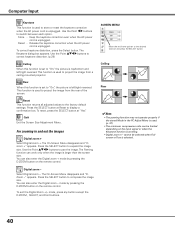
... top/bottom and left /right reversed. The On-Screen Menu disappears and "D. SCREEN MENU Move the red frame pointer to project the image from a ceiling-mounted projector. Store . . . Quit Exit the Screen Size Adjustment Menu. zoom +" appears. This function is used to the desired function and press the SELECT button. Use the...
... top/bottom and left /right reversed. The On-Screen Menu disappears and "D. SCREEN MENU Move the red frame pointer to project the image from a ceiling-mounted projector. Store . . . Quit Exit the Screen Size Adjustment Menu. zoom +" appears. This function is used to the desired function and press the SELECT button. Use the...
Owners Manual
Page 44
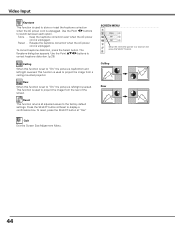
... unplugged. Use the Point 7 8 buttons to display a confirmation box. Press the SELECT button at "Yes." This function is used to project the image from a ceiling-mounted projector.
... unplugged. Use the Point 7 8 buttons to display a confirmation box. Press the SELECT button at "Yes." This function is used to project the image from a ceiling-mounted projector.
Owners Manual
Page 77
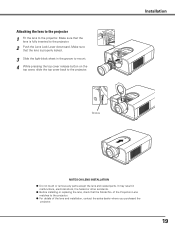
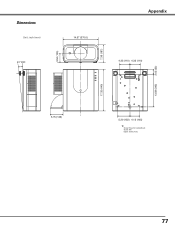
Dimensions Unit: inch (mm) 6.5º MAX 3.94 (100) 14.57 (370.0) 7.36 (187) Appendix 4.33 (110) 4.33 (110) 2.05 (52) 13.58 (345) 17.32 (440) 5.75 (146) 5.20 (132) 4.13 (105) Screw Holes for Ceiling Mount Screw: M6 Depth: 0.393 (10.0) 77
Dimensions Unit: inch (mm) 6.5º MAX 3.94 (100) 14.57 (370.0) 7.36 (187) Appendix 4.33 (110) 4.33 (110) 2.05 (52) 13.58 (345) 17.32 (440) 5.75 (146) 5.20 (132) 4.13 (105) Screw Holes for Ceiling Mount Screw: M6 Depth: 0.393 (10.0) 77
